
11 Feb 2019 Business Intelligence with Oracle Cloud
Article 3: Oracle Data Integration Platform Cloud: Your new ETL tool
This is the third article in our series Business Intelligence with Oracle Cloud, and we’re focusing on their main data integration service currently available, the Oracle Data Integration Platform Cloud, also known as DIPC. We hope to give you a preliminary understanding of DIPC, and then to run through some basic tasks, so that you can proceed with further development and use later on.
In this article we’ll first explain what DIPC is and highlight some aspects to consider before starting to work with it; then we’ll look at connectivity between DIPC and an Oracle Database Cloud Service instance, a necessary connection in most ETL flows. Finally, we’ll detail how to execute data integration tasks previously developed with Oracle Data Integration Studio (ODI Studio), the standard way to develop and execute ETL processes in DIPC.
1. About Oracle Data Integration Platform Cloud
DIPC is a cloud-based integration platform that allows you to perform many operations on data in any shape or format from both on-premise and cloud data sources. In practical terms, it’s the cloud evolution of the robust Oracle Data Integrator, the main data integration tool for a large number of companies and uses, but now boasting a highly improved user interface and key new features.
Some of the data tasks that can be performed are:
- Copy an entire or partial data source into Oracle cloud storage in a programmed manner using the Synchronize Data feature, or in real time using the Replicate Data
- Run ETL operations by importing ODI scenarios and executing them.
- Integrate with Big Data technologies such as a Kafka cluster or an Oracle Data Lake.
Note that DIPC instances are offered as autonomous and user-managed: basically, autonomous instances perform some configuration and management tasks automatically, at the cost of lower flexibility in terms of configuration and development. One critical aspect is that autonomous instances do not allow the management of access rules or SSH access to ODI Studio, ODI Console and the cloud database associated to DIPC. So as you can imagine, a detailed analysis of which instance type is the most suitable for your particular case is an essential first step before creating a DIPC instance. For further information on the difference between autonomous and user-managed, click here.
2. Connecting Oracle Data Integration Platform Cloud with Oracle Database Cloud Service
This section explains how to connect an autonomous DIPC with an Oracle Database Cloud Service (ODBCS) instance. Note that before proceeding it is necessary to have created and started these two instances already.
Step 1:
The first task is to get the details of your ODBCS instance (steps 1 to 3).
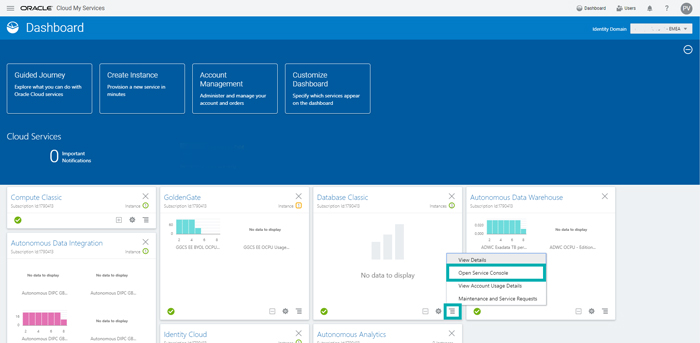
Open your Oracle Cloud Portal Dashboard and click on Action Menu and Open Service Console located in the Database Classic section.
Step 2:
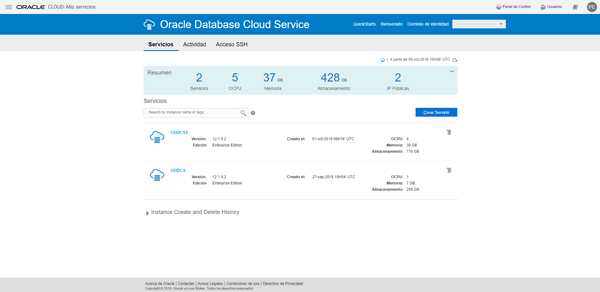
Click on the desired ODBCS instance from the list of your previously created instances.
Step 3:
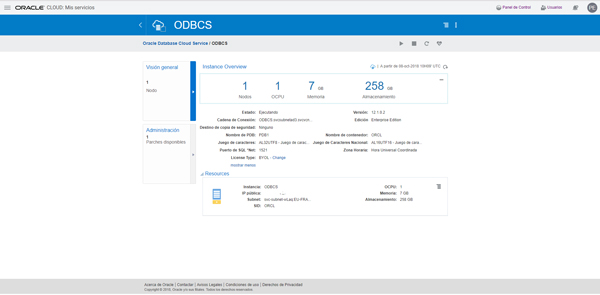
Your database instance connection details are available on the screen shown below. Note that Chain Connection contains the port and the service name of your instance.
Step 4:
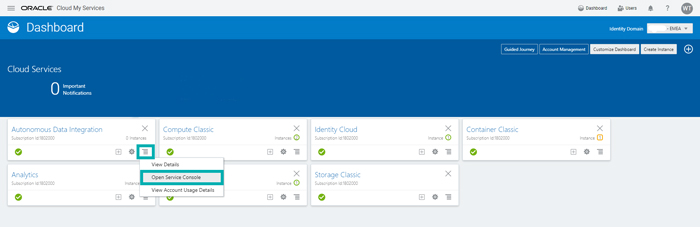
Once you have your database details, reopen your Oracle Cloud Portal Dashboard and click on Action Menu and Open Service Console located in the Data Integration section.
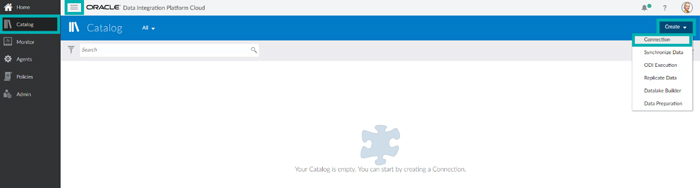
Step 5:
On the entry page of your DIPC instance, click on Action Menu and Catalog to open the DIPC Catalog. Next, click on Create and Connection.
Step 6:
When the Connection window pops up, specify Oracle as Type, and fill in the other blanks using the information obtained in step 3. Note that Agent must be specified if you want to connect to an on-premise instance.
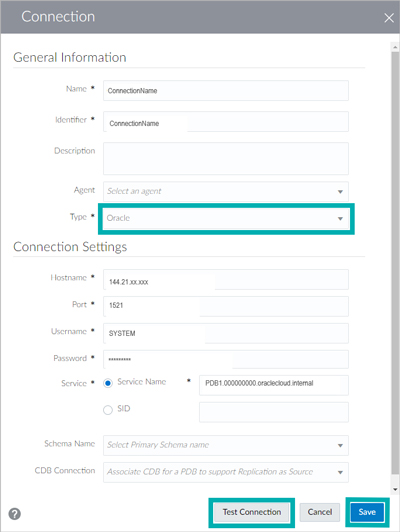
Click on Test Connection to ensure that the information provided is correct and then click on Save to finalize.
This connection should now be available in your DIPC Catalog and ready to use in any DIPC task such as Synchronize Data, ODI Execution, Replication Data or Data Preparation.
3. Executing data integration processes in Oracle Data Integration Platform Cloud
One of DIPC’s main features is the ODI Execution, which allows you to run any bulk data operation or transformation previously developed with ODI Studio from the DIPC instance. In practical terms, DIPC can open ODI Deployment Archives, read any scenario therein and execute it, using the DIPC connections that the user has previously mapped to the scenario’s logical schemas as sources.
This section includes step-by-step instructions on how to execute and monitor an ODI scenario from DIPC, using the DIPC ODI Execution feature. The ODI scenario used in this specific example is the LOAD_TRG_CITY 001 scenario from the ODI 12c Getting Started appliance, which can be downloaded here.
Please note that the ODBCS connection previously created is also needed for this example.
Step 1:
The first task is to create an ODI deployment archive containing the desired scenarios to be executed (steps 1 and 2).
First, open your data integration development in ODI Studio (in our example, the ODI 12c Getting Started appliance). Click on Team tab, Deployment Archives, Create From Repository and Selected Objects, to create an archive with a custom list of already developed scenarios.
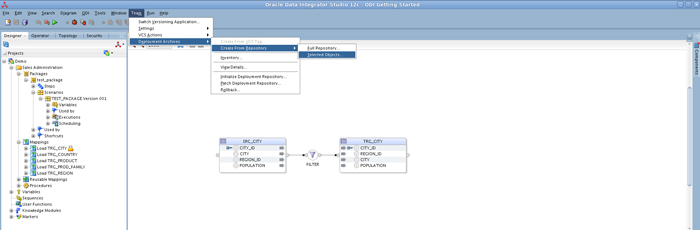
In this example, a deployment containing the LOAD_TRG_CITY 001 scenario will be created; note that this scenario only includes a mapping that loads data from the SRC_CITY table to the TRG_CITY table (see picture above).
Step 2:
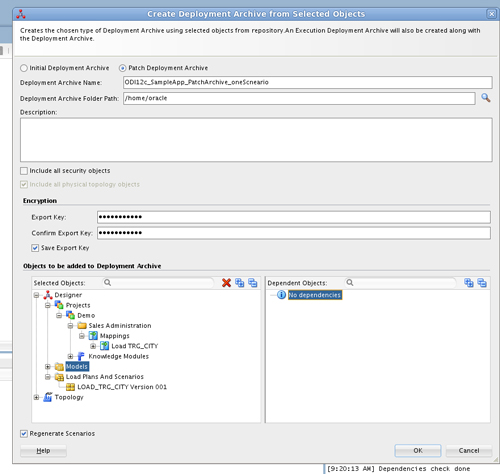
In the Create Deployment Archive from Selected Objects window, first check the Patch Deployment Archive option so an addible repository fraction is created, instead of a complete fresh repository; this is always required when archiving anything to be used later in DIPC. If you would like to find out more about deployment archives, click here.
In the same window, define the output local path and password, and drag and drop the scenarios you want to include to the Selected Objects area. In this example, only by manually dragging the Load TRG_CITY mapping, all related objects are selected, including its models, scenarios and topology.
Finally, click on OK to generate the deployment archive file in the specified path.
Once the deployment archive file is in your local machine, the next step is to upload it to DIPC and execute it (steps 3 and 4).
Step 3:
Open your DIPC instance entry page and click on Action Menu and Catalog to open the DIPC Catalog, and then click on Create and ODI Execution.

Step 4:
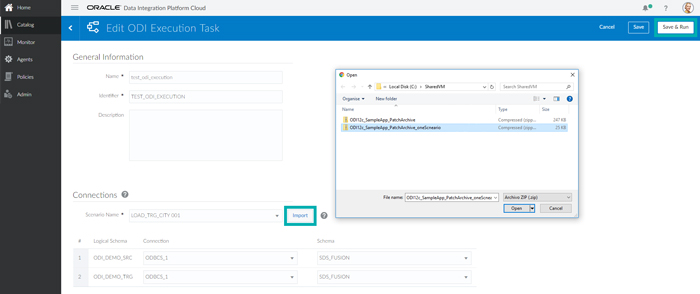
In the Edit ODI Execution Task page, specify a Name and Identifier for this new task.
Click on Import and select the ODI deployment archive previously generated (located in your local machine). Then click on the blank next to Scenario Name to select any scenario included in the archive. In this example, the LOAD_TRG_CITY 001 scenario is the only one displayed since the archive file only contains this scenario.
Once the scenario has been selected, all its logical schemas will be listed below. For each logical schema, select the DIPC connection and physical schema you want to use from your list of previously created DIPC connections. This configuration allows you to change a task’s physical connection easily, without using ODI Studio, making DIPC a centralized access point for a lot of configuration, execution and monitoring data integration tasks.
Finally, click on Save & Run to save and immediately execute this task; click on Save if you want to run it later. This task should be now available in the DIPC Catalog.
Step 5:
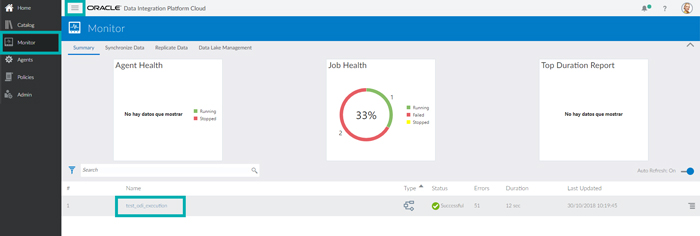
On the DIPC entry page, click on Monitor to see all the DIPC tasks that have been run, including ODI Execution, Replicate Data and others. This screen allows you to easily check all historical executions, as well as currently running tasks. This is indeed a significant advantage over ODI, which doesn’t have such a visual monitoring screen.
As shown in the picture below, the recently created and run ODI Execution has already finished with a successful final status and a duration of 12 seconds. Click on its Name to see the execution details.
Step 6:
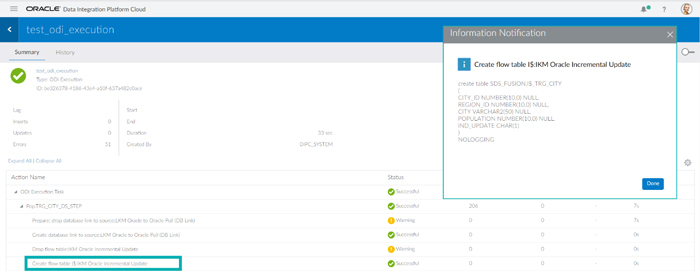
This page shows you the details of the execution, including an overall summary as well as the list of all execution steps with status, duration and amount of data processed.
When clicking on an Action Name, the physical SQL sent to the database is displayed, as shown in the picture below. What’s more, if a step finishes in error, when you click on its Status, the specific ODI error pops up – very handy for identifying the error cause.
Bear in mind that the ODI task executed in this example moves data from one source table to a target table inside a unique database cloud instance, the simplest cloud data integration scenario. More complex scenarios, such as from on-premise to cloud and from on-premise to another on-premise, require DIPCS agents to be installed in the remote instances so these can communicate to the DIPC Host in the Oracle Cloud for manageability aspects. Click here to learn more about agents.
Conclusions
After creating an Oracle Data Integration Platform Cloud instance, setting several storage connections and executing some data integration tasks, we can safely say that Oracle is going in the right direction by offering an accessible and flexible cloud data integration tool that still offers the core features of the powerful and robust Oracle Data Integrator.
Basically, DIPC means a centralised cloud platform for data integration management. It allows you to perform a lot of data integration tasks, ranging from creating real-time data replication and ad hoc data preparation processes to programmatically executing and monitoring key enterprise ETL processes. The only external software you need is ODI Studio, which is used by BI developers to implement ETL processes. Once these processes have been properly developed, they can be uploaded to DIPC, where they are executed and monitored.
Some advantages of DIPC over the traditional on-premise ODI are:
- DIPC is much faster and easier to set up than ODI, which requires a significant amount of installation and configuration.
- DIPC includes all the usual benefits of a cloud platform, such as easier data accessibility, higher hardware flexibility and a minimum risk of server failure.
- DIPC offers a user-friendly web-based portal to manage ETL executions and monitoring that ODI lacks.
- DIPC improves data integration capabilities with new built-in features which are fully manageable through the web portal, such as Replicate Data, Synchronise Data, Datalake Builder and Data Preparation.
If you need help implementing your data integration processes in DIPC, or moving any part of your BI environment to the cloud, don’t hesitate to consult us. Our BI and Cloud experts will be happy to help you!