21 Feb 2019 Data Extraction from Fusion Cloud
The Oracle BI Cloud Connector (BICC) is a useful tool for extracting data from Fusion and for storing it in shared resources like Oracle Universal Content Management (UCM) Server or cloud storage in CSV format. The data extract can be downloaded from these cloud resources to local resources, before post-processing operations like transformations and loads into Data Warehouses. There are multiple ways to download data from UCM Server: in this article, we’ll analyze how to extract content from Fusion to UCM Server, and then how to download the extract to a local resource.

Using the BI Cloud Connector (BICC) Console we can schedule the cloud extract and load it into UCM Server.
1. Cloud Extract configuration steps
- Configure BICC privileges
- Specify BICC offerings to extract
- Configure external storage using BIACM
- Schedule and monitor the Fusion data extracts using BIACM
- Create a process that downloads the extracted files located in UCM using RIDC
1.1 Configure BICC privileges
BICC and UCM privileges need to be configured to obtain permissions:
a. Role Name: BIACM_ADMIN
Role Hierarchies: Application Implementation Administrator and ESS Administrator
Role Description: Provide access to schedule the extraction jobs in BIACC
b. Role Name: BICC_UCM_CONTENT_ADMIN
Role Hierarchies: OBIA_EXTRACTTRANSFORMLOAD_RWD
Role Description: Provide privilege to extract data to UCM
1.2. Specify the offerings to extract
Navigate to the BICC Console, Select Configure Cloud Extract to open the Configure Cloud Extract dialog. On the Offering page, you can specify the offerings that you want to extract.
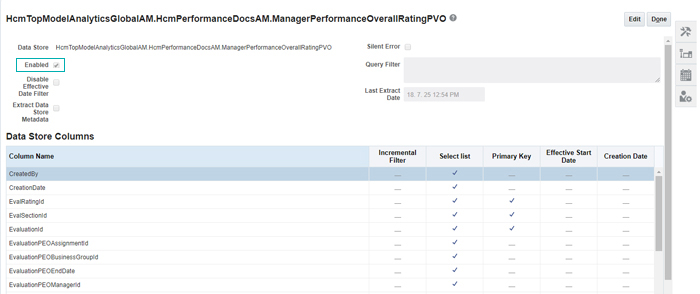
In this article, we will extract HcmTopModelAnalyticsGlobalAM.HcmPerformanceDocsAM.ManagerPerformanceOverallRating under Human Resources. Please note that we can only extract the existing VOs using the BICC Console.
Go to Human Resources and enable the required Data Store:

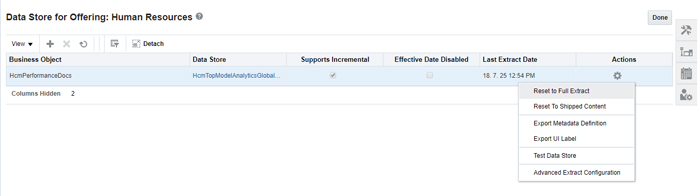
A full extract can be set using the Reset to Full Extract option:
1.3. Configuring external storage
The BICC Console provides two options for storage:
- External Storage – UCM
- External Storage Cloud Storage Service
In this article, we are using UCM as our storage type. Navigate to Configure External Storage and configure the UCM connection:

1.4. Schedule and monitor the Fusion data extracts
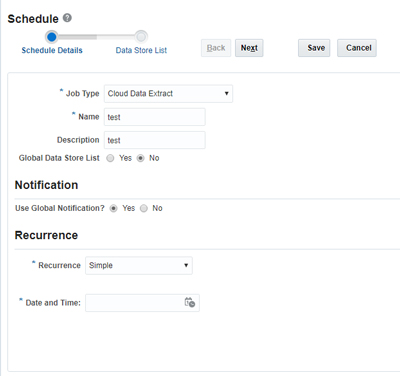
Select Manage Extract Schedules to open the Manage Extract Schedules dialog, where you can set up a once-only or regular data extract of Business Intelligence data from an Oracle Applications Cloud data source. You can also monitor an extract here; scheduled jobs write logs that can be used to review errors or be shared with Oracle Support to resolve a service request. To download the logs, click Help and select Download Logs.
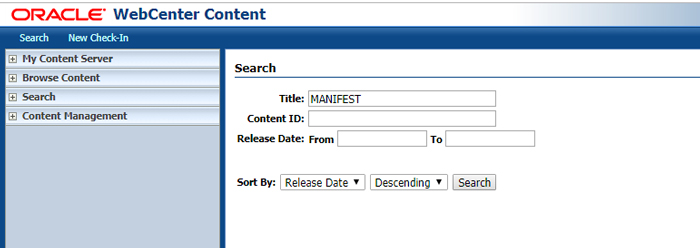
1.5. Downloading the extracted files from UCM
In order to verify the created extract, navigate to UCM and check for MANIFEST; the
UCM web URL will have this format: http://host_name:port_number/cs/
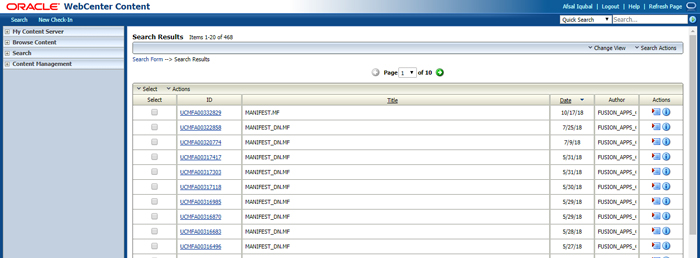
It will list all the MANIFEST.MF files based on the created schedules:
The content of a MANIFEST.MF file looks like this:
PLV_KEY=FUSION_13_0 file_hcmtopmodelanalyticsglobalam_hcmperformancedocsam_performanceoverallratingpvo-batch579181477-20181017_074707.zip;335399;a2e8da3075bd6afe2abe3029dbdb1d73
While the first line describes the Fusion Apps version (here 13_0), the rest of the file lists the exported and zipped CSV files in the following way:
- hcmtopmodelanalyticsglobalam_hcmperformancedocsam_performanceoverallratingpvo → file name according to extracted data source (VO, AM), written to UCM with prefix file_and suffix .zip – here standing for data source
- 335399→ unique UCM Document ID → primary key for that document
- a2e8da3075bd6afe2abe3029dbdb1d73 → file-specific MD5 checksum
If the MANIFEST looks fine, then we are good to go. Here we are using the Remote Intradoc Client(RIDC)- based transfer utility to download the content from UCM Server; it’s a thin communication API for talking to the Content Server.
The connection information for UCM should be provided in the connection.properties as the RIDC Java Library uses it:
url=https://<fusion-apps-host>/cs/idcplg
username=<username to access UCM like biadmin>
password=xxxx
policy=oracle/wss_username_token_client_policy
This script below starts reading and downloading all Manifest files in a loop. According to the unique UCM Document ID, a new subdirectory export/<MANIFEST.MF DocID> will be created if not existent yet. If a previous download has been completed successfully, there is no need to download these files again. In addition, here the indicator is the existence of a file export/< MANIFEST.MF DocID >/download.complete.
The RIDC-based transfer utility (oracle.ucm.fa_client_11.1.1.jar) can be downloaded here
java -jar ridc/oracle.ucm.fa_client_11.1.1.jar SearchTool \
--SortField=dID \
--SortOrder=asc \
--quiet --propertiesFile=./connection.properties \
--log_file_name=logs/manifestSearchResults.txt \
--simpleRIDCLogging \
--dDocTitle="MANIFEST.MF" \
--dSecurityGroup="OBIAImport" \
--delimiter=, \
--fields=dID,dDocName,dInDate,dOriginalName,VaultFileSize --defaultFields=false >logs/manifestSearchResults.log 2>logs/manifestSearchResults.err

numRows=`cat logs/manifestSearchResults.txt | wc -l`
numRecs=`cat logs/manifestSearchResults.txt | awk -v lastRow="$numRows" '{ if (FNR == lastRow) printf("%d\n", $1); }'`

echo "Number of Rows: ${numRecs}"
if [ ${numRecs} -eq 0 ]
then
    echo "No data available! Finishing ..."
    exit 255
else
    echo "Running the download of recent BIACM extracts for ${numRecs} record(s) ..."
fi

i=1
while [ $i -le $numRecs ]
do
    currDocId=`cat logs/manifestSearchResults.txt | awk -v "current=$i" '{ if (NR == (2 + current)) print $0 }' | awk -F, '{print $1}'`
    currDocDate=`cat logs/manifestSearchResults.txt | awk -v "current=$i" '{ if (NR == (2 + current)) print $0 }' | awk -F, '{print $3}'`

    echo "   >> Saving Manifest file with UCM Doc ID    : ${currDocId}"
    echo "   >> Saving Files from Extraction Date       : ${currDocDate}"

    if [ ! -d export/${currDocId} ]
    then
        mkdir export/${currDocId}
    fi

    if [ ! -f export/${currDocId}/download.complete ]
    then
        echo "     Will extract data into directory `pwd`/export/${currDocId}"

        java -jar ridc/oracle.ucm.fa_client_11.1.1.jar DownloadTool \
             --propertiesFile=./connection.properties \
                 --log_file_name=logs/manifestDownload.txt \
         --outputDir=export/$currDocId --md5 --md5lowercase \
                 --dID=$currDocId --RevisionSelectionMethod Latest

        for a in `cat export/$currDocId/MANIFEST.MF | awk '{ if (NR > 1) print $0}'`
        do
            nextFileName=`echo $a | awk -F\; '{print $1}'`
            nextDocId=`echo $a | awk -F\; '{print $2}'`
            nextMD5Val=`echo $a | awk -F\; '{print $3}'`

            echo "      >> Downloading file ${nextFileName} with Document ID ${nextDocId} ..."

            java -jar ridc/oracle.ucm.fa_client_11.1.1.jar DownloadTool \
                   --propertiesFile=./connection.properties \
                   --log_file_name=logs/fileDownload.txt \
           --outputDir=export/$currDocId --md5 --md5lowercase \
                   --dID=$nextDocId --RevisionSelectionMethod Latest

            downldMD5=`cat logs/fileDownload.txt | grep MD5 | awk -F= '{print $2}' | awk -F\] '{print $1}'`

            if [ $nextMD5Val != $downldMD5 ]
            then
        echo "Error: MD5 checksum value for downloaded file is incorrect!"
        echo "Exiting!"
            fi
        done
        echo "`date +%Y%m%d%H%M%S`" > export/$currDocId/download.complete
        echo "   Done! Data Extract downloaded into directory `pwd`/export/${currDocId}!"
    else
        echo "   Not downloading  extract data into directory `pwd`/export/${currDocId} as previously downloaded on `cat export/${currDocId}/download.complete`"
    fi

    echo "-----------------------------------------------------------------------------------------"
    echo ""

    i=`expr $i + 1`
done
After downloading every ZIP file the MD5 checksum will be obtained and compared with the value from the Manifest file. If both values are equal, then the next file from the list in Manifest will be downloaded; if they are different, the script will break with an error message.
This script may take a significant time to execute, depending on the network connection speed and the amount of data. The amount of data will vary, depending on scope (number of chosen offerings and data sources) and the type of extraction (full or incremental). After completion, all files are located in the directory export/<date_time> and are ready for customer post-processing activities: unzipping, loading and transforming (ELT) via ODI or other tools.
Conclusions
Extracting data from Fusion Cloud to a local system can take a while, but by following the above steps you will ensure the configuration is correct. Always make sure that the local file system has enough free space, since an initial full data extraction might produce a large amount of data. If you want to know more about it, just contact us!