
08 Abr 2019 Steps to use Power Centre as a RESTful web service consumer and to load the JSON response into a relational target
In today’s world data is ubiquitous and critical to business, thus increasing the need for integration across different platforms like cloud, web service etc. Bearing in mind that the current data warehousing and data analytics world is so dependent on ETL, a connection between ETL and the software system is the key to meeting business requirements.
Informatica provides both a web service consumer transformation and an HTTP transformation that can access a remote webpage and return the information provided (these days, usually in the form of JSON files). When the web service requires input parameters, Informatica passes them with the standard GET method.
Unfortunately, RESTful web services do not use standard GET parameters; instead, they have a URI, i.e. a regular URL followed by a URN that identifies a particular resource and which acts as an input parameter of sorts (e.g. “”). Informatica currently has no way of assembling the URI on the fly; however, this problem can be solved.
This blog post explains the steps to overcome this limitation with an example – in our scenario we are invoking a URL by passing the following parameters to the URL:
- Encrypted Asset Tag Number
- Start Date
- End Date
- Time Interval for Reading ( Seconds/Minutes/Hours)
1. Pre-requisites to configure REST call using HTTP Transformation
- Valid REST-based URL supporting either XML or JSON. In our scenario the response is in JSON format
- Valid SSL certificates to connect to REST URL outside the network
- Basic Authentication Mechanism (User Name and Password)
2. Overview of the steps to be followed
An Informatica REST web service has the following components:
Resource
A resource includes the mapping that the REST web service runs and the definition of the response message that the web service returns. The resource also includes a resource ID, a key field in the output data.
When you define a resource, you define the structure of the output data that the web service returns to the client; a web service can have multiple resources.
Resource mapping
The mapping that returns the data to return to the web service client. A resource mapping does not read the request query. The REST resource mapping contains a read transformation which reads a data object in the model repository to retrieve data to return to the client. By default, you do not have to add a filter transformation or a lookup transformation to retrieve the data based on the client query. The REST web service filters the output data after the mapping returns the data.
Request message
A request from a web service client to the web service to perform a task. An Informatica web service can perform an HTTP with the GET method; the request message is a string that contains the name of the web service, the name and network location of the resource to perform the task, and the parameters to filter the output.
Resource ID
A key field to search for the output data; each key field has a URL in the output data.
Response message
A JSON or XML file that contains the data to return to the web service client. The response message can contain a hierarchy of elements and multiple-occurring data.
Steps to be followed for Implementation
Step 1: Extract the Certificate from the URL
As part of this step we need to download the full certificate hierarchy from the browser.
Follow the steps given in the Informatica Network site.
Step 2: Split the Public and Private Keys of the Certificate
We need to split the certificate into public and private keys and generate 2 separate files to avoid the error given in the Informatica Network site while working with an HTTP transformation.
Step 3: Create HTTP Connection in Informatica Workflow Manager
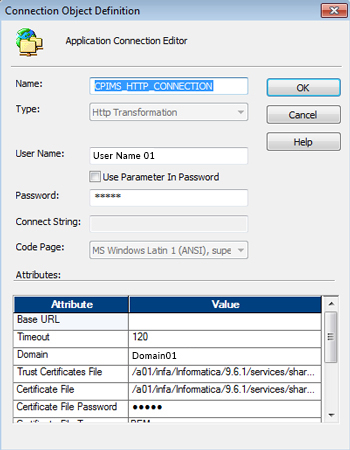
As shown below, create the application connection for HTTP by keeping the base URL blank by passing the following key attributes. Store the certificate and private key files separately and give the appropriate file path in the respective attributes.
- Name: Enter a name for the HTTP transformation which is understandable
- User Name: Enter the username of the REST API URL call
- Password: Enter the password for the URL
- Authentication Type: Select the authentication type as “Basic”
- Domain : Select the domain name of the web service URL
- Trust Certificate File : $INFA_HOME/services/shared/bin/ CERTIFICATE.pem
- Certificate File : $INFA_HOME/services/shared/bin /CERTIFICATE.pem
- Certificate File Password: admin
- Certificate File Type : PEM
- Private Key File : $INFA_HOME/services/shared/bin/PRIVATE_KEY.pem
- Key Password: admin
- Key File Type : PEM
Step 4: Create Mapping in Power Centre Designer
When you create a REST web service consumer transformation, you select the HTTP method that the Data Integration Service uses in the request message. You cannot change the HTTP method after creating the transformation.
You configure the transformation to use one of the following HTTP methods:
Get:
Retrieves a resource or a collection of resources from the web service. For example, you can retrieve a table of products or retrieve information about one product.
Post:
Sends data to a web service. Use this method to create a resource or a collection of resources. For example, you can add the details of a new store transaction.
Put:
Replaces a resource or a collection of resources. If the data does not exist, this method posts the data. For example, you can update a customer shipping address.
Delete:
Deletes a resource or a collection of resources. For example, you can delete the record of an employee that no longer works for the organization.
The method used in this example is the GET method to fetch the data from the web service and the base URL; either we can hardcode it inside the transformation or we can pass it through the parameter file. In this scenario we are creating a parameter file with the full URL path as shown below. The flexibility of using the parameter file is that the URL can be dynamically generated by a UNIX script or a mapping before this main mapping.
![]()
Final URL passed in the above parameter $$URL_HAB32AI7013A.
In the end, the best approach is to use the HTTP GET transformation with a $$URL_HAB32AI7013A already crafted for the variable values needed. You will be required to provide at least one parameter, but if you feed it a NULL value the resulting URL will be valid. That’s why we have 1=$1 (We will pass 1) resulting in 1=1 as a replacement for the NULL value.
Remember that Power Center does not update mapping variable values until the session ends, so the $$URL_HAB32AI7013A needs to be set to the needed value before the session is invoked – therefore it must be a workflow variable, or a parameter file variable. We decided to go with a mapping parameter file generated by a UNIX script before running this session of the workflow.
Below you can see an example of the final URL being generated:
Output JSON Response
We are getting the following JSON response from the URL which gives the reading value for a given asset tag given in the URL every minute.
{
   "Items":[
      {
         "Timestamp":"2018-10-21T20:00:00Z",
         "Value":5.09578466
      },
      {
         "Timestamp":"2018-10-21T20:01:00Z",
         "Value":5.09460545
      },
      {
         "Timestamp":"2018-10-21T20:02:00Z",
         "Value":5.0934267
      },
      {
         "Timestamp":"2018-10-21T20:03:00Z",
         "Value":5.09224749
      }
   ]
}
Step 5: Load the response in JSON into a Relational Target
To load the JSON response into a relational target we used an unstructured data transformation. In our scenario, we created an unstructured transformation with 2 output ports as shown below. We can export the XML schema from the UDT.
![]()
Step 6: Mapping/Transforming the Ports from JSON to XML
Now, using Informatica Data Transformation Studio, we need to map the ports from the JSON output file to the XML schema generated in the UDT.
- Connect to Informatica Data Transformation Studio.
We need to give the JSON schema as one of the inputs in the Data Transformation Studio, so we need to generate the JSON schema corresponding to the JSON response. We can get this online from Link.
- Import the JSON schema to the Data Transformation Studio by creating a new project as shown below:
![]()
- Give the project a name and click on next as shown below:
![]()
- Select Import Type as JSON schema:
![]()
- Select the locally saved JSON schema file:
![]()
- Then map the fields from the JSON schema to the XML generated from the unstructured data transformation using the mapper, as shown below:
![]()
![]()
- Run the project to generate the XML file corresponding to the JSON data:
![]()
- Next deploy the project:
![]()
- Once the project is deployed, the XSD file created in the service DB folder in the local machine needs to be moved to the Informatica Server in the path $INFA_HOME/DataTransformation/ServiceDB.
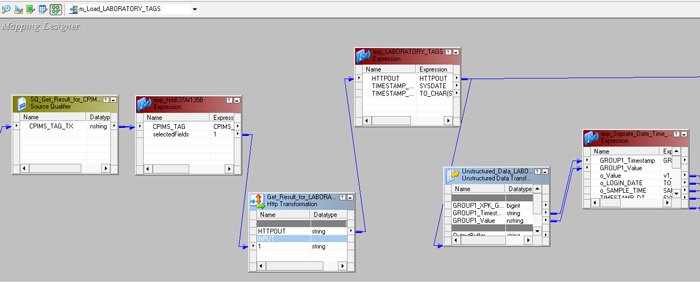
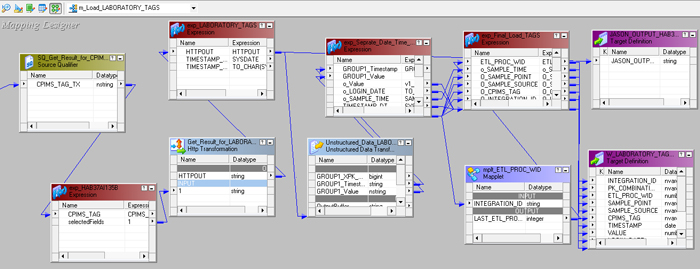
- The final mapping will look like this:
- Output after execution is as follows:
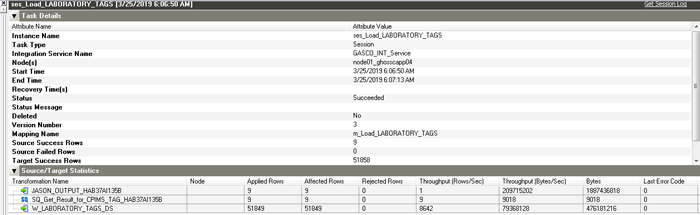
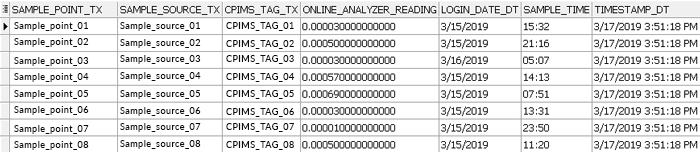
- The Result data in the final table is stored like this:
Conclusion
While we wish Informatica had a dedicated transformation for every scenario we might encounter, the bottom line is that web services and their protocols are evolving very fast nowadays, and new methods are constantly appearing. Informatica’s HTTP transformation has, so far, always been able to access every web service we have encountered, even if at times it needed a bit of outside help in terms of having a dynamic URL at run time.