08 Nov 2023 Creating A Local Airflow Environment Using Docker Compose
Airflow is an open-source platform for creating, scheduling, and monitoring workflows, which is becoming increasingly popular as an orchestration tool due to its flexibility, scalability, and ease of use. Airflow enables users to define, schedule, and monitor complex workflows, making it an ideal solution for data engineering, machine learning, and ETL pipelines.
We have already talked about this technology in blog posts like Deploying Apache Airflow on a Kubernetes Cluster and Running Apache Airflow Workflows on a Kubernetes Cluster. Whilst these blogs explain how to work in a production environment, today we’ll explore how to build an Airflow environment using Docker Compose for local development.
Airflow Architecture
Before diving into Docker Compose itself, it’s important to understand the Airflow architecture and its components. Airflow has a modular architecture consisting of a web server, a scheduler, a metadata database, and an executor.
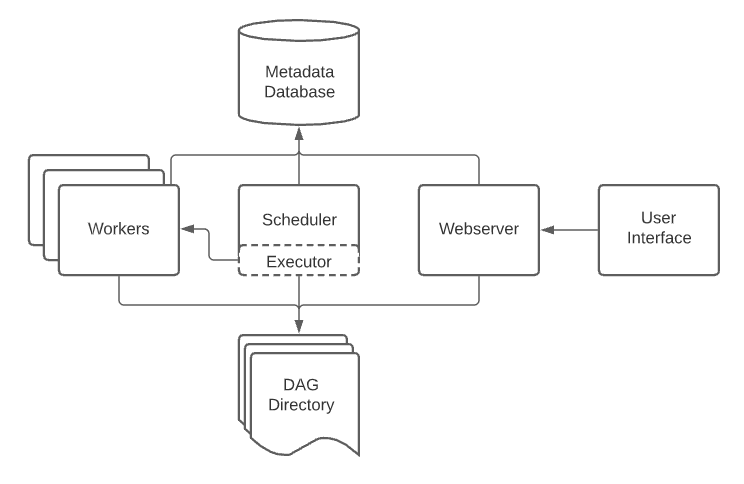
Image from Airflow official website.
Web Server
The Airflow web server provides a graphical interface for users to view and manage workflows, and is responsible for displaying the status of DAGs (Directed Acyclic Graphs) and tasks, as well as allowing users to trigger DAG runs and view task logs.
Scheduler
The Airflow scheduler schedules DAG runs and creates tasks: it monitors the metadata database to determine when to trigger new DAG runs and it creates tasks based on the DAG’s dependencies.
Metadata Database
Airflow uses a metadata database to store information about DAGs, tasks, and task instances. This database can be any database that supports SQL Alchemy, such as PostgreSQL, MySQL, or SQLite.
Executor
The Airflow executor is in charge of running tasks on worker nodes. There are three types of executors available in Airflow: LocalExecutor, CeleryExecutor, and KubernetesExecutor.
- LocalExecutor: Runs tasks on the same machine as the Airflow scheduler and web server, making it a great option for local development and testing.
- CeleryExecutor: Uses the Celery distributed task queue to run tasks on remote worker nodes, ideal for running tasks in a production environment.
- KubernetesExecutor: Runs tasks on a Kubernetes cluster, so it’s a good choice for running tasks in a cloud environment or in on-premise Kubernetes clusters.
Other Relevant Airflow Concepts
As well as understanding its architecture, there are other concepts that we should get to know before working with Airflow:
DAG
In Airflow, a DAG is a collection of tasks that are arranged in a specific order and can be executed to achieve a specific goal. Each task in a DAG is a separate unit of work that can be run independently, and the dependencies between the tasks are defined using Python code.
The DAG itself is defined in a Python script, specifying the tasks that need to be executed, the order in which to do so, and any dependencies between them. Airflow uses this definition to create a directed acyclic graph of tasks to be executed by the Airflow scheduler.
Variables
Airflow variables are key-value pairs that are used to store arbitrary configuration settings, or parameters that can be referenced by a DAG or any of its tasks. Variables are for values that may change over time or that might need to be parameterised, such as API keys, file paths, and email addresses.
To create or modify an Airflow variable, you can either use the Airflow UI or the ‘airflow variables’ command in the terminal. Once created, variables can be accessed in a DAG or task using the ‘Variable.get()’ method.
Connections
Airflow connections are used to define external resources that can be used by a DAG or any of its tasks, such as a database or a cloud storage service. Connections are defined using a key-value pair, where the key is the name of the connection, and the value is a dictionary that defines the connection parameters.
To create or modify a connection, you can either use the Airflow UI or use the ‘airflow connections’ command in the terminal. Once created, connections can be accessed in a DAG or task using the ‘Connection.get()’ method.
Plugins
A plugin is a self-contained package that can be used to extend Airflow’s functionalities. Plugins can be used to add new operators, hooks, sensors, macros, and other custom functionalities.
Plugins can be developed using Python, and there are many existing plugins available that you can use or modify to fit your particular use case!
Airflow Local Environment
Now that we have a basic understanding of the Airflow architecture, let’s look at how to use Docker Compose to create an Airflow environment with LocalExecutor. Docker Compose is a tool to define and run multi-container Docker applications, allowing you to define the services, networks, and volumes needed for your application in a single YAML file, making it easy to start and stop it.
To create a minimum Airflow environment using Docker Compose, we only need to define three services: the Airflow web server, the Airflow scheduler, and the PostgreSQL database. In production environments, you may want more services.
We have placed the Docker Compose and the required files in a GitHub repository, so you can directly access and clone the repository in order to get your own local Airflow environment up and running:
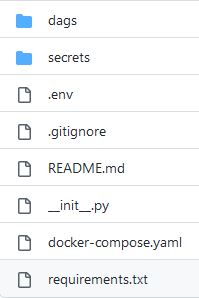
Repository structure from GitHub
Based on this structure, to develop in your local Airflow environment you should:
- Place your DAGs in the ‘dags’ folder.
- Store variables and connections in the ‘secrets’ folder in the variables.yaml and the connections.yaml files respectively.
- Add your dependencies to the requirements.txt.
- Additionally, you could create a ‘plugins’ folder and place plugins there so Airflow will load them.
To start the Airflow environment, simply run ‘docker-compose up’ in the same directory as the docker-compose.yaml file. This will start the PostgreSQL database, the Airflow web server, and the Airflow scheduler services. If everything is working, you will be able to access to your localhost:8080 with the default ‘airflow’ username and password, and see all the DAGs you have placed in the ‘dags’ folder.
Remember that in Docker Compose we are not specifying any specific version in the ‘image’ field, so it will get the latest one. We suggest you specify the same version as in your production environment.
Moreover, bear in mind that to connect to the different services your business has, you will need to create a role or policy with the corresponding permissions for authentication from your local environment.
Using this repository, you will be able to share a common development environment using the same Airflow version, dependencies, variables, and connections. Of course, you can download it and adjust it according to your needs.
Conclusion
In conclusion, Docker Compose is a powerful tool that can be used to create a local Airflow environment quickly and easily for development and testing purposes. By leveraging Docker Compose, we can spin up an Airflow environment with a LocalExecutor and a PostgreSQL database in a matter of minutes.
Using this environment, developers can quickly develop and test their DAGs or new configurations without worrying about setting up a complex Airflow environment. Additionally, it allows developers to share their development environment with others, making collaboration and testing much easier.
Overall, the development of an Airflow environment using Docker Compose can significantly speed up the development phase in Airflow, and also offer many benefits to the development team.
If you are considering adopting Airflow in your data platform, don’t hesitate to contact us as we have broad experience both deploying Airflow environments and developing DAGs for running workflows. Our team of specialist consultants will be more than happy to share their experience with you and set you on the right course for a successful outcome!