
18 Jul 2019 OBIEE 12c SSO setup with Active Directory and Windows Native Authentication
Corporate systems often need to be integrated to facilitate smooth end-user access, thus increase productivity. The aim of this blog article is to show users how to log on to their Windows PCs and access the OBIEE URL directly, without any additional authentication being required.
1. Pre-requisites:
- Ports should be opened on the Active Directory (AD) Server to the machine hosting the Admin Server and BI Server. The port numbers vary from implementation to implementation, but in general:
- Port 636 is used for communication to the AD Server.
- TCP and UDP protocol need to be enabled on port 88 for Kerberos. This blog post assumes the Kerberos Server is the same as the AD Server.
- As most of the LDAP AD implementations accept only https requests, the OBIEE instance should be SSL-enabled and needs to have the necessary AD Server certificates. Certificates should be imported into the following java key stores using keytool import utility:
- {JAVA_HOME}/jdk/jre/lib/security/cacerts.
- Keystore used for OBIEE SSL configuration.
- Kerberos package should be installed in Linux to use the Kinit utility.
2. High-level Steps to enable SSO for OBIEE 12c
- Configure authentication provider to connect to AD.
- Create a User account in AD for Kerberos.
- Generate a Keytab file and set principal name using SETSPN.
- Java Cryptography Extension (JCE) Unlimited Strength files download.
- Configure krb5.conf and test.
- Configure WebLogic Login Module (krb5Login.conf).
- Configure Single Pass Negotiate Identity Assertion Provider.
- Configure BI APP for SSO.
- Configure BI Instance for SSO.
- Additional Debugging Options.
3. Configuring authentication provider to connect to AD
3.1. Log in to the SSL-enabled WebLogic console and configure a new authenticator by navigating to the page: Security Realms -> My realm -> Providers -> New
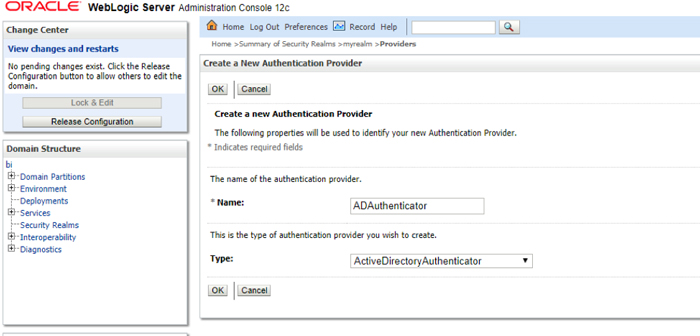
Figure 1: Sample values for New Authenticator
3.2. Set the Control Flag to ‘SUFFICIENT’ for both ADAuthenticator and Default Authenticator.
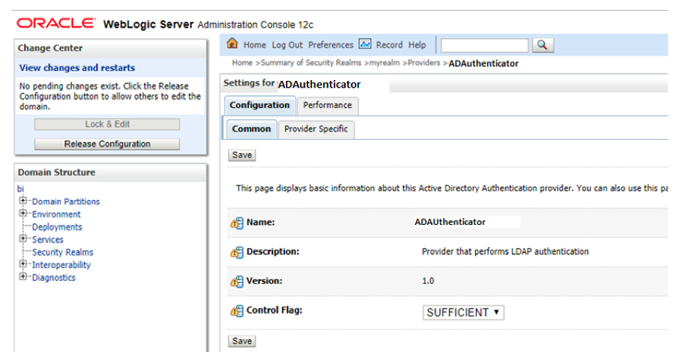
Figure 2: Control Flag for New Authenticator
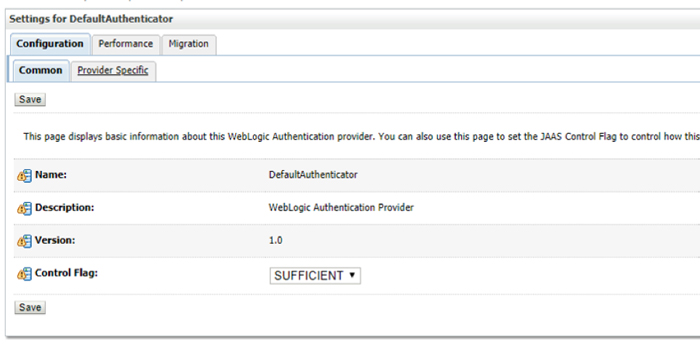
Figure 3: Control Flag for Default Authenticator
3.3. Re-order the list of authenticators as shown below:
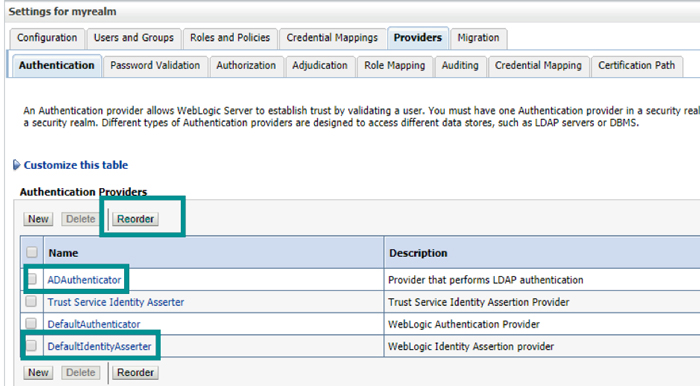
Figure 4: Re-ordered list of authenticators
3.4. Click on ADAuthenticator and navigate to the ‘Provider Specific’ tab to configure with AD details. The following settings vary from implementation to implementation. Depending on the AD configuration, the sAMAccountName should be modified to CN or any other value:
Host: ad.clearpeaks.com
Port: 636
Principal: CN=OBIEE LDAP Auth,OU=CPusers,OU=Abu Dhabi,DC=clearpeaks,DC=com
(Here, OBIEE LDAP Auth is an user account created in AD for authentication purposes.
A valid existing account can be used as well)
Credential: [Password for above account]
Confirm Credential: [Re-enter the password]
SSL Enabled check box: Checked
User Base DN: OU=Abu Dhabi,DC=clearpeaks,DC=com
All Users Filter: (&(sAMAccountName=*)(objectclass=user))
User From Name Filter: (&(sAMAccountName=%u)(objectclass=user))
User Name Attribute: sAMAccountName
Retirve the User Account Control check box: Checked
Group Base DN: OU=CPusers,OU=Abu Dhabi,DC=clearpeaks,DC=com
Group From Name Filter: (&(cn=%g)(objectclass=group))
All remaining values as defaults
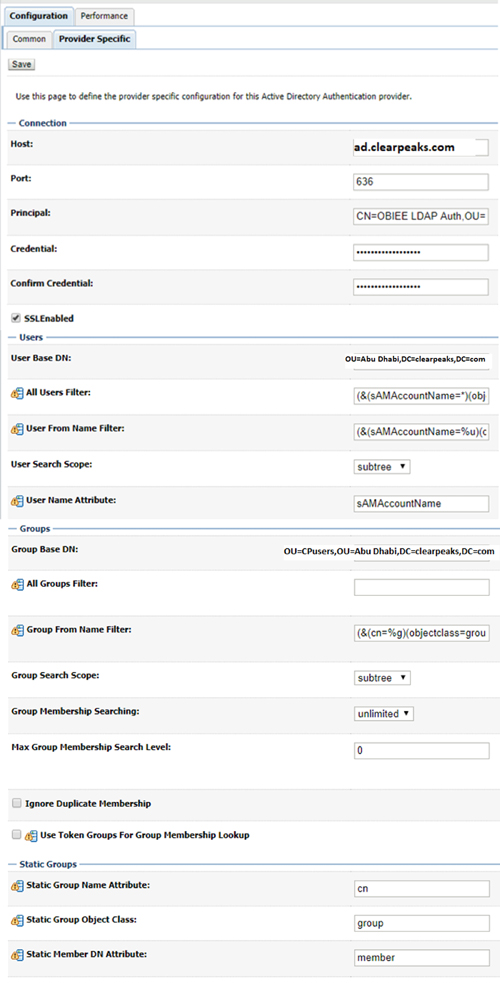
Figure 5: Sample values of Active Directory
3.5. Click on Save and Activate Changes.
3.6. Now restart all services using start.sh and stop.sh.
3.7. After services have been successfully restarted, you should see a list of AD users in ‘Users and Groups’ in the WebLogic console. The values under the Name column will act as the login name in the next step.
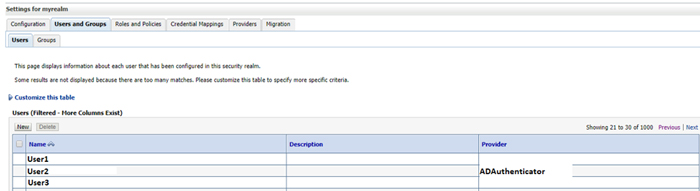
Figure 6: Users list retrieved from AD
We have created one AD group called OBIEE-Users where required OBIEE users will be members. Only users who are members of this group will be able to access OBIEE, while the others will get the ‘Forbidden’ error in the browser.
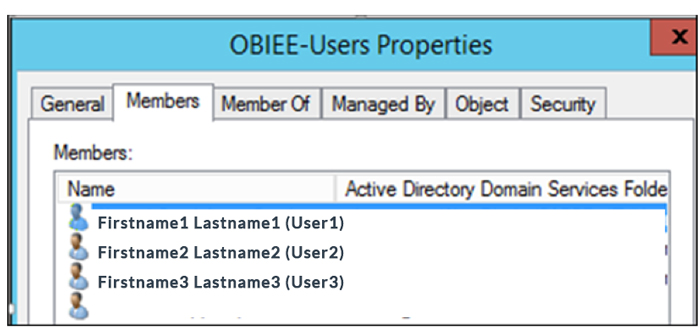
Figure 7: Users list in AD group
3.8. Assign the OBIEE Users group as a member of BI Content Author in Enterprise Manager.
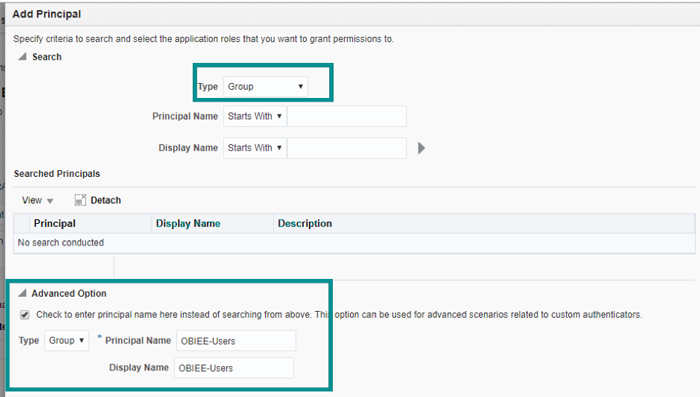
Figure 8: Membership for AD group
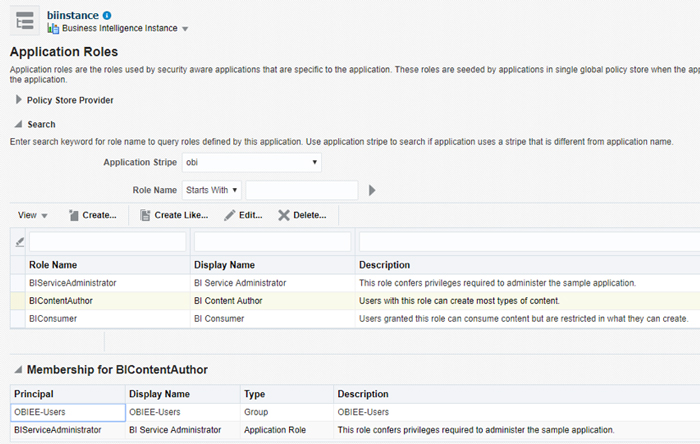
Figure 9: Membership for BI Content Author
3.9. Set virtualize = TRUE in EM. This enables OBIEE to use more than one authenticator for authentication.
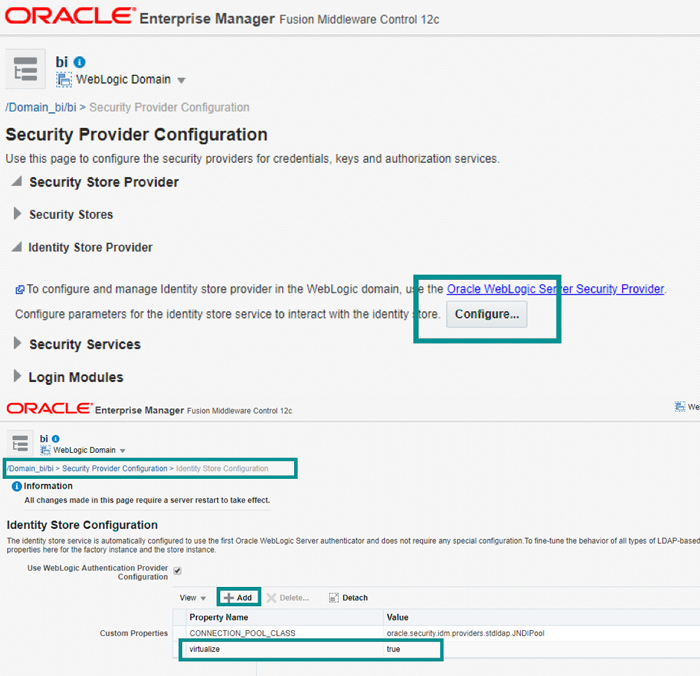
Figure 10: Configuring virtualization property
3.10. Now restart all services using start.sh and stop.sh
Once the services have been restarted, you should be able to log in to OBIEE using AD credentials. The login name will be the sAMAccount name and the password is the AD user password. If login is not successful using AD credentials, do not proceed, and fix the AD configuration in the WebLogic console. Validate the connectivity to the AD Server and ensure you are using the right attribute to get the login names.
Optionally, you can stop now if you are happy logging in to OBIEE using AD credentials. If you would like to eliminate this step, Kerberos must be configured to do the auto-login job.
4. Creating a User account in AD for Kerberos
4.1. Create a new account in AD with the help of AD administrators with the properties below. Choosing a meaningful name for the account will help AD administrators to identify that this account is created for OBIEE purposes.
- Password never expires.
- This account supports Kerberos AES 256 bit encryption.
We have created a user with the name ‘obieessouser’:
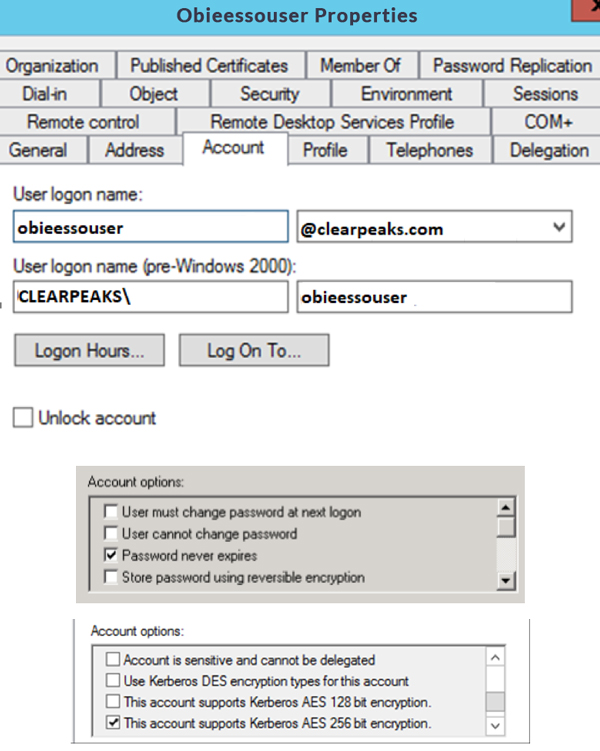
Figure 11: Properties of user in AD
5. Generating Keytab file and set principal name using SETSPN
5.1. Execute the below ktpass command in AD PowerShell to generate a Keytab file:
ktpass -princ HTTP/obieeprod.clearpeaks.com@CLEARPEAKS.COM –mapuser obieessouser -pass
Oracle123 -crypto AES256-SHA1 –ptype KRB5_NT_PRINCIPAL -out C:\obiee.Keytab -kvno 0
5.2. Then execute the setspn command. If a Fully Qualified Domain Name (FQDN) is used in the above ktpass command, use the short name of obiee Server in the setspn command.
setspn -A HTTP/obieeprod obieessouser
5.3. Execute the command below to list the SPN names associated to the user account we created in AD.
setspn -L obieessouser
5.4. This should display two SPN names that have been linked:
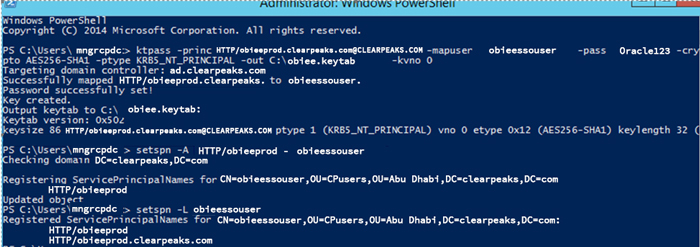
Figure 12: Steps performed in AD PowerShell
5.5. Copy the Keytab file generated on AD to the domain directory of OBIEE Server:
%ORACLE_HOME%/user_projects/domains/bi/
6. Java Cryptography Extension (JCE) Unlimited Strength files download
If Java is to accept AES256 Encryptions, we need to apply JCE for Java 8:
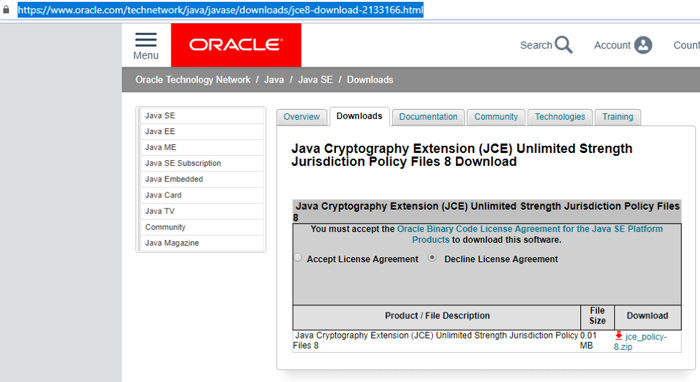
Figure 13: Oracle JCE page
As per the ReadMe file, extract the downloaded zip file to get the two jar files, namely US_export_policy.jar and local_policy.jar.
After backups have been taken for the original files, copy these two files into the locations below:
- /usr/java/jdk1.8.0_201-amd64/jre/lib/security/
- /apps/Oracle/Middleware/Oracle_Home/oracle_common/jdk/jre/lib/security/
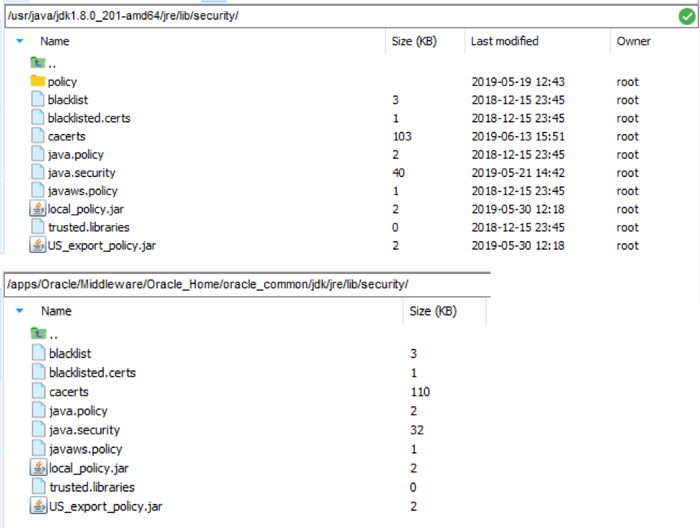
Figure 14: Placing JCE files in the directories
7. Configuring krb5.conf and test
7.1. This file is used by WebLogic to locate the KDC (Kerberos Domain Controller) Server and communicate with it. The location of the file in Linux is:
/etc/krb5/
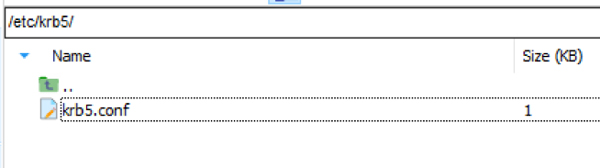
Figure 15: Location of krb5.conf file
7.2. The contents of the file are:
[libdefaults]
default_realm = CLEARPEAKS.COM
default_tkt_enctypes = AES256-CTS-HMAC-SHA1-96
default_tgs_enctypes = AES256-CTS-HMAC-SHA1-96
permitted_enctypes = AES256-CTS-HMAC-SHA1-96
ticket_lifetime = 600
[realms]
CLEARPEAKS.COM = {
kdc = ad.clearpeaks.com
admin_Server = ad.clearpeaks.com
default_domain = CLEARPEAKS.COM
}
[domain_realm]
.clearpeaks.com = CLEARPEAKS.COM
[appdefaults]
autologin = true
forward = true
forwardable = true
encrypt = true
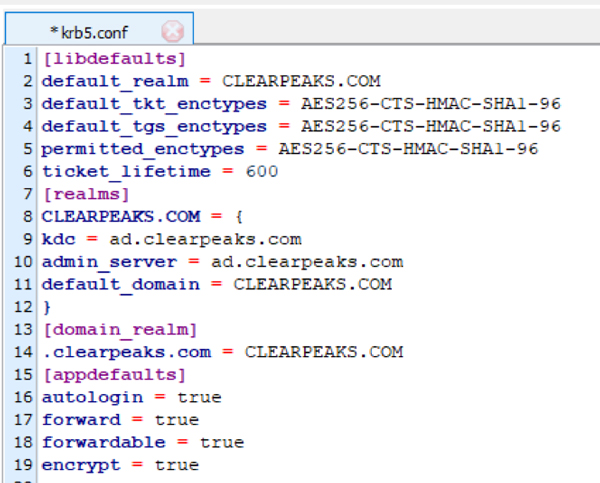
Figure 16: Sample krb5.conf file
7.3. Test the connectivity of the Kerberos Server from the WebLogic Server using the Keytab file:
export KRB5_CONFIG=/etc/krb5/krb5.conf

syntax: Kinit’  –V –k –t [Keytab location] HTTP/[weblogic hostname]

Kinit’  -V -k -t /apps/Oracle/Middleware/Oracle_Home/user_projects/domains/bi/obiee.Keytab HTTP/obieeprod.clearpeaks.com

Figure 17: Kinit test
You should get a success message – ‘Authenticated to Kerberos v5 ’.
If you don’t get the success message here, do not proceed, and check the contents of krb5.conf file to avoid any spaces, and check the connectivity of the KDC Server on ports (88). Sometimes copying and pasting the contents may not work, and you have to type the contents manually. Also, check the case sensitivity in realm names.
8. Configure WebLogic Login Module (krb5Login.conf)
8.1. Create a file ‘krb5Login.conf’ in the location %ORACLE_HOME%/user_projects/domains/bi/ with the contents below:
com.sun.security.jgss.krb5.accept {
 com.sun.security.auth.module.Krb5LoginModule required
 principal="HTTP/obieeprod.clearpeaks.com@CLEARPEAKS.COM"
 Keytab=obiee.Keytab
 useKeytab=true
 storeKey=true
 debug=true;
};

Figure 18: krb5Login.conf and Keytab file location
Quotation marks around the principal name must be correct, Copying and pasting from the above content may not work in all cases.
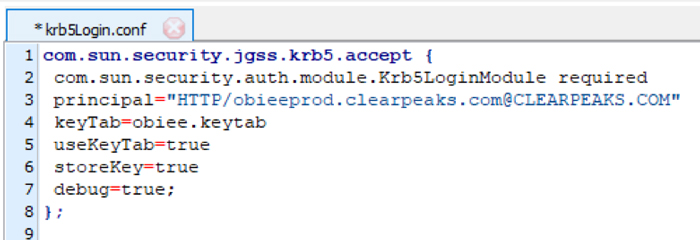
Figure 19: Sample krb5Login.conf file contents
8.2. Open the setDomainEnv.sh file in the location ‘%ORACLE_HOME%/user_projects/domains/bi/bin’ and find the line that reads ‘JAVA_PROPERTIES=»${JAVA_PROPERTIES} ${EXTRA_JAVA_PROPERTIES}»’
Paste these lines before the identified line:
EXTRA_JAVA_PROPERTIES="-
Djava.security.auth.login.config=/apps/Oracle/Middleware/Oracle_Home/user_projects/domains/
bi/krb5Login.conf -Djavax.security.auth.useSubjectCredsOnly=false
-Djava.security.krb5.realm=CLEARPEAKS.COM -Djava.security.krb5.kdc=ad.clearpeaks.com -
Dsun.security.krb5.debug=true -Djava.security.enableNegotiate=true -
Djava.security.krb5.conf=/etc/krb5/krb5.conf ${EXTRA_JAVA_PROPERTIES}"

export EXTRA_JAVA_PROPERTIES

Figure 20: Changes in setDomainEnv.sh file
8.3. Restart the services for the changes to take effect.
9. Configure Single Pass Negotiate Identity Assertion Provider
9.1. WebLogic extracts the SPNEGO/Kerberos ticket from the browser and communicates with the Kerberos Server using the loginconf and Keytab file we set up before; to enable WebLogic to do this, we have to add a new authenticator:
Security Realms -> myrealm -> Providers -> New
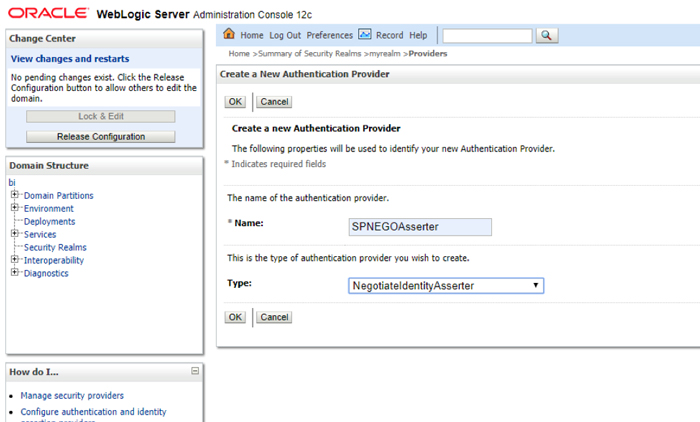
Figure 21: New authentication provider for Negotiate Identity Asserter
9.2. Re-order the authenticator as shown below:
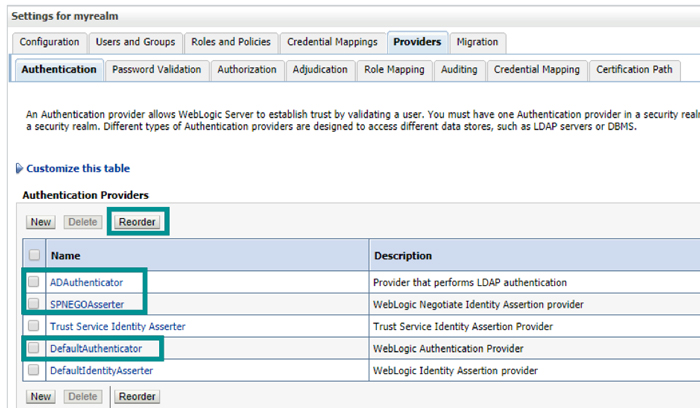
Figure 22: Re-ordered list of authentication providers
10. Configure BI APP for SSO
10.1. We need to modify the analytics.ear deployment to accept the Kerberos authentication:
Back up the ‘analytics.ear’ deployment in the location: /apps/Oracle/Middleware/Oracle_Home/bi/bifoundation/jee/
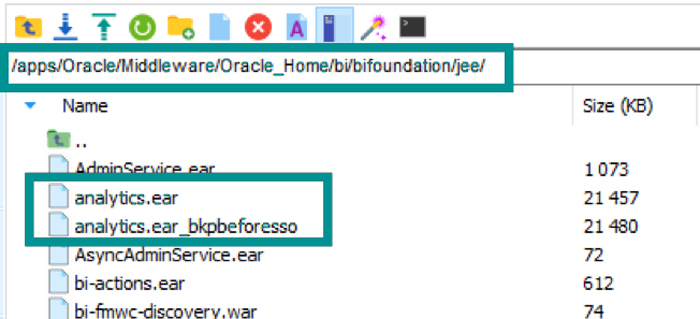
Figure 23: Backup of analytics.ear
10.2. It is preferable to use a 7zip tool to make the changes mentioned below. Copy the analytics.ear into a Windows PC.
In 7zip -> Tools -> Options -> Editor tab -> set WordPad as editor
C:\Program Files (x86)\Windows NT\Accessories\WordPad.exe
10.3. Open the analytics.ear with the 7zip archive manager and double click on it to see ‘analytics.war’. Double click on analytics.war inside the 7zip window and navigate to WEB-INF directory.
10.4. Edit weblogic.xml in WordPad and add these lines before </weblogic-web-app>:
   <security-role-assignment>
       <role-name>SSORole</role-name>
       <principal-name>OBIEE-Users</principal-name>
   </security-role-assignment>
It should look like this:
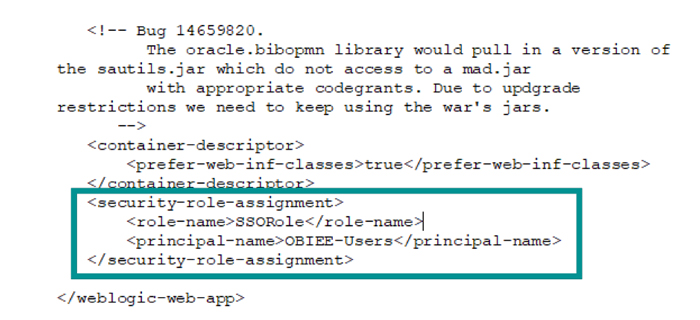
Figure 24: weblogic.xml after modification
10.5. Save the file in WordPad and close it to get a confirmation from 7zip to save. Here the ‘SSORole’ can be anything, but ensure that the same name is given in the next change that we are going to make. Check the formatting of xml and multiple principal names can be added according to requirements (one line for each principal name). Here ‘OBIEE-Users’ is the LDAP group that we created in Active Directory and OBIEE users are members of this.
10.6. Now edit the web.xml file from 7zip window. Locate this section:
   <login-config>
      <auth-method>CLIENT-CERT</auth-method>
   </login-config>
10.7. Modify the section like this:
<security-constraint>
      <web-resource-collection>
         <web-resource-name>BI Analytics</web-resource-name>
         <url-pattern>/*</url-pattern>
      </web-resource-collection>
      <auth-constraint>
         <role-name>SSORole</role-name>
      </auth-constraint>
   </security-constraint>

   <login-config>
      <auth-method>CLIENT-CERT</auth-method>
   </login-config>
   <security-role>
      <role-name>SSORole</role-name>
   </security-role>
10.8. After ensuring the proper xml formatting, it should look as follows:
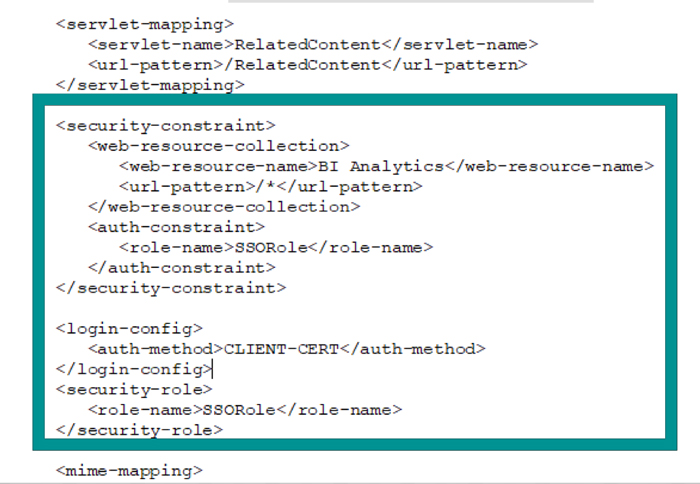
Figure 25: web.xml after modification
10.9. Save in WordPad and close the file to get confirmation from 7zip. Since the changes are made from 7zip GUI, we don’t need to repackage the analytics.ear again. Place the analytics.ear file back into the Linux directory where it is picked from, then we are ready to deploy it in WebLogic.
10.10. Log in to the WebLogic console and navigate to deployments. Stop the analytics deployment before proceeding.
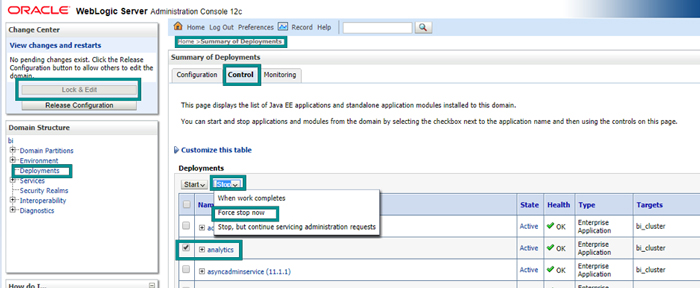
Figure 26: Stopping analytics deployment
10.11. Update the analytics deployment
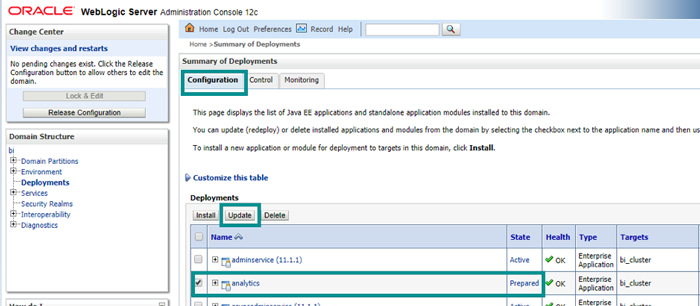
Figure 27: Updating analytics deployment

Figure 28: Updating analytics deployment displaying the path of updated file
10.12. Activate Changes
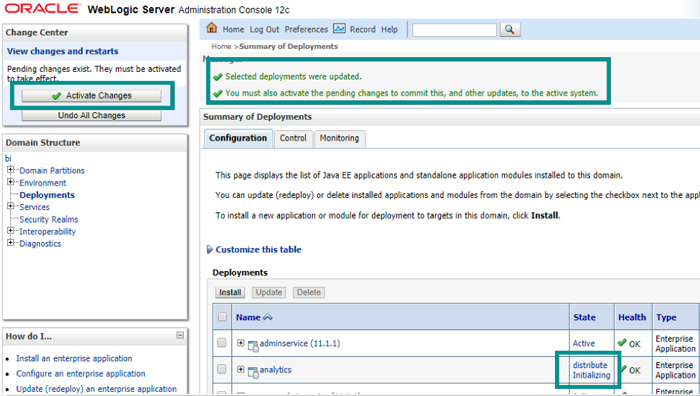
Figure 29: Activating changes after updating the deployment
10.13. Now open weblogic.xml and web.xml in the location:
‘/apps/Oracle/Middleware/Oracle_Home/user_projects/domains/bi/Servers/bi_Server1/tmp/_WL_user/analytics/eiguw6/war/WEB-INF/’ and ensure our recent changes are updated in the xml files:
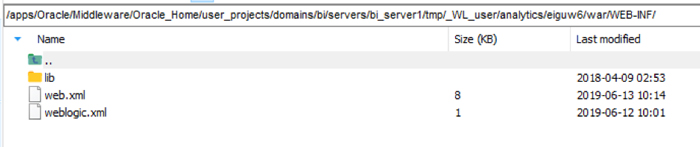
Figure 30: File location after activating changes
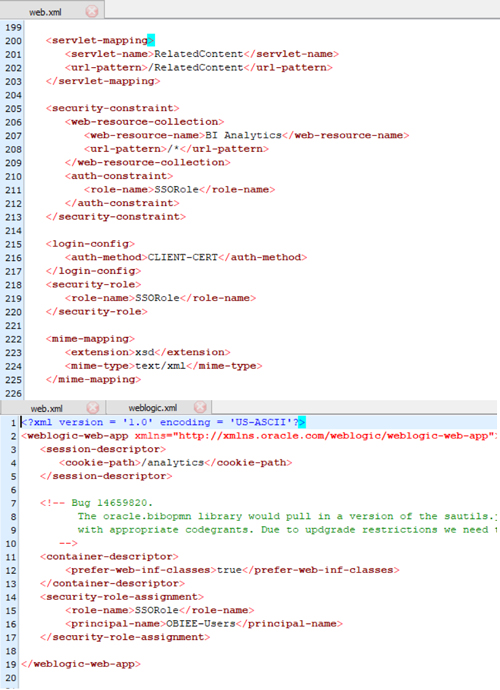
Figure 31: File contents after activating changes
11. Configure BI Instance for SSO
11.1. Navigate to EM -> Business Intelligence -> biinstance
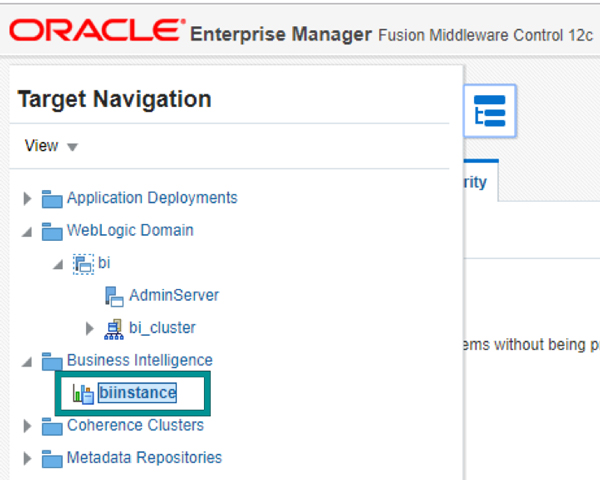
Figure 32: Navigating to BI instance
11.2. After clicking on ‘Lock & Edit’, enable the SSO check box. Give the URL for log off as:
‘https://(hostname):9503/analytics/saw.dll?Logoff’
Example: https://obieeprod.clearpeaks.com:9503/analytics/saw.dll?Logoff
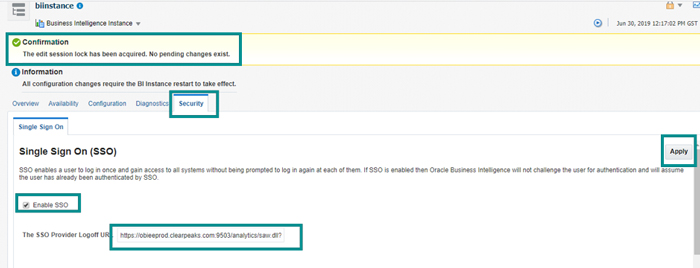
Figure 33: Modified URL for SSO
Click on Apply and Activate Changes
11.3. Now restart all services using start.sh and stop.sh
If you are using Chrome, no additional steps are required, but if you are using Internet Explorer refer to Oracle documentation to perform the additional steps to enable “Automatic logon only in Intranet zone” for the WebLogic URL, if needed.
After completing all the above-mentioned steps, and when the user is logged in to Windows, they should be able to access the OBIEE URL without username and password prompting.
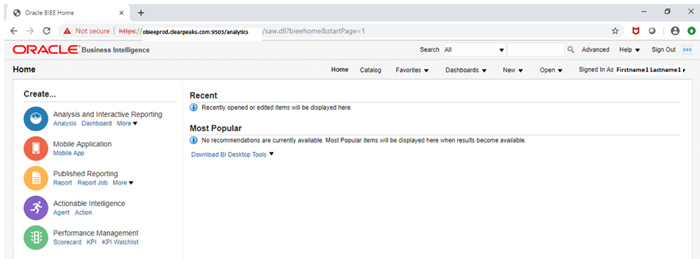
Figure 34: OBIEE page after setup
12. Additional Debugging Options
If, after performing the above steps you are still not able to log in to OBIEE using SSO,
- Use Oracle developed helper app to check the SSO configuration. Oracle support document id: Doc ID 1390127.1.
- Ensure there are no blank spaces, additional characters and the right use of quotation marks in the configuration files we altered.
- Use the Kinit utility to check the validity of the Keytab file and connection issues.
- Ensure there are no port blocking issues in a corporate environment between OBIEE Server and Active Directory Server. Use any GUI tool that informs of port-blocking events in the network.
- If WebLogic fails to get usernames from LDAP AD after configuring the authenticator and if you see a ‘General SSL Engine’ problem, place the Active Directory certificate and root certificate in the ‘cacerts’ Java Keystore used by WebLogic. Eg: /usr/java/jre/lib/secrutiy/cacerts
Conclusion
Configuring OBIEE Single Sign On (SSO) with Microsoft Active Directory and Windows Native Authentication is a lengthy process which needs to be validated at multiple stages to guarantee a smooth implementation. Click here if you would you like to know more about how to configure SSO for OBIEE.