28 May 2025 Integrating Kafka with PDI
In this blog post, we’ll dive into the details of how to configure and use Pentaho Data Integration (PDI) to build a transformation that reads data from a Kafka topic.
Apache Kafka is a distributed data streaming platform designed for high-throughput, fault-tolerant, and scalable data management. It operates as a low-latency high-performance messaging system, enabling the publication, storage, and consumption of real-time data.
Here at ClearPeaks we are experts in Kafka solutions, especially on Cloudera platforms. Whilst we have previously covered Kafka in other blog posts, today we’ll focus on using PDI to ingest Kafka messages.
PDI is a powerful ETL tool designed for data integration, transformation, and processing. It provides a graphical interface to design data pipelines and workflows, and supports both real-time and batch data processing, making it suitable for a wide range of data analytics and reporting applications.
Advantages of Using Kafka with PDI
Integrating Kafka with PDI offers several advantages for organisations looking to manage data in real time:
- Real-time processing: Data is processed as soon as it arrives, without having to wait for it to accumulate in a database or archive.
- Scalability: Kafka handles large volumes of data, and PDI can integrate faultlessly into these massive streams, ensuring that data transformations scale correctly.
- Integration with diverse sources and destinations: PDI can integrate Kafka with other systems including databases, flat files, cloud platforms and more, enabling the orchestration of complex data processes.
Use Case
Requirements and Kafka Consumer Step
To use the Kafka consumer step in PDI, version 8.0 or later is required. This step operates at the transformation level and must be paired with a sub-transformation to work properly. In this blog post, we’ll go through how it works and how to configure it.
The parent (or main) transformation is responsible for pulling the streaming data and managing all Kafka topic configurations, including bootstrap servers, topic name, and consumer group ID.
Each time the parent transformation receives a batch of messages, it triggers the execution of the sub-transformation, which processes each message in the batch, allowing you to build a pipeline that transforms Kafka messages just like any standard PDI transformation.
Sample Data Set
For this demonstration, we’re running a local Kafka producer instance to simulate the data stream. We’ll produce a simple message in JSON format, then create a transformation in PDI to consume the message, process it, and finally load the data into a local PostgreSQL database.
The Kafka topic is configured with the following details:
- Bootstrap server: localhost:9092
- Topic name: KafkaPDI
- Consumer group: PDI_Consumer_Group
The JSON data set has the following structure:
[
   {
      "position":"1",
      "country":"China",
      "population":"1,439,323,776",
      "yearly_change":"0.39 %",
      "net_change":"5,540,090",
      "density_per_square_km":"153",
      "land_area_in_square_km":"9,388,211",
      "migrants_net":"-348,399",
      "fertility_rate":"1.7",
      "median_age":"38",
      "urban_population":"61 %",
      "world_share":"18.47 %"
   },
   {
      "position":"2",
      "country":"India",
      "population":"1,380,004,385",
      "yearly_change":"0.99 %",
      "net_change":"13,586,631",
      "density_per_square_km":"464",
      "land_area_in_square_km":"2,973,190",
      "migrants_net":"-532,687",
      "fertility_rate":"2.2",
      "median_age":"28",
      "urban_population":"35 %",
      "world_share":"17.70 %"
   },
   {
      "position":"3",
      "country":"United States",
      "population":"331,002,651",
      "yearly_change":"0.59 %",
      "net_change":"1,937,734",
      "density_per_square_km":"36",
      "land_area_in_square_km":"9,147,420",
      "migrants_net":"954,806",
      "fertility_rate":"1.8",
      "median_age":"38",
      "urban_population":"83 %",
      "world_share":"4.25 %"
   }
].
The PostgreSQL DDL is as follows:
CREATE TABLE IF NOT EXISTS public.world_population (

    topic text COLLATE pg_catalog."default",
    PARTITION integer,
    "offset" integer,
    message_timestamp timestamp WITHOUT time zone,
    "position" integer,
    country text COLLATE pg_catalog."default",
    population integer,
    yearly_change numeric,
    net_change integer,
    density_per_square_km integer,
    migrants_net integer,
    land_area_in_square_km integer,
    fertility_rate numeric,
    median_age integer,
    urban_population integer,
    world_share numeric,
    dt_lastupdate timestamp WITHOUT time zone).
In some cases, the Kafka producer may compress messages using algorithms like LZ4 or Snappy. These compression libraries aren’t bundled with PDI by default, so to enable support, you’ll need to manually download the required JAR files and place them in the lib directory of your PDI installation.
Solution
Let’s start with the parent transformation. Open a new, empty transformation, search for the Kafka consumer step in the Design tab, and drag it onto the transformation canvas:
Figure 1: Kafka consumer step
Now it’s time to configure the step. In the Setup tab, we’ll configure the connection to the Kafka bootstrap server, specify the topic(s), and set the consumer group name. The key fields to configure are:
- Transformation: Path to the sub-transformation that will process the incoming Kafka messages.
- Connection: Specify the connection type – Direct for bootstrap servers or Cluster if you’re connecting to a Kafka instance running in a Hadoop cluster.
- Topics: Specify the name of the topic(s).
- Consumer group: Specify the name of the consumer group.
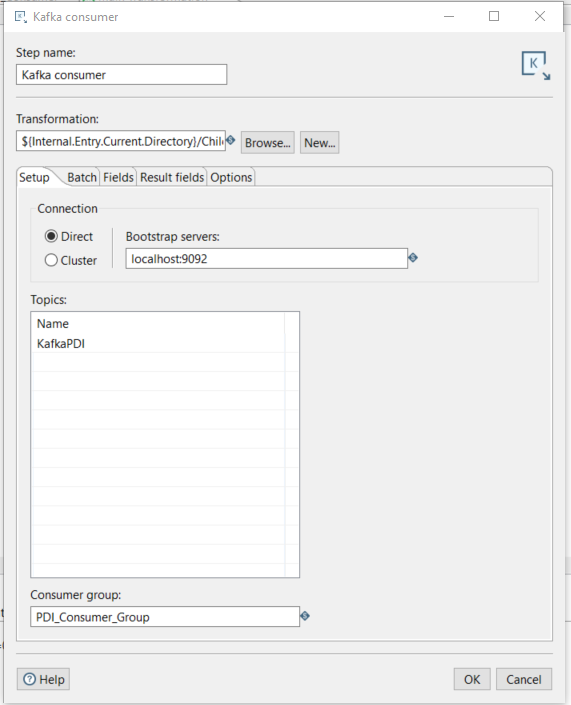
Figure 2: Kafka consumer Setup tab
The Batch tab is used to determine how many messages we want to pull before passing them to the sub-transformation. This can be defined either by duration (in milliseconds) or by the number of messages.
For example, if we wanted to process the batch every 1,000 messages or every minute, we would configure it like this:
- Duration (ms): 60000
- Number of records: 1000
The other options should only be modified if there are performance issues:
- Maximum concurrent batches: If the consumer step cannot keep pace with the incoming data stream, we can increase the number of concurrent batches. However, this will increase memory and CPU usage.
- Message prefetch limit: This specifies how many incoming messages the step will queue for processing as they’re received from the broker.
Finally, we can configure the offset management, with two available options:
- Commit when record read: This commits the message as soon as the record is read by this step.
- Commit when batch completed: This commits the message once the batch has been processed by the sub-transformation.
We’ll use the Commit when batch completed option, so if the sub-transformation fails, the messages will not be committed and can be re-ingested when the process is relaunched:
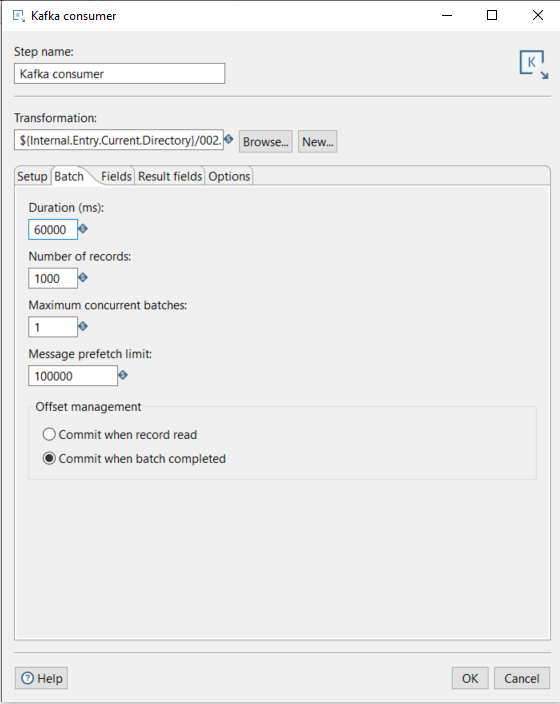
Figure 3: Kafka consumer Batch tab
The Fields tab is used to define the fields in the message. We’ll leave this option as default, but if the message contains unmapped additional fields, they need to be explicitly defined here:
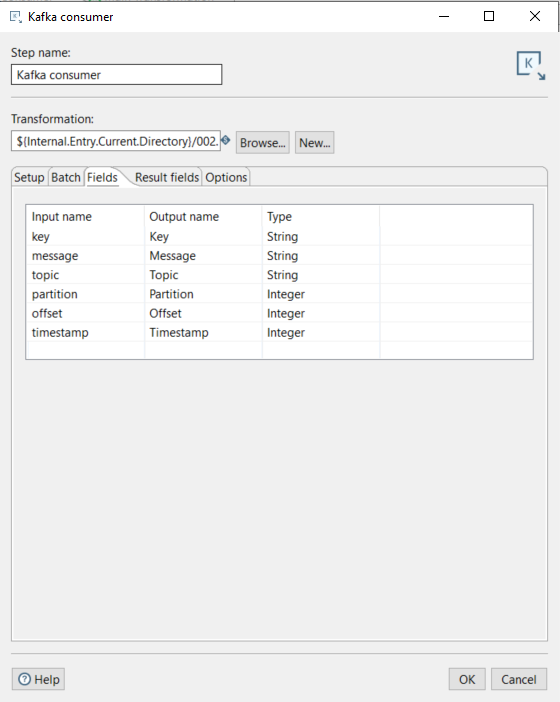
Figure 4: Kafka consumer Fields tab
The Result fields tab is used to stream records back to the parent transformation, if necessary.
Finally, in the Options tab, we can define the parameters that will be passed to the broker when connecting from the consumers. Some parameters are already included by default. A full list of parameters can be found here. In this use case, we won’t set any additional parameters, but some commonly used ones are:
- auto.offset.reset: This specifies behaviour when connecting to a topic for the first time.
- earliest: Reads from the earliest offset in the topic.
- latest: Reads from the latest offset in the topic.
- client.id: A unique identifier that is passed to the server when connecting and making requests. This helps to track the source of requests using a logical name instead of relying on IP addresses and ports.
Other frequently used parameters relate to connectivity and security protocols, like sasl.mechanism, security.protocol, and sasl.jaas.config.
These parameters fall outside the scope of this use case, as they relate to Kafka’s security configuration. We’ll be sending messages in plain text using a local Kafka consumer instance:
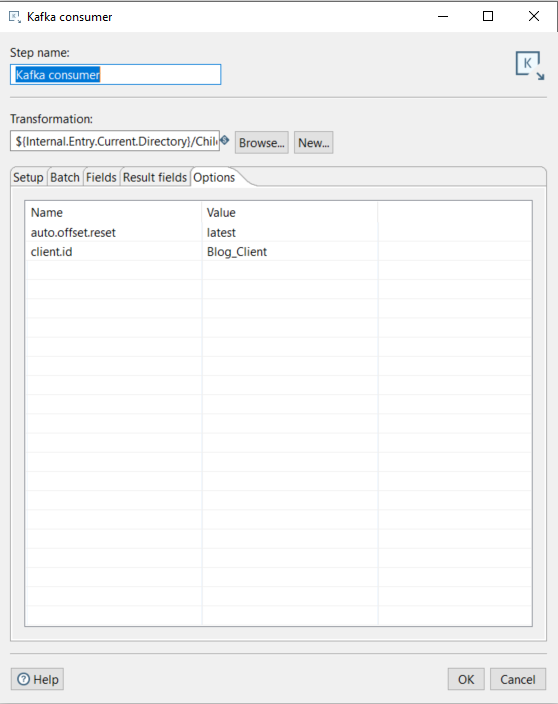
Figure 5: Kafka consumer Options tab
Now that our parent transformation is ready, let’s set up the sub-transformation.
We’ll start by creating another empty transformation, which will later be linked to the parent transformation via the Setup tab of the parent transformation.
The sub-transformation must start with the Get records from stream step; using any other starting step will cause the transformation to fail.
This step will retrieve all the messages from the parent transformation. In our case, we want to retrieve all the data inside the message: specifically, the same fields defined in the Fields tab of the parent transformation:
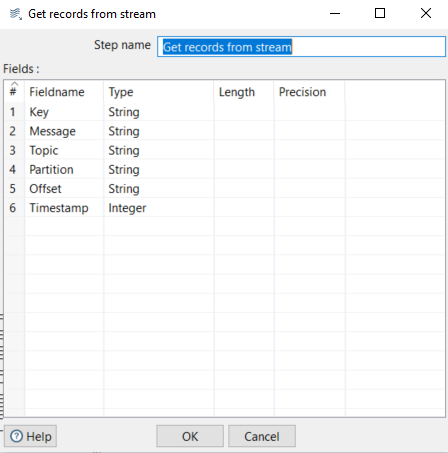
Figure 6: Get records from stream step
Now we can start transforming all the messages consumed from the topic, just like any other transformation, depending on the requirements and needs.
Let’s drag the following steps onto the canvas:
- JSON Input
- Replace in string
- Select values
- Modified JavaScript value
- Get system info
- Table output
With this setup, we’ll start by parsing the incoming message using JSON Input. The Replace in string step will be used to clean up percentage signs from specific fields. Next, we’ll convert these cleaned fields to integers using Select values.
The Modified JavaScript value step will handle converting the timestamp field from epoch format to a human-readable timestamp. We’ll also use Get system info to capture the system date, marking when each message was processed. Finally, the transformed data will be inserted into a database table using the Table output step:

Figure 7: Sub–transformation canvas
In the JSON Input step, we define the input source as the preceding step, Get records from stream, and specify Message as the input field. Next, we map the fields contained within the JSON structure:
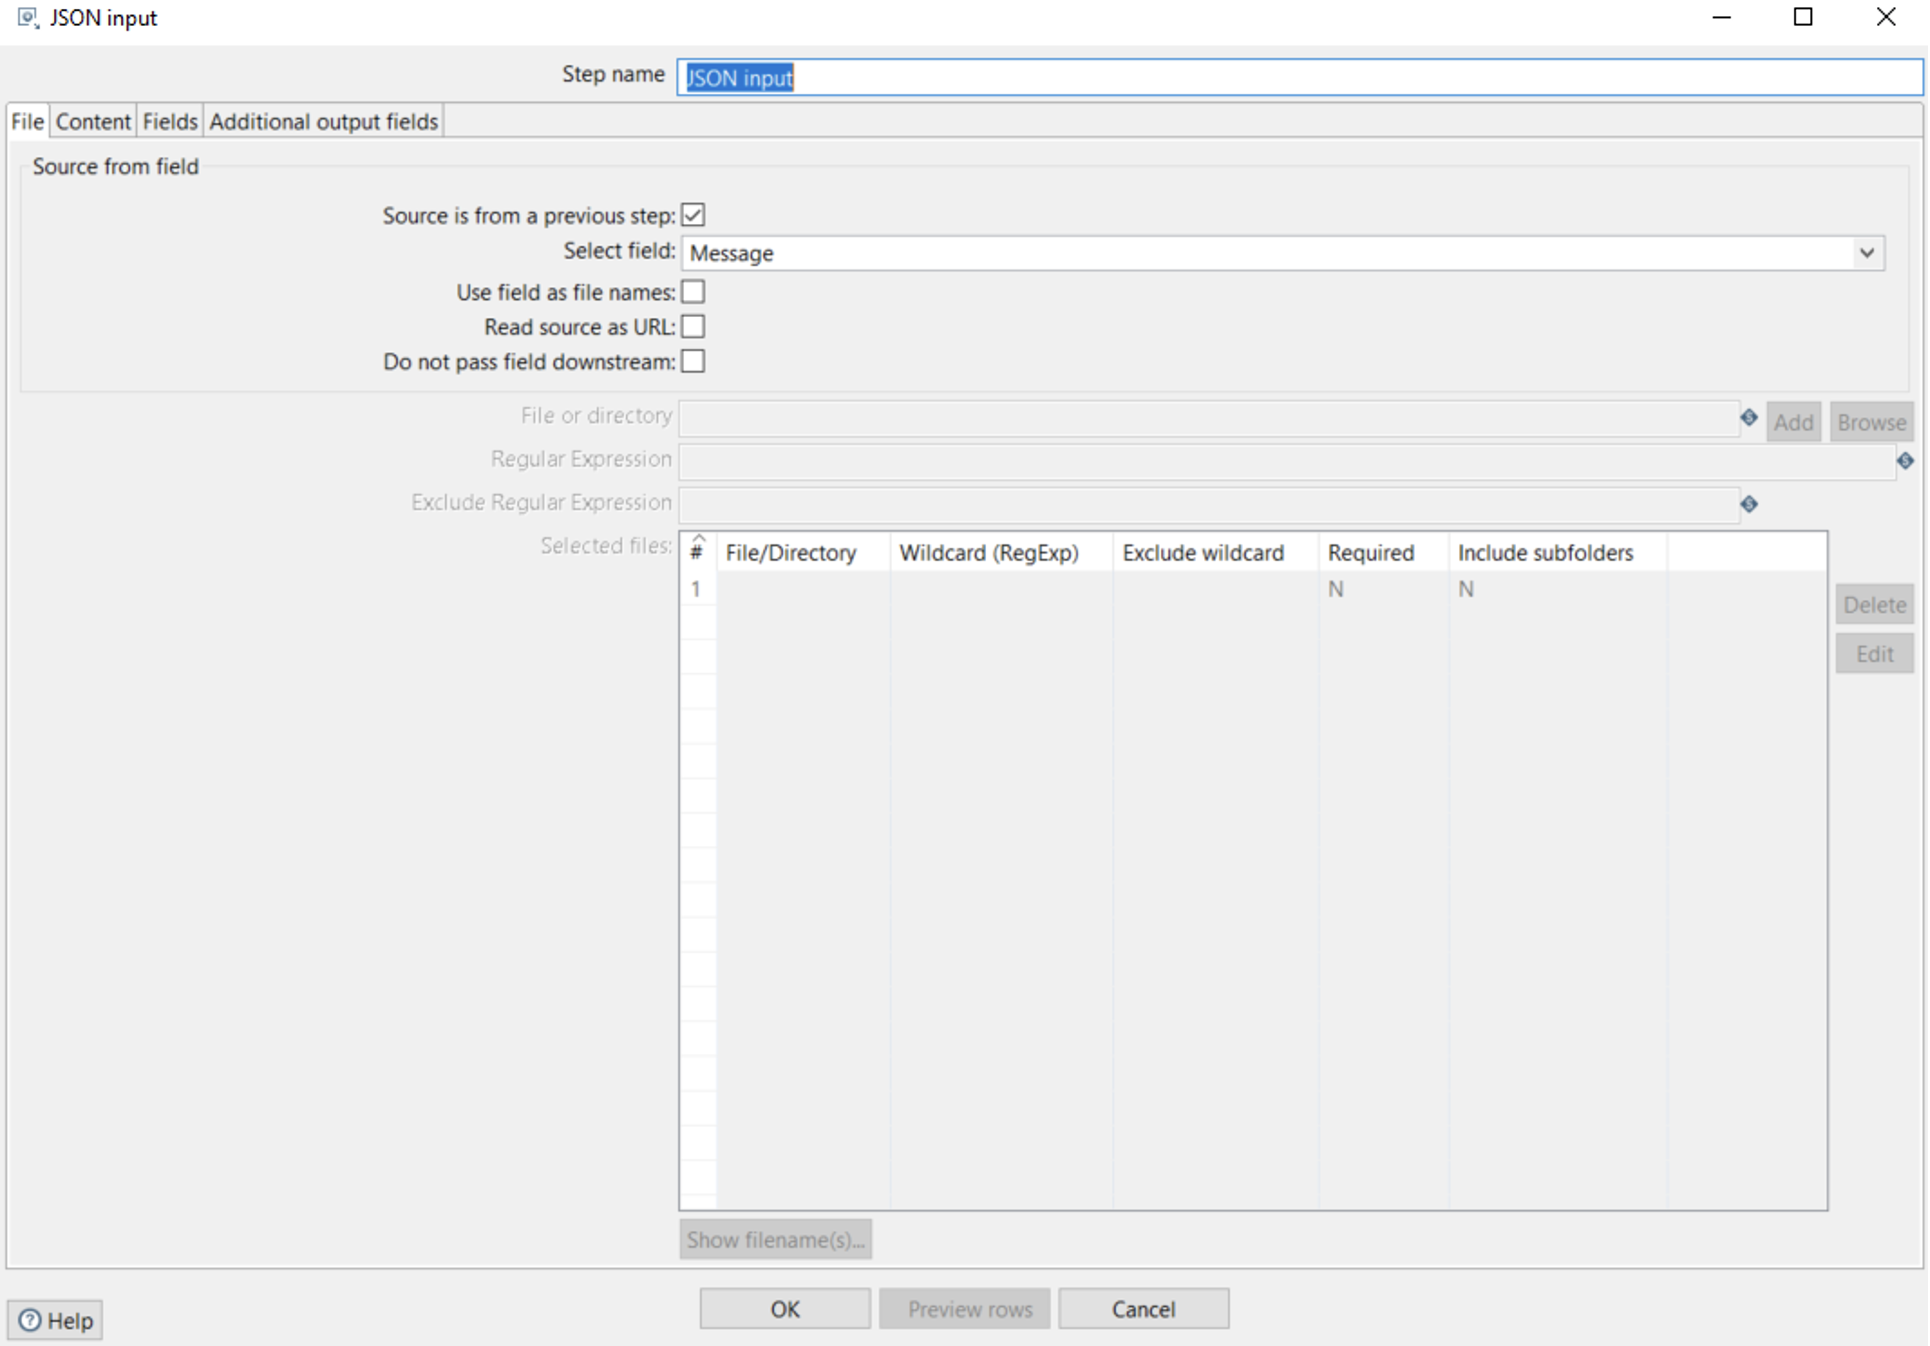
Figure 8: JSON input File tab

Figure 9: JSON input Fields tab
In the Replace in string step, we remove percentage signs from the fields yearly_change, urban_population, and world_share:

Field 10: Replace in string step
In the Select values step, we will change the metadata of the three cleaned fields to Integer.
Next, we will convert the epoch Timestamp field from the Kafka message into a readable timestamp using the Modified JavaScript value step:
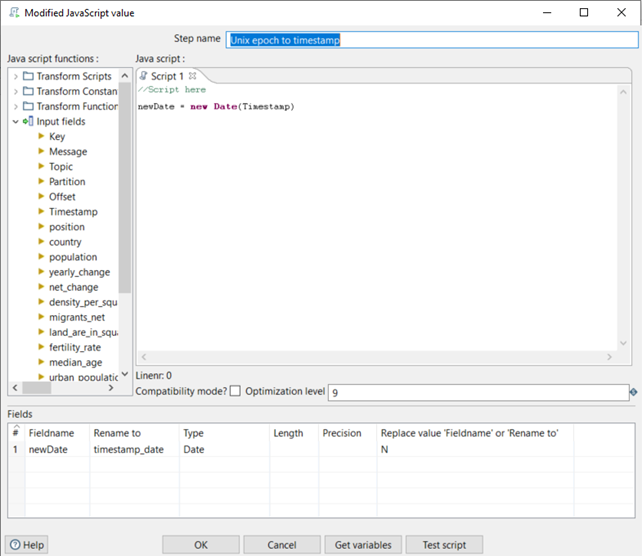
Figure 11: Modified JavaScript value step
To improve traceability, we’ll capture the timestamp of when the sub-transformation processes each message using the Get system info step:
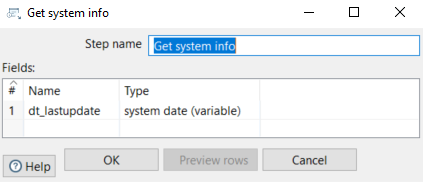
Figure 12: Get system info tab
Finally, we’re ready to save this data into the PostgreSQL database using the Table output step:
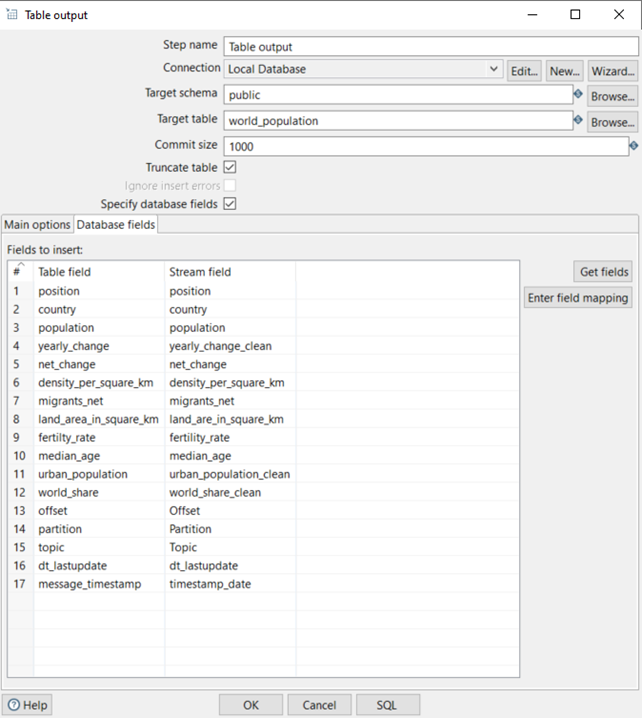
Figure 13: Table output tab
Now, when we run the parent transformation, it will start listening to the Kafka topic. We can verify this by observing the activity in the Kafka producer:
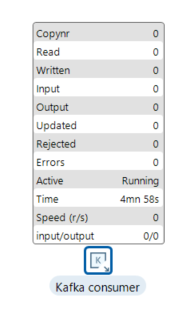
Figure 14: Parent transformation execution

Figure 15: Consumer groups listening to the topic
At this point, we produce the message, which is then consumed by the Kafka consumer step, passed to the sub-transformation, and finally loaded into the PostgreSQL table.
By checking the log, we can verify that the message was ingested by PDI at 15:22:41. Once the sub-transformation has finished, the parent transformation resumes listening. This is an important aspect of how the Kafka consumer works in PDI. Once triggered, the transformation continues listening continuously, 24/7, so it’s essential to design your flow with mechanisms to pause or stop it when necessary:
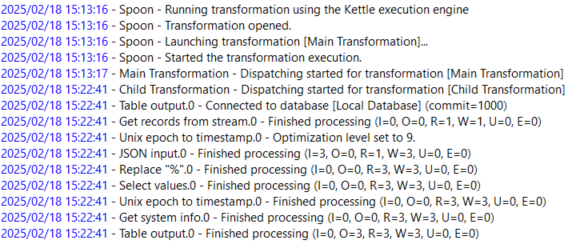
Figure 16: Parent transformation execution log
To conclude our use case, let’s verify that the data has indeed been loaded into the PostgreSQL table:

Figure 17: Postgres table
Conclusions
Apache Kafka’s integration with Pentaho offers a powerful approach to real-time data management, combining Kafka’s real-time streaming capabilities with PDI’s robust data transformation capabilities. This integration enables organisations to build modern, scalable ETL pipelines that respond quickly to changes in data, facilitating data-driven decision-making in real time.
In this use case, we demonstrated how a JSON message published to a Kafka topic can be efficiently consumed by PDI, processed, and loaded into a PostgreSQL table. This end-to-end pipeline ensures seamless data flow from streaming sources to structured storage, allowing businesses to maintain up-to-date analytics and reporting. By harnessing Kafka’s fault tolerance and Pentaho’s flexibility, organisations can implement resilient, future-proof data architectures tailored for dynamic operational environments.
Do you want to explore how real-time streaming can enhance your data landscape? Get in touch with the ClearPeaks team; our experts are here to help you to design and implement cutting-edge data solutions that really deliver results!