15 Abr 2026 Integrating Microsoft Entra ID (Formerly Azure AD) Authentication with Node.js APIs
When building web applications, it is common to delegate user authentication to a trusted identity provider such as Microsoft Entra ID (formerly Microsoft Azure Active Directory or Azure AD – we will be using this name in this blog post), whilst keeping authorisation logic in the backend API. This approach combines enterprise-grade identity and login security with tighter control over business-specific access rules.
In this article, we’ll break down how to design such a system using Azure AD for authentication and Node.js with Express for authorisation and resource protection. We’ll explore how Azure AD tokens work, how your API should validate them, and how to manage permissions securely.
Separation of Concerns: Who Does What?
Let’s start by clarifying the roles:
Azure AD (Authentication)
- Handles login, MFA, and user identity management.
- Issues access, ID, and refresh tokens after a successful sign-in.
- Confirms the user’s identity and ensures credentials are verified securely.
Your Node.js API (Authorisation)
- Validates incoming tokens from Azure AD.
- Determines what the authenticated user can do based on permissions, roles, or ownership.
- Enforces access to your resources, such as orders, reports, or configurations.
This pattern is known as federated authentication: you rely on Azure AD as the trusted identity provider (IdP), but maintain control over access to your resources.
The flow typically follows the OAuth 2.0 and OpenID Connect protocols:
- Your frontend application redirects users to the Azure AD sign-in page.
- Users authenticate with their organisational credentials. The username and password are entered on the Azure AD sign-in page, so they are not accessible to either the frontend or backend application.
- Azure AD redirects the user back to your application with an authorisation code.
- Your application exchanges this code for tokens.
- Your API validates these tokens and makes authorisation decisions.
Token-Based Authentication: The Foundation
Tokens are stateless, meaning the server doesn’t store session data, making them well-suited to scalable Node.js applications. The most common token format is JWT, a compact, URL-safe string that carries claims between parties.
A JWT consists of three parts:
- Header: The algorithm and token type (e.g., { «alg»: «HS256», «typ»: «JWT» }).
- Payload: Claims like the user ID, roles, and expiration time (e.g., { «sub»: «user123», «exp»: 1728000000 }).
- Signature: Verifies integrity using a secret key.
JWTs are signed, not encrypted, so sensitive data should never be included in the payload. Use them for authentication, not data transfer.
In Node.js, implementing JWT is straightforward with libraries such as jsonwebtoken and express-jwt.
Different Types of Azure Tokens
Azure uses several types of tokens, each with a distinct purpose and configuration. All of them use the JWT format.
Access Tokens
Access tokens are intended for API consumption. They contain the scopes (permissions) required for the API being called. For example, when calling a Node.js API, the access token is included in the Authorization header.
Client applications should not inspect access tokens for application logic; they should send them to the API for validation.
Their lifetime typically ranges from 60 to 90 minutes, depending on the configuration. For more information, consult the Microsoft documentation here.
ID Tokens
These tokens are intended for the client application. They contain information about the user, such as their name or email. The client application may read these tokens to display user information, but they should not be sent to third-party APIs. Refer to the official documentation for more details.
Refresh Tokens
Whilst access tokens are efficient, their short lifetime poses a UX challenge: users shouldn’t have to sign in repeatedly. Refresh tokens solve this by generating new access tokens without user re-authentication.
They can live for up to 90 days, although token rotation is recommended for security reasons.
How Refresh Tokens Work
- On sign-in, an access token (a short-lived JWT) and a refresh token (longer-lived, for example, seven days) are issued.
- The client stores both tokens securely (the access token in memory, the refresh token in an HttpOnly cookie or another secure storage).
- When the access token expires, the client sends the refresh token to get a new access token.
- For added security, rotate refresh tokens each time they are used.
More information can be found here.
Understanding Azure Token Claims
Azure AD tokens contain a number of claims. Here are the most important ones for API authorisation:
- oid (Object ID): A unique identifier for the user in Azure AD.
- sub (Subject): Another unique identifier, but specific to your application.
- preferred_username or upn: The user’s email or username.
- roles: The application roles assigned to the user in Azure AD.
- scp (Scopes): The permissions granted by this specific token.
- tid (Tenant ID): The Azure tenant to which the user belongs.
- aud (Audience): The intended recipient of the token, which should be your API.
Setting Up Microsoft Entra ID Application Registration
Before writing any code, you need to register your application in Azure AD. This creates a trust relationship between Azure and your application.
In the Azure Portal, navigate to Microsoft Entra ID > App registrations and create a new registration. You’ll need to configure:
- Redirect URIs: Where Azure should send users after authentication.
- API permissions: The Microsoft Graph or other API permissions required by your application.
- Expose an API: The scopes that your API offers.
- App roles: The roles used for role-based access control.
The key configuration for this scenario is Expose an API. Here, you define custom scopes like api://your-api-id/access, which clients must request to access your API.
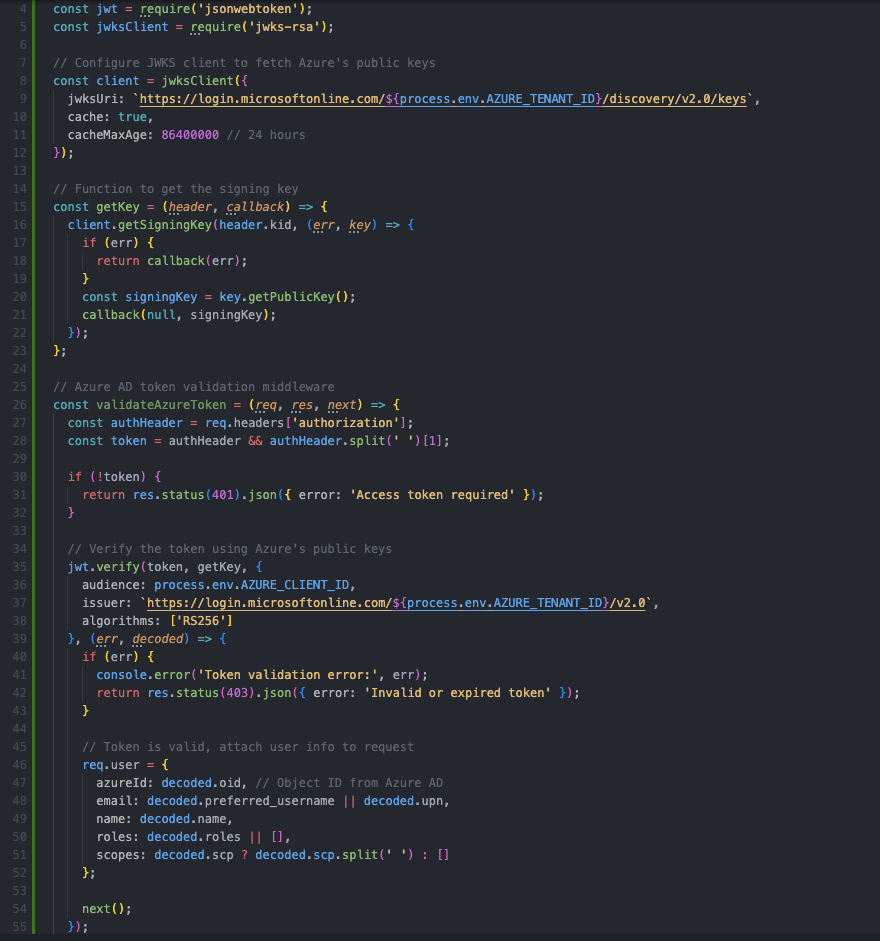
How to Validate Azure Access Tokens in Your Node.js API
The following example shows a practical implementation of Azure token validation in a Node.js API. First, we’ll build middleware to perform several critical tasks:
- Fetch Azure AD’s public keys to verify the token signature.
- Validate the token audience, ensuring that the token was issued for your API.
- Validate the issuer, ensuring that the token came from your Azure tenant.
- Extract user information and Azure roles into a consistent format.
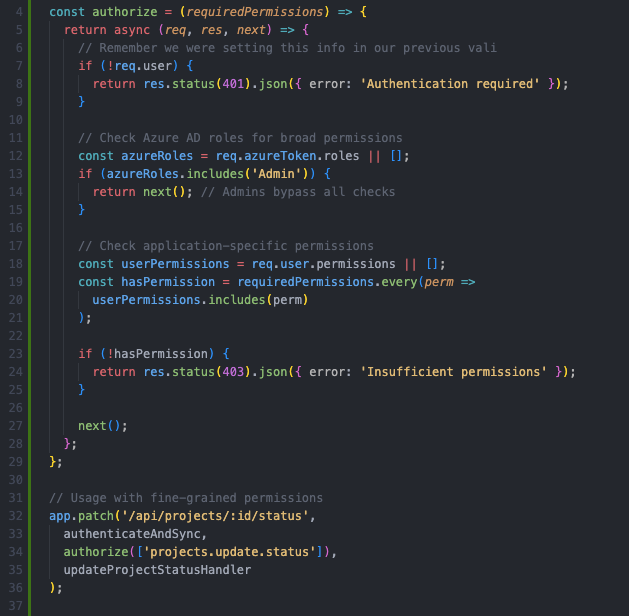
Managing Authorisation in a Node.js API
Now comes the critical part: while Azure handles authentication, your API still needs to manage authorisation, and this usually means mapping Azure AD users to your application’s authorisation model.
The following example shows how to check both roles and permissions (scopes) from the token, allowing you to work flexibly with either option:
Common Pitfalls in Token Management
Finally, it’s important to be aware of the most common mistakes developers make when working with JWT tokens:
- Poor secret storage: Hard-coding secrets in the codebase. Use environment variables or a secrets manager like AWS Secrets Manager.
- Insecure storage: Storing tokens in localStorage, which is vulnerable to XSS. Use HttpOnly, Secure cookies instead.
- No rotation: Reusing the same refresh token indefinitely increases exposure if compromised.
- Overly broad claims: Including sensitive data in JWT payloads, which are Base64-encoded and readable.
- Ignoring revocation: Having no way to invalidate tokens after logout or a security breach. Use blocklists or short expirations.
- Weak signatures: Using symmetric keys such as HS256 in distributed systems. Use asymmetric ones instead, such as RS256, to enable verification without sharing secrets.
In enterprise scenarios, these pitfalls can lead to security and compliance issues. For example, a token leak may expose user data or allow unauthorised access.
Conclusion
Integrating Entra ID (Azure AD) authentication with your Node.js API provides enterprise-grade security while maintaining flexibility in authorisation. By letting Azure handle complex authentication flows and user management, you can focus on building application-specific authorisation logic that meets your business needs.
Remember that Azure handles authentication by verifying identities, while your API controls authorisation by deciding what authenticated users can do. This separation of responsibilities creates a security architecture that is scalable and well suited to enterprise applications.
The patterns and code examples in this article provide a solid foundation, but they should be adapted to your specific requirements. Security reviews and keeping up with Azure AD’s evolving features and best practices are essential.
If you are designing or modernising authentication and authorisation for your data applications, ClearPeaks can help you define an approach that is secure, flexible, and aligned with your wider data and application architecture. Get in touch with our team today!