07 Ago 2025 SharePoint Ingestion Using Azure Data Factory
We work with a wide range of Azure services to help businesses build powerful, flexible, and easy-to-maintain data solutions, and one of the tools we most often use is Azure Data Factory (ADF), ideal for moving data between systems and automating complex workflows.
We’ve already covered a few ways ADF can be used in real-world scenarios: for example, we’ve written about different use cases for copying data in ADF, about how to customise metadata-driven copy tasks, and how to introduce CI/CD practices in ADF. If you’re new to ADF pipelines or want to explore more advanced use cases, take a look at this blog post, where we walk through building dynamic, automated pipelines. If you’re looking to go beyond pipelines, we also explored how to build a lakehouse architecture with Azure Synapse Analytics.
Today, we’ll run through another important implementation. Many companies use Microsoft SharePoint as a secure platform to store and manage documents, and especially for team collaboration. It’s typically used to hold business-critical files like reports, logs, and input data for analytics.
However, manually downloading and processing these files for reports or analysis can take time and lead to mistakes. What’s more, it doesn’t scale well with increasing data volumes or operational demands. In this article we’ll see how to use ADF to automate SharePoint file ingestion into your data lake, in a structured and reusable way, from setting up authentication to building the pipeline.
Use Case Overview
We recently worked with a customer who had numerous files in SharePoint, including data related to employee development, workforce planning, performance tracking, and overall data quality. This data is used daily for planning, reporting, and operations.
To avoid the time-consuming and error-prone manual ingestion process, we implemented an automated solution using ADF to securely pull these files from SharePoint and to move them into Azure, where they are stored in in an ADLS a landing zone (a secure, raw storage area in the data lake where incoming data is saved without any transformation, ready for further processing).
Automating this process both removes the need for manual work and helps to reduce errors. It also ensures that the data from SharePoint is available on time for everyone who needs it. The solution is easy to scale as more files or teams are added, and it’s designed to be reusable and production-ready. Whether the data is used in reports, dashboards, or analytics, this setup keeps everything up to date and well-connected within the overall data platform.
The entire workflow is orchestrated through ADF pipelines:

Fig 1: SharePoint File Ingestion with ADF
To make this automated setup work, ADF needs secure access to SharePoint.
This is done by calling Microsoft Graph API, a RESTful web API that enables you to access Microsoft Cloud service resources like SharePoint files, OneDrive documents, Outlook emails, Microsoft Teams chats, and Azure Active Directory user information.
Enabling ADF Access to SharePoint
Before beginning the actual implementation in ADF, we need to register an application in Azure Active Directory (now called Entra ID), as Microsoft Graph enforces secure access using OAuth 2.0, an industry-standard protocol for authorisation. Without this registration, Microsoft Graph will not permit authentication or grant access to SharePoint resources.
Following best practices, we use a service principal (i.e., an app-based identity) rather than personal credentials. The authentication of app registration can be configured by following the steps below.
Permissions Granted to the App
We configure the app with app-only access permissions, allowing it to authenticate without user interaction and operate strictly within the privileges explicitly granted. For more information about authentication, please refer to this link.
The key permissions used are:
- Files.Read.All – to read files across all SharePoint sites.
- Sites.Read.All – to access SharePoint sites, as the files can be stored in different sites.
These permissions enable the app to retrieve both file content and metadata across SharePoint, which is essential for locating and ingesting the necessary files.
With access now configured, we’re ready to begin making API calls and pulling files into our data pipeline.
Implementation in Azure Data Factory
Let’s now dive into the actual implementation of the SharePoint ingestion pipeline using the Microsoft Graph API. In the image below, we have our simplified Data Factory pipeline to ingest SharePoint files.

Fig 1: ADF Pipeline to copy SharePoint file
The first step to implement the ingestion of SharePoint files into ADF using the Graph API is to generate an access token (a temporary key) that must be included in every Microsoft Graph request to prove that our app has the right permissions to access the data.
After authentication, we need to identify the SharePoint site that holds the file. To do so, we retrieve a Site ID (a unique identifier) for each SharePoint site. This Site ID is required in the Graph API endpoint to locate the correct site.
Once we have the Site ID, we can construct the file URL using Microsoft Graph. This URL is used to target the specific file or folder we want to access. The full path includes the Site ID and the relative path to the file within that site.
Let’s break this process down into steps and walk through each one in detail.
Get Tenant ID, Client ID, and Client Secret Required for Access Token
The first step in our pipeline is to retrieve the Tenant ID, Client ID, and Client Secret, which are values generated during the app registration process and saved in Azure Key Vault. We use a Web Activity to perform an API call to retrieve each secret value from the Key Vault (see Figure 1).
The URL for this Key Vault should be the Key Vault URI concatenated with ‘secrets/<secret_name>?api-version=7.0’. For example: https://my-keyvault.vault.azure.net/secrets/my-client-secret?api-version=7.0
Log In to Generate Access Token
With these values, we perform an API call to generate the access token required for every Microsoft Graph request, to prove that our app has the right permissions to access the data. For this, we use a Web Activity in ADF that sends a POST request to the following endpoint:
https://login.microsoftonline.com/{tenant-id}/oauth2/v2.0/token
Request Configuration in Web Activity:
- Method: POST.
- Headers:
Content-Type: application/x-www-form-urlencoded - Body:
@concat(
    'grant_type=client_credentials&client_id=',
    activity('GetClientID').output.value,
    '@',
    activity('GetTenantId').output.value,
    '&client_secret=',
    activity('GetClientSecret').output.value,
    '&scope=https://graph.microsoft.com/.default'
)
No authentication method is selected within the web activity: everything is passed directly in the body. The response includes the access_token, which we extract using an expression like @activity(‘GetToken’).output.access_token. This token is then used in Microsoft Graph API calls.
Dynamically Get the Site ID
Rather than hardcoding the Site ID, we use another Microsoft Graph API request using ADF Web Activity, to retrieve it dynamically. This approach makes the pipeline more flexible and easier to adapt if the SharePoint site ever changes.
Request Configuration in Web Activity:
- Method: GET
- Headers:
Authorization : @concat(‘Bearer ‘, activity(‘GetToken’).output.access_token) - Possible URLs:
- https://graph.microsoft.com/v1.0/sites/{domain}.sharepoint.com:/sites/{site-name} – To handle specific sites.
- https://graph.microsoft.com/v1.0/sites/{domain}.sharepoint.com:/teams/{site-name} – To handle Microsoft Teams sites.
- https://graph.microsoft.com/v1.0/sites/{domain}.sharepoint.com/ – To handle the default Shared Documents site.
This returns the unique siteId, which is needed in the next step.
Copy SharePoint Files
With both the accessToken and siteId in place, we use a Copy Data activity in ADF to download the file from SharePoint. The Source is a HTTP Linked Service and the destination an ADLS.
Source Configuration
The HTTP Linked Service requires an Anonymous Authentication type and parametrised base URL in order to pass the values dynamically from our pipeline.

Fig 3: HTTP Linked Service Configuration
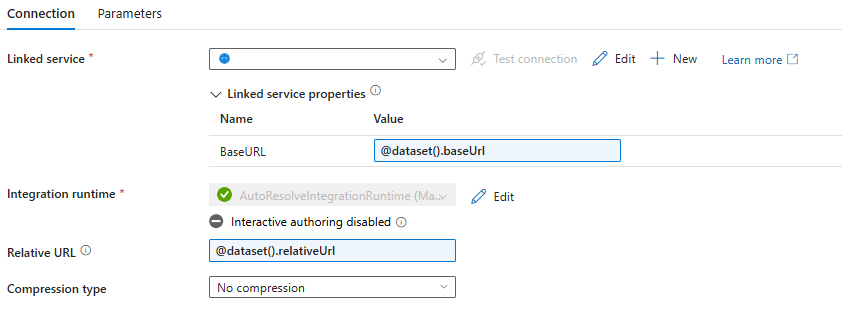
Fig 4: Source Dataset Configuration
The Source section in Copy Data contains the following details:
- baseUrl: @concat(‘https://graph.microsoft.com/v1.0/sites/’, activity(‘GetSiteId’).output.id, ‘/drive/root:/’)
- relativeUrl:
@concat(
    split(
        split(
             , '/Shared%20Documents/'
        )[1]
    , '?')[0]
, ':/content')
- Additional headers: @{concat(‘Authorization: Bearer ‘,activity(‘GetToken’).output.access_token)}
- Request method: GET
The baseUrl and relativeURL combine to form the full URL, which should look like the following ‘https://graph.microsoft.com/v1.0/sites/<site_id>/drive/root:/<path-to-file>:/content’. The path-to-file is obtained from SharePoint, by going to the Details section of a file as shown in the screenshot below.

Fig 5: Sample SharePoint File
From the path in this screenshot, we only need the part on the right of the Shared Documents.
Sink Configuration
For the Sink section, we create an Azure Data Lake Storage Linked Service and a generic Binary type dataset. It is key for the dataset to be Binary, to support the ingestion of any file type. This is because we want to store the files downloaded by the API as-is.
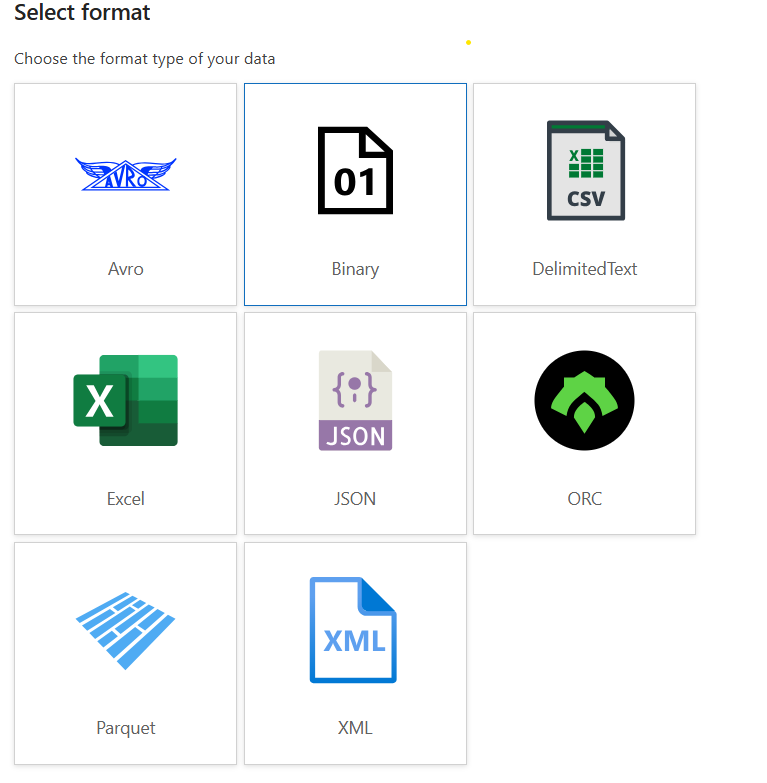
Fig 6: Sink Format Type
In our case, the path is dynamically provided by our pipeline, making it easier to handle and only requiring one single dataset, as in the Source.
Conclusion
Instead of manually downloading files from SharePoint every time, we automated the entire process using Azure Data Factory and Microsoft Graph API. This not only saved our customer significant time but also reduced manual errors and ensured that data was readily available for reporting and analysis. As a result, they were able to shorten report turnaround times and make faster informed decisions.
We hope this blog post has helped you to understand how to simplify the process of ingesting files from SharePoint into Azure using Data Factory. This approach removes the need for manual steps and guarantees that teams always have access to the most up-to-date information for reporting and analysis.
If you’re planning to set up a similar flow between SharePoint and Azure Data Lake, or need help improving your data ingestion process, we’d be glad to help. Simply drop us a line today!