04 Mar 2026 Exploring Snowpark Connect for Apache Spark
Snowpark Connect for Spark is an official library that enables the running of Spark-based applications and workloads directly on Snowflake, without moving data outside the platform or managing dedicated Spark clusters. With Snowpark Connect for Spark, developers can interact with Snowflake databases using familiar Spark APIs. You can execute SQL queries, read and write data, as well as perform complex transformations directly in Snowflake, combining the scalability of its compute engine with the flexibility of Spark’s programming model.
To avoid confusion, it’s important to note that Snowflake provides two different tools with similar names but different functions and purposes:
| Snowflake Connector for Spark | Snowpark Connect for Spark (Snowpark Submit) | |
| What it is | A connector that enables Apache Spark to read data from, and write data to, Snowflake. | An API and execution environment that allows Spark-like code (DataFrame API) to be executed on the Snowflake infrastructure. |
| How it works | Spark continues to run on your own infrastructure (e.g., Databricks or EMR), and the connector transfers data between Spark and Snowflake using JDBC and optimised APIs. | Snowpark Submit enables you to run Spark workloads, not just native Snowpark code, directly on Snowflake, non-interactively and asynchronously, without having to manage external clusters. |
| Typical use cases | Read/write Snowflake data from Spark environments. | Migrate existing apps or workloads to Snowflake; develop new Spark solutions on Snowflake. |
| Limitations | Spark execution does not occur on Snowflake; only the data is moved. | Not all Spark features and behaviours are supported on Snowflake; some may need adaptation. |
| Advantages | Minimal changes to existing jobs and infrastructure (mainly connecting the environments). | Compute happens on Snowflake, reducing the need to run and maintain external Spark clusters for those workloads. |
In this article, we’ll focus on Snowpark Connect for Spark and Snowpark Submit, which enable the execution of Python Spark code using Snowflake’s compute layer, and its elastic, fully managed infrastructure.
How It Works
With the release of Apache Spark 3.4, the Spark community introduced Spark Connect, an architectural evolution (decoupled client–server architecture) designed to separate client code execution from the underlying Spark cluster. Building on this foundation, Snowflake now offers Snowpark Connect for Spark (general availability), which allows users to execute Spark code directly on a Snowflake virtual warehouse. This innovation removes the need to provision or manage Spark clusters whilst still using familiar Spark APIs.
With Snowpark Connect for Spark, developers can run existing Spark DataFrame, Spark SQL, and user-defined function (UDF) workloads using Snowflake’s elastic compute runtime. Organisations benefit from both Spark’s developer-friendly syntax and Snowflake’s intelligent infrastructure, without needing to manage dedicated Spark clusters or complex manual tuning tasks.
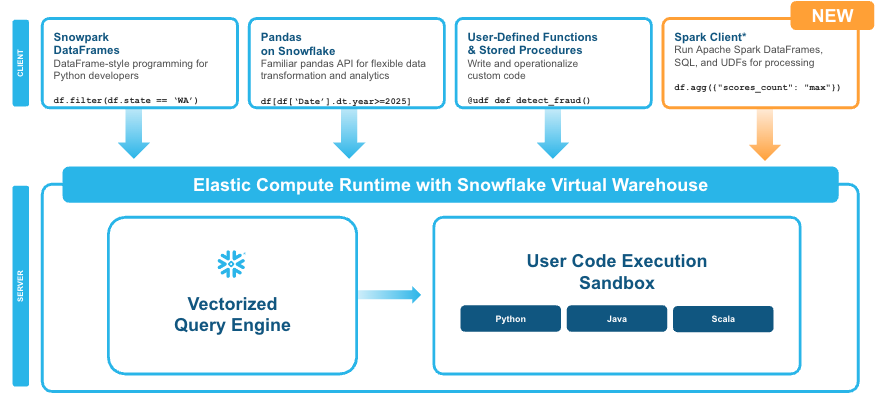
Figure 1: Snowpark Connect for Spark enable Spark code to run on Snowflake without having to migrate to Snowpark DataFrames (Source: Snowflake)
Snowpark Connect for Spark is essentially a bridge that allows Spark code to interact with Snowflake; internally, it operates as a translation and distributed execution layer. The following table explains, step by step, how the Snowflake Connector for Spark works:
| Spark client vs. Snowflake | With Snowpark Connect for Spark, Spark code (DataFrames, SQL queries, or UDFs) acts as the client, whilst Snowflake acts as the engine that processes the data. |
| Operation translation | When you write Spark operations (e.g., df.filter or df.groupBy), the connector translates these transformations into optimised SQL statements that Snowflake can execute. The Spark logical plan is converted into a plan that Snowflake’s engine can run. |
| Execution in Snowflake | Snowflake receives the execution plan and runs it in a virtual warehouse. You don’t need to manage memory, worker nodes, or cluster tuning: Snowflake automatically handles optimisation, parallelisation, and scaling. |
| Data and result transfer | Operation results are returned to the Spark client, which can continue applying transformations or export the data. Internally, the connector uses the Snowflake JDBC driver and batching techniques to minimise data transfer and maintain high performance. |
| Transparency and compatibility | For developers, most Spark operations work exactly as they would on a standard Spark cluster. The connector handles the translation, submission, and retrieval of operations, effectively allowing Spark to run on top of Snowflake with minimal code changes. |
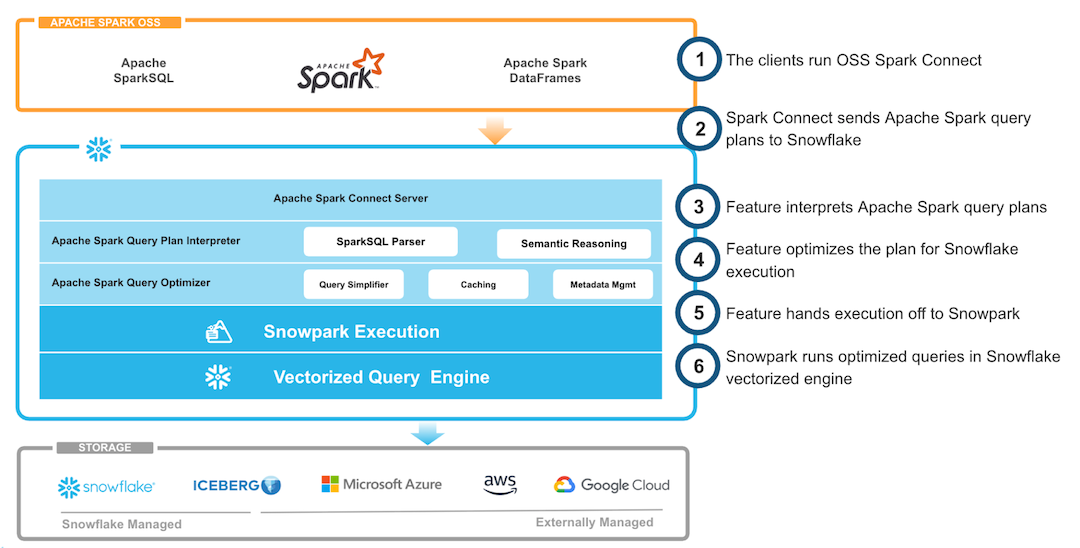
Figure 2: Architectural view (Source: Snowflake)
What Does Snowpark Connect for Spark Do?
Snowpark Connect for Spark enables integration between a Spark runtime and the Snowflake platform. It is designed to:
- Establish a secure connection between Spark and Snowflake.
- Execute SQL and DataFrame operations programmatically on Snowflake.
- Push down transformations, aggregations, and validations into Snowflake, minimising data movement.
- Support data engineering, machine learning, and data quality validation workflows that run on Snowflake.
- Facilitate migrations of applications, pipelines, and workloads from Spark environments to the Snowflake platform with minimal changes.
In essence, it allows developers to integrate Snowflake into existing Spark or Databricks pipelines using familiar Spark APIs, reading from and writing to Snowflake efficiently, with pushdown optimisation where supported.
With the release of Snowpark Connect for Spark, users can benefit from Snowpark’s execution model without needing to rewrite their Spark code or adopt new APIs. Your existing code can now run natively within Snowflake’s compute engine with minimal changes.
In the following sections of this article, we’ll present some practical examples of this integration in action: more specifically, we’ll show how to deploy and run our Data Quality Accelerator on Snowflake. This accelerator is a data quality toolkit developed by our team, based on Python, Spark, and Great Expectations. It was first implemented on Databricks and Cloudera, then adapted to RDBMS (watch out for our upcoming blog post on this). Now, using Snowpark Connect for Spark and a few minor code changes, we were able to move the application to Snowflake.
How To Use It
There are two main ways to execute Spark-based code on Snowflake using Snowpark Connect for Spark:
- Directly from a Snowflake Notebook.
- Using Snowpark Submit from an external environment.
Both approaches are part of the Snowpark Connect for Spark model, but differ in how they integrate with the Snowflake runtime, manage dependencies, and fit into larger or more complex workflows.
Snowflake Notebooks
With Snowflake Notebooks, you can build and test Spark workloads in a managed Snowflake environment: just create a notebook, configure the connection, and start a Spark session to run PySpark code to load, transform, and analyse your data.
Prerequisites:
In the notebook, under Packages, ensure that the following are available:
- Python, version 3.10 or later
- snowpark-connect (latest version)
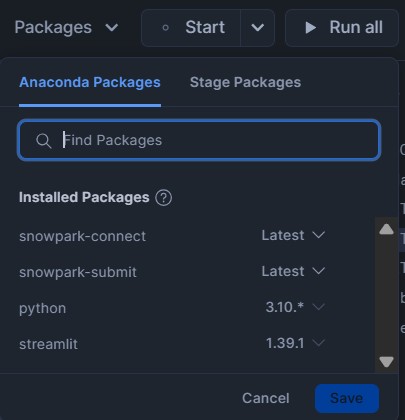
Figure 3: Snowflake Packages screenshot
There are two ways to create the Snowpark connection. The first is using the server auto-initialisation syntax (the simplest and most straightforward):
from snowflake import snowpark_connect

#Enable automatic Spark connect and start the session
spark = snowpark_connect.server.init_spark_session()

# Read the table from the catalog
df_tab = spark.table("BOOKS.DATA.BOOKS_DATASET")

# Apply transformations without use SQL
df_result = (
    df_tab
    .filter(df_tab["subtitle"].isNull())   # WHERE subtitle is NULL
    .select("ISBN13", "ISBN10", "TITLE", "SUBTITLE")
)

# Show the results
df_result.show(10)
spark.stop()
The other option (code below) is to use the manual initialisation method to configure the Spark environment and session, allowing us to define certain parameters, like the ApplicationName, SPARK_CONNECT_MODE_ENABLED, or SPARK_REMOTE variables (sample values are sc://localhost:15002 or sc://my-spark-cluster:15002):
import os
from snowflake import snowpark_connect
from pyspark.sql.functions import col
from pyspark.sql import SparkSession
from pyspark.sql import Row

#Enable manual Spark connect and start the session
os.environ["SPARK_CONNECT_MODE_ENABLED"]="1"
os.environ["SPARK_REMOTE"] = "sc://LOCALHOST:15002"
#start the local Snowflake Spark Connect Session
snowpark_connect.start_session()
spark = SparkSession.builder.appName("SnowparkConnect").getOrCreate()

#Create a dummy row
dummy_data = [Row (ISBN13 =9999, ISBN10 ="USER", TITLE ="TITLE", SUBTITLE ="SUBTITLE",
                AUTHORS ="Jim X", PUBLISHED_YEAR=2000, AVERAGE_RATING=7, PAGES=178)]
df_dummy = spark.createDataFrame(dummy_data)

# Insert the row into the Snowflake table (append mode)
(
    df_dummy.write
    .format("snowflake")
    .option("dbtable", "BOOKS.DATA.BOOKS_DATASET")
    .mode("append")
    .save()
)
spark.stop()
Snowpark Submit
With Snowpark Submit, you can run non-interactive, asynchronous Spark workloads directly on Snowflake’s infrastructure, without managing the clusters yourself. It lets you deploy production-ready Spark applications through a simple command-line interface and integrate them with your existing orchestration tools.
In the following sections, we’ll explain how to configure the environment and package the solution for execution with Snowpark Submit, how to execute and monitor jobs, and what limitations apply when compared to standard Spark.
Prepare the Environment and Application Package
The DQAccelerator application we want to run in Snowflake is a modular application developed in PySpark, with the following structure:
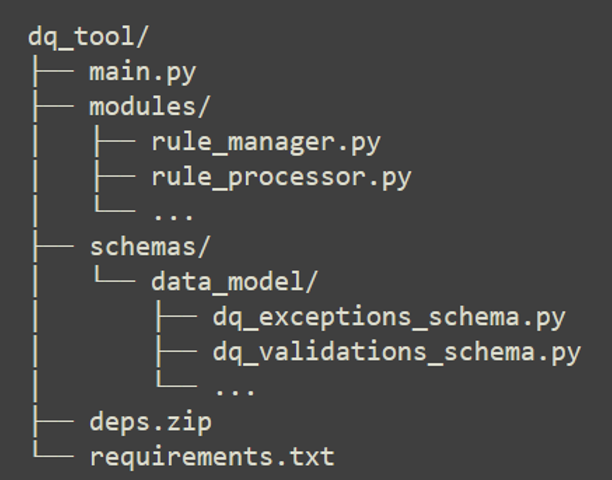
Figure 4: DQ Accelerator file structure
This means that we will not run a single standalone Python script. To run the full application, we must first prepare the local environment and then create the package that will be sent to Snowflake.
Step 1: Create the installation environment
When we run snowpark-submit, Snowflake does not automatically install the libraries needed by the application (as a pip install would in a container build, for example). Our application and all its dependencies must be prepared in the local environment and sent as a ZIP package.
It is important to note that Snowflake runs Spark workloads on a Linux environment. Therefore, if we use Windows locally, it’s highly recommended to use WSL2 (for example, Ubuntu on WSL2) when creating the application package; this helps to avoid compatibility issues, especially during dependency installation.
Within the WSL2 terminal:
- Install pyenv and components to manage the Python versions:
curl https://pyenv.run | bash
- Then add pyenv to the shell:
- Open the configuration file in WSL:
nano ~/.bashrc
- Scroll to the end of the file and paste this:
export PYENV_ROOT="$HOME/.pyenv"
[[ -d $PYENV_ROOT/bin ]] && export PATH="$PYENV_ROOT/bin:$PATH"
eval "$(pyenv init - bash)"
- Then reload the file so that the changes take effect:
source ~/.bashrc
- Install Python 3.10 with pyenv:
pyenv install 3.10
sudo apt-get update
sudo apt-get install -y tk-dev liblzma-dev libffi-dev zlib1g-dev libbz2-dev \ libreadline-dev libsqlite3-dev libssl-dev build-essential
pyenv local 3.10
- Create and activate the virtualenv:
pyenv virtualenv 3.10.19 snowpark310
pyenv activate snowpark310
Step 2: Install dependencies and create the app package
- Update txt with the libraries needed for Snowflake:
# Data core
numpy==1.26.4
pandas==2.1.0
pyarrow==15.0.2

# Data validation and quality
great_expectations==1.3.3
pydantic==2.6.4
pydantic_core==2.16.3

# Visualisation
altair==4.2.1

# Snowflake + Snowpark
snowflake-connector-python==3.10.0
snowflake-snowpark-python==1.15.0

# Others
pyyaml==6.0.1
jinja2==3.1.6
- Install all the dependencies and compress them into a ZIP file in Linux (WSL):
#Create folder and install in target:
cd ~/dq_tool-main
rm -rf deps
rm -rf deps.zip
mkdir deps
pip install --upgrade pip setuptools wheel
pip install --upgrade pip
pip install -r requirements.txt -t deps

#Create deps.zip (compress the contents of deps, not the deps folder)
cd deps
zip -r ../deps.zip .
cd ..
Module Packaging
As mentioned above, our application is modular and consists of a logical file structure. To run it in Snowflake, the modules/ and schemas/ folders must be uploaded to the container.
By default, snowpark-submit loads the Python modules provided in the packaged ZIP file, so we must also include the schemas folder (we’ll compress the contents of the modules/ and schemas/ folders into the same ZIP file). There must be an __init__.py file in each subfolder so that Python recognises the directories as packages:
From the project root directory (dq_tool/):

rm modules.zip
zip -r modules.zip modules schemas
Execute and Monitor the Job
After creating the application package in the WSL console, and because our local host for running snowpark-submit is Windows, we must copy all the generated files into the Windows environment before submission:
# From WSL:
cp -r ~/dq_tool-main /mnt/c/snowflake_cli_config/Spark_Test/dq_tool_exec

#This will put the files in the following Windows path:
C:\snowflake_cli_config\Spark_Test\dq_tool_exec\
At this point, in the Windows environment, we’ll see both the original folder (the cloned repository in dq_tool-main) and the new package prepared in WSL2 (in dq_tool_exec), ready to be executed with snowpark-submit.
To execute the DQAccelerator App on Snowflake:
First, we’ll create a virtual environment with Python 3.9 (we use Python 3.9 here because it’s the version used to develop the solution, even though the Snowflake Spark runtime uses Python 3.10), then install the snowpark-submit tool:
#Create virtual environment:
python -m venv snowpark39

#Activate:
.\snowpark39\Scripts\Activate.ps1

#Install necessary packages (optional, e.g. Snowpark):
pip install --upgrade pip
pip install ‘snowflake-snowpark-python[full]’
After that, go to the packaged project folder from WSL2 and run snowpark-submit:
cd C:\snowflake_cli_config\Spark_Test\dq_tool_exec

snowpark-submit --account ABC12345-XXX.snowflakecomputing.com --host ABC12345.snowflakecomputing.com --user JHONDOE --password 123@ABC!123 --role DQACC_APP --warehouse COMPUTE_WH --compute-pool COMPUTE_POOL --database DQACC --schema DQOPS --py-files modules.zip,deps.zip --verbose main.py
We can use a connection.toml file instead of passing all the parameters in the command line:
[snowpark-submit]
host = ".snowflakecomputing.com"
port = 443
account = ""
user = "test_user"
role = "test_role"
password = ""
protocol = "https"
warehouse = "test_warehouse"
database = "test_db"
schema = "test_schema"
compute_pool = "test_compute_pool"
After running the job, we can monitor the output by executing the following command (the highlighted parameter is returned by the submit command):
snowpark-submit --account ABC12345-XXX.snowflakecomputing.com --host ABC12345.snowflakecomputing.com --user JHONDOE --password 123@ABC!123 --role DQACC_APP --warehouse COMPUTE_WH --compute-pool COMPUTE_POOL --database DQACC --schema DQOPS --workload-status --snowflake-workload-name SNOWPARK_SUBMIT_JOB_SERVICE_BSJHZLQV1761129688138475800 --display-logs
The monitor output will look like this:
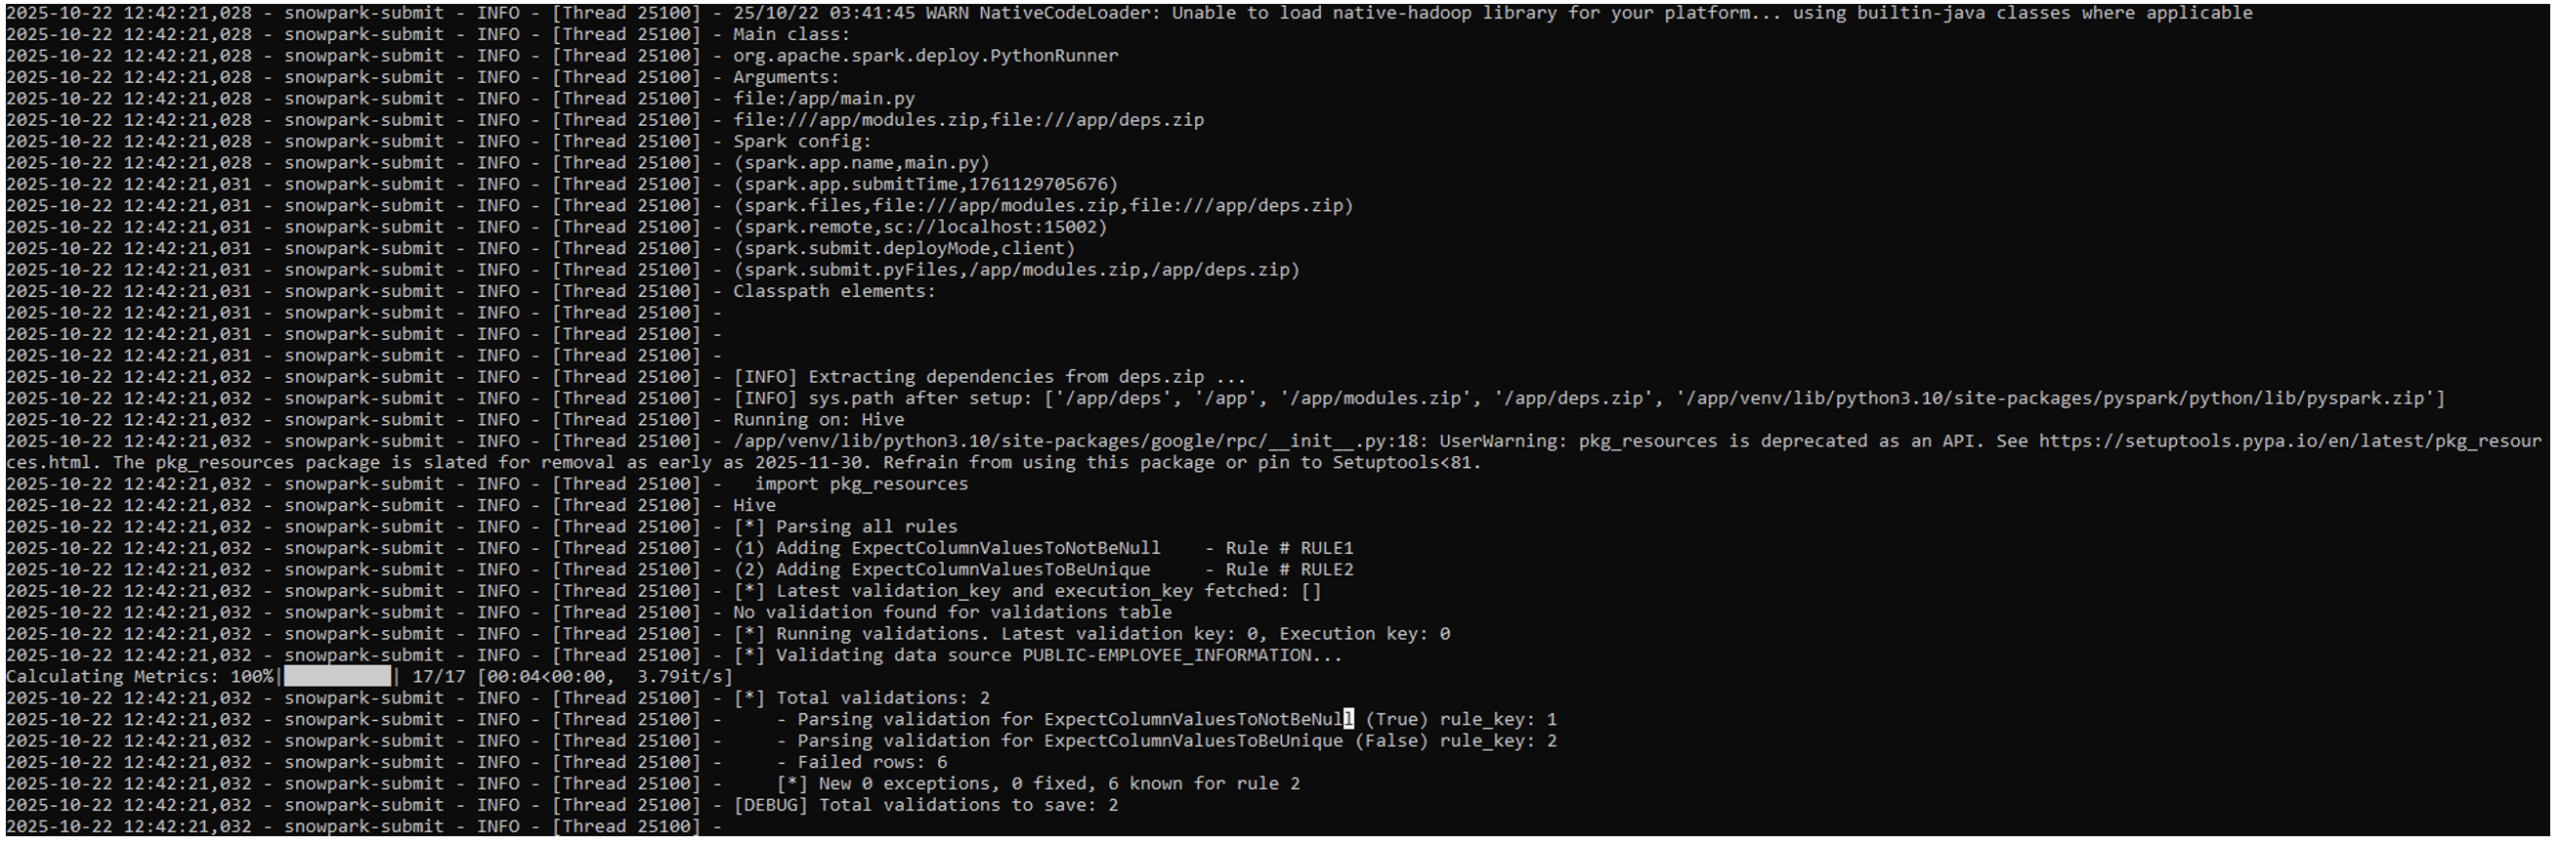
Figure 5: Snowpark Submit execution log
Once our Spark application has run on Snowflake, we can review the results of the defined data quality rules in the DQ_VALIDATIONS table, together with the detected issues in the DQ_EXCEPTIONS table, both stored in the Snowflake application data model:
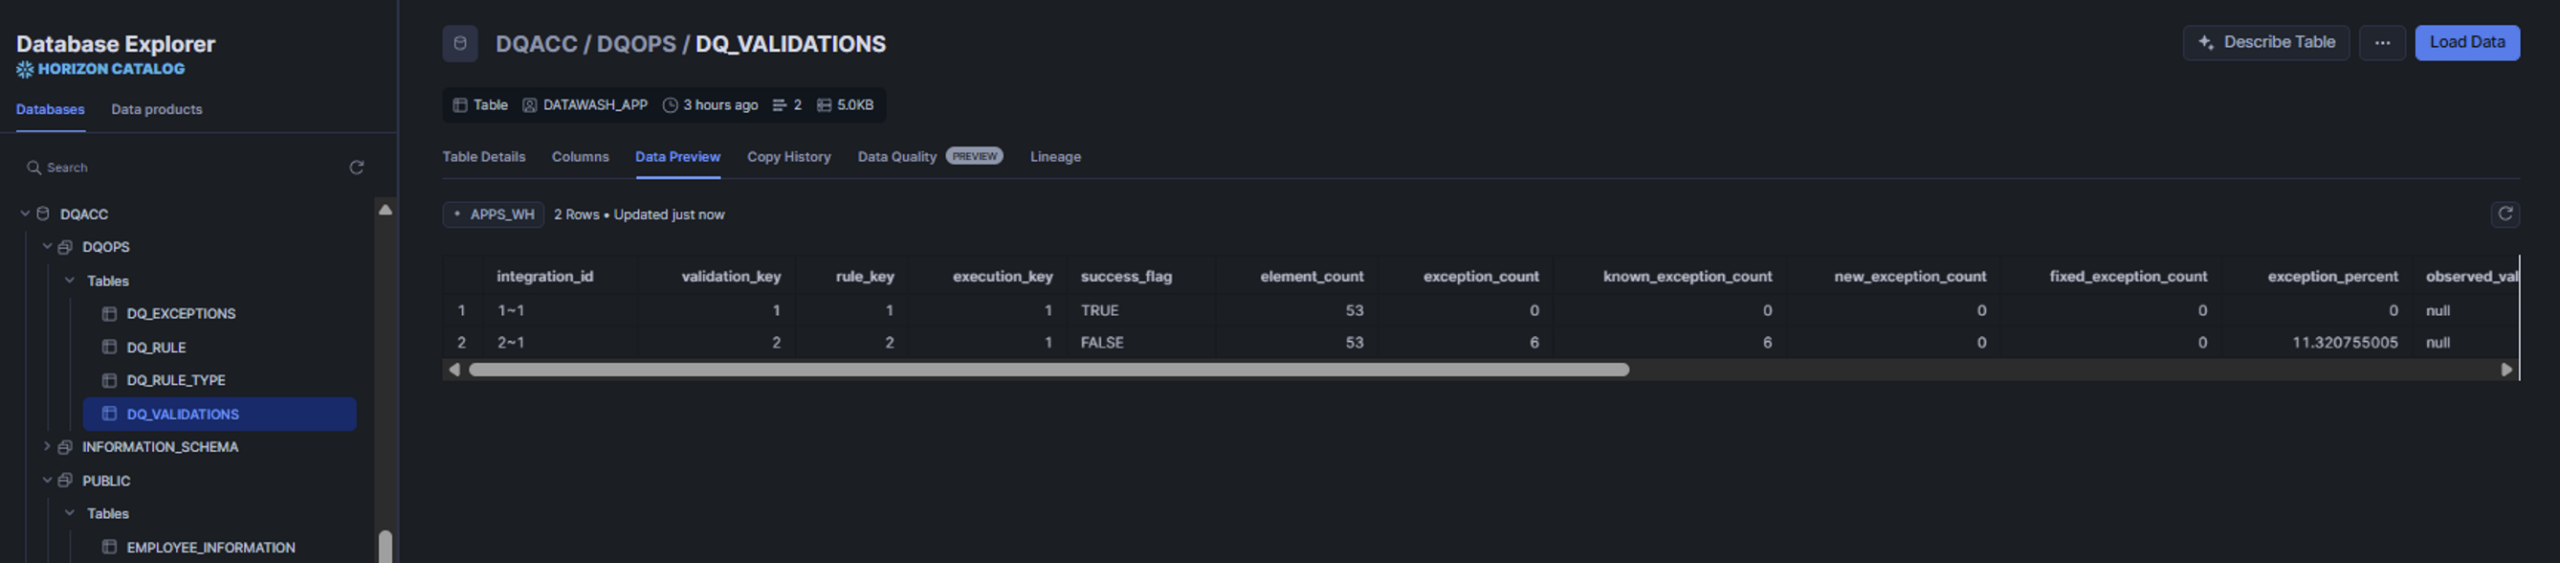
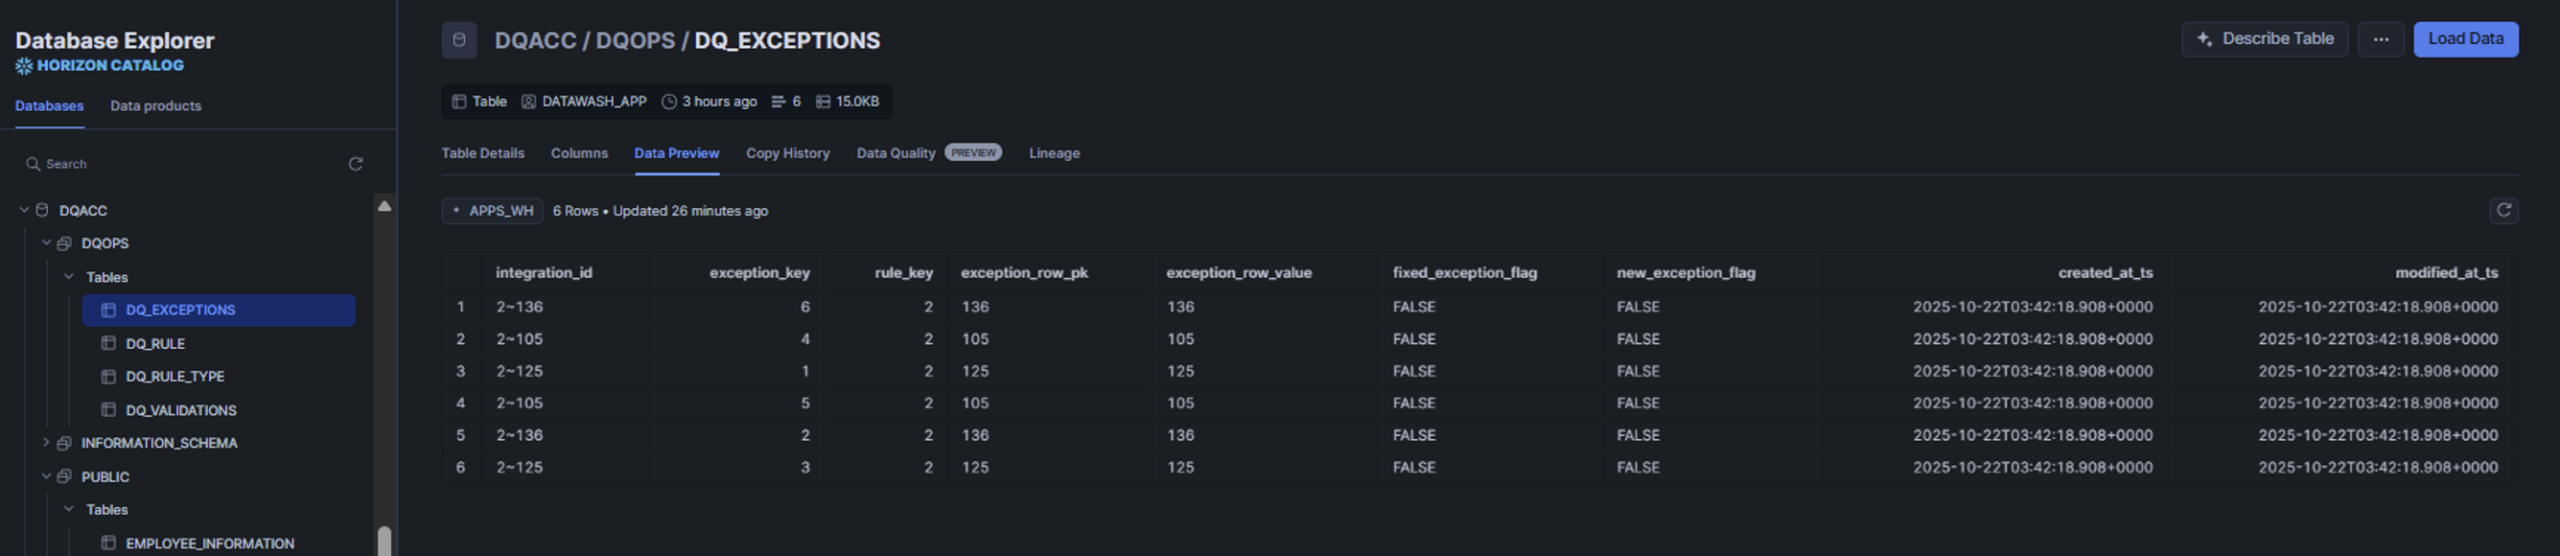
Figure 6-7: Snowflake screenshot with sample data from a process run
Limitations and Required Changes Applied to Our Spark Application
Not everything that Spark supports is available, or behaves in the same way, in Snowpark Connect for Spark. Here are some of the main documented compatibility gaps:
Data types:
- Some Spark data types are not supported in Snowpark Connect for Spark, including DayTimeIntervalType, YearMonthIntervalType, and UserDefinedTypes (UDT).
- Snowpark Connect for Spark performs implicit type conversion in some cases: for example, Spark ByteType, ShortType, and IntegerType are represented as
- NullType is not supported directly in Snowpark Connect for Spark: for example, when using lit(None), it is inferred as
Unsupported Spark APIs: Some Spark APIs are unsupported or behave differently:
- DataFrame.hint(): hints are ignored.
- DataFrame.repartition(): has no effect (no-op).
- pyspark.RDD APIs: unsupported.
- pyspark.ml (Spark MLlib): unsupported.
- pyspark.streaming APIs: unsupported.
Data sources, file formats, and storage formats: Some unsupported or limited file formats:
- Avro: unsupported file type.
- ORC: unsupported.
- CSV, JSON, Parquet & Text: Snowflake documents unsupported options (for example, Append and Ignore save modes, and certain format-specific settings such as escape, lineSep, and compression).
- When writing to Snowflake tables, bucketing and partitioning are not supported.
Lambda function limitations:
Snowpark Connect for Spark supports lambda expressions (also called anonymous functions) and higher-order functions (such as the transform function), but there are still limitations: UDFs are not supported inside lambda expressions (including some built-in functions implemented using Snowflake UDFs).
Other changes:
In our case, to successfully run the application, we made some adjustments to migrate the original Spark code to Snowflake:
- We added a block of code to the main script to manage dependency files and installation paths correctly.
- We rewrote part of the SQL logic used by the original Spark implementation. During the migration to Snowpark Connect for Spark, some SQL patterns in our codebase did not behave as expected, so we replaced them with a DELETE + INSERT approach in the migrated version.
- We modified a raised exception: in Cloudera and Databricks, the Spark driver always returned exception_info as a dictionary (dict), whilst in Snowflake we observed cases where the integration returned a flat string instead.
Conclusion
With this release, we now have a new way to execute our existing data integrations and applications developed with Spark on Snowflake, benefitting from all the power and security that the platform offers us. Snowpark Connect for Spark allows us to migrate compatible Spark jobs to Snowflake with minimal code changes and without having to manage separate Spark infrastructure.
If the original Spark code contains incompatibilities that cannot be avoided, or if there is a stronger long-term case for adapting the code to the native Snowpark API, we can choose to make the necessary translation.
Our recommendation is to evaluate every case individually and to carry out a proof of concept, along with performance measurements, to support the decision:
- Identify a set of current Spark jobs that are technically representative of the process you want to migrate or evaluate.
- Run a Poof of Concept (PoC) using Snowpark Connect for Spark, aiming to run the jobs without code changes, or with only the minimum required, to analyse compatibility, performance, and cost.
- At the same time, evaluate what would be required to code those jobs with the native Snowpark API; assess the development effort and potential gains in performance, maintainability, and cost.
- Based on the PoC results (cost, complexity, performance, and compatibility), decide which approach is best for you.
If you find yourself in a similar situation and would like us to help you with this assessment, or if you are planning to move your Spark workloads to Snowflake, don’t hesitate to contact us!