07 Sep 2022 Breakthrough in Cloud BI? New Semantic Modeller in OAC (Oracle Analytics Cloud)
The new July 2022 Oracle Analytics Cloud (OAC) update comes with the highly significant Semantic Modeller, pushing Oracle in the right direction. In this blog post, we will run through Oracle’s next-generation modelling tool and a modelling language to create semantic models.
What is a Semantic Model?
A semantic model is a metadata model that contains physical database objects (metadata) that are abstracted and modified into logical dimensions. It acts like a translation layer between the application and the underlying data structures.
The new OAC Semantic Modeller is a fully integrated Oracle Analytics Cloud (browser-based) modelling tool component. It boasts close integration with Git to provide a seamless multi-user development experience, and developers can create their models using the Semantic Modeller UI, or they can create models using the Semantic Model Markup Language (SMML).
Is this an alternative to the current Administration tool? Yes!
The Semantic Modeller can easily be accessed from the Home page of the Oracle Analytics Cloud instance, as shown below:
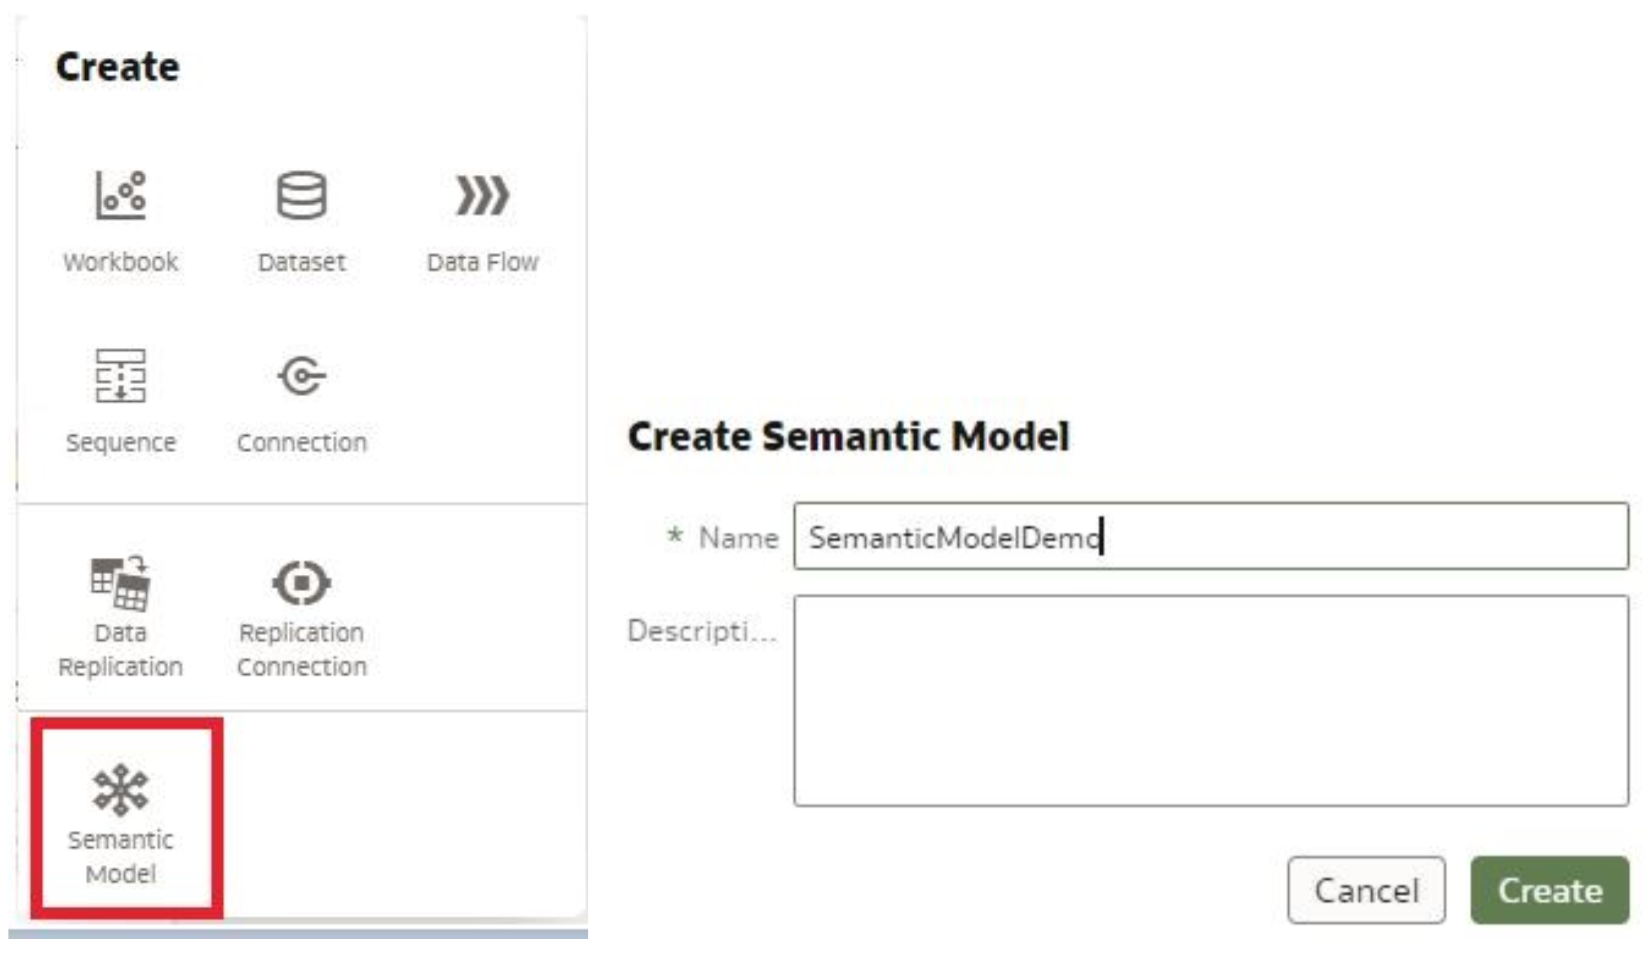
From the Create menu, select Semantic model; let’s name it ‘SemanticModelDemo’. On the next page, you will find four options to choose from, depending on how you want to create the semantic model, and we will be discussing them in detail in this blog.

Let’s start with an empty model
Once the Semantic Modeller interface opens, these main tabs are available:
![]()
- Connections
- Physical Layer
- Logical Layer
- Presentation Layer
- Variables
- Invalid Files
The Connections tab shows all the available connections from our OAC instance. Remember, we do not define connections here – instead, they are defined outside the Semantic Modeller from Create – Connections. Semantic models can only use connections with the System Connection field selected:

Semantic Model – Physical Layer
In the physical layer, you can create Databases consisting of the metadata of the physical tables, schemas, table aliases, and joins between them. This is similar to the RPD physical layer in an administration tool. We have created a sample database for the data modelling in this blog.
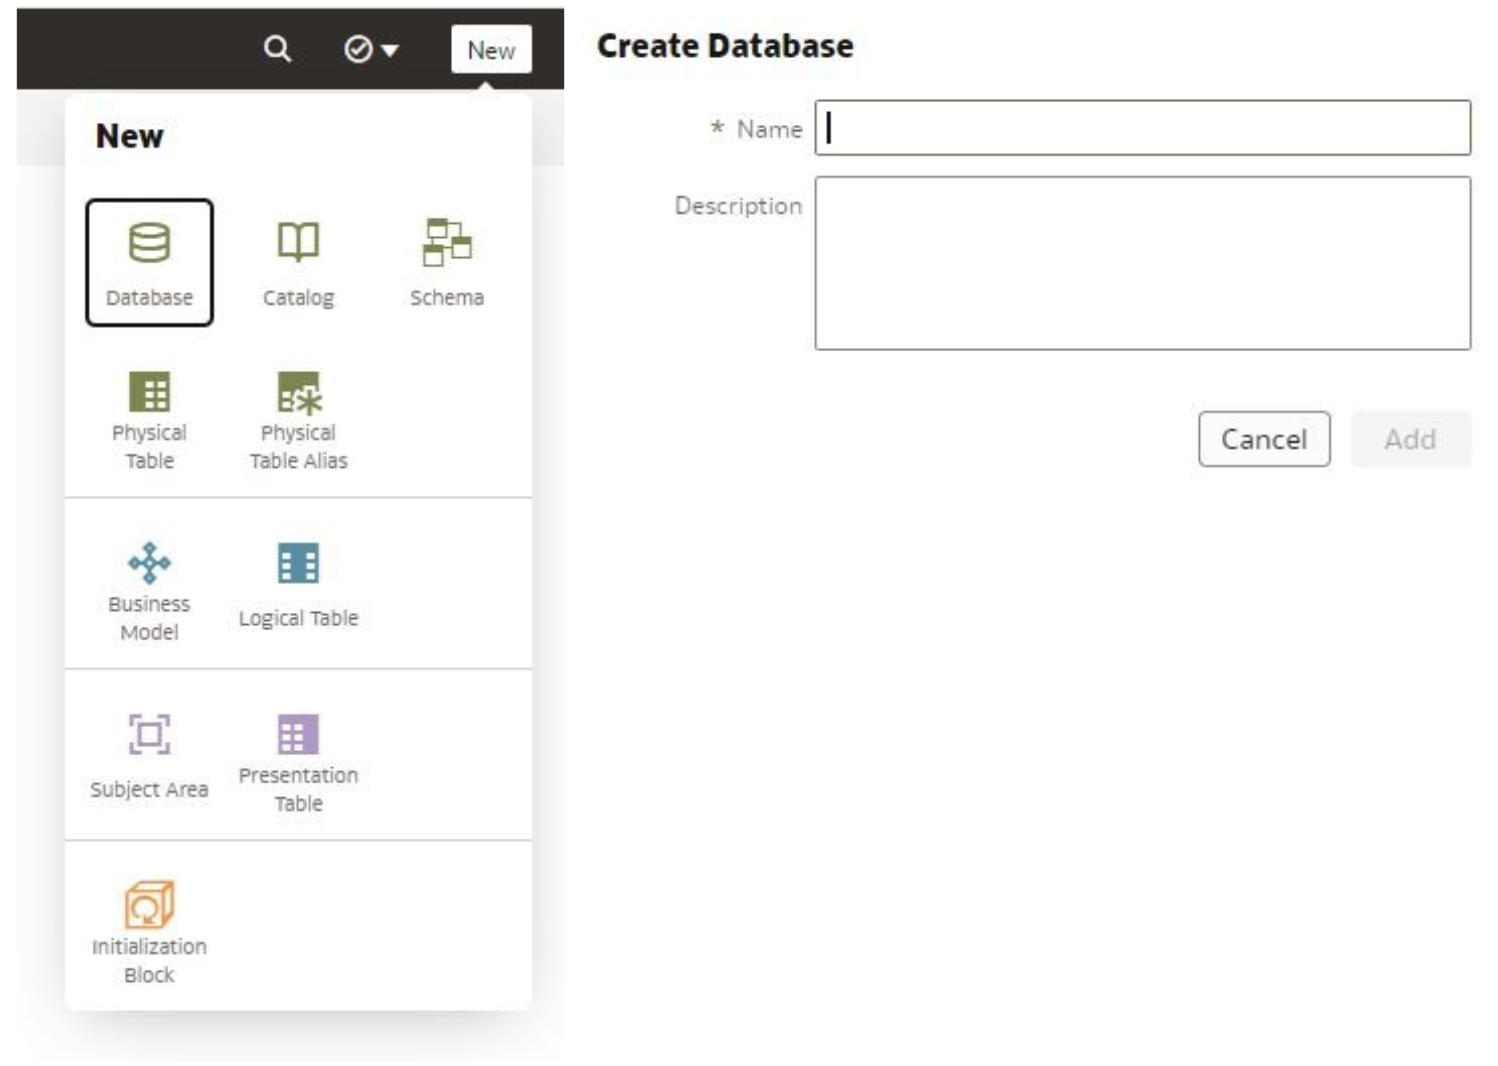
Now you have created a database in the physical layer where you can select a Fact table (drag & drop in the Tables view) from the available connections in the left pane. The system automatically creates joins if tables are added to the physical layer with foreign keys defined.
But here we have disabled it, and we manually define each join:

Now that you have selected all the tables for the physical layer, let’s create a Table Alias for each object just like in the RPD. Right-click on the table and on Create Physical Table Alias:

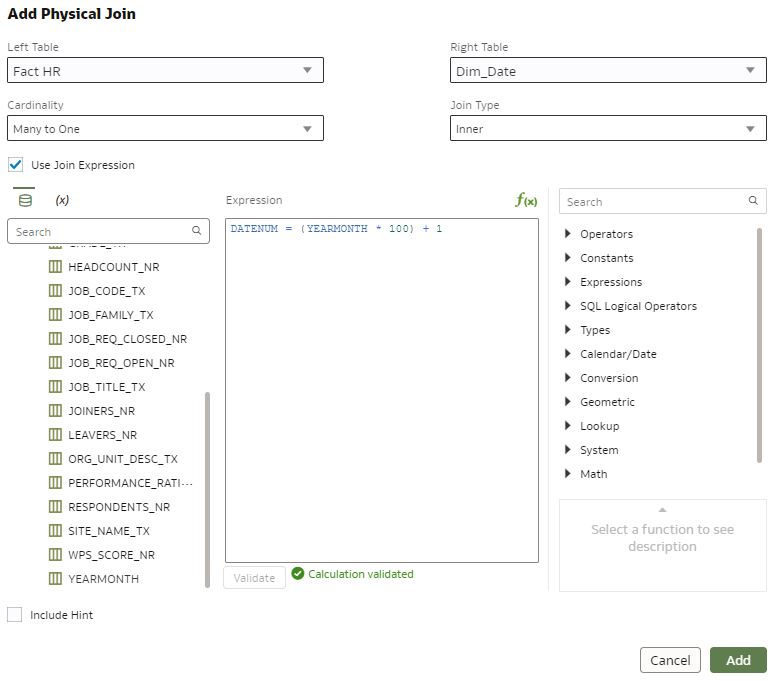
After creating aliases for all the physical tables, you should create physical joins between the Facts and Dimensions. You can also add joins using Join Expressions and validate the condition:

After defining the joins between the Fact and Dimension tables, the physical diagram should look like this:

It is much easier to define connection pools, unlike in the RPD where you had to provide all the connection information. Instead, the Semantic Modeller allows you to select the connection from the drop-down menu.
Semantic Model – Logical Layer
The logical layer does a similar job to the RPD BMM layer. Here, the physical tables are converted into logical tables and logical joins defined between them. The dimension hierarchies are missing from the business model layer because they are now part of the Dimension tables, which makes more sense for users:

You should import the Fact table that was created in the physical layer and then add the dimensions. As the physical relationship is already defined, the dimensions that join the Fact tables are pre-selected in the BMM model. The lookup tables are handled in a different tab:
![]()

After adding the Dimension tables to the Business Model, you can create the hierarchies for these tables; right-click on the table and choose the Edit > Hierarchy tab:


After creating the hierarchies, you can set the dimensional levels for the Fact source. Just right-click on the Fact table, select the Sources tab and set the levels in the Data Granularity section:

From the Edit menu > Columns you can set the Aggregation rule or create calculations using expressions:

Semantic Model – Presentation Layer
In the presentation layer, you can create a Subject Area and add tables:


That’s it! We have created a model, so now let’s Check Consistency:
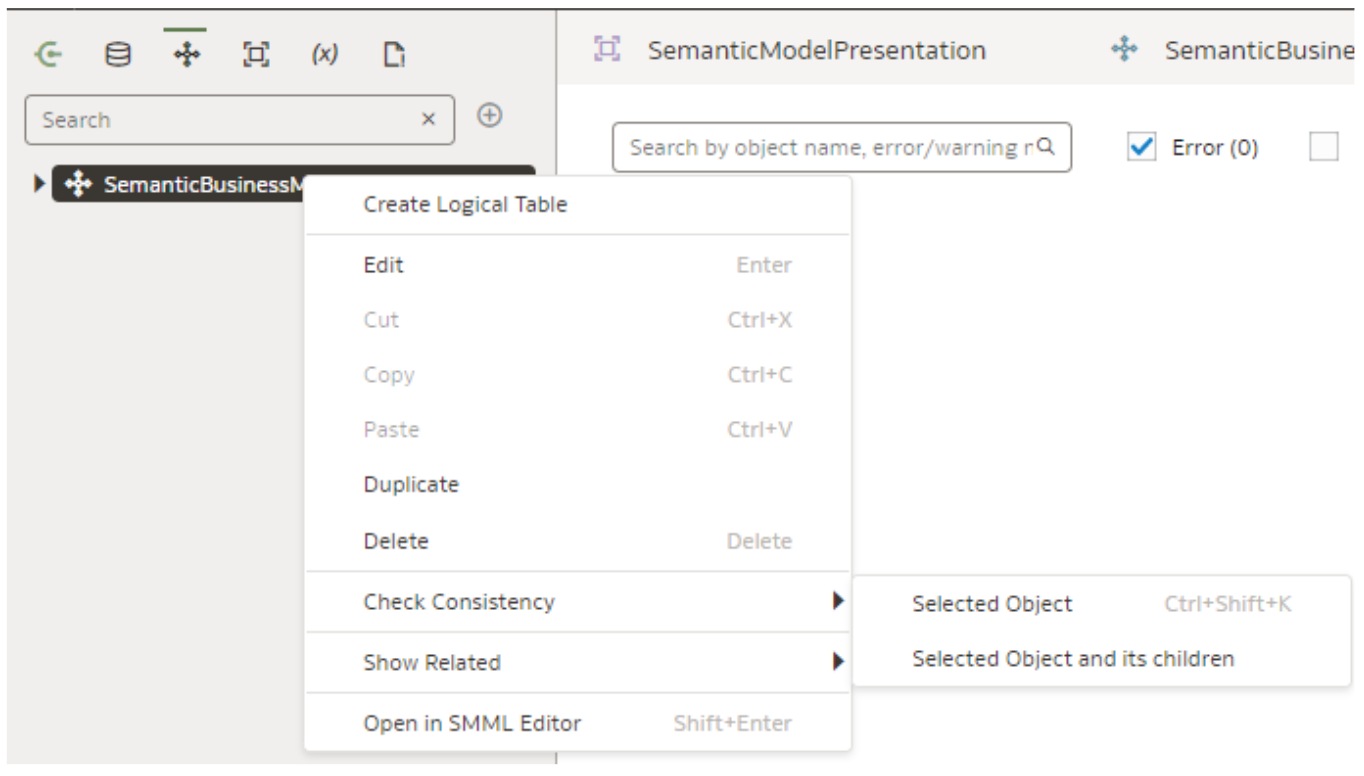
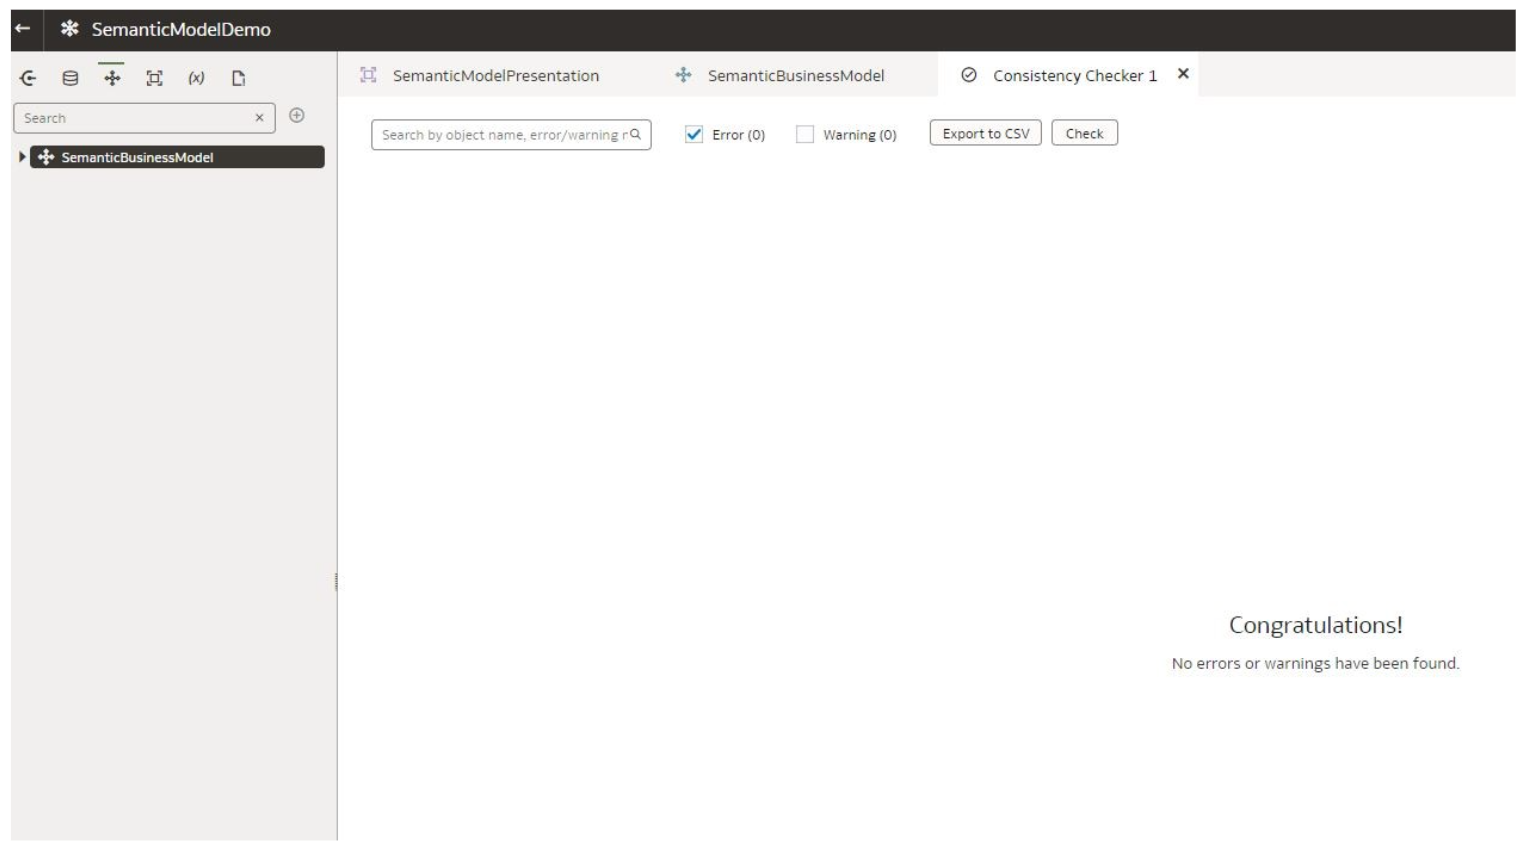
Now our semantic model has been created from scratch. It also has a lineage viewer to show the mappings of physical, logical, and presentation layers, just like Query Related Objects in the RPD admin tool. We like this feature as you can get the data lineage with just one click. Right-click on any object whose lineage you want to view and select Show Lineage or use the Ctrl + Shift + L shortcut on your keyboard to open the lineage viewer:

Import a File to Create a Semantic Model
We saw at the beginning of the blog post that we can create a semantic model in four different ways. The second option is to import an RPD file (exported semantic model) or ZIP file (archived semantic model) from your computer and create or modify a semantic model in the Semantic Modeller environment.
After importing the RPD file, the Semantic Modeller editor opens, and you should:
- Review the model’s metadata, objects, and properties to make sure they are populated correctly.
- Confirm the data source connection.
- Add any needed connection pools or assign a connection to each imported connection pool.


After importing the saved RPD file, enter the RPD password just like in the admin tool:

Once the model has been imported, you can see the existing objects, physical tables, connections, etc., in the Semantic Modeller interface:

Load the Deployed Model to Create a Semantic Model
You can load the deployed semantic model from Oracle Analytics to create a semantic model using the new Semantic Modeller environment. You can use this option when you do not have access to the deployed semantic model’s source files, but need them to perform troubleshooting work from the Semantic Modeller editor.

Click on Load from Analytics Server and wait a moment while the deployed RPD model is imported to the Semantic Modeller.
Using Git Repositories with the Semantic Modeller
This is the most promising capability of the Semantic Modeller in this new release. You can use Git repositories with Oracle Analytics to enable multi-user semantic model development. Integration with Git repositories means making semantic model JSON files available to other developers to work on using HTTPS or an SSH connection, so the development team can clone a model and work in branches to add, update, and commit the files on local and push the changes to the remote repository. We will explain how to upload a semantic model to a Git repository using SSH.
An SSH connection uses a key that you generate in Oracle Analytics and copy into the Git account. This key is then used to authenticate OAC to the Git repository without needing to supply a username and password.
- First, create a Git account at https://github.com. You can find more details here.
- After creating an account with GitHub, create an empty repository:

- Copy this repository URL to initialise Git from OAC:

If you are new to Git and want to learn more about Git repositories and Git basics, such as remote repositories, cloning, commits, pushes and branches, read the Git documentation at https://git-scm.com/book/ and https://git-scm.com/doc.
Let’s use an existing semantic model which we have already created in this blog post to initialise with Git. Once you have opened the semantic model, you need to select the Git Panel on the bottom right:
![]()
After clicking on this, the Git panel opens, and you can configure the Git and initialise what you created in the previous step to our Git repository:

After clicking Start you will see the screen below, where you have to enter the SSH URL you copied while creating the Git repository:

Make sure that the branch you are specifying in this step does not exist, otherwise you’ll get an error saying that it already exists.
In the next step, you can choose an existing profile or create a new profile to initialise with Git. Select a new profile and generate an SSH key. Leave the algorithm selection as default (ECDSA). The other algorithm (RSA) is deprecated in GitHub, so it won’t work.

Click on Generate Key to generate an SSH key and add the key to the Git profile to authenticate from OAC to GitHub. Below is a sample key:
ecdsa-sha2-nistp521 == username@domain.com
Once the key has been generated, copy and add it to the GitHub profile settings (Settings > SSH and GPG Keys > New SSH Key):

Once authenticated, the semantic model can be viewed in the empty GitHub repository that you created at the beginning of this section:

By default, a semantic model Git repository has one default main branch. You can add more branches for development purposes for different developers. Make sure no developer works on the main branch. It will be your production environment, so each user should develop in different branches and then merge them into the main one.
In the OAC Git panel, you can see the main Git building blocks:
![]()
These tabs are explained in this Oracle document.
Now let’s create a local branch in the Git panel to work on the changes in the current semantic model. Navigate to Create Local Branch. This is to add the changes to, and then to push them to the remote repository.

The current branch is displayed in the panel.

You can select Switch Branch to switch between branches. Once we create the local branch, it automatically switches to the new one:

Delete the existing join between Fact and Dimension from the current model, then save it. You can see the changes in the Status pane under Unstaged Changes:

After completing the changes in the semantic model, check in all the changes (Stage All) and commit the changes, which means the current branch is ready to be pushed to the remote repository in Git. You can see that once we click on Stage All, the changes that you performed in the previous step will automatically be displayed under the Staged Changes tab. Next, commit the changes by entering a concise description to finalise the changes in the model:

![]()
Then go to the Push tab which displays the changes committed to the local branch. This tab is used to push the staged and committed changes to the remote branch in Git, available to other developers using the branch:

Note that in the GitHub application the local branch that you pushed from OAC to the remote repository is visible, separate from the main branch:

Similarly, you can pull the branches from the remote repository to the OAC Semantic Modeller to add further changes. In the screen below you have pulled a branch that you modified earlier to the Semantic Modeller from the remote repository:

You can see that the join we removed between Fact and Dimension is not visible in the current model.
Integration with Git provides a seamless, efficient multi-user development environment and source control, and it also allows the developers to perform the most common Git operations from within the Semantic Modeller interface. As it is a multi-user development environment, each developer works with a separate branch while working on the semantic model parallelly.
Once a developer finishes working on a branch, the changes are pushed to the remote repository from the Semantic Modeller interface, which will be reflected in the Git interface, as explained earlier. To merge the changes to the main branch, the developer should create a Pull request from the Git interface:

Then choose the branch that you want to compare with the main branch:
![]()
In the New Pull Request screen there’s the option to add members to ‘Review/Approve’ the changes. Once approved, you can merge the changes to the main branch, which is our production version of the semantic model. After merging, you must go to the production environment and “pull” from the main branch to bring the changes to production. Hopefully, Oracle will release a CI/CD process that avoids this last step and automatically brings the changes to production after merging.
Semantic Modeller Markup Language (SMML)
In this release you may also notice an interesting new feature, the ‘Semantic Modeller Markup Language (SMML)’. SMML is a modelling language based on the JSON format to add business semantics to data. Developers can now use either the Semantic Modeller user interface or the SMML (external text editor) to create or modify the model’s source code.
Now let’s see how the SMML editor can be used to model the data. Open the semantic model and simply right-click on the Fact table from the physical layer. You can see the option Open in SMML Editor and the SMML editor window opens with the source code of the physical diagram. Similarly, you can open any object in a semantic model in the SMML editor to make changes:

The image below shows the SMML editor of the physical diagram from the semantic model:

We can make a remarkably simple change using the SMML editor, changing the column name using the source code of a Dimension table. Right-click on a Dimension table and open it in the SMML editor, as shown below:

Now we will change the column name from MIN_SALARY to MINIMUM_SALARY and save the model. You can observe that the column name has changed to MINIMUM_SALARY after saving the changes:

Conclusion
After reading this blog post, OAC and OAS developers might think that this is a breakthrough in the Cloud BI universe. The new OAC Semantic Modeller is a huge step, not only for Oracle Analytics Cloud but for the entire BI community, and this goes to show that Oracle has a clear roadmap for a future where it thrives ahead of other modern BI tools.
The Semantic Modeller feels amazing and is very user-friendly, and it has the “modern look” that so appeals to the user. The transition from the Oracle Admin Tool with three layers to the Semantic Modeller is seamless, and the user experience is much more fluid. For the experienced OAC/OAS developer, the transition will be easy.
The most exciting feature, for us, is the integration with Git. Multi-usage in RPD has always been a weakness in the Oracle Admin Tool, and the new integration with Git offers a real multi-user experience where dozens of different users can work on the semantic model simultaneously, without the risk of their changes being overwritten by someone else when published. This is the real game-changer for the entire Oracle Analytics community, making the development of new models faster, more efficient, and more fun! We can’t wait to see what’s next for the Oracle Semantic Modeller.
If you have any queries yourself about what you’ve read or about how Oracle Analytics can grow your own business, simply contact us and our team of Oracle experts will get straight back to you!


