31 Aug 2022 Deploying Apache Airflow on a Kubernetes Cluster
These days, data-driven companies usually have a huge number of workflows and tasks running in their environments: these are automated processes which are supporting daily operations and activities for most of their departments, and include a wide variety of tasks, from simple file transfers to complex ETL workloads or infrastructure provisioning. To obtain better control and visibility of what is going on in the environments where these processes are executed, there needs to be a controlling mechanism, usually called a scheduler.
One such scheduler is Apache Airflow. Airflow is an open-source platform which can help companies to monitor and schedule their daily processes, able to programmatically author, schedule and monitor workflows using Python, and it can be integrated with the most well-known cloud and on-premise systems which provide data storage or data processing. On top of this, it also offers an integrated web UI where users can create, manage and observe workflows and their completion status, ensuring observability and reliability.
In today’s technological landscape, where resources are precious and often spread thinly across different elements of an enterprise architecture, Airflow also offers scalability and dynamic pipeline generation, by being able to run on top of Kubernetes clusters, allowing us to automatically spin up the workers inside Kubernetes containers. This enables users to dynamically create Airflow workers and executors whenever and wherever they need more power, optimising the utilisation of available resources (and the associated costs!).
In this blog series, we will dive deep into Airflow: first, we will show you how to create the essential Kubernetes resources to be able to deploy Apache Airflow on two nodes of the Kubernetes cluster (the installation of the K8s cluster is not in the scope of this article, but if you need help with that, you can check out this blog post!); then, in the second part of the series, we will develop an Airflow DAG file (workflow) and deploy it on the previously installed Airflow service on top of Kubernetes.
Overview
As mentioned above, the objective of this article is to demonstrate how to deploy Airflow on a K8s cluster. To do so, we will need to create and initialise a set of auxiliary resources using YAML configuration files.
The first items that we will need to create are the Kubernetes resources. K8s resources define how and where Airflow should store data (Persistent Volumes and Claims, Storage class resources), and how to assign an identity – and the required permissions – to the deployed Airflow service (Service account, Role, and Role binding resources).
Then we will need a Postgres database: Airflow uses an external database to store metadata about running workflows and their tasks, so we will also show how to deploy Postgres on top of the same Kubernetes cluster where we want to run Airflow. First, we will need to create a Configmap, to configure the database username and password; then, a Persistent Volume and a Claim, to store the data on a physical disk; finally, a Postgres service resource, to expose the database connection to the Airflow Scheduler.
Finally, we will be able to deploy the actual Airflow components: the Airflow scheduler and the Airflow webserver. These are the two main components of the Airflow platform. The scheduler runs the task instances in the structured order defined by what is called DAG, and the webserver is the web UI to monitor all the scheduled workflows.
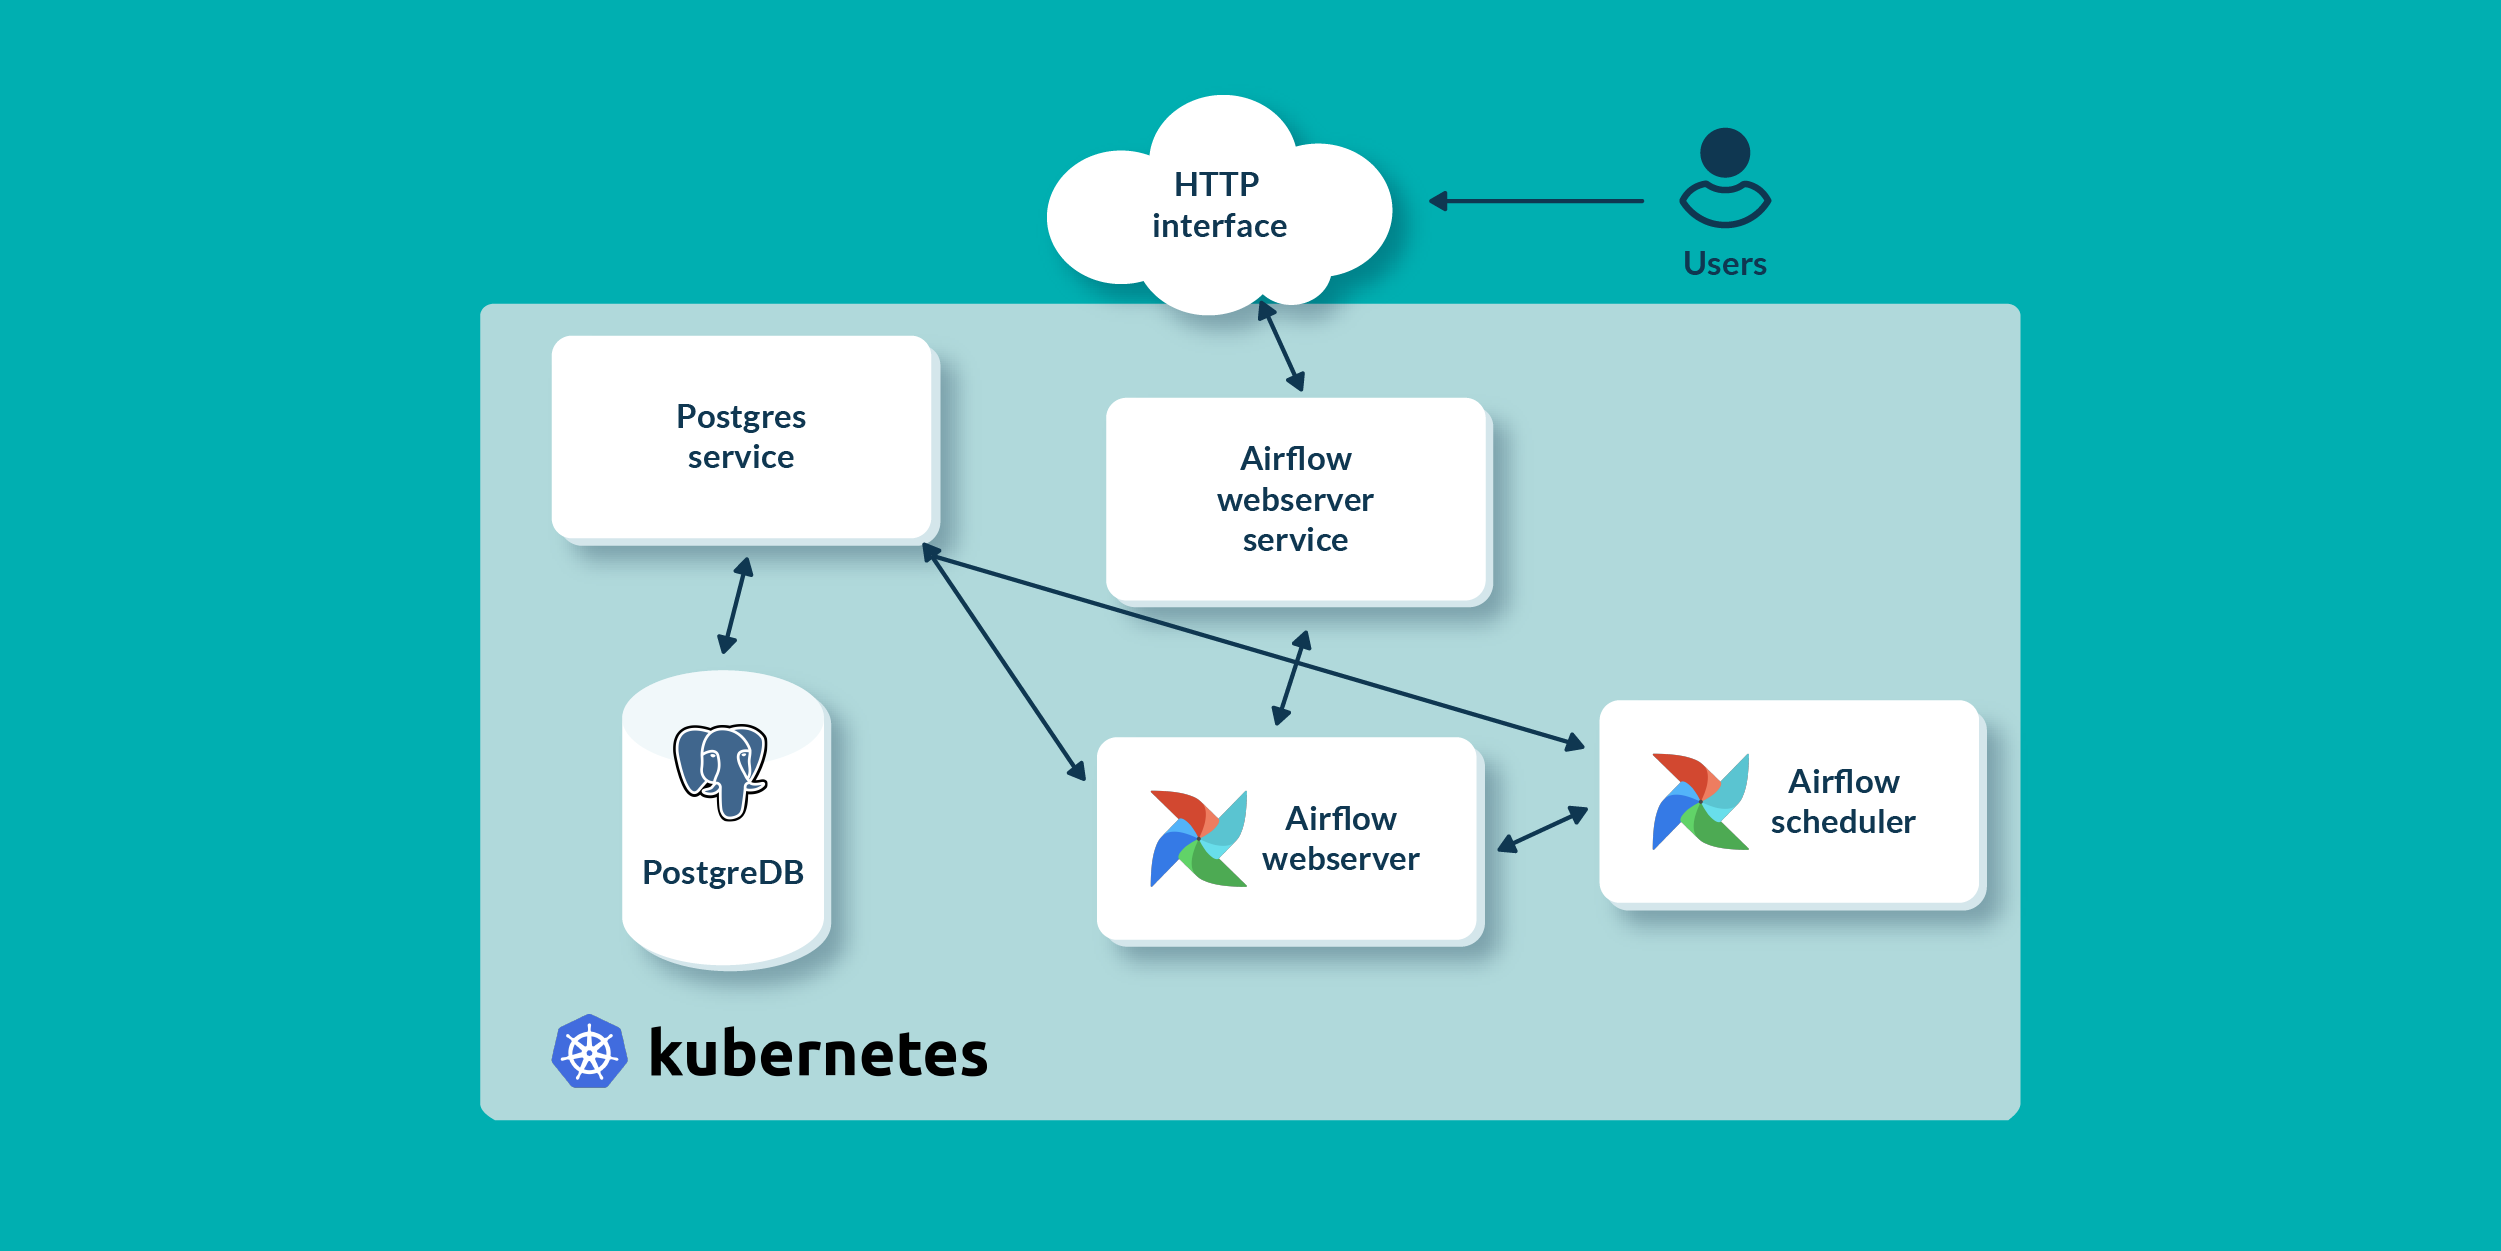
In the picture below, all the main blocks of the deployment are shown:
Creating Template Files
So, as we said, the first thing to do to prepare our Airflow environment on Kubernetes is to prepare YAML files for the deployment of the required resources.
Usually, when creating such files, we can download templates from the Helm charts repository using the Helm package manager. Once downloaded, the files can be adapted to our specific needs, in order to reflect the desired application deployment.
To do so for our Airflow instance, we can use the following commands to define the Airflow repository, download the Helm chart locally, and finally create the template YAML files.
helm repo add apache-airflow https://airflow.apache.org
helm repo update apache-airflow
mkdir airflow-yamls
cd airflow-yamls
helm template –output-dir ./ /root/.cache/helm/repository/airflow-1.5.0.tgz
In this way, the template files are created in the current path with a bunch of files and directories.
Note that not all of them are used in this blog post. For example, we can ignore those related to the redis, celery and flower services, which we won’t be using. When all the unnecessary files have been removed from the directory, we end up with only those needed to deploy Airflow, as shown in the picture below. Of course, these are just template files, and they need to be adapted to have valid YAML files.
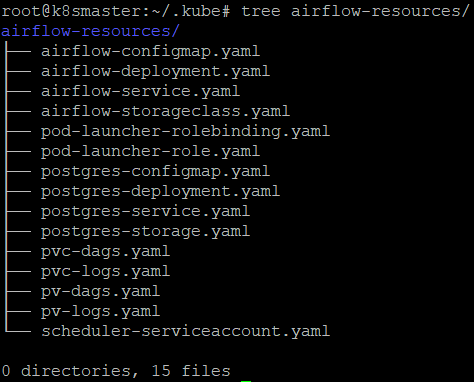
In the following sections, we will explain how each of them was used to define and create all the required resources for our Airflow environment. The YAML files from the picture above will be referenced below wherever they are used.
Preparing the Postgres Deployment
As we mentioned above, Airflow uses an internal database to store all the metadata about running tasks and workflows. For production-ready deployments, we recommend using an external database, so we deployed a PostgreSQL database for demonstration purposes.
To do so, the first thing we need is a ConfigMap resource. ConfigMaps are Kubernetes resources which can be used to automatically configure applications running in the container when the Kubernetes pod is starting up. For our deployment, we used ConfigMap to set the Postgres database name, username, and password.
The file we used to create this resource is called postgres-configmap.yaml and it is shown below:
apiVersion: v1
kind: ConfigMap
metadata:
  name: postgres-config
  labels:
    app: postgres
data:
  POSTGRES_DB: postgresdb
  POSTGRES_USER: admin
  POSTGRES_PASSWORD: test123.
After the Configmap has been defined, it can be created with the command below:
kubectl apply -f postgres-configmap.yaml -n airflow
Note that in our example, for simplicity, the credentials are in plaintext. This is obviously not the best approach from a security perspective. For a production deployment where there are sensitive values, use Kubernetes Secrets and store the secrets in external vaults like HashiCorp Vault, or store sensitive values in a cloud service where they will be safe.
Next, we need to create PersistentVolume and PersistentVolumeClaims for the Postgres service.
PersistentVolumes are Kubernetes resources which define how the applications running inside a Kubernetes cluster store the data (quality and directory). A PersistentVolume also requires a StorageClass. StorageClass is a resource which defines in which quality the data will be stored (whether in cloud or locally). In this way, cluster administrators can define where the data will be stored and can automatically provision the data storage if a cloud provider is used.
PersistentVolumeClaims, on the other hand, are Kubernetes resources used to logically bind an application and the physical location of the data storage. They can be defined as an interface between the data storage and the application.
The YAML file we used to create the PersistentVolume and the PersistentVolumeClaim used by Postgres is called postgres-storage.yaml and is shown below:
kind: PersistentVolume
apiVersion: v1
metadata:
  name: postgres-pv-volume
  labels:
    type: local
    app: postgres
spec:
  storageClassName: manual
  capacity:
    storage: 5Gi
  accessModes:
    - ReadWriteMany
  hostPath:
    path: "/opt/data"
---
kind: PersistentVolumeClaim
apiVersion: v1
metadata:
  name: postgres-pv-claim
  labels:
    app: postgres
spec:
  storageClassName: manual
  accessModes:
    - ReadWriteMany
  resources:
    requests:
      storage: 5Gi
After the YAML file has been defined, the resources can be created with the command below:
kubectl apply -f postgres-storage.yaml -n airflow
Once done, check that they were created successfully:
kubectl get pv -n airflow
kubectl get pvc -n airflow
The output of the command above should look like the picture below:

We can see that PersistentVolume is called postgres-pv-volume and is bound by PersistentVolumeClaim postgres-pv-claim, while Reclaim Policy is defined as Retain, which means that when PersistentVolumeClaim is deleted, the volume will not be deleted but retained, thus becoming available to other Pods or applications.
At this point we can create Deployment and Kubernetes Service resources for our Postgres deployment.
Deployment is a Kubernetes resource which is used to control a set of Pods in which applications are running, so that administrators can control the scalability of the application, create ReplicaSets, rollback previous versions, and so on.
The YAML file to deploy the Postgres service is called postgres-deployment.yaml and is shown below. Note that this Postgres deployment uses a pre-built docker image.
apiVersion: apps/v1
kind: Deployment
metadata:
  name: postgres
spec:
  replicas: 1
  selector:
    matchLabels:
      app: postgres
  template:
    metadata:
      labels:
        app: postgres
    spec:
      containers:
        - name: postgres
          image: postgres:10.1
          imagePullPolicy: "IfNotPresent"
          ports:
            - containerPort: 5432
          envFrom:
            - configMapRef:
                name: postgres-config
          volumeMounts:
            - mountPath: /var/lib/postgresql/data
              name: postgredb
      volumes:
        - name: postgredb
          persistentVolumeClaim:
            claimName: postgres-pv-claim
To create the Postgres deployment, we can use the following command:
kubectl apply -f postgres-deployment.yaml -n airflow
Once again, check that the deployment has been created successfully:
kubectl get pods -n airflow
The output should look like this:

Note how the Postgres deployment postgres-5cb8b67d8f-xzg26 is running with one Pod running, which is shown by the column READY and the value 1/1.
Now that the Postgres deployment is finished, we need to create its service. A service is a Kubernetes resource used to expose an application to other applications through a network port.
The YAML file to create a Kubernetes service for the Postgres deployment is postgres-service.yaml, shown below:
---
apiVersion: v1
kind: Service
metadata:
  name: postgres
  labels:
    app: postgres
spec:
  type: NodePort
  ports:
    - port: 5432
  selector:
    app: postgres
As defined above, the Postgres service will listen on port 5432 and it will be accessible from inside the cluster via the same port. This port will be used when configuring the Airflow scheduler. We create the Postgres service with the same command:
kubectl apply -f postgres-service -n airflow
Now that we have a Postgres service up and running, we need a database with all the schemas and tables used by the Airflow scheduler. This can be done by using the Python package for integration between the Airflow and PostgreSQL databases: postgres-airflow. First, Python must be installed inside the Postgres container. To do so, open the Postgres container bash CLI with the following command:
kubectl exec --stdin --tty {container_name} -- /bin/bash
Once inside the container bash CLI, install Python and the postgres-airflow package with the following commands:
sudo apt-get update
sudo apt-get install Python3.8
AIRFLOW_VERSION=2.2.4
PYTHON_VERSION="$(python --version | cut -d " " -f 2 | cut -d "." -f 1-2)"
CONSTRAINT_URL="https://raw.githubusercontent.com/apache/airflow/constraints-${AIRFLOW_VERSION}
/constraints-${PYTHON_VERSION}.txt"
pip install "apache-airflow[postgres]==${AIRFLOW_VERSION}" --constraint "${CONSTRAINT_URL}"
Now, the database inside Postgres can be initialised like this:
airflow db init
Preparing Resources for Airflow Deployment
As mentioned earlier, in order to deploy Airflow, there are a few Kubernetes resources that need to be created first: these include PersistentVolumes, PersistentVolumeClaims, ConfigMap, Role, RoleBinding, and ServiceAccount, similar to the Postgres service we have seen above.
PersistentVolumes and PersistentVolumeClaims are defined in a similar way to the Postgres service resources, but with one difference: the StorageClass resource is created specifically for the Airflow scheduler and not left on the default value manual. In this case, we are using a fast StorageClass, which defines VolumeClaims data storage on local SSD disks. The created resources are shown in the picture below and named dags-pv (for DAG files), and logs-pv (for the Airflow scheduler logs). To create these resources, we used the files below and the kubectl apply command that we used for the Postgres service.
- pv-dags.yaml
- pvc-dags.yaml
- pv-logs.yaml
- pvc-logs.yaml
- airflow-storageclass.yaml

The next resource to create is ConfigMap. This consists of two environment variables which will be injected into the container when the scheduler Pod starts up. This Configmap is defined in the YAML file airflow-configmap.yaml and is shown below:
apiVersion: v1
kind: ConfigMap
metadata:
  name: airflow-config
data:
  sql_alchemy_conn: "postgresql://admin:test123.@postgres:5432/postgresdb"
  executor: "KubernetesExecutor"
The first variable defines the SQLAlchemy connection string, so that the scheduler can connect to the Postgres database; the second variable defines the scheduler executor. KubernetesExecutor enables the scheduler to request a worker Pod from the Kubernetes API server when you need more power for executing the tasks. The Pod then runs the tasks, reports the results back to the scheduler, and terminates. This is the true power of running Airflow on a Kubernetes cluster! To create the ConfigMap, use the same commands as before:
kubectl apply -f airflow-configmap.yaml -n airflow
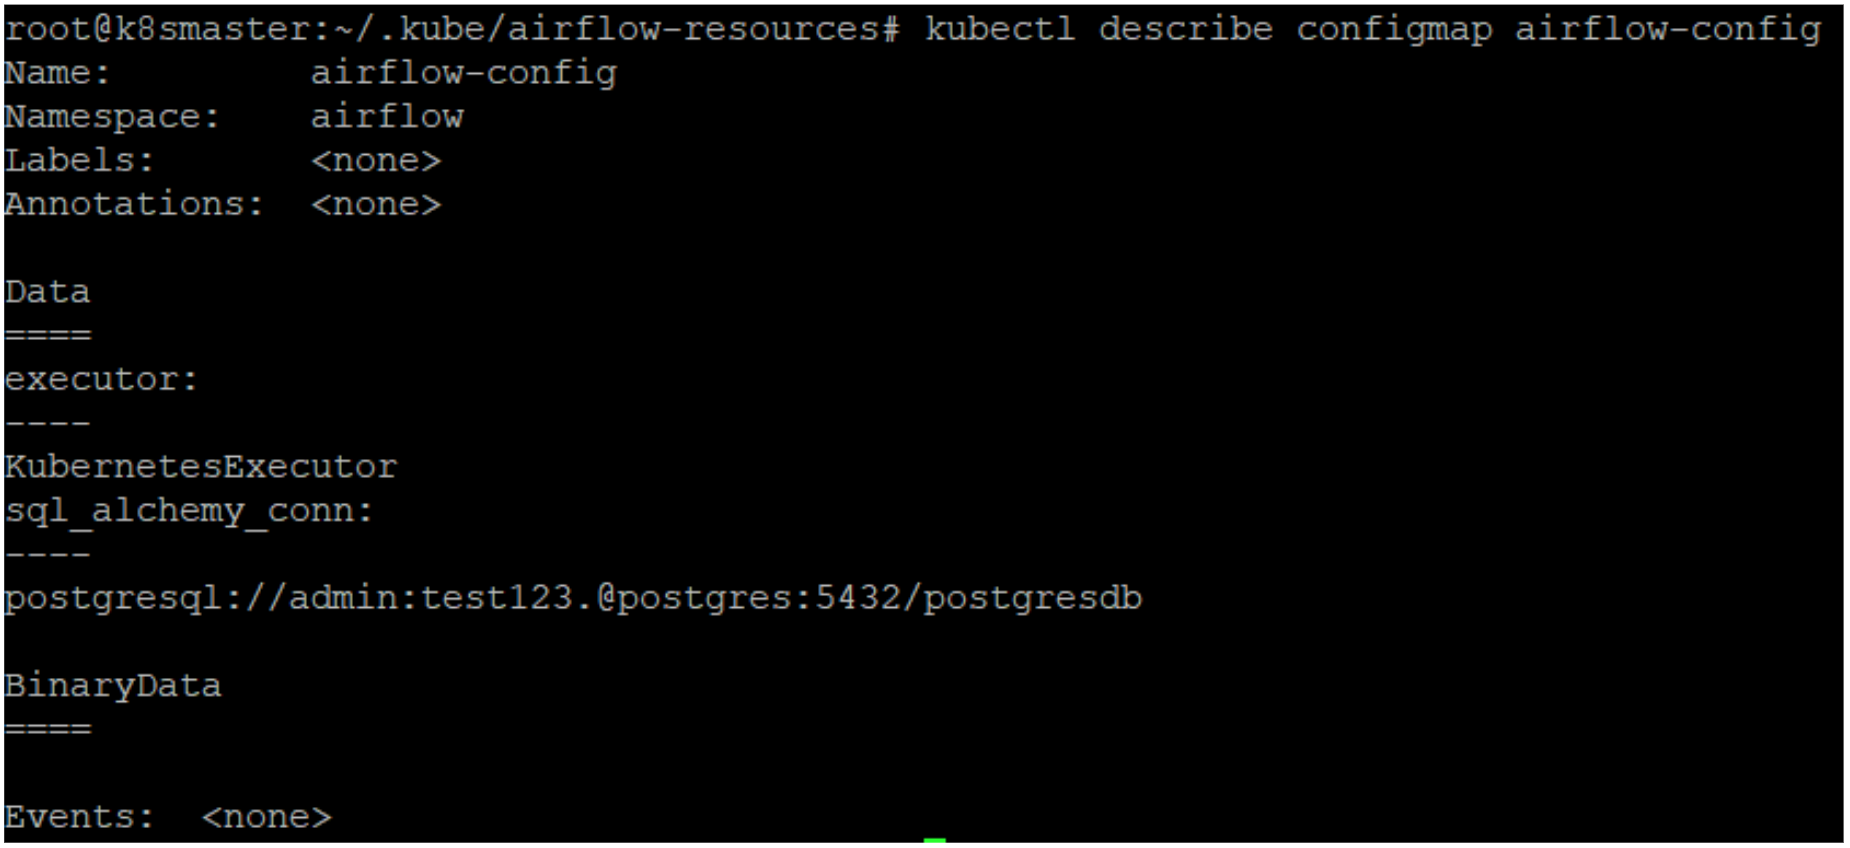
More details about the created ConfigMap can also be obtained by using the describe command, as shown below:
kubectl describe configmap airflow-config
In order to give the Airflow scheduler an identity, we also need to create a ServiceAccount and a Role. Applications and services running in the Kubernetes cluster need to have identities to send requests to the Kubernetes API server, and to guarantee control and to establish authorisation for the API server, Roles and ServiceAccounts need to be created and connected to the applications using RoleBinding resources. The mechanism to achieve that is called RBAC – Role Based Access Control. RBAC can be also used to restrict access to the Secrets and ConfigMaps in the Kubernetes cluster.
First, we create a ServiceAccount for the Airflow scheduler, defined in scheduler-serviceaccount.yaml as shown below:
kind: ServiceAccount
apiVersion: v1
metadata:
  name: airflow-scheduler
  labels:
    tier: airflow
    component: scheduler
    release: release-name
    chart: "airflow-1.5.0"
    heritage: Helm
Then we create a Role. A Role is Kubernetes resource which defines all the permissions that the application or service has for the Kubernetes API server. The Role for our Airflow scheduler is defined in the file called pod-launcher-role.yaml and is shown below:
kind: Role
apiVersion: rbac.authorization.k8s.io/v1
metadata:
  name: pod-launcher-role
  namespace: "airflow"
  labels:
    tier: airflow
    release: release-name
    chart: "airflow-1.5.0"
    heritage: Helm
rules:
  - apiGroups: [""]
    resources: ["services", "endpoints", "pods"]
    verbs: ["get", "list", "create", "delete", "watch", "patch"]
  - apiGroups: [""]
    resources: ["pods/logs"]
    verbs: ["get", "list", "create", "delete", "watch", "patch"]
  - apiGroups: [""]
    resources: ["pods/exec"]
    verbs: ["get", "list", "create", "delete", "watch", "patch"]
  - apiGroups: [""]
    resources: ["events"]
    verbs: ["list"]
After the Role has been created, it can be bound to the previously created ServiceAccount with the RoleBinding resource defined in pod-launcher-rolebinding.yaml, shown below:
kind: RoleBinding
apiVersion: rbac.authorization.k8s.io/v1
metadata:
  namespace: "airflow"
  name: pod-launcher-rolebinding
  labels:
    tier: airflow
    release: release-name
    chart: "airflow-1.5.0"
    heritage: Helm
roleRef:
  apiGroup: rbac.authorization.k8s.io
  kind: Role
  name: pod-launcher-role
subjects:
  - kind: ServiceAccount
    name: airflow-scheduler
    namespace: "airflow"
All resources can now be created, following the exact order of the commands below:
kubectl apply -f scheduler-serviceaccount.yaml -n airflow
kubectl apply -f pod-launcher-role.yaml -n airflow
kubectl apply -f pod-launcher-rolebinding.yaml -n airflow
Deploying Airflow on a Kubernetes Cluster
All the resources are now ready to create an Airflow deployment on top of the Kubernetes cluster. The deployment YAML file for the Airflow scheduler and Airflow webserver is called airflow-deployment.yaml:
---
kind: Deployment
apiVersion: apps/v1
metadata:
  name: airflow
  namespace: "airflow"
spec:
  replicas: 1
  selector:
    matchLabels:
      deploy: airflow
      name: airflow
      component: webserver
  template:
    metadata:
      labels:
        deploy: airflow
        name: airflow
        component: webserver
    spec:
      serviceAccountName: airflow-scheduler
      containers:
        - name: airflow-scheduler
          image: 'apache/airflow:2.2.4'
          imagePullPolicy: IfNotPresent
          env:
            - name: AIRFLOW__CORE__SQL_ALCHEMY_CONN
              valueFrom:
                configMapKeyRef:
                  name: airflow-config
                  key: sql_alchemy_conn
            - name: AIRFLOW__CORE__EXECUTOR
              valueFrom:
                configMapKeyRef:
                  name: airflow-config
                  key: executor
          volumeMounts:
            - name: logs-pv
              mountPath: /opt/airflow-kubernetes/logs
            - name: dags-pv
              mountPath: /opt/airflow-kubernetes/dags
          command:
            - airflow
          args:
            - scheduler
        - name: airflow-webserver
          env:
            - name: AIRFLOW__CORE__SQL_ALCHEMY_CONN
              valueFrom:
                configMapKeyRef:
                  name: airflow-config
                  key: sql_alchemy_conn
            - name: AIRFLOW__CORE__EXECUTOR
              valueFrom:
                configMapKeyRef:
                  name: airflow-config
                  key: executor
          image: 'apache/airflow:2.2.4'
          imagePullPolicy: IfNotPresent
          ports:
            - containerPort: 8080
          command:
            - airflow
          args:
            - webserver
      restartPolicy: Always
      volumes:
        - name: dags-pv
          persistentVolumeClaim:
            claimName: dags-pvc
        - name: logs-pv
          persistentVolumeClaim:
            claimName: logs-pvc
This deployment file contains keywords for all the created resources: PersistentVolumes, ServiceAccount, and ConfigMap.
To deploy the Airflow scheduler and webserver, we run the following command:
kubectl apply -f airflow-deployment.yaml -n airflow
When the Pod starts up, all the resources are used by the containers. Remember we have two containers here: one for the Airflow scheduler and one for the Airflow webserver. To check this, we can use the following command:
kubectl get pods -n airflow
The output of the above command should look like this:

In the READY column, we can see that two containers are running, shown by the value 2/2.
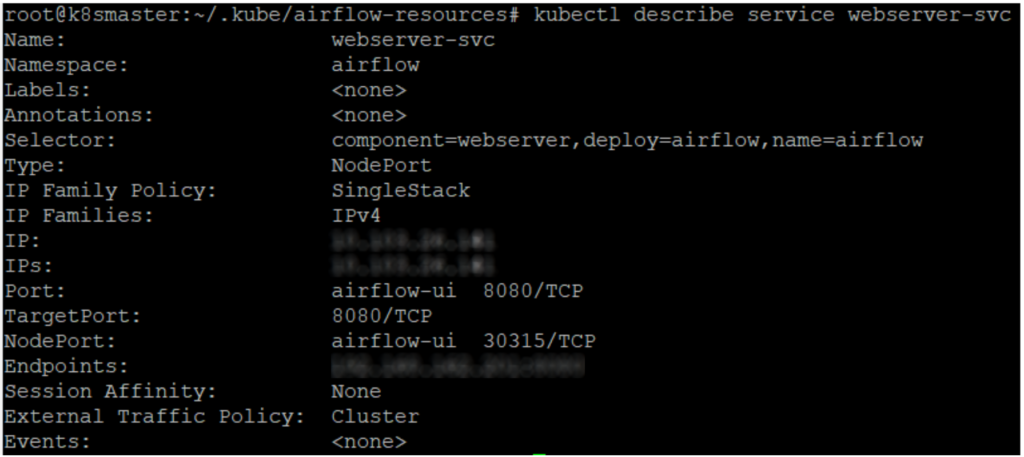
The Airflow webserver container should be accessible by the user, so as mentioned before, we need to create a Kubernetes service for it. The YAML file to create the webserver service with the defined network port is called airflow-service.yaml and is shown below:
---
kind: Service
apiVersion: v1
metadata:
  name: webserver-svc
  namespace: airflow
spec:
  type: NodePort
  selector:
    deploy: airflow
    name: airflow
    component: webserver
  ports:
    - name: airflow-ui
      protocol: TCP
      port: 8080
      targetPort: 8080
The Airflow webserver is bound to the network port 8080, but this is just the internal port accessible from the inside the cluster. After creating the webserver service with the following command, the service itself and its details can be checked again with the describe command:
kubectl apply -f airflow-service.yaml -n airflow
kubectl describe service webserver-svc -n airflow
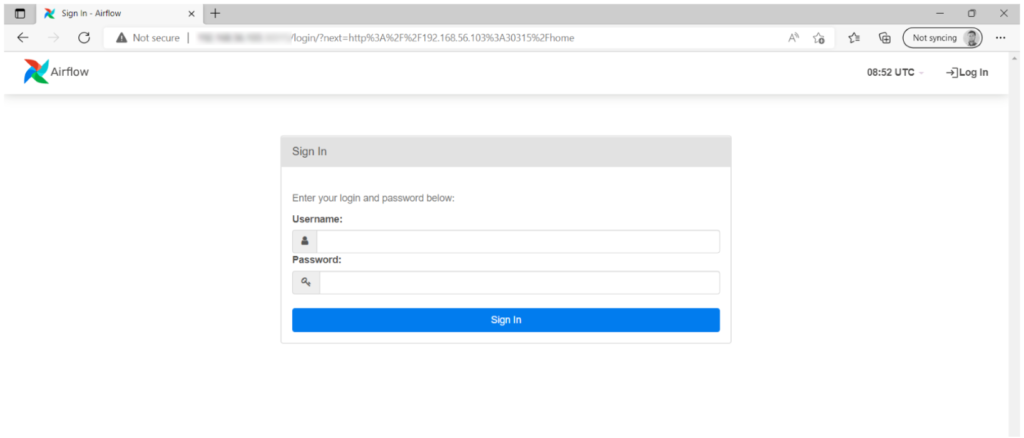
Now when Airflow is finally deployed on the Kubernetes cluster and is running successfully, we can open the Airflow webserver UI using the local VM IP address and the Kubernetes internal proxy port 30315, as shown in the picture above. In the browser, the webserver UI should open, and the login screen should appear like this:
Conclusion
In this blog post we have gone through the process of Apache Airflow deployment on top of a Kubernetes cluster running on Ubuntu virtual machines. The same process can be a good starting point to deploy Airflow on bare metal servers and to configure Airflow for safe production usage.
As we mentioned in the article, some of the Airflow resources, like ConfigMaps and sensitive values, are created in plaintext, and this could be more secure: mechanisms to cover this are Kubernetes Secrets and an RBAC (Role-based Access Control) approach to secure the resources on the Kubernetes cluster at user level. It is also recommendable to employ external storage services such as HashiCorp Vault to store sensitive values, deployed on-prem or in the cloud.
We hope this first part of the Airflow blog post series has sparked your interest in a secure Airflow deployment in your production environment. In the next part of the series, we will get our hands dirty and show you how to run and monitor Airflow workflows running in a Kubernetes cluster. If you need further support for your Airflow deployment, or if you are interested in possible use cases for this technology, or if you want to see how to integrate it with your existing architecture, do not hesitate to contact us – our experts will be happy to help you!
