30 Oct 2019 Exposing data in a RESTful API with NiFi
RESTful APIs are extremely common application program interfaces (APIs) that follow the Representational state transfer (REST) software architectural style. They use HTTP requests to GET, PUT, POST and DELETE data.
Despite offering hundreds of different processors for diverse purposes, NiFi does not have a specific one to directly expose FlowFiles as the result of a REST API call.
This could possibly be a key requirement for your colleagues or clients, so in this blog article we will demonstrate how NiFi can help meet this specific need. We will highlight the solution and also explain how it can be modified – or enhanced – to be adapted to your own case.
1. HTTP Request and Response
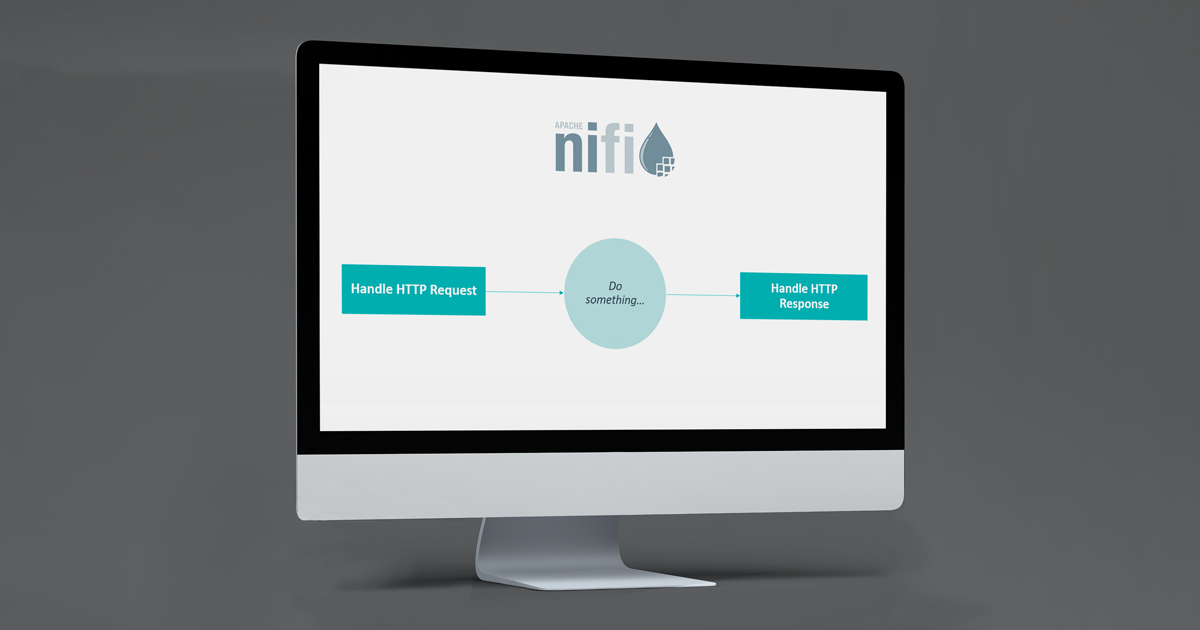
Luckily for us, NiFi has two processors that are good for the job: HandleHTTPRequest and HandleHTTPResponse.
As their name suggest, the first one can listen for HTTP requests coming to a specific port, while the latter produces some kind of response. A typical scenario would look something like this:

Figure 1: Representation of a generic HTTP Request/Response scenario in NiFi
Let’s start by placing them on the NiFi canvas and see how we can configure them.
For the Request handler (HandleHTTPRequest), all we need to do is decide a port and assign a service to the HTTP Context Map property. To do so, just click on the corresponding value and create a simple StandardHTTPContextMap. For the port, remember to use an available one (we were running NiFi on Docker, so we additionally opened the port depicted in the figure below alongside the usual 8080 on which we access the NiFi GUI).
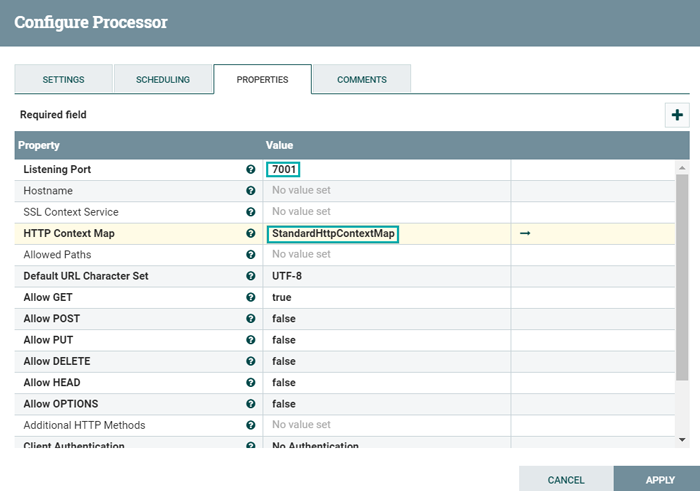
Figure 2: HandleHTTPRequest configuration properties
In our case, we also disabled all types of HTTP methods except GET, but this is totally optional.
The Response handler (HandleHTTPResponse) is even easier to configure; just set a Status Code and, again, an HTTP Context Map, this time reusing the one you previously created.
Remember to enable the HTTP Context Map Service: click on the arrow next to it in either of the two processors configuration tabs and click on the lightning bolt icon. Alternatively, right-click anywhere on the canvas and select Configure to see a list of all available services and enable/disable them.

Figure 3: Configuration tab to enable/disable the HTTPContextMap service
2. Let’s “do something”
With both Request and Response handlers set up, it’s time to build our flow and effectively do something with our API call. So, in the following sections, we describe a relatively simple but widely applicable scenario that can be easily modified to better fit your needs.
Our goal is to fetch a specific file, with a specific extension, from a certain folder. To make the exercise simple and easily replicable, the folder is in our local file system, but it would also be quite straightforward to fetch data from an HDFS, for example (how to do so, however, falls outside the scope of this article).
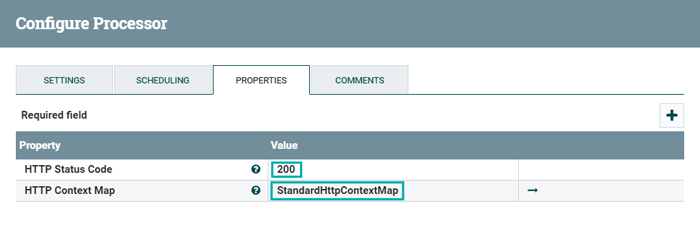
Figure 4: HandleHTTPResponse configuration properties
We imagine that our API call looks something like this:
- Headers:
- type: file_extension
- URI:
- localhost:7001/path?filename=file_name
We want to pass the extension of the file as a header name type; the path, as part of the URI; and the filename, as a query parameter. As possible type values we will expect csv of xlsx, so we will build our NiFi flow to handle either csv files or excel files. In both cases, we will return data in JSON format.
The image below offers an overview of the complete flow. We already covered the configuration of the first and last processors (the ones in yellow), so in the next sections we will go through the details of each of the remaining sections, where the API logic is implemented.

Figure 5: Overview of the full NiFi flow
3. Fetch the file using the request parameters
In this section (in the picture, in red) we split the flow depending on the type header (csv or xlsx) and we fetch the file with the specified path and name.
The FlowFile coming from the Request handler has a series of attributes that describe the request. Amongst them, we can find http.headers.type, http.param.filename and http.request.uri. They hold the values that we pass to the request in order to identify the file that we would like to fetch. They are visible in the picture below.
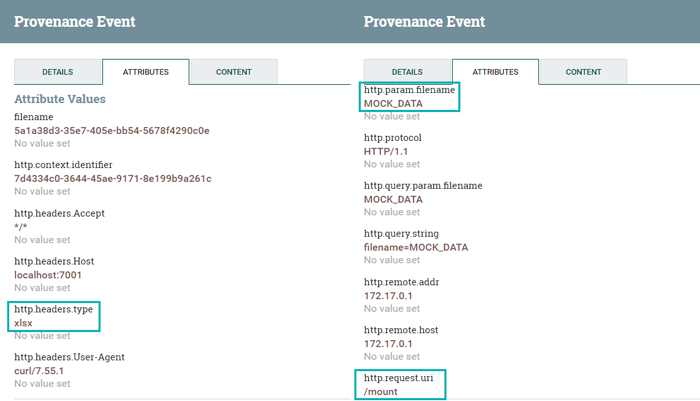
Figure 6: HTTP Request attributes
The http.request.uri is used by the UpdateAttribute processor. This is not strictly needed, but it helps to properly extract the path from the request, especially if it comes in a more complex format. In the picture below, you can see how we simply take the last bit of the URI (after the last / ) and use it as the folder where our file is stored. Of course, this is a very simplified case, but depending on how we configure it and which formulas of the NiFi Expression Language we use, we could tackle different scenarios (with more complex paths or with different URI structures).
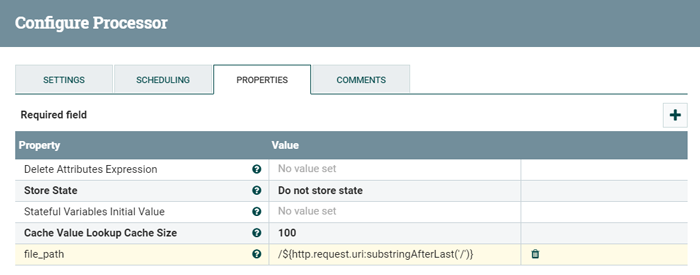
Figure 7: UpdateAttribute configuration to extract the file_path attribute
The RouteOnAttribute processor comes next. This processor allows us to split the flow depending on which type of file we are looking to fetch, as they will have to be processed differently. As depicted in the picture below, this processor needs you to define the states you require and the rule to match the incoming FlowFile to one of them. We take the type header and we create an output state for the two options we expect: csv and xlsx.

Figure 8: RouteOnAttribute configuration to split the flow
After that, it’s time to fetch our file with the FetchFile processors. In the image below (representing the configuration tab of both processors), you can see how the file is identified by a parametrized string, using the attributes that we described. Of course, we could have parametrized the file extension as well, and split the flow only afterward: that’s a legitimate alternative, but it doesn’t change the result of the flow.
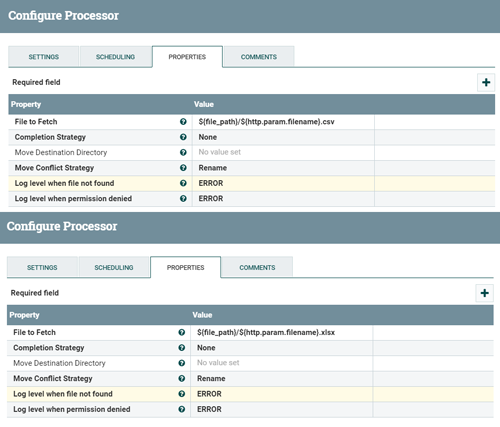
Figure 9: FetchFile configuration tabs
4. Convert the file to JSON
Once our file is fetched, we need to convert it to the JSON format. In both cases, NiFi doesn’t provide a direct conversion, so we will have to go by steps.
For the csv file, we can chain a ConvertCSVToAvro and a ConvertAvroToJSON processor. For the excel file, we must first use a ConvertExcelToCSV before we can convert it to Avro and finally to JSON.
The conversion from Excel to JSON is quite straightforward. We simply need to redirect the output of the Excel FetchFile to the input of the ConvertExcelToCSV.
The conversion from CVS to Avro needs a schema to be passed to the Record schema property. Here’s the one we use:
{
"name":"peoplerecords",
"namespace":"nifi",
"type":"record",
"fields":[
{"name":"id","type":"int"},
{"name":"first_name","type":"string"},
{"name":"last_name","type":"string"},
{"name":"email","type":"string"},
{"name":"gender","type":"string"},
{"name":"ip_address","type":"string"}
]
}
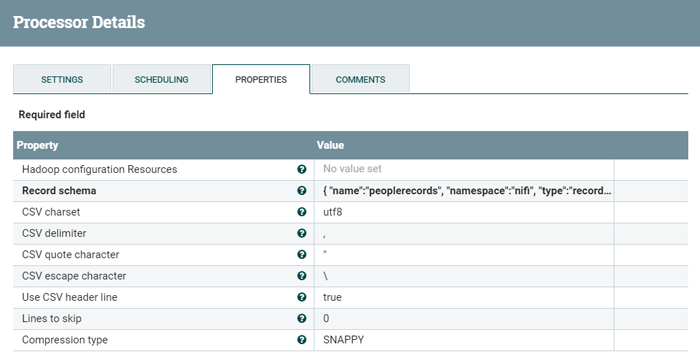
Figure 10: Properties tab of the ConvertCSVToAvro processor
The conversion to JSON is also straightforward; we simply connect the Avro output to the JSON processor.
5. Test
That’s it. By connecting the output of the JSON conversion to the HTTP Response handler, our REST API flow is ready.
We test it with two methods: with a Curl call and with a Postman call.
First, make sure to start the flow. Then, open a command prompt and send the following command (assuming your NiFi node has visibility over a file system with a root folder called mount in which we have a file called MOCK_DATA.xlsx with a schema that corresponds to the Avro schema described earlier):
curl -H “type: xlsx” localhost:7001/mount?filename=MOCK_DATA
If you did everything properly, you should receive a response like the one depicted below (note that curl sends GET requests by default).
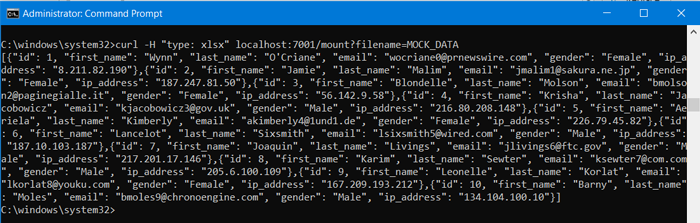
Figure 11: – Example of response after a GET call with curl
Now we can try to fetch a csv file with Postman. With the flow still running, change your query to fetch a csv file and set the proper header in the Postman request. You should get a similar result to the one in the below picture.
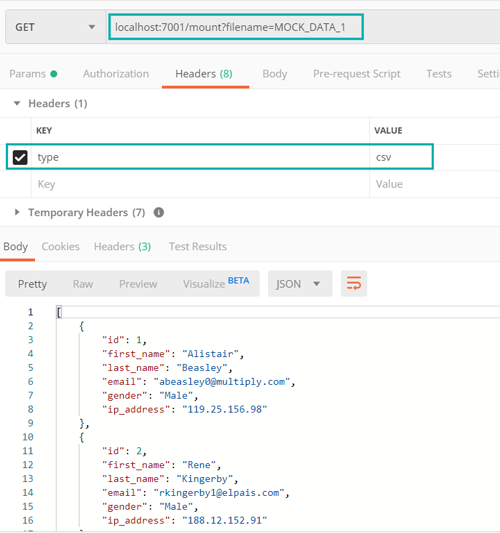
Figure 12: – Example of response with Postman
As you can see, in both cases we receive the JSON we were expecting. Congratulations, you just exposed your data in a REST API with NiFi!
Next steps
We have just seen saw how NiFi allows to properly set up a REST API, allowing to make up for the lack of a tailored processor by using its more generic HTTP Handlers. However, the case we described is quite simple, and most probably not comparable to a real production case. NiFi is mostly used in big data / streaming environments, so possible enhancements could include:
- fetching an entire HDFS folder instead of a single local file
- using wildcards to filter for certain file names or types, instead of looking for a single specific file
- reading from Kafka or other relevant streaming queues
- reading from stores such as databases or NoSQL stores
If you would like to explore some of them, do not hesitate to contact us!