01 Mar 2023 Introduction to Snowflake’s Snowpark
This article will show you what Snowpark is, how to use it, and why it is a great way to integrate Snowflake and all your data processes, pipelines and models developed by your organisation in languages other than SQL.
The adoption of data science, advanced analytics, artificial intelligence (AI) and machine learning (ML) is on the rise, and it’s becoming more and more necessary to have the capability to easily integrate different programmatic languages into the same platform, for instance, Python combined with SQL.
To address this, Snowpark for Python was made generally available (GA) by Snowflake last November, defining a path to gain additional workloads without the need to create and to maintain an additional and complex infrastructure management for separate languages and platforms.
An Introduction to Snowpark
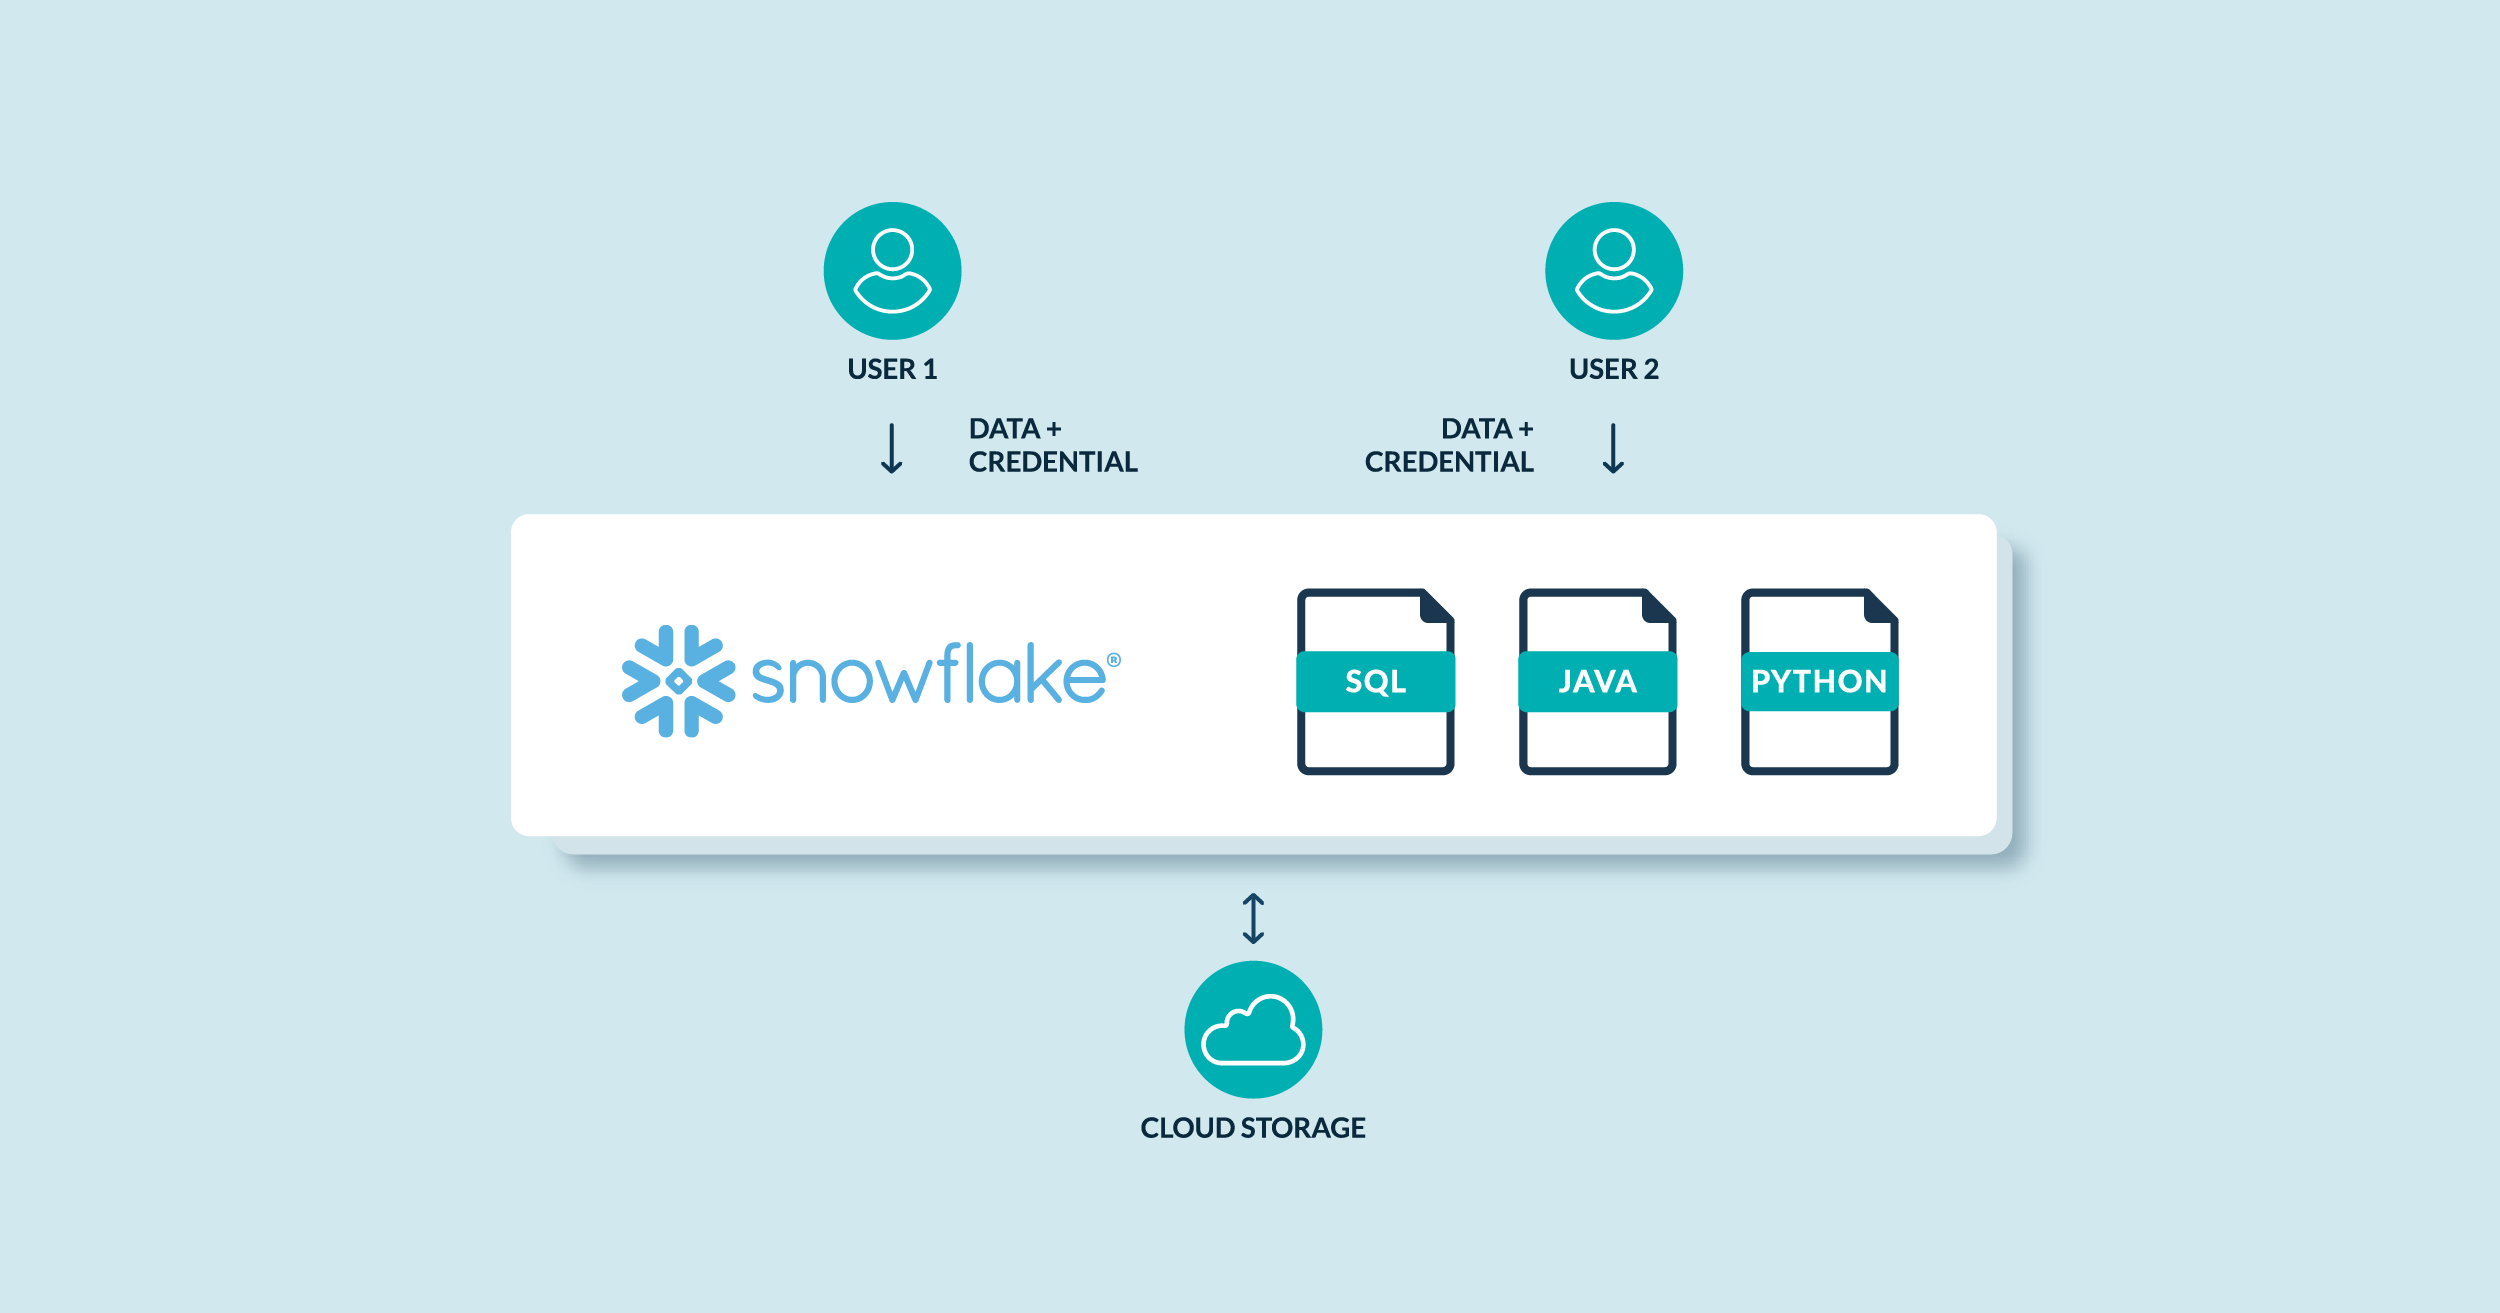
Snowpark is a new developer framework designed to make building complex data pipelines much easier, and to allow developers to interact with Snowflake directly without having to move data. The latest release allows you to use three Snowpark languages (Scala, Java, and Python) for production workloads. The Snowpark API brings deeply integrated, DataFrame-style programming to the languages developers prefer to use.
Snowpark enables all your teams to collaborate on the same single copy of the data, while natively supporting everyone’s programming language, minimising the complexity of having to manage additional environments for non-SQL data pipelines.
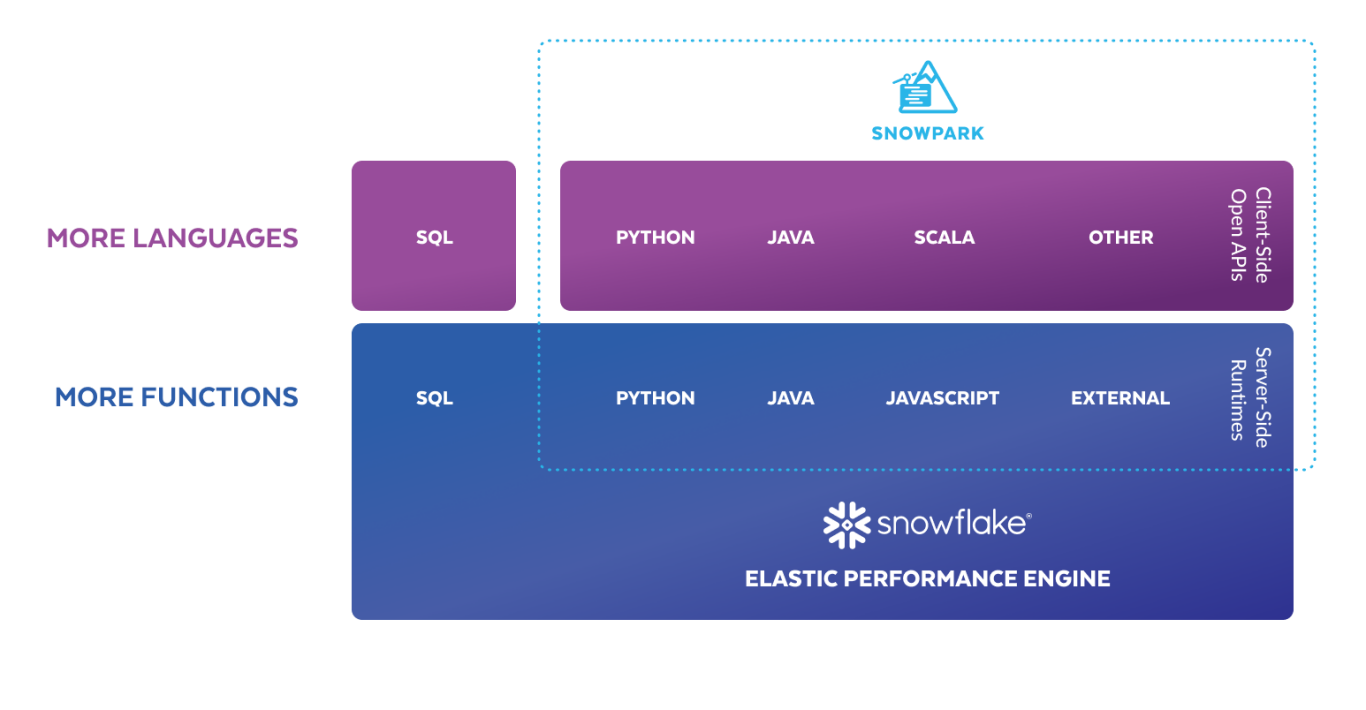
Diagram 1: Snowpark programming languages and compute engine
(Source: https://www.snowflake.com/en/data-cloud/snowpark/)
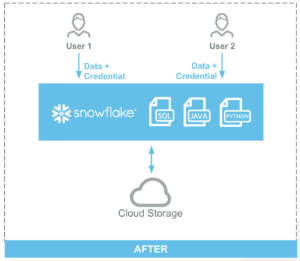
The new Snowpark for Python package has been built to enable connectivity to Snowflake in a more advanced way than the old Snowflake Connector for Python. The old connector allows you to execute SQL commands in Snowflake and a few other things, but the new package works with a wider set of functions and options and obtains better results. Snowpark enables more complex data use cases, including the ability to run UDFs, external functions, and Stored Procedures directly inside Snowflake.
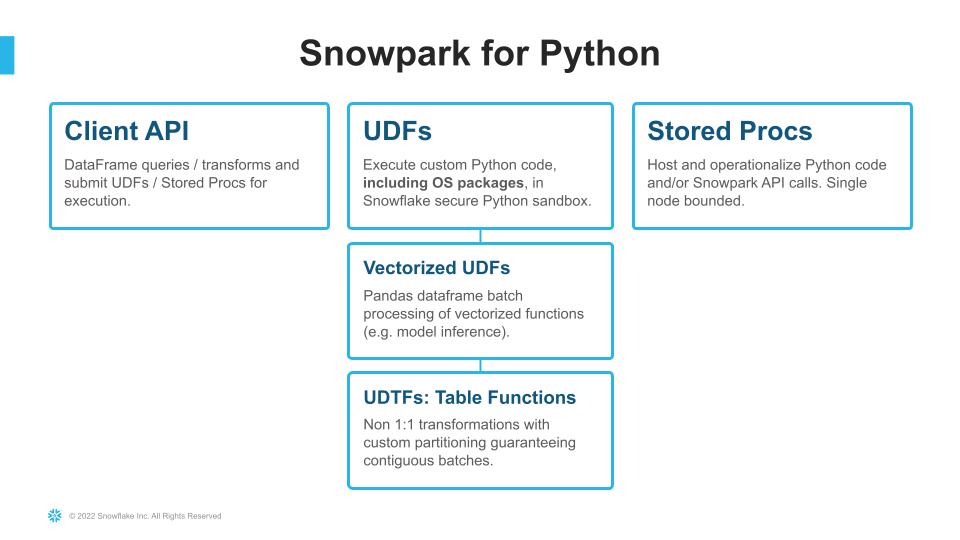
Diagram 2: Snowpark for Python options and features
(Source: https://www.snowflake.com/blog/snowpark-python-feature-engineering-machine-learning/)
Main Features of the New Snowpark for Python
- Read data from tables, views and SELECT statements as new Snowflake DataFrames that can be converted into Panda DataFrames.
- Access supporting files in cloud storage and read their contents to contribute to the overall Python script.
- Perform powerful data transformations built out of multiple components using Pandas.
- Convert Panda DataFrames into Snowflake DataFrames and/or write the data into Snowflake.
- Create and modify User Defined Functions (UDFs) that leverage Python, using Python scripts and packages that are not already stored within Snowflake.
- Create and modify Stored Procedures that leverage Python, using Python scripts and packages that are not already stored within Snowflake.
- Call UDFs and Stored Procedures directly as part of a wider Python script.
- Apply machine learning models to generate new forecasts using libraries such as PyTorch or scikit-learn.
Business Use Cases Where Snowpark can be Applied
- Identify data quality issues and perform data validation tasks.
- Analyse, explore, and use the data loaded in Snowflake from external data applications.
- Deploy and increase the accuracy of AI and ML models processing large and complex data sets.
- Increase data security without having to move data out of the Snowflake environment to be able to work with it.
- Modernise and unify data processing infrastructure for large-scale data pipelines.
- Create scalable workflows to provide data to analysts and engineers, loading and transforming structured, semi-structured, and unstructured data as part of their data engineering pipelines.
- Manage the development lifecycle with DataOps.
- Data governance and security (data classifiers and masking functions).
Are SNOWPARK and SPARK the Same?
In complex environments, one common data architecture that we find is the use of Snowflake as a data lake/data warehouse, coupled with Databricks to implement Spark for compute ML models or complex data pipelines.
Databricks allows you to manage the Spark clusters and provides relatively simple access for Python.
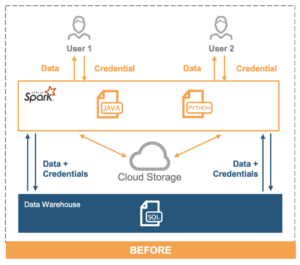
The configuration previously explained means you are moving all your data out (from Snowflake) and then processing it in a separate elastic cluster (Databricks/Spark).
To get around this, Snowflake has created Snowpark, which allows you to compute data directly in Snowflake with its own DataFrame API in Java, Scala, and now Python, working in the same way as Spark/Databricks.
(Source: https://www.snowflake.com/resource/spark-to-snowflake-migration-guide/)
In conclusion, a Snowpark job is conceptually very similar to a Spark job.
In addition, the Snowflake platform can also connect to Spark through the Snowflake Connector for Spark, so you can keep Snowflake open to connect to your existing Spark workloads.
Optimised Virtual Warehouse for Snowpark
Snowpark for Python comes with a great new feature, Snowpark-optimised virtual warehouses, especially set up for Snowpark workloads (in public preview).
Each node of this new type of warehouse provides 16x the memory and 10x the cache compared to a standard warehouse. Snowpark-optimised warehouses come with all the features and capabilities of normal virtual warehouses, including a fully managed experience, elasticity, high availability, and built-in security properties.
These are recommended for workloads that need large memory requirements, such as ML model training. Snowpark workloads utilising UDFs, UDTFs, or Stored Procedures, can also benefit from Snowpark-optimised warehouses.
Of course, you can continue to run Snowpark workloads in standard warehouses if you don’t need the additional resources enabled by Snowpark-optimised warehouses.
How To Do It
Use the following syntax to create your optimised virtual warehouse:
create or replace warehouse snowpark_optimized_wh with
warehouse_size = 'MEDIUM'
warehouse_type = 'SNOWPARK-OPTIMIZED';
To maximise CPU and memory resources when running Snowpark processes, set the MAX_CONCURRENCY_LEVEL parameter for your warehouse like this:
alter warehouse snowpark_ optimized_wh set max_concurrency_level = 1;
Limitations
- The initial creation and restart of a Snowpark-optimised virtual warehouse may take longer than a standard type.
- Certain scikit-learn algorithms may not use all of the resources available in this kind of warehouse.
- It doesn’t support Query Acceleration.
- It’s not supported on XSmall or SMALL sizes.
Implementing Snowpark
As you can see in Diagram 1, it’s possible to use different languages to develop your pipelines and processes, and to execute these in two different modes, Client and Server. Both scenarios are explained below.
Server Side
If you are looking to develop UDFs or Stored Procedures using Python language (Java or Scala) stored inside your Snowflake account, use the following implementation method on your Snowflake architecture. Snowflake has now integrated the ability to create and execute Python UDFs or SPs directly in a Snowflake worksheet.
Environment Configuration
The first step is to acknowledge the Anaconda packages and install them on your Snowflake account:
- Log into Snowsight (the Snowflake web interface).
- Click on the dropdown menu next to your login name, then click on Switch Role » ORGADMIN to change to the organisation administrator role.
- Click on Admin » Billing » Terms & Billing.
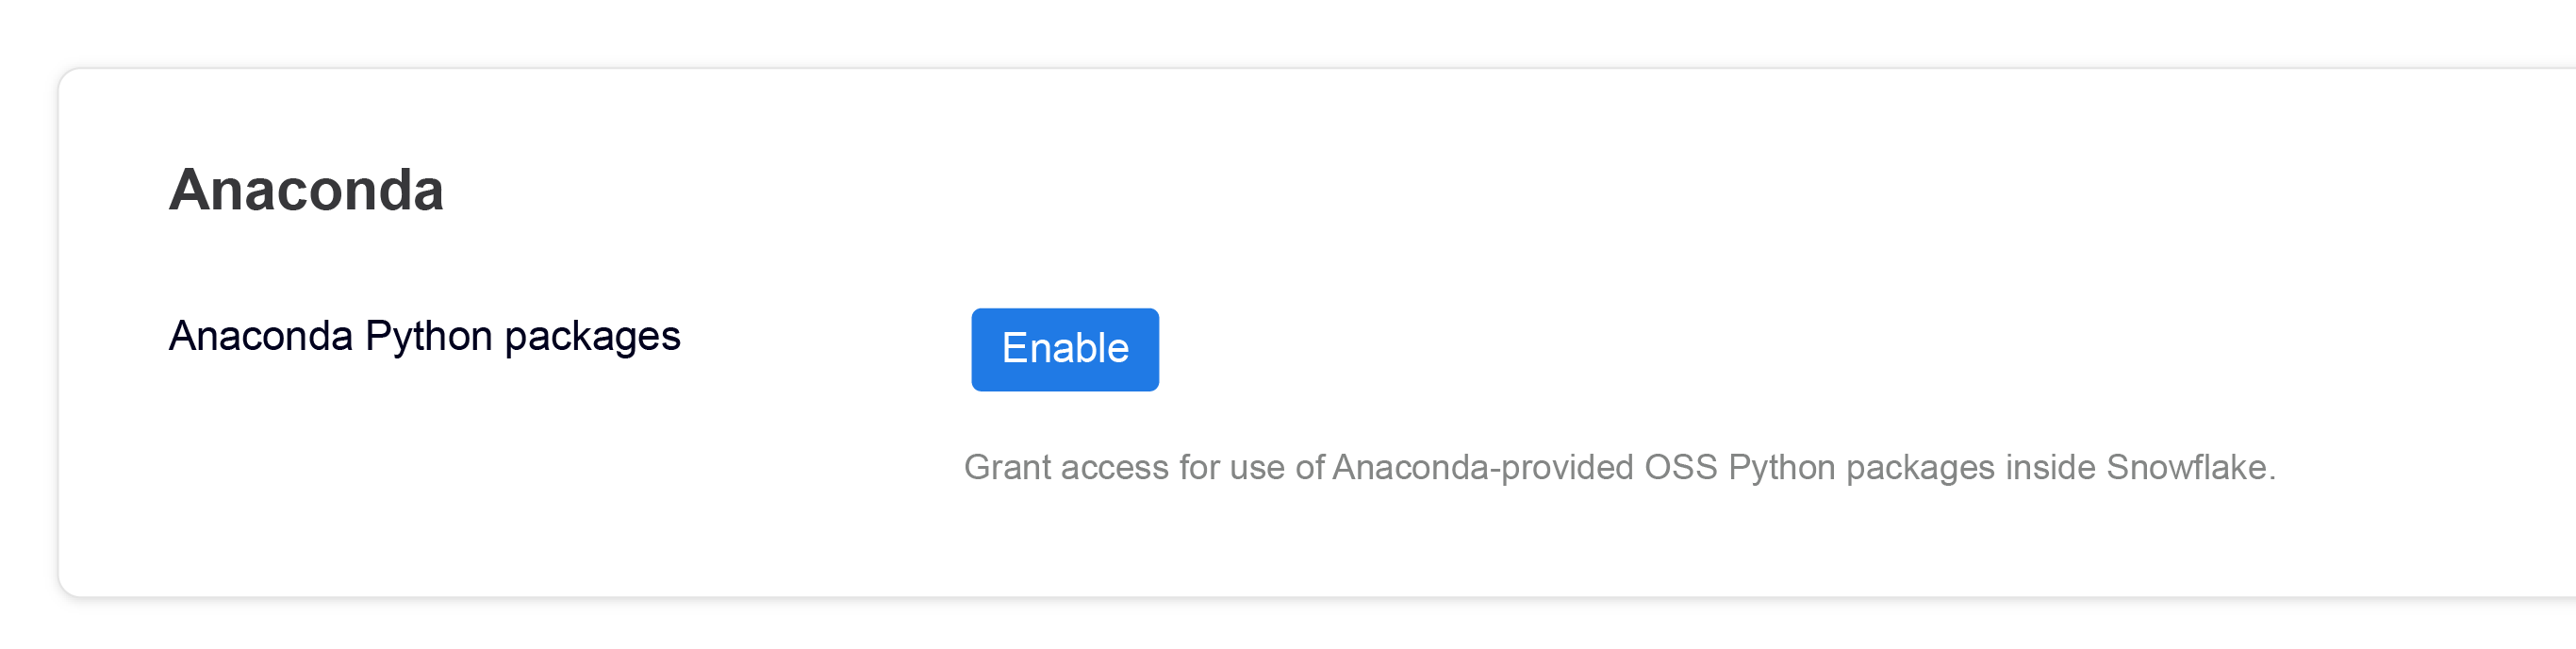
- Scroll to the Anaconda section and click on the Enable button; the Anaconda packages (Preview Feature) dialogue opens.
- Click on the link to review the Snowflake Third-Party Terms.
- If you agree to the terms, click on the Acknowledge & Continue button (see below).

Develop and Compile Your Process
Now you are able to create functions and procedures inside your Snowflake account and execute them using its architecture.
In this demo, our use case is to develop a simple process to read, move and transform data from a source table called CALL_CENTER to a target table CALL_CENTER_AGG_LARGE, filtering the data using a condition (CC_CLASS=’Large’), selecting two source fields (CC_NAME and CC_CITY), and creating a newly calculated metric (Total Employees per City). The output dataset will be stored in a new table:
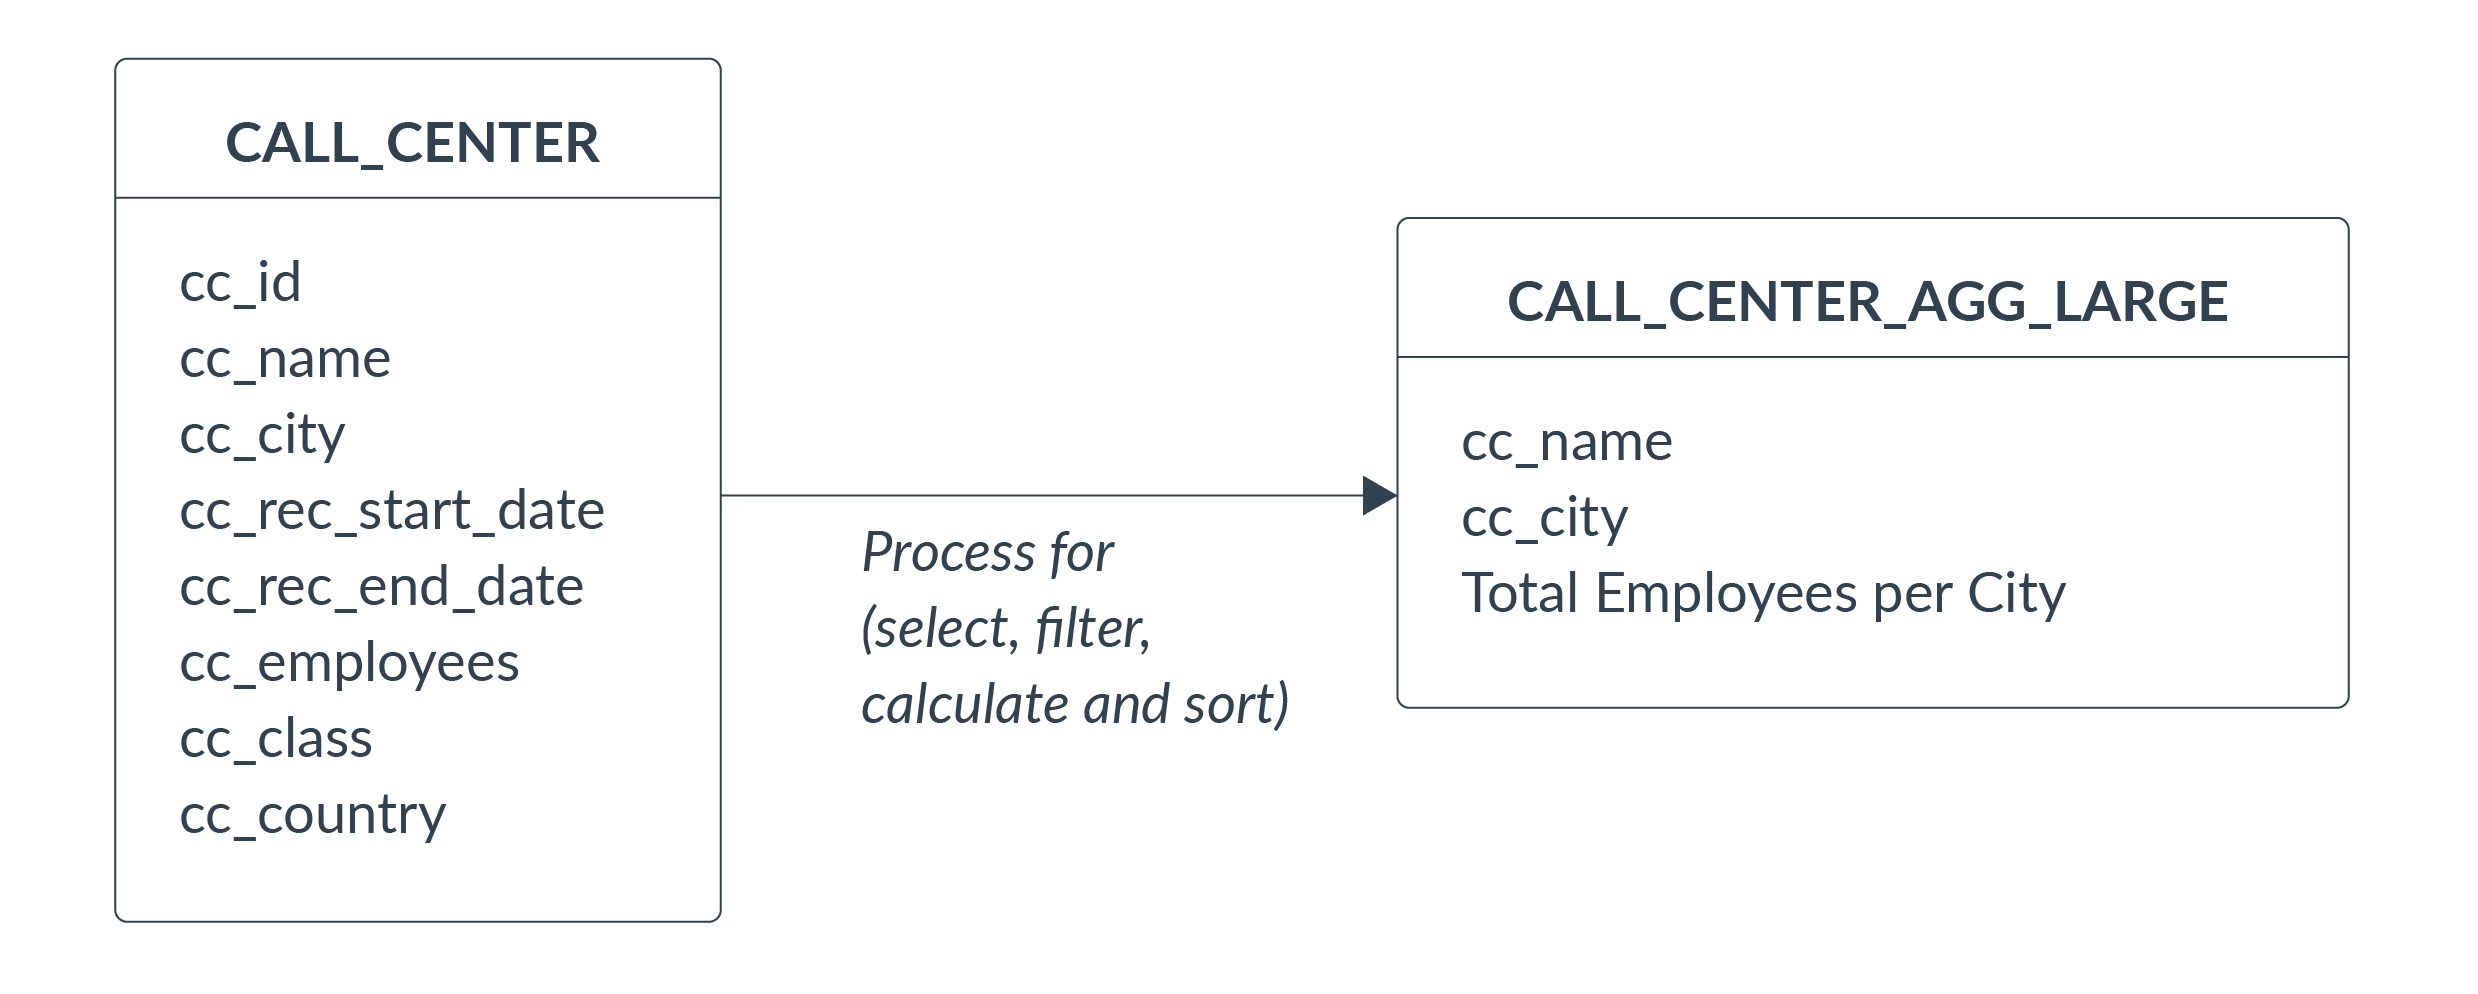
Diagram 3: Data model to be implemented using Snowpark
Procedure Codification
HEADER
It is mandatory to define the following properties in the header procedure:
- The value to be returned by the Stored Procedure; specify the Snowflake data type of your return value (in our case a string).
- Your programming language and runtime version.
- The Snowpark package for the version of the library that you want to use.
- The Handler name (the complete name of your main function or method).
Optional parameter:
- IMPORTS – To be used if you are creating a stored procedure to invoke code uploaded from a stage (for instance, file myfile.py on the internal stage mystage).
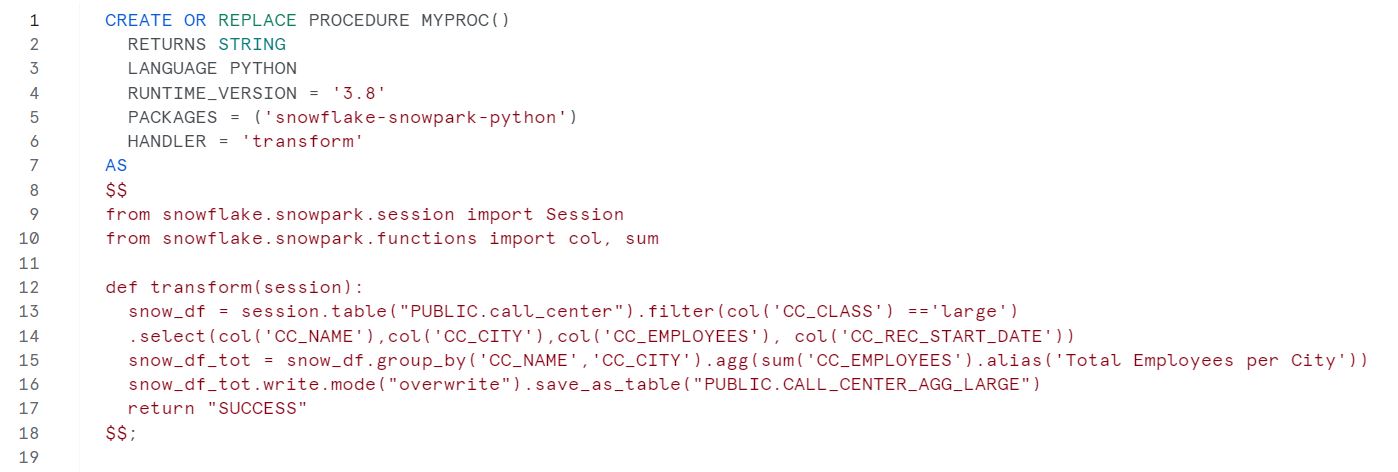
BODY
Next, define your Python code in one block enclosed by $$. In our example, we declared:
- Import the SESSION library from Snowpark to manage the access and to manipulate the data.
Define our function (called Transform):
- Select and transform the source data and load it into a Python DataFrame.
- Calculate the new metric with the defined logic (aggregate the cc_employees field).
- Load the output into a new table (if the object exists, the process overwrites it; if not, it creates the table).
- Load the output into a new table (if the object exists, the process overwrites it; if not, it creates the table).
- Return the defined message string; optionally, we can manage the exception errors at this point.
EXAMPLE CODE:
Execution
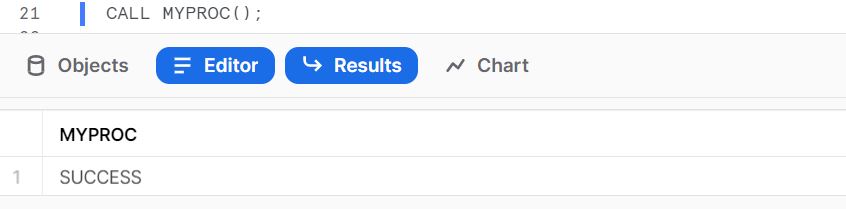
You can execute your new UDF or Stored Procedure by calling the object inside Snowflake using the CALL statement:
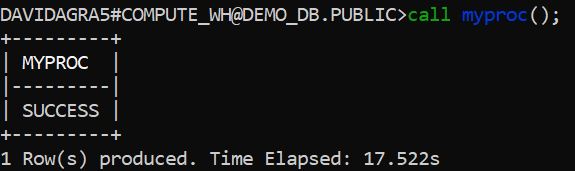
Or you can call the process from SnowSQL (CLI), or use other third-party tools implemented in your organisation (for instance, your ETL tool):
Now we can validate the result of our data transformation process executed on Snowflake:
Note: To use SnowSQL to connect to the database, we recommend you configure your default connection parameters file to simplify and secure the process – add your connection to the CONFIG.file (in %USERPROFILE%\.snowsql\ path):
[connections.demo_db_pub]
#SnowSql connexion for DEMO_DB.PUBLIC
accountname = xxxxxxx-xx99999
username = XXXXXXX
password = XXXXXXX
dbname = DEMO_DB
schemaname = public
warehousename = COMPUTE_WH
Client Side
Now let’s imagine a different scenario, where you need to connect a data application to display a dashboard able to interact with the data stored in your Snowflake architecture. In a case like this the Python code will reside in the client application outside Snowflake.
You can code your external scripts in your data application to establish the connection to Snowflake, and run the Python code outside the Snowflake data platform, using the configured virtual warehouses and the stored data (so no data movement is required).
Environment Configuration
Before you can use Snowpark sessions to interact with Snowflake, you must configure your environment. Anaconda is a Python package that can be used to configure Python environments on your server or local machine, allowing you to create your virtual environment using Anaconda’s Snowflake Snowpark for Python, ensuring that every package installed on your local machine works properly with the native Snowflake packages.
Download the Anaconda package:

Then install the downloaded package:
$ bash Anaconda3-2011.11-Linux-x86_64.sh
After that, create the conda environment:
$ conda create --name snowpark -c https://repo.anaconda.com/pkgs/snowflake python=3.8
Now activate the conda environment by running the following command:
$ conda activate snowpark
After activating the environment (called Snowpark), install Snowpark for Python, including Pandas, in the conda environment:
$ conda install -c https://repo.anaconda.com/pkgs/snowflake snowflake-snowpark-python Pandas
Develop and Compile Your Process
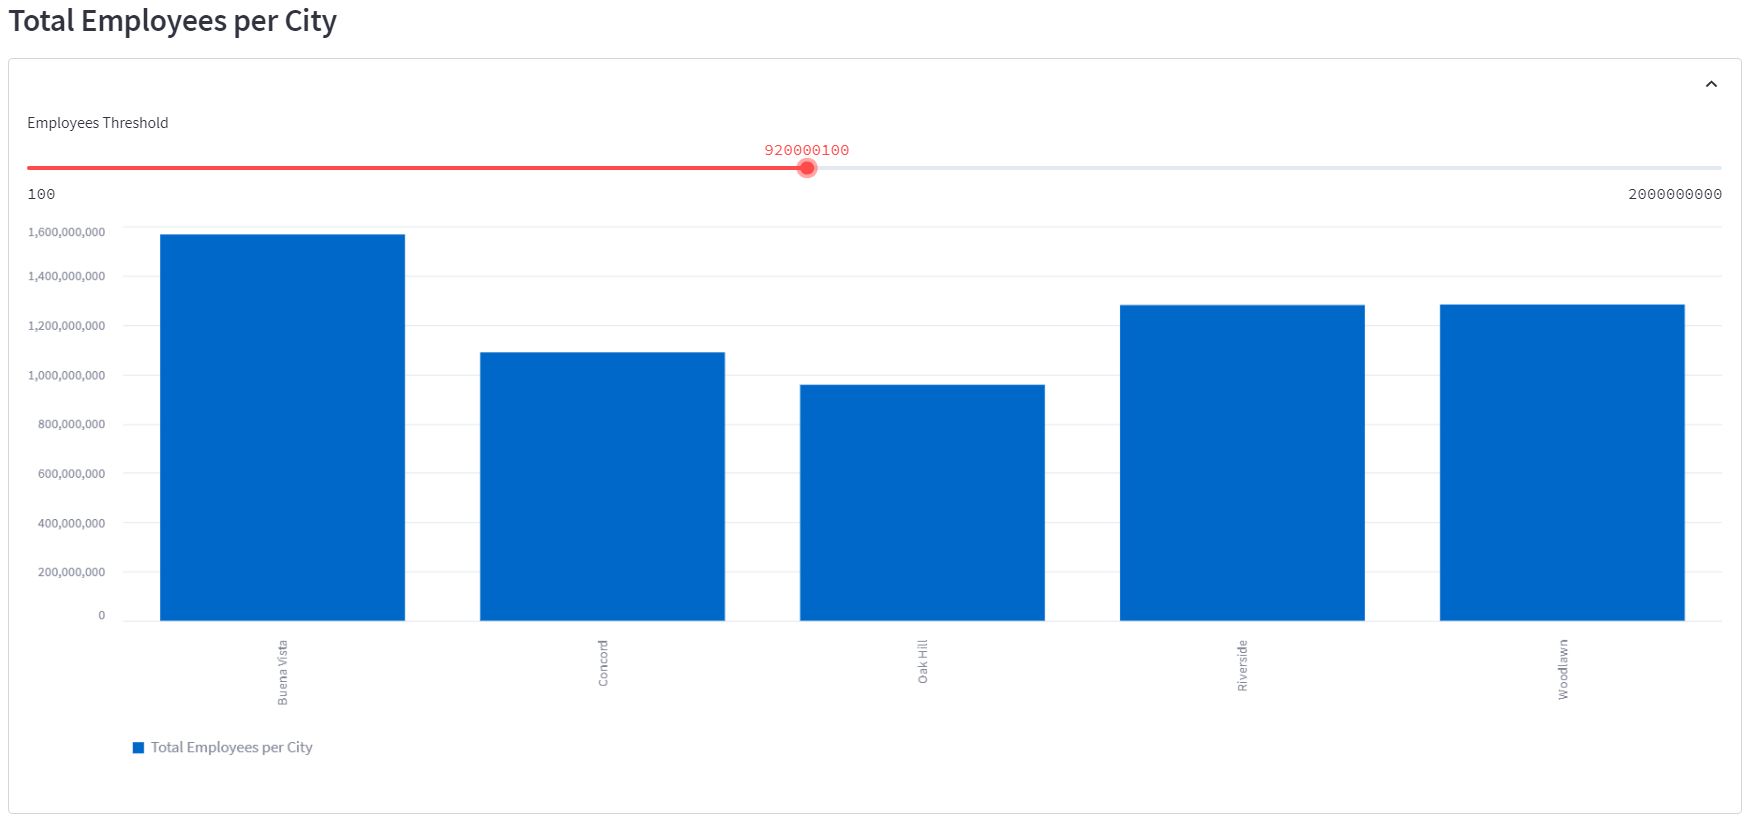
For this scenario we will use Streamlit as our data application. It will allow us to develop an application, hosted on our server, which will be accessible from our web browser to interact with the data. There will be a dashboard with a graph, showing us our data stored in Snowflake, with the defined logic and shape for analytical purposes.

Data application dashboard developed with Streamlit
Procedure Codification
HEADER
- Import the session library from Snowpark to manage the access and to manipulate the data.
- Import the Streamlit library to create the data application.
- Import Pandas to work with the DataFrames created by Snowpark and use them in Streamlit.
BODY
Continue defining your Python code. In our example, we declare:
- Define the Streamlit page config.
- Configure the connection to Snowflake through the function create_session_object. You can find the full list of connection parameters in the Snowflake documentation.
Create our function (called load_data) to model the data and display it in the dashboard:
- Select and transform the source data and load it into a DataFrame.
- Calculate the new metric.
- Pass and configure the data to Streamlit.
Finally, we define the main function to call the create_connection and load_data methods.
EXAMPLE CODE:
# Import required libraries
from snowflake.snowpark.session import Session
from snowflake.snowpark.functions import avg, sum, col,lit
import streamlit as st
import Pandas as pd

st.set_page_config(
     page_title="Environment Data Atlas",
     page_icon="🧊",
     layout="wide",
     initial_sidebar_state="expanded",
     menu_items={
         'Get Help': 'https://developers.snowflake.com',
         'About': "This is an *extremely* cool app powered by Snowpark for Python, Streamlit,
     and Snowflake Data"
}
)

# Create Session object
def create_session_object():
   connection_parameters = {
      "account": "xxxxxxx-xx99999",
      "user": "XXXXXXXX",
      "password": "XXXXXXXX",
      "role": "ACCOUNTADMIN",
      "warehouse": "COMPUTE_WH",
      "database": "DEMO_DB",
      "schema": "PUBLIC"
   }
   session = Session.builder.configs(connection_parameters).create()
   return session

# Add header and a subheader in Streamlit
st.header("Data Employees")
st.subheader("Powered by Snowpark for Python and Snowflake | Made with Streamlit")

# Create Snowpark DataFrames that loads data from Snowflake
def load_data(session):
    # Filtered Employees by Large Class and calculate the new metric
    snow_df = session.table("PUBLIC.CALL_CENTER").filter(col('CC_CLASS') == 'large')
    snow_df = snow_df.group_by('CC_CITY').agg(sum('CC_EMPLOYEES').alias('Total Employees
per City')).sort('CC_CITY')
    # Display an interactive chart to visualize the data
    with st.container():
        st.subheader('Total Employees per City')
        with st.expander(""):
            threshold = st.slider(label='Employees Threshold',min_value=200000,
            value=2000000000, step=10000000)
            pd_df_emp = snow_df.filter(col('Total Employees per City') > threshold).to_Pandas()
            st.bar_chart(data=pd_df_emp.set_index('CC_CITY'), width=850, height=500,
            use_container_width=True)
 if __name__ == "__main__":
    session = create_session_object()
    load_data(session)
Execution
From the Bash Snowpark environment, execute the application using this command:
$ streamlit run my_snowpark_streamlit_app.py
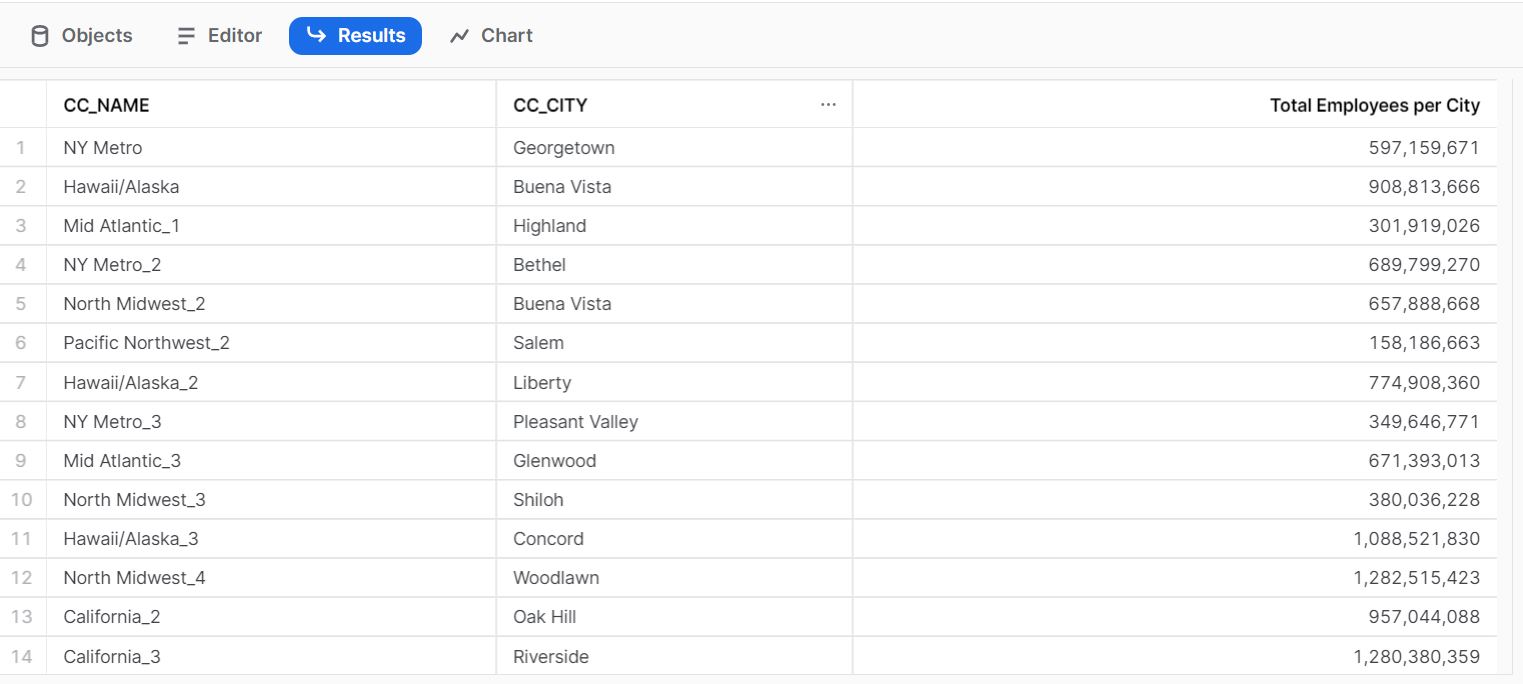
The application presents the following output, and as a user we can interact with the data using the picker object (Employees Threshold). Each time the user selects a new value on the selection bar, the application executes a new query to Snowflake, collects the data, and sends it to Streamlit to be displayed:
If you access the Bash prompt, you can see how the application launches a new query to update every action applied on the front end:

Conclusion
We have seen how Snowpark allows you to develop your data pipelines in your preferred language, with no limits on the level of complexity, and then to easily process and integrate these pipelines into your Snowflake platform through a secured environment and leveraging the data and power of your deployed architecture without the need to create additional, complex environments for it.
In future ClearPeaks blog posts we will show you some more examples of how to implement real use cases using Snowpark, so stayed tuned! In the meantime, don’t hesitate to get in touch with our team of certified consultants for more details about how this new experience for Snowflake can accelerate development and reduce costs too!
