23 Mar 2022 Kubernetes for Managing Microservices
The microservices trend has grown at the speed of light, and a lot of companies have adopted a microservices architecture approach for many of their applications as it offers tangible benefits including flexibility, agility, and scalability, among others. Although the advantages are clear, some people still do not know how microservices work and how they interact with each other.
Monolith vs Microservices architectures
Let’s answer this question by explaining the difference between monolith and microservices architectures.
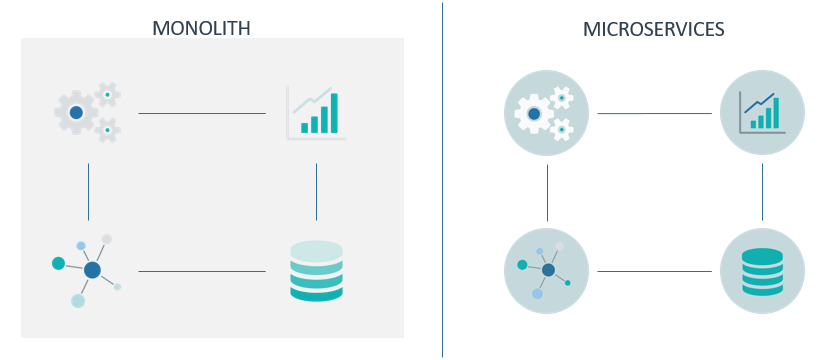
Monolith architecture is the traditional design for software applications. As its name suggests, it follows a single, unified “rock” style, but with software rather than rocks. This means that all the components and functionalities of the service are gathered and self-contained as one, meaning that everything is interconnected and interdependent, so everything must be present in order for it all to work.
You are now probably thinking of some of the problems this involves: updating a component means updating the entire service; scaling is done as a whole, although it might only be needed in some components – and this is why microservices appeared.
Microservices aim for a loosely coupled approach, where the components are isolated and deployed independently. This architecture enables services to be highly maintainable and testable, fast to update, and reliable – and with this separation companies can speed up their innovations and the commercialisation of new features, being able to implement, update or scale each component on demand.
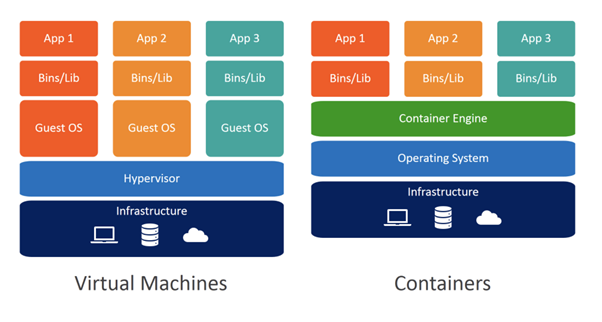
Currently, there are two main approaches to isolate applications or services: virtualisation and containerisation.
Virtualisation vs Containerisation
WaveWorks – Docker vs Virtual Machines (VMs): A Practical Guide to Docker Containers and VMs
Virtualisation is a concept dating from the 1960s that allows multiple logical computers inside a single physical one. Basically, these logical computers, known as virtual machines (VMs), are guest software running on a software called Hypervisor, which provides an abstraction layer to the guest operating system on top of the host machine hardware.
Containerisation, on the other hand, is a type of application-level virtualisation that aims to encapsulate software applications in containers. A container is basically a light-weight portable environment containing the application and related files and dependencies. The most well-known containerisation engine is Docker, an open-source project that leverages kernel functionalities to isolate resources (CPU, memory, etc.) and namespaces to containerise applications. If you are interested in seeing a case scenario with Docker, check out our blog post about AWS with Airflow and containers.

While virtualisation is used in many fields with multiple applications, in microservices containerisation is preferrable because containers are easier to create and move between infrastructures. Although containerisation has become popular in web applications, its presence is increasing in big data and cloud infrastructures to facilitate high availability and scalability, as scaling and deploying new features is a constant need in current applications.
Due to the exponential growth of containerisation, many companies end up having a huge number of containers, impossible to manage and orchestrate. To tackle this problem, container-oriented orchestrator tools such as Kubernetes are used to track the status of containers, to check whether everything is working, to scale up or down when necessary, etc.
Kubernetes
Kubernetes (K8s) is the most widely used container orchestration tool. Originally created by Google to manage all their company containers and cloud services, it was later released as open source by the Cloud Native Computing Foundation. Nowadays, it is maintained by the community, and orchestrates most of the microservices on the market and manages many cloud services under the hood.
Among all the benefits offered by Kubernetes – and orchestration tools in general – there are three main features to highlight:
- High availability: applications have no downtime and are always accessible to the user.
- Scalability: applications can be scaled up fast when the workloads increase or scaled down when the load decreases.
- Disaster recovery: applications and data can be restored to a previous state.
In the following section, we are going to explain how Kubernetes works and how it provides these capabilities.
K8s Architecture
Kubernetes follows a master-slave architecture, having one or multiple control planes acting as the master nodes, and one or multiple nodes acting as worker nodes. As in many master-slave architectures, worker nodes usually require more resources since they process most of the workloads, whereas master nodes run cluster management processes; a virtual network interconnects the control planes and nodes to act as a single machine. In this section, we are going to describe the K8s architecture and its main components.
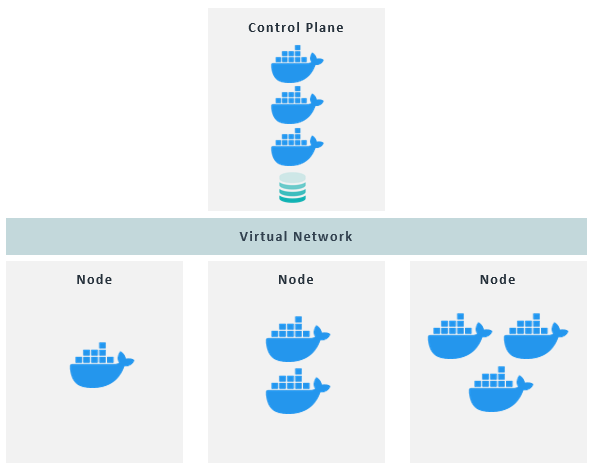
Nodes and Pods
Nodes are physical or virtual machines that host the containerised applications, where each can run one or multiple applications. Each node has a Kubernetes process named kubelet running on it, which basically allows the nodes to talk to each other and execute some tasks like running application processes. The containerised applications run in wrappers called Pods, which are the smallest unit of deployment and can include one or more containers.
Pods create running environments on top of the containers (usually Docker containers) to add an abstraction layer, so users only interact with the K8s layer and not with the container engine. Usually only one application runs per Pod, or the main application and some auxiliary containers that must run in the same Pod.
Each Pod has its own IP address, used to interact with others. However, as Pods are ephemeral, when a Pod is re-created, it is assigned a new IP address, which would need a re-assignment of the endpoint. In order to solve this inconvenience, a component called Service is used to attach a permanent IP address to each Pod. Leveraging this decoupling of the Pods and Services lifecycles, Pods can be re-created without having to deal with connection issues, already handled by Services.
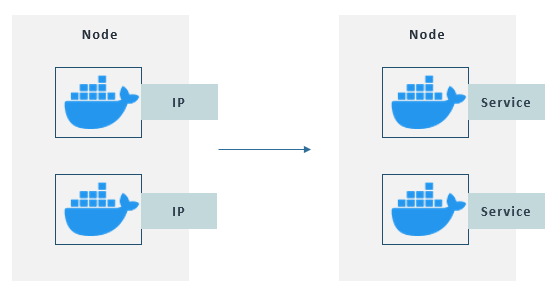
Pods use Services to communicate with each other instead of their own IP
By default, Services are not exposed outside the cluster, they are internal. However, some applications should be accessible via a browser, so an external Service is needed to expose a Service endpoint. This type of Service can be specified on creation. These external Services follow the format “http://node-ip:port”, which is not very practical, so a component called Ingress is used to forward the requests to the corresponding external Service from a readable endpoint like “https://my-app.com”.
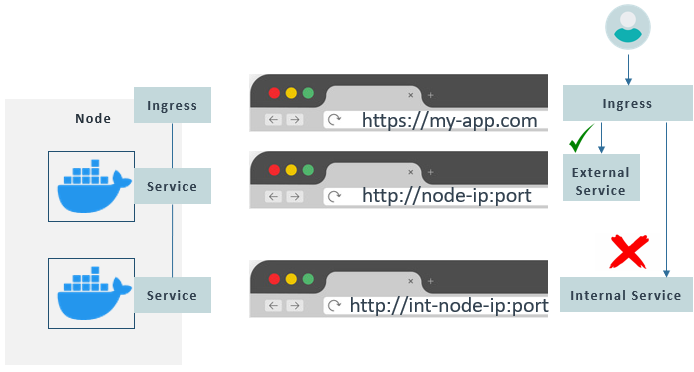
Ingress redirects external petitions only to External Services, never Internal
Thanks to the K8s distributed system, when a Pod dies, the contained application doesn’t become unavailable. This is because replicas can be configured and distributed between nodes, with all the application replicas attached to the same Service. Services not only provide a permanent IP, but also act as load balancers to forward the requests to available replicas.
The definition of these replicas is done in a blueprint for the application Pod called a Deployment. In general, you usually define Deployments rather than create Pods directly, as Deployments act as abstractions of Pods where you can provide some configuration such as replicas, labels, names, etc.
Nonetheless, applications like databases are special cases as they interact with storages (explained in the Volume section). To avoid inconsistencies while writing and reading from storage, replicas are handled by another component called Statefulset. Statefulsets are for stateful apps or databases, whereas Deployments are for stateless applications.
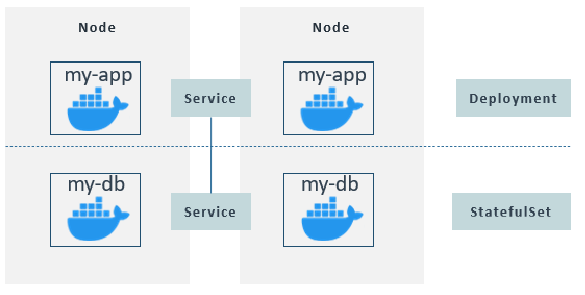
Replicas over nodes are generally handled by Deployments for stateless applications and StatefulSets for stateful applications or databases. Replicas use the same Service and it forwards the petitions to the corresponding replica.
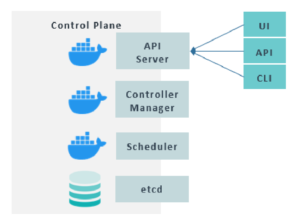
Control Plane
Critical processes are run to manage the cluster in the control plane, as it’s a master node. These processes offer four main components:
- API Server: the entry point to the K8s cluster, it’s the component that client applications will communicate with, such as UIs, APIs, and the Kubernetes command line tool named kubectl.
- Controller Manager: tracks what is happening on the cluster, like container health.
- Scheduler: decides on which node a new Pod should be scheduled, based on the workload and the available resources on the nodes.
- etcd: a key-value storage that stores snapshots of the current state of the cluster in charge of recovery in case of disaster.
In production environments, you will usually have multiple control planes too, to ensure availability in case of disaster.
Virtual Network
As mentioned before, a virtual network is required to enable communication between nodes and control planes. Furthermore, the virtual network gathers all the nodes and turns them into one powerful machine with the resources of each node.
Without entering into too much detail, the virtual network is responsible for port allocation, naming, service discovery, load balancing, application configuration, and migration. There are many open-source and cloud-based implementations available on the market to be used in your cluster as the virtual network. If you are interested in learning more about this, we recommend you take a look at the official Kubernetes documentation.
ConfigMap and Secret
Other useful components in Kubernetes are the ConfigMap and the Secret. Both are a sort of configuration file. You place environment variables or application variables in the ConfigMap and your secrets and credentials in the Secret.
These utilities are extremely useful to change properties without the need to re-build and push images to the repo to then pull them into the Pod.
Although Secrets and ConfigMaps are essentially the same, a key-value yaml file, Secret stores values (passwords, certificates, secrets, etc.) in base64 format. This format isn’t secure itself; Secret components are meant to be encrypted using third-party tools to provide real security.
Volume
Some Pods generate or store data, and considering that Pods can be destroyed, this data can be lost too. However, we might be using some applications like databases where we need data to persist. Kubernetes offers a specific component for this, Volume.
Volume basically attaches physical storage (locally in the cluster or externally outside the cluster) to the Pod. With this, K8s decouples storage from Pods, persisting the data even if the Pod gets re-created.
Remember that K8s don’t manage data persistence, so it’s up to you to deal with replicas and availability.
Now that we have explained the main concepts around Kubernetes, we will provide a brief step-by-step tutorial to set up a Kubernetes cluster. Although there are many ways of creating a K8s cluster, like using minikube to create a local cluster, we are going to reproduce the most realistic option, installing Kubernetes in a distributed environment using virtual machines.
Setting up a Kuberentes Cluster in VirtualBox
There are many virtualisation products out there, but for this demo we are going to use one of the most common: VirtualBox. Nonetheless, feel free to use whichever one you want. To facilitate the process, we are going to use the kubeadm toolbox to install Kubernetes.
For the following sections, we are going to assume you have installed VirtualBox and an ISO with a Linux OS.
Configuring the Virtual Machines
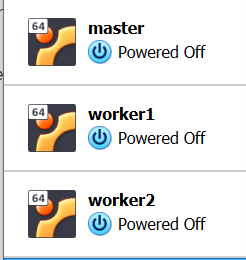
The first step is basically to create the virtual machines. For this example, we are going to create three VMs, one master and two workers.
The creation process should be quite straightforward in VirtualBox:
- New VM. You will have to follow all the steps for each machine.
- Name the machines and select the OS (corresponding to your Linux ISO). We suggest naming them master, worker1, and worker2.
- Assign RAM. Bear in mind that VMs need 2-4GB RAM, but the more the better.
- Follow the next two steps with the default option of creating a virtual disk with VDI.
- Select Fixed size for the VM (dynamic is not needed).
- Assign sufficient capacity to the VM. As we are only going to install Kubernetes and a few dependencies, 20-30GB should be enough.
Once created, the network must be configured so the three machines can reach each other. The steps are simple:
- Go to Settings on each VM.
- Click on “Network” on the left panel.
- Make sure Adapter 1 is enabled and attached to NAT; this forwards internet connection from your PC to the VM.
- Add a second adapter by clicking on Adapter 2, enable the adapter and attach it to “Host-only Adapter”.
At this point, you should have three VMs that can reach each other. The next steps consist of entering each VM and installing Docker, as it is a K8s dependency. Before installing Docker, though, we must add that we will use kubeadm to install Kubernetes, and the versions of Docker and kubeadm must match.
In our case, as we used Ubuntu, the versions we used are:
- docker-ce=5:19.03.15~3-0~ubuntu-focal
- docker-ce-cli=5:19.03.15~3-0~ubuntu-focal
- kubelet=1.20.2-00
- kubeadm=1.20.2-00
- kubectl=1.20.2-00
To install Docker, run the following:
sudo apt-get install \
    ca-certificates \
    curl \
    gnupg \
    lsb-release

curl -fsSL https://download.docker.com/linux/ubuntu/gpg | sudo gpg --dearmor -o /usr/share/
keyrings/docker-archive-keyring.gpg

echo \
  "deb [arch=$(dpkg --print-architecture) signed-by=/usr/share/keyrings/docker-archive-
keyring.gpg] https://download.docker.com/linux/ubuntu \
  $(lsb_release -cs) stable" | sudo tee /etc/apt/sources.list.d/docker.list > /dev/null

DOCKER_VERSION=5:19.03.15~3-0~ubuntu-focal
sudo apt update
sudo apt-get install docker-ce=$DOCKER_VERSION docker-ce-cli=$DOCKER_VERSION containerd.io
Configuring the Kubernetes Cluster
Once we have the virtual machines up, running and connected, with Docker installed, we can start installing Kubernetes to configure the cluster.
In each VM, we will need to install Kubernetes: kubelet, kubectl and kubeadm.
sudo apt-get update && sudo apt-get install -y apt-transport-https curl

curl -s https://packages.cloud.google.com/apt/doc/apt-key.gpg | sudo apt-key add -

cat << EOF | sudo tee /etc/apt/sources.list.d/kubernetes.list
deb https://apt.kubernetes.io/ kubernetes-xenial main
EOF

sudo apt-get update
sudo apt-get install -y kubelet=1.20.2-00 kubeadm=1.20.2-00 kubectl=1.20.2-00
sudo apt-mark hold kubelet kubeadm kubectl
Bear in mind that kubeadm can’t work with swap enabled because it interferes with kubelet. So we need to disable it:
sudo swapoff -a
Furthermore, container runtime and kubelet use cgroups drivers for the cgroups management on Linux machines, so Docker should be configured to use cgroups. If it is enabled by default and you have issues in the following steps, create or edit the file /etc/docker/daemon.json and add:
{
    "exec-opts": ["native.cgroupdriver=systemd"]
}
And remember to restart the Docker and Kubernetes services:
sudo systemctl daemon-reload
sudo systemctl restart docker
sudo systemctl restart kubelet
Once Kubernetes has been installed, we must install and configure the control plane and the nodes.
Configuring Control Plane
The first thing we must configure in the Kubernetes cluster is the control plane.
First, we will need the VM IP:
sudo apt install net-tools
ifconfig
And copy the local IP (that looks like 192.168.X.X.); then run the kubeadm initialisation command:
sudo kubeadm init --apiserver-advertise-address=192.168.X.X --pod-network-cidr=192.168.0.0/16
As we are using VMs, we might get an error or warning saying we don’t have enough CPUs because kubeadm expects at least 2 CPUs. If so, run the following command to reset the control plane configuration:
sudo kubeadm reset
And then run the init command again, adding the parameter –ignore-preflight-errors=NumCPU.
If everything goes as planned, you should see something like this:

Following the instructions, run the following commands as a regular user to use the cluster without requiring administrator permissions:
mkdir -p $HOME/.kube
sudo cp -i /etc/kubernetes/admin.conf $HOME/.kube/config
sudo chown $(id -u):$(id -g) $HOME/.kube/config
Now we must configure the virtual network in order to communicate the control plane with the nodes. As we said before, there are many pre-built virtual network configurations; for this example, we are going to use a popular one known as Calico.
curl https://docs.projectcalico.org/manifests/calico.yaml -O
kubectl apply -f calico.yaml
Finally, save the kubeadm join command for later as it will be run on the nodes to connect them to the cluster.
Configuring Nodes
Configuring the nodes is pretty straightforward if the VMs can reach the master node and Kubernetes has been installed correctly.
You just need to run the join command copied before to each VM:
sudo kubeadm join 192.168.X.X:6443 --token 2swb8u.ufnwvoexh85wkoci \
    --discovery-token-ca-cert-hash sha256:
a0bc339b5f96981fa5f0c607a800cfd8b3b80eb5ff9f7bc484658872aa0ff72d
If you want, you can add the parameter –node-name [name] to set the name of the nodes, otherwise it will get the name from the machine.
To check that everything has gone correctly, go to the master node and run:
kubectl get nodes
If the three nodes are ready, it means that everything went well and now you have a running Kubernetes cluster ready to deploy any kind of containers!
Conclusion
Microservices are popular due to their flexibility in adding new features, and the use of containers in companies is on the rise as well. Kubernetes is the most used orchestration tool for containers, and it is a must-know technology in the data engineering world, especially for DevOps.
We hope this blog solves any conceptual doubt you had regarding microservices, containerisation and Kubernetes itself, and that the tutorial was useful to create your first Kubernetes cluster to play with! If you have any questions or want to know how microservices or Kubernetes can leverage your business, please contact us and we will be glad to help you.
