14 Jul 2021 Navigating from OAC to BI Publisher with Parameters
Here at ClearPeaks, we are always trying to understand how tools work so that we can squeeze the best out of them to meet our customers’ needs. In this article we’re going to explain how to set up an action link from an OAC to a BI Publisher report with the special particularity of passing a set of parameters, including a date filter. Even though this article deals with OAC, the method can also be applied to OBIEE or OAS.
Our starting point is an OAC dashboard that depicts the hiring cost by gender and nationality for a specific date range:
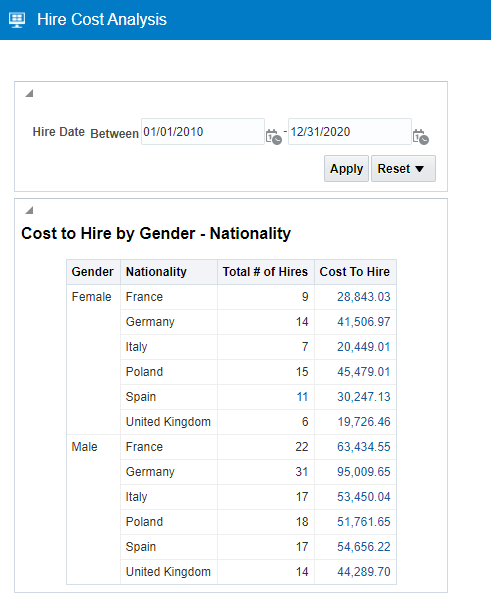
Figure 1: Hire Cost Analysis dashboard
When clicking on the Cost To Hire amount for any row, a navigation to BI Publisher is set in order to display the disaggregation of the hiring cost. In this case, the cost for French females will be broken down:
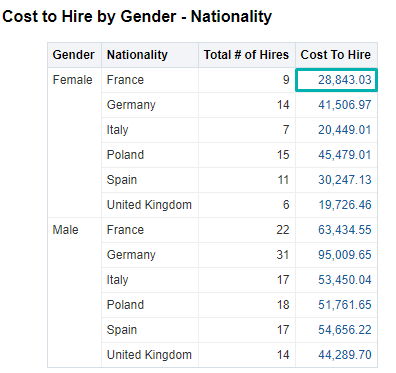
Figure 2: Cost to Hire dashboard – French females
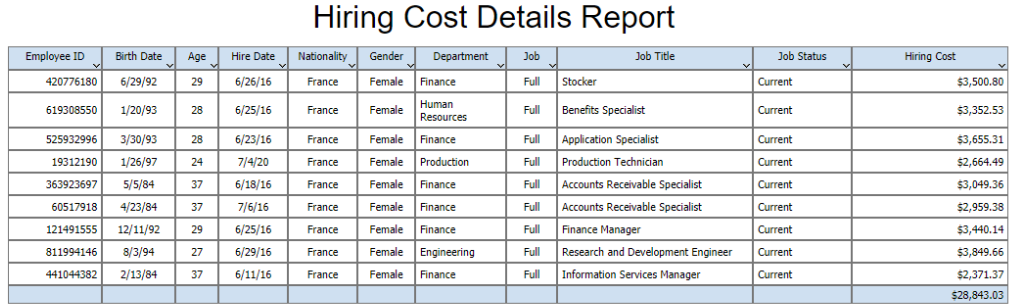
Figure 3: BI Publisher – Hiring Cost Details Report
How can we pass dates that are not even shown from a report through a navigation? This will be explained in the article, with the implementation process divided into several steps:
STEP 1: Create your OAC Report
In this case, the report granularity might need aggregated data, so a drilldown to BI Publisher makes sense. Since the report is filtered by a dashboard prompt, it needs a date filter as prompted:
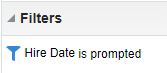
Figure 4: OAC report – Date filter
STEP 2: Create your BI Publisher Report
To create a BI Publisher report, you need to create a data model first, and then the report where the layout is defined. In this case, the query and the report parameters will be defined in the data model.
It is very important to set proper names to the parameters and use them in the query.
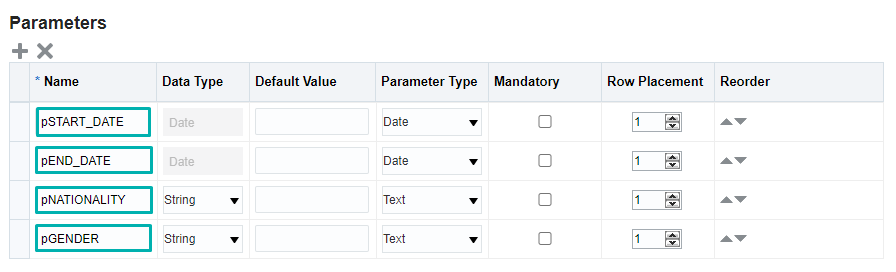
Figure 5: BI Publisher Report – Parameter definitions
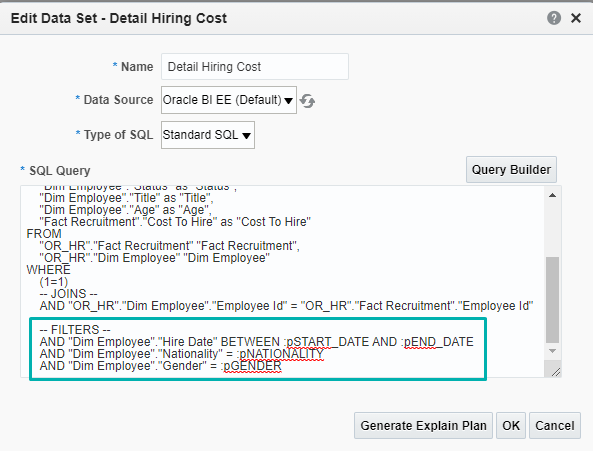
Figure 6: BI Publisher Report – Query filters using parameters
STEP 3: Create an Action Link Between OAC and BI Publisher
You can learn how to guide user navigation in OAC dashboards and analysis using action links. An action link will allow users to access external web content in the context of your BI analysis, to use conditions and agents to automate the initiation of business processes, or to invoke a Web Service.
To set up an action link, go to your OAC report and click on the column properties of the field that you want to use to navigate. In our example, Cost To Hire will be the selected column to navigate to BI Publisher.
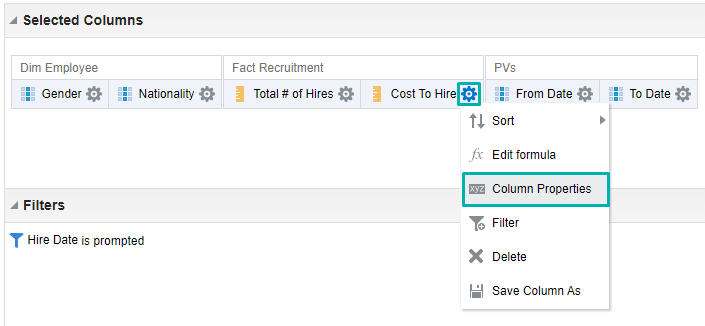
Figure 7: Set up an action link – Column properties
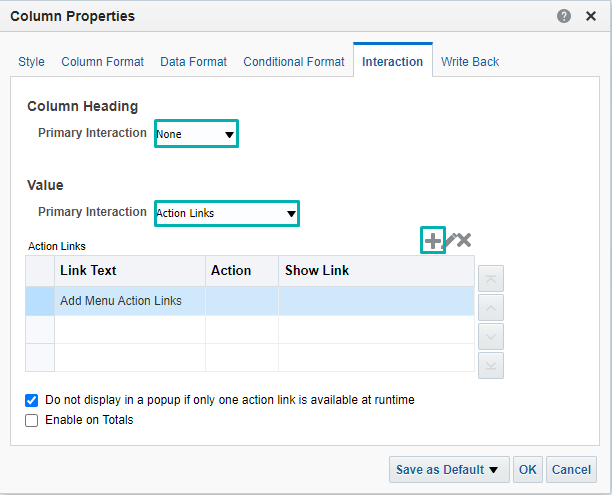
Figure 8: Set up an action link – Interaction tab
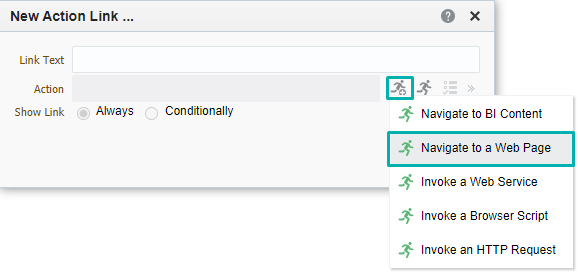
Figure 9: Set up an action link – Create action link – Navigate to a Web Page
The type of action link is crucial to determining the navigation possibilities. In this case, since BI Publisher has a different URL from OAC, it is important to set the action link as Navigate to a Web Page.
The first URL to enter is from BI Publisher, so navigate to your BI Publisher report and click on the settings icon to get the URL:
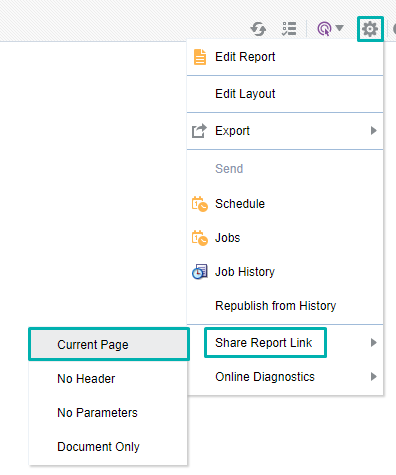
Figure 10: Set up an action link – Get BI Publisher URL
In our example, the URL is:
https://url_to_oac/ui/analytics/saw.dll?bipublisherEntry&Action=open&itemType=.xdo&bipPath=%2FBIP%2FHiring%20Cost%20Details%
20Report.xdo&bipParams{“_xmode”:”2″,”_sTkn”:”242d733617993ae0f2b”,”_xiasynch”:””,
“_xpf”:””,”_xpt”:”0″,”_dFlag”:”false”,”_edIndex”:”0″,”_dIndex”:”0″,”_rToken”:””,
“_ranDiag”:”false”,”_xdo”:”%2FBIP%2FHiring%20Cost%20Details%20Report.xdo”,
“_paramspSTART_DATE”:””,”_paramspEND_DATE”:””,”_paramspNATIONALITY”:””,
“_paramspGENDER”:””,”_xt”:”Hiring%20Cost%20Details%20Report”,”_xf”:”analyze”,
“_xana”:”view”}&_linkToReport=true
Enter the URL in the text box shown below, prompted after setting the action link as a Navigate to a Web Page (Figure 9):
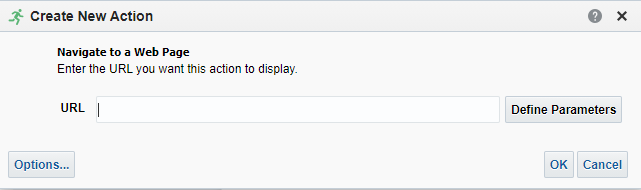
Figure 11: Set up an action link – Enter the BI Publisher URL here
Click on OK to complete.
STEP 4: Define Date Columns to Pass Through Navigation
This step is often the key to making this navigation work, considering the difficulty of passing the filter set to BI Publisher by the dashboard prompt, and how to split that date range into 2 different values to filter the SQL explained in step 2.
First, let’s see what value is returned by the dashboard prompt: to do so, assign a presentation variable to the date prompt and use it in the OAC report to visualise the format. Navigate to OAC and edit the dashboard prompt:
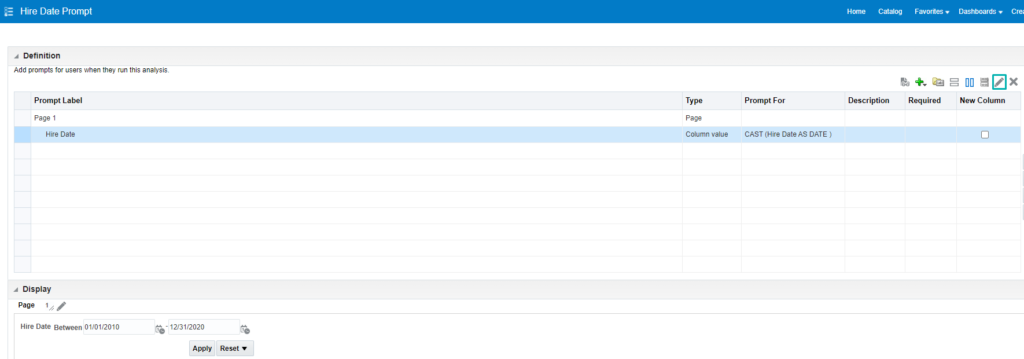
Figure 12: Edit dashboard prompt
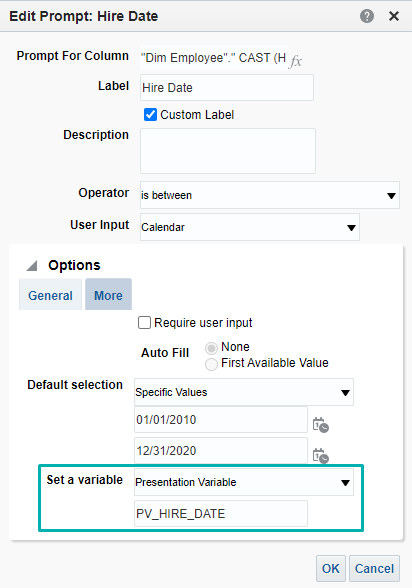
Figure 13: Set up a Presentation Variable
Once the presentation variable has been set, add it to the report:

Figure 14: Add the Presentation Variable to the report

Figure 15: Presentation Variable to OAC report
Remember to add single quotes once the presentation variable has been added to the report:
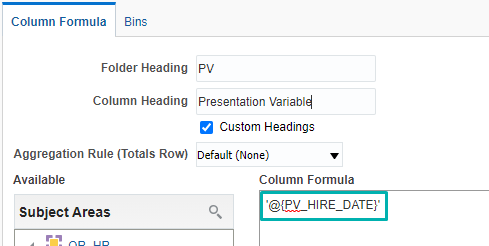
Figure 16: Presentation Variable syntax
Once added, we can see its value from a dashboard perspective:

Figure 17: Presentation Variable date format when displayed in OAC dashboard
As can be observed in Figure 17, the value shown in the dashboard is a string concatenation of the 2 dates selected in the prompt with a comma as a separator, so the idea is to apply string functions to extract both dates, the initial and the final.
For the former, apply the following formula:
CAST(to_datetime(SUBSTRING(‘@{PV_HIRE_DATE}’ FROM 0 FOR LENGTH(‘@{PV_HIRE_DATE}’) – LOCATE(‘,’,’@{PV_HIRE_DATE}’)) ,’YYYY-MM-DD’) AS DATE)
And for the latter:
CAST(to_datetime(SUBSTRING(‘@{PV_HIRE_DATE}’ FROM LOCATE(‘,’,’@{PV_HIRE_DATE}’)+1 FOR LENGTH(‘@{PV_HIRE_DATE}’) – LOCATE(‘,’,’@{PV_HIRE_DATE}’)+1),’YYYY-MM-DD’) AS DATE)
Bear in mind that both fields need to be casted to date as we want to pass these fields as date fields. In addition, as they are not relevant to the dashboard itself, they will be hidden from the OAC table. It is crucial not to hide the fields from the Criteria tab (column properties); go to the editing options and hide the fields from there.

Figure 18: Hide unused fields in OAC table
STEP 5: Parametrise the Action Link
Go back to the OAC report, click on Cost To Hire column properties and edit the action link as described in step 3.
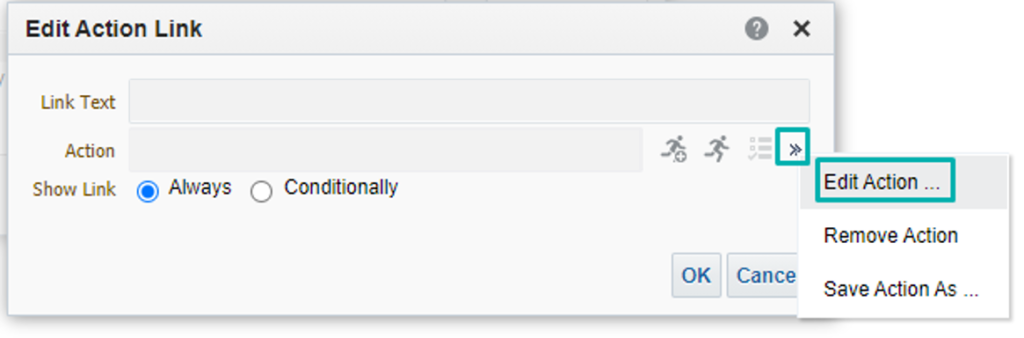
Figure 19: Edit the action link to include parameters
Click on Define Parameters and the following window will appear:
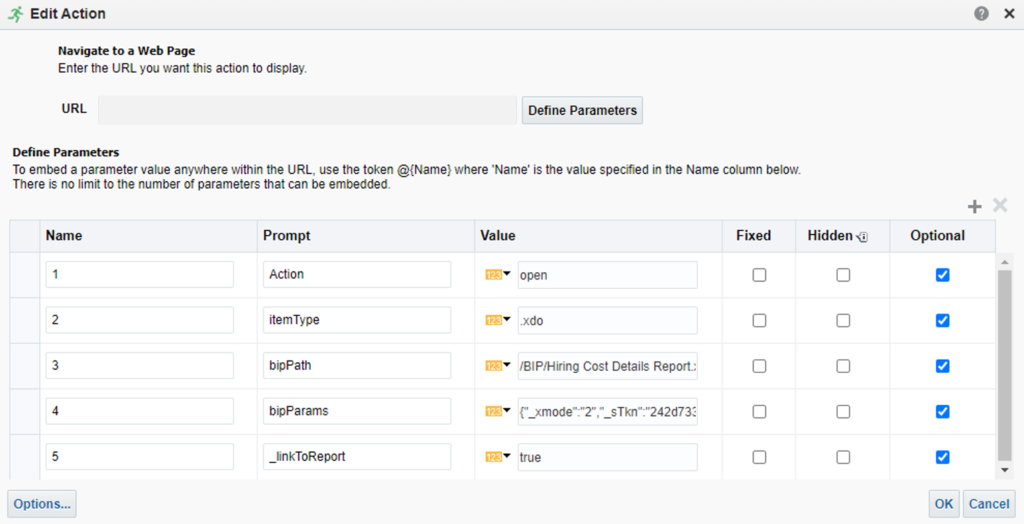
Figure 20: Define parameters to use in the navigation
Now it’s time to parametrise the different variables that will be passed to BI Publisher. The first thing to note is that all parameters need to be hidden in order to avoid another window prompt once the user starts navigating.
The first 3 parameters will be kept by default, but the rest will be removed. Based on the image below, the following 4 parameters will be created:
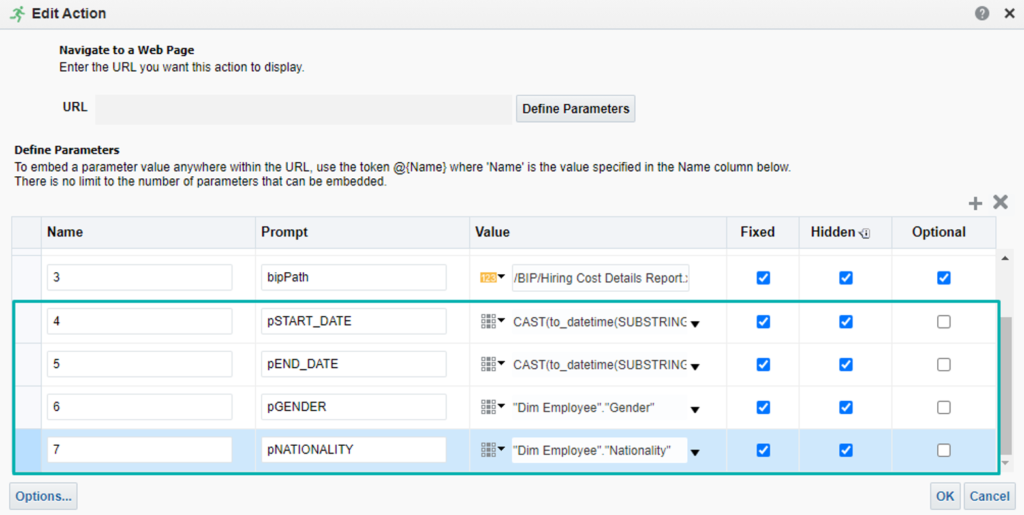
Figure 21: Set up parameters
The key here is that the date filters have been included in the report in step 4 and so we can now select them.
The different options when defining a parameter are shown below:
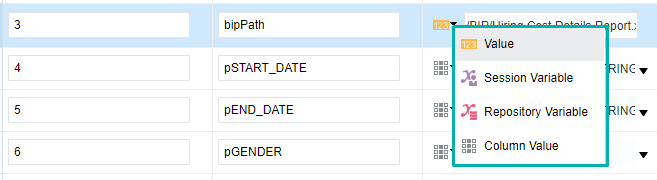
Figure 22: Options to set up a parameter in an action link
By and large, Value will be used to filter a specific value like ‘Female’, and Column Value will be selected to filter the clicked value in the OAC report.
In our example, the user is not required to select any variable in the target BI Publisher report, so the number of parameters to be included in the navigation should match the number of parameters set in the BI Publisher.
Finally, once all the parameters have been set correctly, the URL needs to be modified according to the following logic:
https://url_to_oac/analytics/saw.dll?bipublisherEntry&Action=@{1}&itemType=@{2}&bipPath=@{3}&bipParams={“_xmode”:”2″,”_sTkn”:”78416170177d3ff717b”,”_xiasynch”:””,”_xpf”:””,”_xpt”:”0″,
“_dFlag”:”false”,”_edIndex”:”0″,”_dIndex”:”0″,”_rToken”:””,”_ranDiag”:”false”,
“_xdo”:”/BIP/Hiring Cost Details Report.xdo”,”_paramspSTART_DATE”:”@{4}”,”_paramspEND_DATE”:”@{5}”,”_paramspGENDER”:
“@{6}”,”_paramspNATIONALITY”:”@{7}“,”_xf”:”analyze”,”_xana”:”view”}
As you can see, the number headed by ‘@’ corresponds to the Name column in Figure 21.
STEP 6: Double-check your Navigation
Everything should work now, but since managing dates can be challenging sometimes, it is very important that we ensure that the date format matches the source field format in the database. In this case, since the date format in the OAC report is YYYY-MM-DD and the one required for the database is MM/DD/YYYY, the format of the date parameters in the BI Publisher data model needs to be changed.
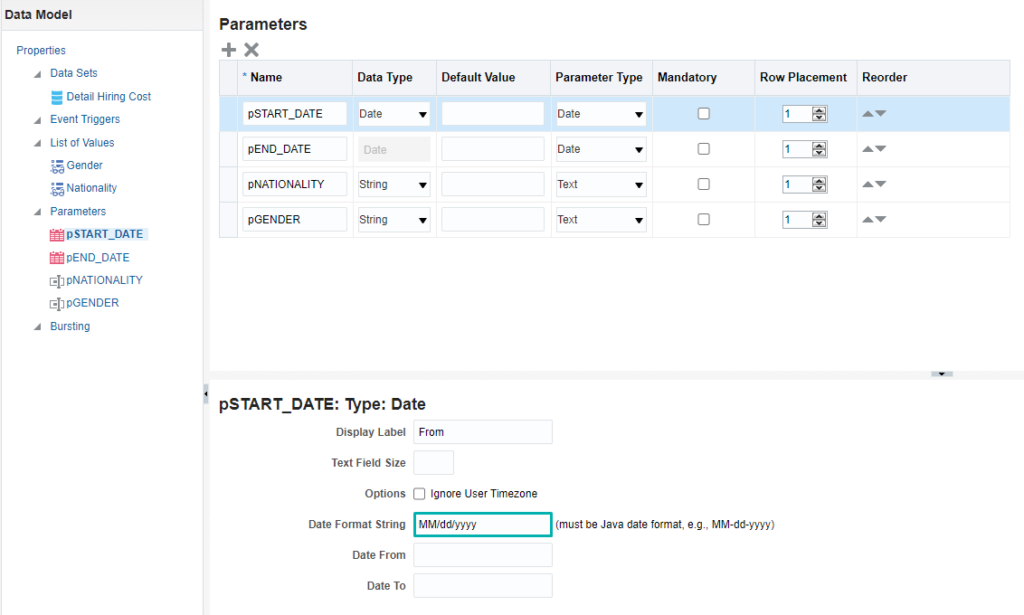
Figure 23: Specify the date format to match the database
Now you can have a go!
Conclusion
In this article we have customised a navigation from an OAC report to a BI Publisher report and filtered the target report properly.
ClearPeaks are experts in Oracle technologies, always up-to-date with market trends and the latest features. If you believe our expertise can be of use to you, please contact us – we’ll be happy to help!
