18 Mar 2013 Secured Oracle HTTP Server: Configuring SSL
In a previous post we explained how an Enterprise OBIEE 11g environment can be secured when deploying OBIEE 11g content outside the organization by placing an Oracle HTTP Server (OHS) into the DMZ side firewall. In this new post we will describe the steps needed to configure the OHS to redirect traffic from outside the DeMilitarized Zone (DMZ) using a secured HTTP communication with Secure Sockets Layer (SSL).
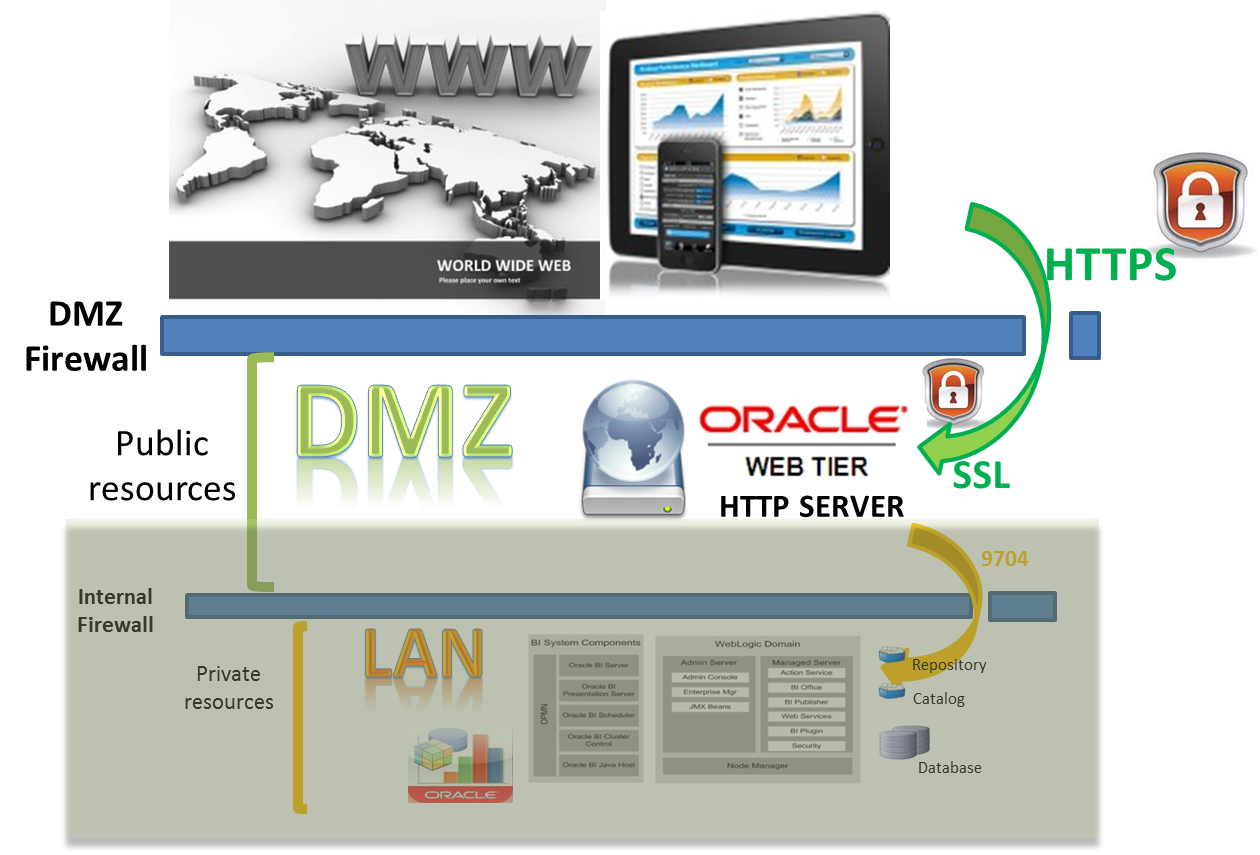
The following graph describes the environment:
After installing an Oracle HTTP Server (OHS) and having associated it to your weblogic server domain, there are two main steps needed to configure the OHS so your browser can connect to it via SSL. Those steps are:
1. Create an Oracle Wallet which contains an SSL Certificate
– Create an Oracle Wallet and generate a Certificate Signing Request
– Submit the Certification Request to your signing CA
– Import the Trusted Certificate
– Import the User Certificate
2. Configure Oracle HTTP Server for SSL
1. Create an Oracle Wallet which contains an SSL Certificate:
Create an Oracle Wallet and generate a Certificate Signing Request
Log in to the domain of interest using Fusion Middleware Control and make sure the component you want to configure is started (in our case it is the ohs5 Oracle HTTP server) and follow the next.
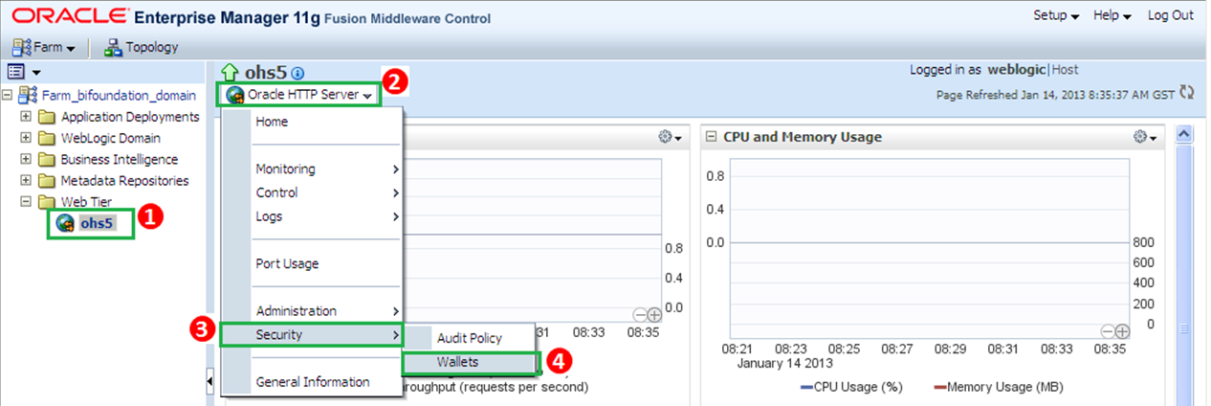
First we have to navigate to the wallets page of the webtier component we want to configure, to do so expand the “Web Tier” folder within your “Farm_bifoundation_domain”, ohs5 webtier component will appear. Then click the ohs5 component from the left pane and once it appears on the right pane click on “Oracle HTTP Server”, select “Security” from the list of available options and finally click on “Wallets”.
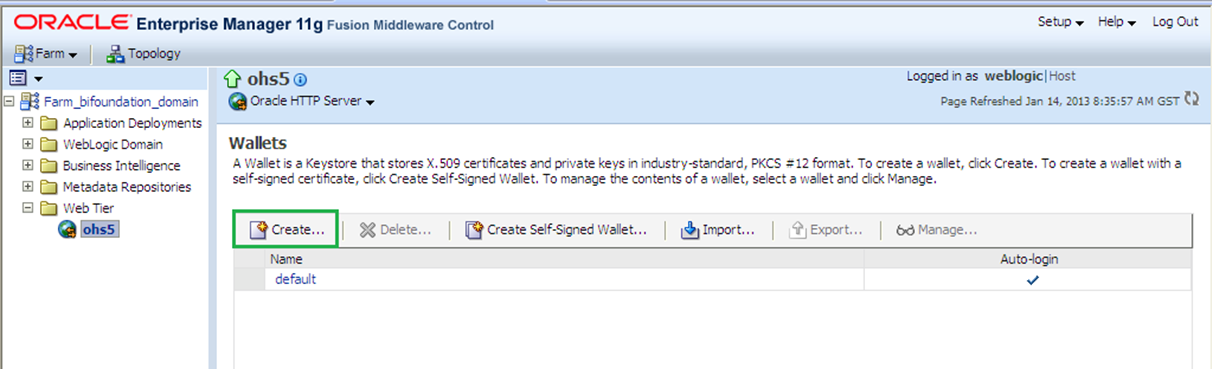
Within the next screen click on “Create” so the Create Wallet page appears.
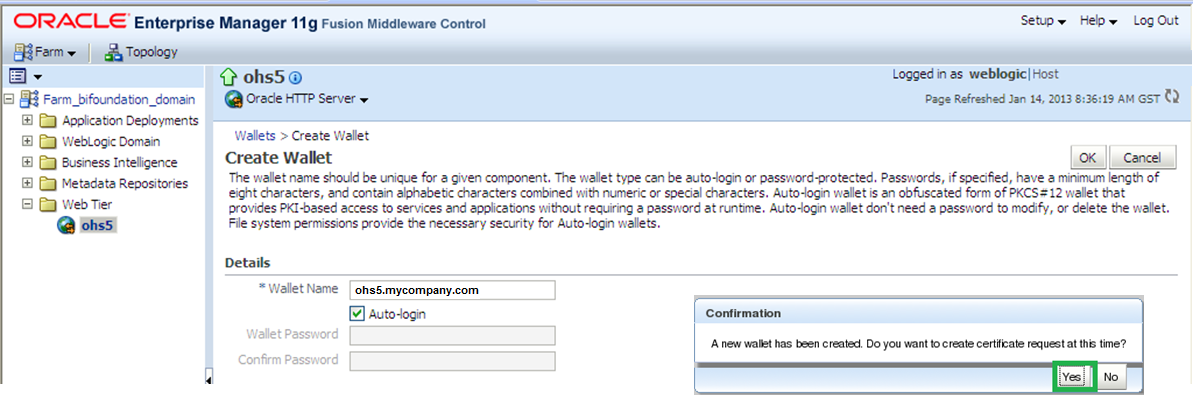
Enter a common wallet name; the common name entered here should match the hostname (fully qualified domain name that will access OHS) of the Oracle HTTP Server to which clients will connect. Leave the default auto-login wallet option. After this is set, click “OK” and then click on “Yes” when the confirmation message appears.
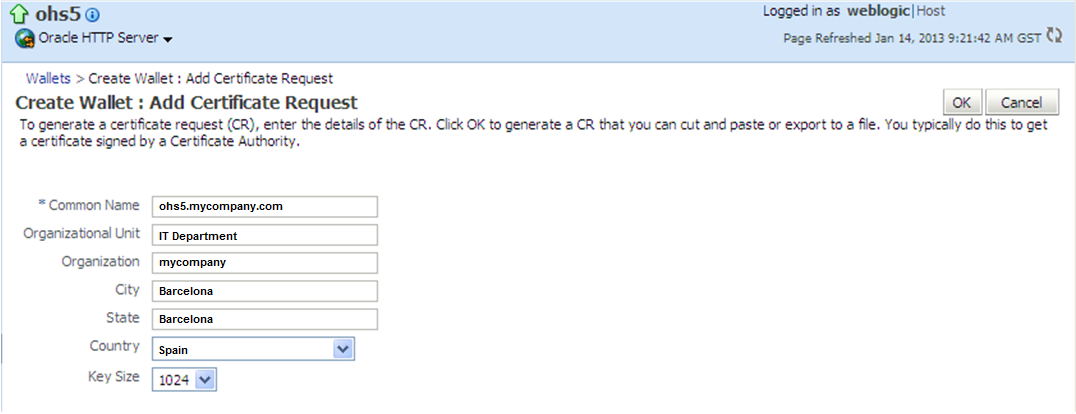
Within the following screen we have to enter some details regarding the server where the OHS has been installed. Enter the details as shown in screenshot below and click on “OK”.
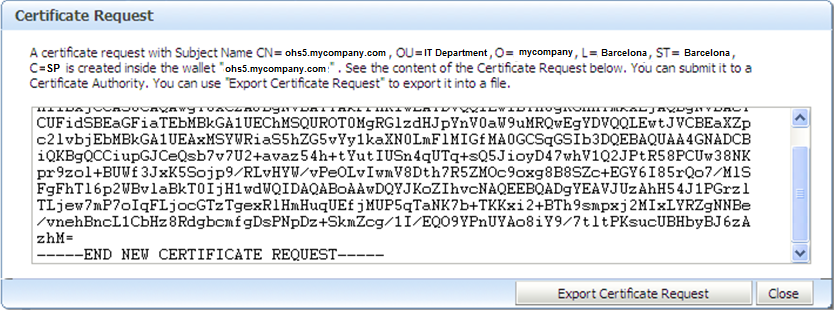
The Certificate Request for the server has just been created; now you can copy and paste the Base64-encoded certificate request from the text box to a file or export it directly to a file with the “Export Certificate Request” button (we named it server.csr)
A message confirming the wallet creation will appear.
Submit the Certification Request to your signing CA
Send the Certificate Request (server.csr) from above to a Certificate Authority. Then the CA will send the certificates for the server; make sure that you download the server certificate (server.cer), the trusted root CA certificate (rootCA1.cer), and any required Intermediate CA certificates in Base64 format (rootCA2.cer, rootCA3.cer…).
Import the Trusted Certificate
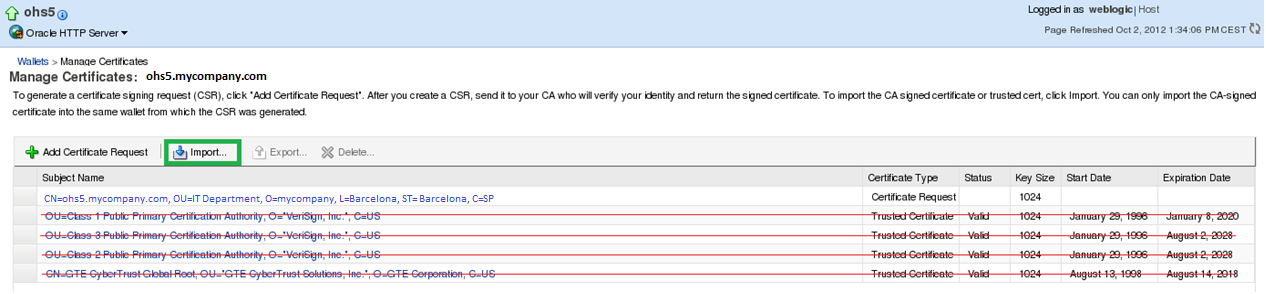
To import a trusted certificate, navigate to the Certificate Management page (“ORACLE HTTP Server” à “Security” à “Wallets” select the wallet we just created “ohs5.mycompany.com”). By default, the created wallet comes with four trusted certificates that we have to delete before we import the new ones. Simply select the trusted certificated to be deleted and click on “Delete”. Be sure not to delete the Certificate Request (the first one). Then click on Import.
In the Import Certificate dialog select the “Trusted Certificate” within the Certificate Type and then use the file selector to browse your file system to locate the file containing the trusted certificate (rootCA1.cer).
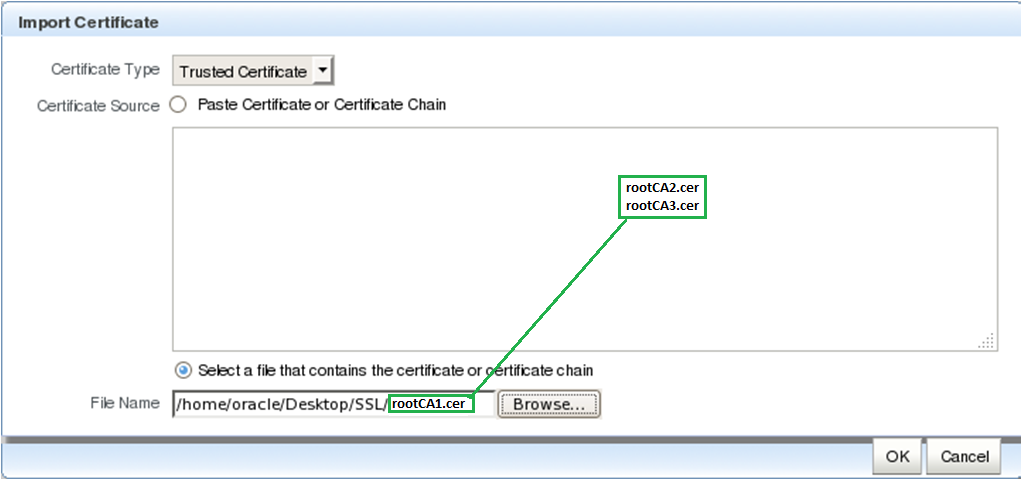
In this first step we will import rootCA1.cer file, repeat the above step for any other Trusted CA Certificates in the chain (rootCA2.cer, rootCA3.cer…).
After every step, a message confirming that the Certificate was successfully imported will appear.
Import the User Certificate
Follow the same steps done in the previous point but in the Import Certificate dialog within the “Certificate Type” box select “Certificate” and then use the file selector to browse your file system to locate the file containing the user certificate (server.cer).
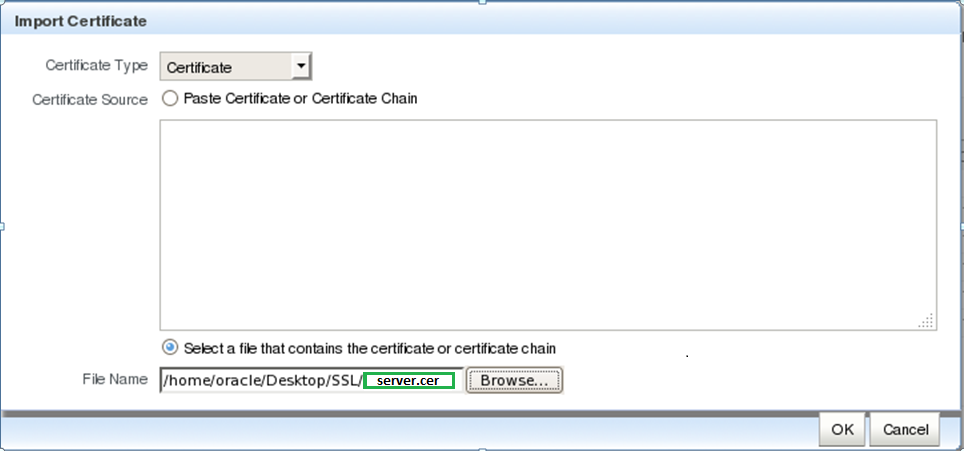
A message confirming that the Certificate was successfully imported will appear.
When the Wallet is complete and contains a valid certificate move to the next step.
2. Configure Oracle HTTP Server for SSL:
We will configure SSL via Fusion Middleware Control. The OHS out of the box install creates an SSL Virtual Host for you, which is configured to use a dummy certificate. The steps below will show how to edit the existing SSL Virtual Host.
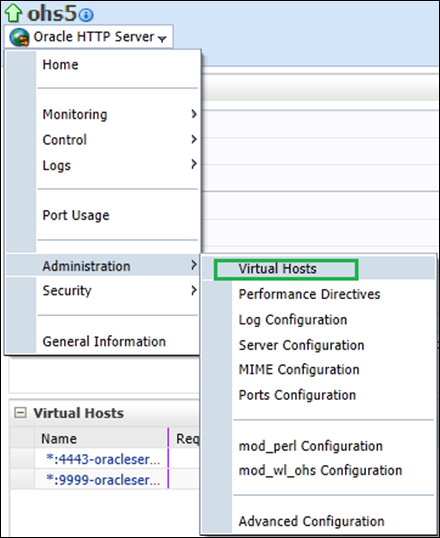
Select the Oracle HTTP Server instance in the navigation pane on the left and navigate to Oracle HTTP Server, then Administration, then Virtual Hosts.
This page shows what hosts are currently configured, and whether they are configured for http or https.

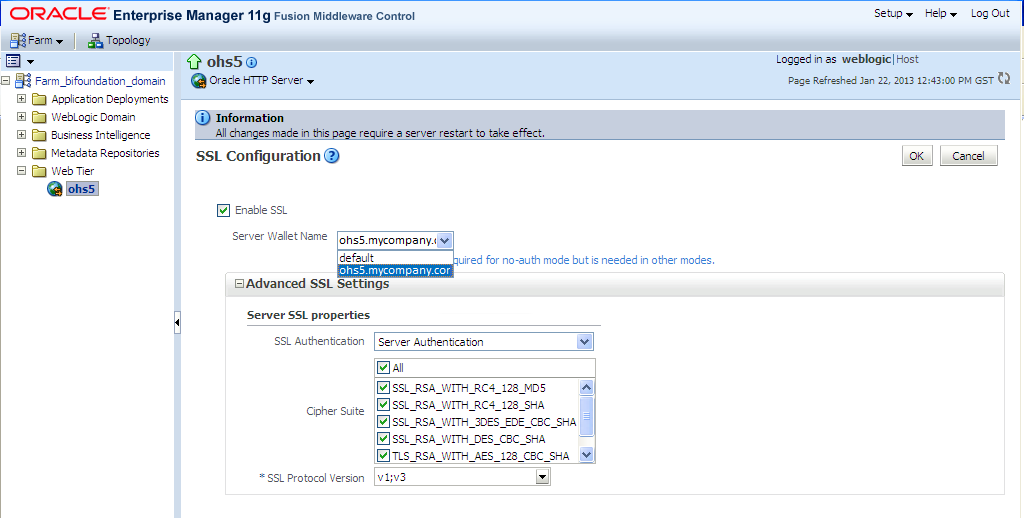
Select the virtual host you wish to update, and click Configure, then SSL Configuration.

To configure SSL for a virtual host that is currently using http simply check the Enable SSL box and select a wallet from the drop-down list and for “SSL Authentication” select “Server Authentication”.
Restart the Oracle HTTP Server instance and test that you can connect from a browser to your Virtual Host via https (SSL secured) and that your Oracle HTTP Server is trusted.
Conclusion
In order to secure the environment with SSL and to avoid the annoying “not trusted server” messages from the browsers and Mobile BI applications we need to import a trusted* server certificate for our Oracle HTTP ServerM; this article guides you through the steps needed to achieve a certified server that can be verified by the browser.
* Commercial Certification Authorities charge to issue certificates that will automatically be trusted by most web browsers
Feel free to share your comments! Also we will be more than happy to guide you for any BI or training services that you might need: info@clearpeaks.com!