05 Jan 2016 Write Back Functionality in OBIEE
Introduction
One of the interesting attributes that OBIEE provides is the facility to enable users to add/update data back to the database. The user can have a column for which values can be entered in the user interface (UI) section on their platform and this can be updated in database. This could have multiple benefits as end users may want to rank their customers or rate their regional business based on performance, and be able to use this data from time to time. This converts OBIEE into a useful reporting tool and mini application for modifying business data.
1. Requirements for implementing the functionality:
Implementing write back requires the configuration of multiple objects within the architecture i.e. Database, Connection Pool, Presentation, BMM and Physical Layers, UI privileges, Column/Table properties etc.
2. Example on implementing the Write back functionality:
Here I am going to demonstrate how to make the Attribute2 column in the Product table (Sample apps) to be a writeable column.
- Edit instanceconfig.xml
This is the initial step to enabling Write Back in OBIEE. Open the instance config file from the location – <Middleware>/instances/instance1/config/OracleBIPresentationServicesComponent/coreapplication_obipsn
Under <DSN>, Add <LightWriteBack >true</LightWriteBack >
- Enable Write Back in the Repository tables
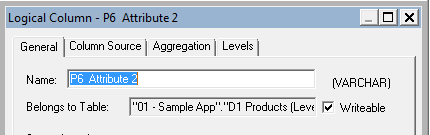
Open the RPD in Offline mode. Then expand the Logical table Product in the BMM layer. Double click on the column Attribute2 and in the general tab enable ‘Writeable’.
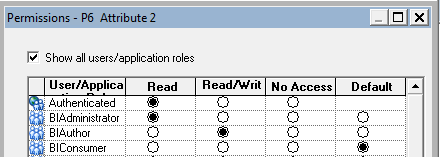
In the presentation layer expand the table Product, double click on the column Attribute2, and in permissions change this column as Read/Write for BI author.
- Setting direct database request permission
In the RPD, goto manage > Identity > application roles > BI Author > Permission> select execute Direct DB request> select Allow

- Disable cache for physical tables
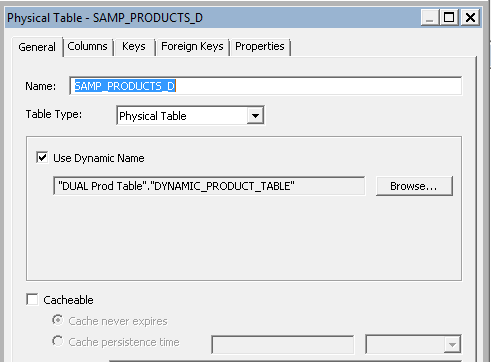
Select the SAMP_PRODUCTS_D table in the physical layer and disable cacheable option.
Double click on D2 customer > unselect override source table and cacheable.
Deploy the modified RPD and restart the BI Presentation services.
- Grant write back privilege to users
Log on to OBIEE presentation services > Administration > manage privileges > Write Back property and click on denied: authenticated user > granted: to authenticated user
- Create Analysis for Write Back
Create a new analysis with columns P1 Product and P6 Attribute2. Open the column property of Attribute2, select the Write Back tab and enable it. Save the analysis.

- Create write back XML template
Goto <Middleware>/instances/instance1/bifoundation/OracleBIPresentationServicesComponent/coreapplication_obips1/analyticsRes/customMessages
Append the attached tags to the Write Back template.xml file (attached Write Back template.xml for reference)
<WebMessage name=”wb_prod_attribute”> — This web message is the reference for this block in the presentation
<XML>
<writeBack connectionPool=”Sample Relational Connection”> — Set the name as in the RPD file
<insert></insert>
<update>
UPDATE SAMP_PRODUCTS_D SET ATTRIBUTE_2=’@2′ WHERE PROD_DSC=’@1′ –- define the update query and refer the columns with their position in the answers
</update>
</writeBack>
</XML>
</WebMessage>

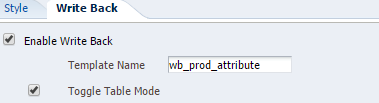
- Enable Write Back in table view
Open the saved analysis > table view > edit view > Table view property > Write Back tab > Select enable Write Back and provide the name as wb_prod_attribute (Saved WebMessage name in the xml). Save the Analysis.
With this step, we have completed the configuration of Write Back in OBIEE. Now this should be tested in order to validate the Write Back configuration.
- Testing the Write Back Option
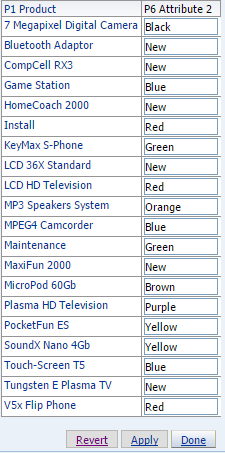
Open the saved report > Click on Update.
This changes the column attribute2 to writeable. Change the value and click apply
Edit the column to the desired value.
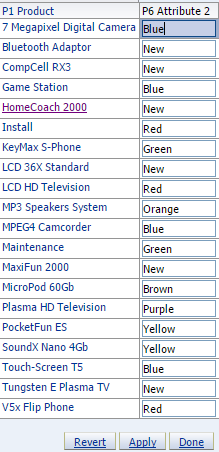
Click Apply and Done
Now open the SQL developer and check the Product in the edited row.
SELECT PROD_DSC,ATTRIBUTE_2 FROM SAMP_PRODUCTS_D where prod_dsc = ‘7 Megapixel Digital Camera’
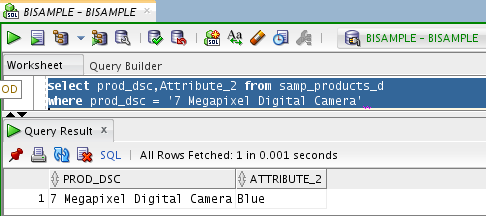
Now we can see that the changes made in the answers are reflected in the DB.
By using this simple this technique OBIEE can act as a front end form for updating data in the database.