12 Apr 2012 Emailing reports to non OBI users using IBots
Sometimes companies need to distribute their OBI reports via email to their employees. For example the sales department needs to have the weekly sales report on their email inbox every Monday morning so they can start the day analysing the sales without having to download any report in OBI. This can be easily achieved by using IBots, as we can schedule them to send the reports to the users or groups that we want.
But let’s imagine now that as the sales figures are really good and the company decides to email them to organisations outside the company (newspapers, magazines…). In this case as we want to email reports to non OBI users we need to reconfigure the IBots as it is not configured by default to send reports by email to non OBI users.
In this article we are going to see how to send a report by email to users that do not belong to any of the defined OBIEE groups or are users by itself of OBIEE using iBots.
To do so we will need to do the following:
1) Setup the SA System subject area
2) Create a conditional request to filter the sender list
3) Create an IBot to schedule and send the desired report
1. Setup the SA System subject area
The purpose of the SA System subject area is to be able to manage user profiles that do not belong to any OBIEE group.
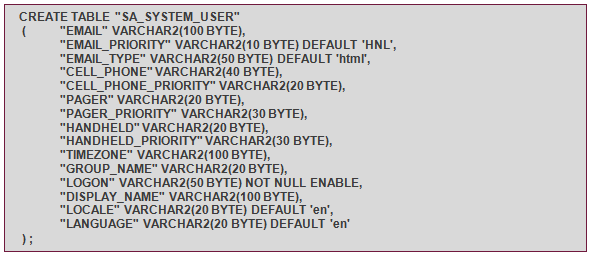
First of all we need to create the physical table in our database:
As we can see there are many fields that can be filled for each users, for our case we will use the following ones:
– EMAIL: Stores the primary email address of the user
– EMAIL_PRIORITY: Priority of the email; it can be ‘H’ for high, ‘N’ for normal or ‘L’. The default one ‘HNL’ means High, Normal and Low.
– EMAIL_TYPE: Can be HTML or Text depending on the email client.
– LOGON: The unique user ID of the user that will log on the system.
– GROUP_ NAME: The name of the group that this user belongs to.
– DISPLAY_NAME: The full name of the user.
Fill the table with the users that need to receive the email:
It is very important that the logon is not administrator otherwise it will not work.
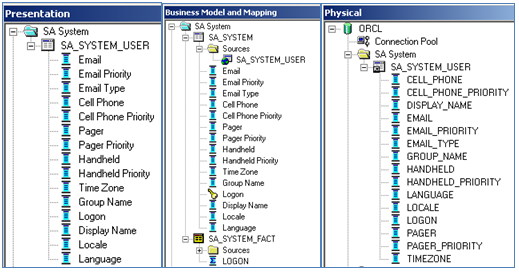
Next step is to import and map the table created in the OBI repository and rename the Presentation Layer columns with the exact names displayed below in the left side, otherwise it will not work:
Notice that you will need an auxiliary fact table to build the subject area. In the Business model layer duplicate the SA system user table and use it as a fact table by removing all columns except logon- Set the aggregation rule as count distinct. Create a new complex join with the dimension table to finish.
2. Create a conditional request to filter the sender list
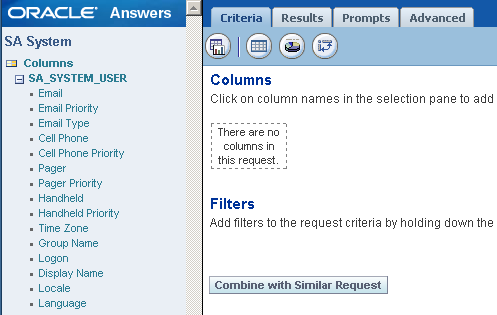
To create the conditional request in OBIEE go to answers and in the main page click on the newly created SA System subject area to create a new report:
Drag Email and Logon columns and filter the user that we want to receive the email:
Save the report and the conditional request will be ready to use.
3. Create an IBot to schedule and send the desired report
Go to OBIEE and click on more products and select delivers in the top right menu, and click on create new iBot:
Go to conditional request tab:
In this tab we select the request that will trigger the iBot. If the request returns rows the iBot will be executed otherwise the iBot will not run. Click on select condition… and select the conditional request created in the section before.
Go now to the schedule tab:
Select start immediately to run the iBot automatically after saving it.
Click on recipients tab:
In the recipients tab we can specify the users that will receive the report. In our case we want to use the conditional request as a source of senders. To do so enable this option on the right side Determine recipients from condition request. As a column containing recipients select Logon. Leave the second column containing recipients in (none).
Click on Delivery content tab and select the report to be sent by the iBot. Also you can add the headline of the email or a substitutive text in case the report returns no rows.
Finally click on Destinations tab:
Select only Email below Specific Devices.
Save the iBot and it will automatically run as we scheduled it to start immediately. Go to the email account set to receive the email and check that the email has been received.
Conclusion
In this article we have seen an easy way to email OBI reports to non OBI users by setting up the System Subject area and using it later to schedule IBots to email the reports to the users that do not belong to any OBI group or are users by itself.


