04 Sep 2019 SSIS in Azure Lift and Shift
Currently, SQL Server Integration Services (SSIS) running on a SQL Server instance is an industry standard in Business Intelligence for data integration and transformation; but however powerful this system is for ETLs, its architecture is far less flexible compared to what Cloud services can offer.
In previous blog entries we have looked at the advantages to be had for companies who upgrade their data management systems to Cloud PaaS solutions, such as:
- Reduced dependency on the IT team.
- No need to maintain an on-premise server.
- Pay only for the services that you need.
To help with the transition, in a recent release of Azure Data Factory V2, the company introduced a new feature: Azure-SSIS Integration Runtime, to enable the execution of existing SSIS projects on Azure’s Cloud resources.
Here at ClearPeaks we wanted to test the potential of this new feature, so we performed a “Lift and Shift” migration of an existing SSIS project to Azure; in this article, we’ll share our experiences and conclusions.
1. Requirements
To reproduce the test presented in this blog post, you need:
- An Azure subscription (free trials are available).
- An Azure Data Factory V2 service.
- An Azure SQL Database Service; for this exercise, a basic tier is enough.
- SQL Server (ideally two) installed on your computer or on the local network.
- SQL Server Data Tools version 15.3 or later installed on your computer.
- SSIS Development Environment (Visual Studio 2015 or later).
- SQL Server Management Studio installed on your computer.
Note: For this test, we used the Azure UI (Azure portal).There are also Powershell commands available for all Azure configurations.
2. Steps
2.1. Starting point: SSIS project deployed on an on-premise SQL Server
Our initial scenario is an SSIS package deployed on an on-premise SQL Server; this package moves data from a table in the Source system (another on-premise SQL Server with a database named SPOC) to a table in the Target system (in the database named TPOC), which is the same SQL Server where the SSIS package is running. Information is loaded incrementally, using a column called DateStamp (datetime) as the incremental column. Readers who have some ETL experience will find this pattern (incremental loads based on a datetime column) rather familiar, and we have done a great deal of ETLs like these at ClearPeaks.
In our SSIS package there are two relevant aspects that deserve mentioning:
- All operations are performed using Execute SQL tasks (no Data Flow tasks).
- We configured a Link Server in our Target SQL Server to transfer data from the Source system; this means we can perform cross-database queries.
The importance of these features will be reflected later in the adaptations we’ll have to perform: Data Flow tasks depend only on Connection Managers, whilst Execute SQL Tasks pose a tougher challenge to Azure’s promises of compatibility, as we are also testing:
- T-SQL compatibility.
- Cross-database queries (a.k.a. Elastic queries).
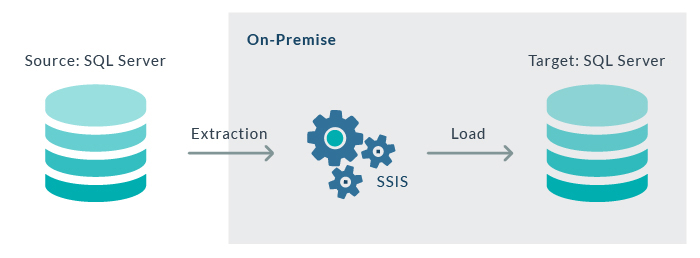
Figure 1: Diagram of the current system: SSIS package deployed on-premise
2.2. Creation of Azure-SSIS Integration Runtime
The first step to Lift and Shift our SSIS package is to configure Azure-SSIS Integration Runtime in Azure Data Factory V2.
In our ADF-V2 Author and Monitor page, we open the Connections tab and then the Integration Runtimes tab. In New, we select Lift-and-Shift existing SSIS packages to execute in Azure and we land on the first configuration page (Figure 2). Because this is a rather simple test, we went for a basic configuration, with just one node and 3 GB of memory, but remember that Azure allows you to configure the service with up to 10 nodes with 2 to 132 GB memory (you can change your Integration Runtimes configuration later).
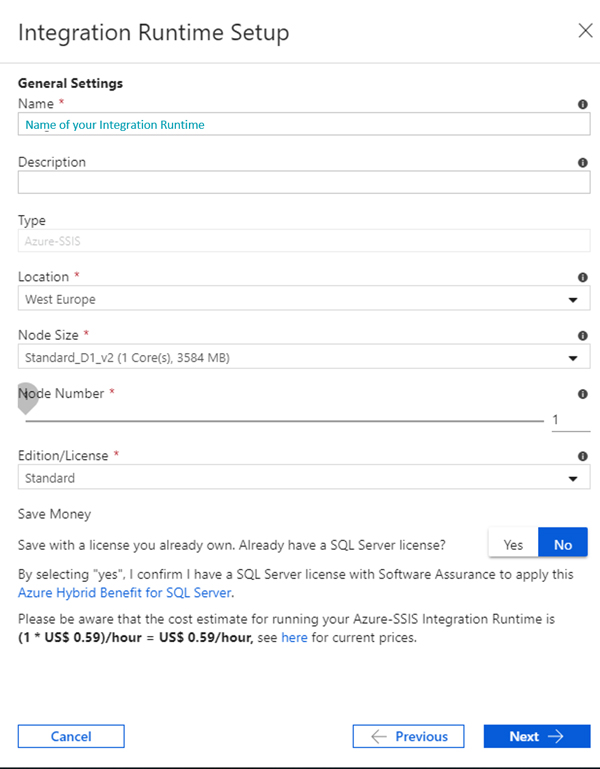
Figure 2: Integration Runtime configuration: features page
In the next configuration page (Figure 3) we will have to introduce our Azure subscription as well as the endpoint for the Azure SQL Database service where we want to deploy our SSIS project. Azure recommends choosing the same location as we used for our Azure SQL Database service of choice for the integration Runtime service.
After Test connection, we have finished configuring our Azure-SSIS Integration Runtime. Now, we can click on Finish and Publish All to publish the changes in Data Factory.
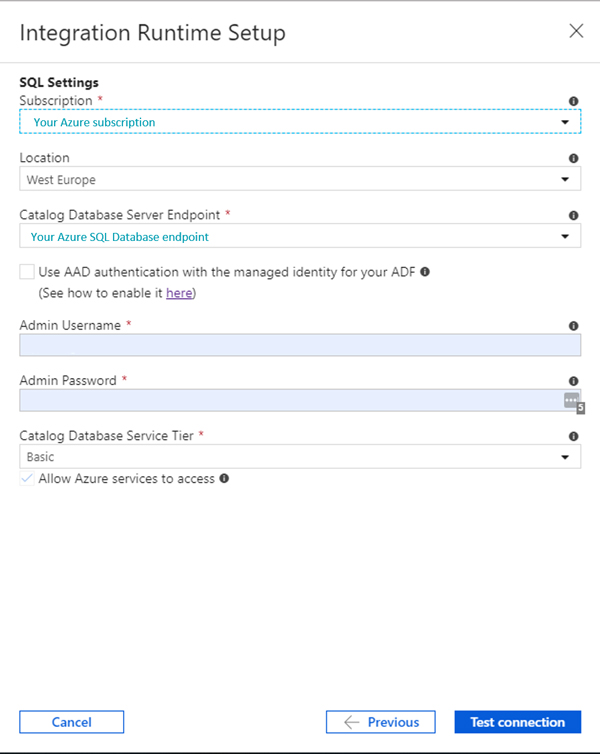
Figure 3: Integration Runtime configuration: subscription page
2.3. Connecting SSISDB with Azure SQL DB
Once we have created the Azure-SSIS Integration Runtimes, we need to connect Azure SQL Database with SQL Server Integration Services Catalogs (SSISDB), where SSIS projects are deployed. To do so, we open our Azure SQL Database on SQL Server Management Studio (SSMS) but in Connect to Server we expand the Options (Figure 4) and, in Connect to database, choose SSISDB.
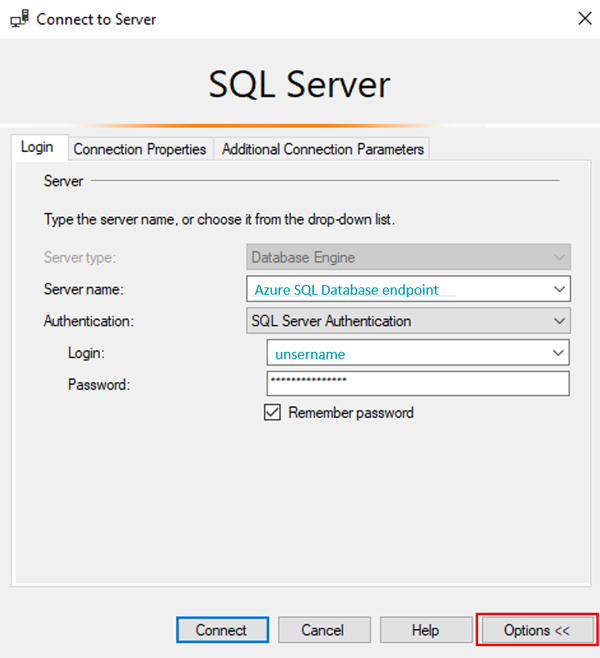
Figure 4: Connect to Server window
After that, in Object Explorer, there should be a new directory named Integration Services Catalogue, which has a Subdirectory named SSISDB. If we right-click on SSISDB there is the option to create a new folder; we choose a name and create the folder, where we will deploy our project later.
Note: when we open the SSISDB catalogs in SSMS we won’t see the rest of DDBB in the same Azure SQL Database service; we need to connect to the other DDBB separately.
2.4. Adaptation of Cloud environment
Before deploying our project on the Integration Services Catalogs we have to perform a few adaptations.
First, we reproduce the Source and Target systems on Azure, following these steps:
- Obtain the CRATE TABLE statements of our Source and Target systems, then execute them on Azure SQL DB to recreate the tables.
- Create a stored procedure that populates the Source table (which we will later schedule in Azure Data Factory), so we can check that the pipeline actually works by observing the data flow from source to target.
- Create a reference to the source table on the Target system using the CREATE EXTERNAL DATA SOURCE statement. Note that our load process requires elastic querying. There is a caveat though: this statement is only available for connections with Azure SQL Database, Shard Map Managers and Azure Storage Blob, i.e. if the source was located in any other type of resource, we would need to adapt our process by changing elastic T-SQL queries for Data Flow tasks.
Disclaimer: In real projects, we obviously wouldn’t have to replicate the local Source server on Azure, it would be a remote source. To connect from Azure to our local Source system, we would need to configure a data gateway but we simplified this step by reproducing the Source system in a different Azure SQL DB service.
2.5. Adaptation of SSIS package
The SSIS project will also need some adaptations. In Visual Studio, we open our project and do the following:
- Create a Connection Manager that points to the target Azure SQL Database.
- Edit the Execute SQL tasks modifying T-SQL scripts where they referenced the source table (s_table) erasing the linked server, for it is no longer necessary (thanks to Azure SQL Database Elastic Query feature, which allows cross-database querying):
- Before: [SPOC].[dbo].[s_table]
- Now: [dbo].[s_table]
After these simple steps, our SSIS project is ready for deployment.
2.6. Deployment of SSIS Package on Azure
To deploy the project on Azure SQL DB we do exactly the same as if it were a local SQL Server. We go back to SSMS and open the directory we created earlier in Integration Services Catalogues (Figure 5). Then we right-click on Projects, select Deploy project and follow the steps in the Integration Services Deployment Wizard.

Figure 5: Integration Services catalogues
Once the project is deployed, it will appear underneath the Projects directory. We can right-click on the project and execute. To monitor the execution, we right-click on SSISDB and select Reports > All Executions. This will load a page with information of all the executions of SSIS Packages; for more detail we can click on All messages.
2.7. Schedule execution in Data Factory
All that remains for us to do now is to schedule the execution in Azure Data Factory V2. We will do this in two steps:
2.8. Create a Trigger
We use triggers to schedule Azure Data Factory V2 pipelines; in this version of ADF they are created independently and then assigned to one (or more) pipeline(s). For the purposes of this experiment, we’ll use a Scheduled Trigger.
2.9. Create pipeline with Execute SSIS activity
Finally, we create the pipeline (Figure 6). It consists of two activities, but we don’t have to create any datasets. To trigger the SSIS package, we just choose the Execute SSIS Package activity from the General section of the menu and then configure the Settings by filling it with the name of our Azure-SSIS Integration Runtime and the location of the package that we want to execute on Integration Services Catalogues.
Then, we create a Stored Procedure activity that executes a stored procedure in the source DB that inserts new records in the source table, capturing the execution date in the DateStamp field. We placed this activity before the execution of the SSIS package, so SSIS will load the last record we inserted, so we will be able to monitor the executions of the pipeline easily by querying the Target table.
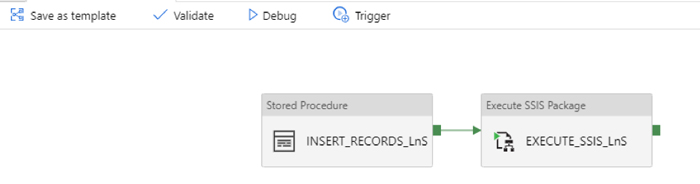
Figure 6: ADF pipeline with two activities connected
Finally, we assign the Trigger to the pipeline by clicking on the Trigger button and selecting the ScheduledTrigger we created before.
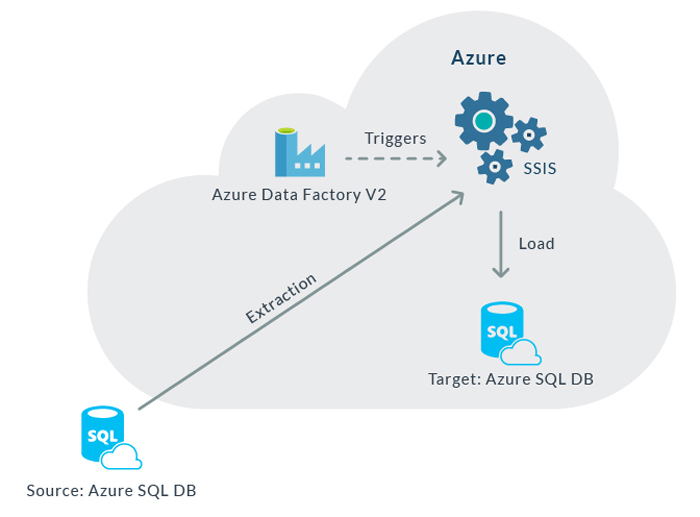
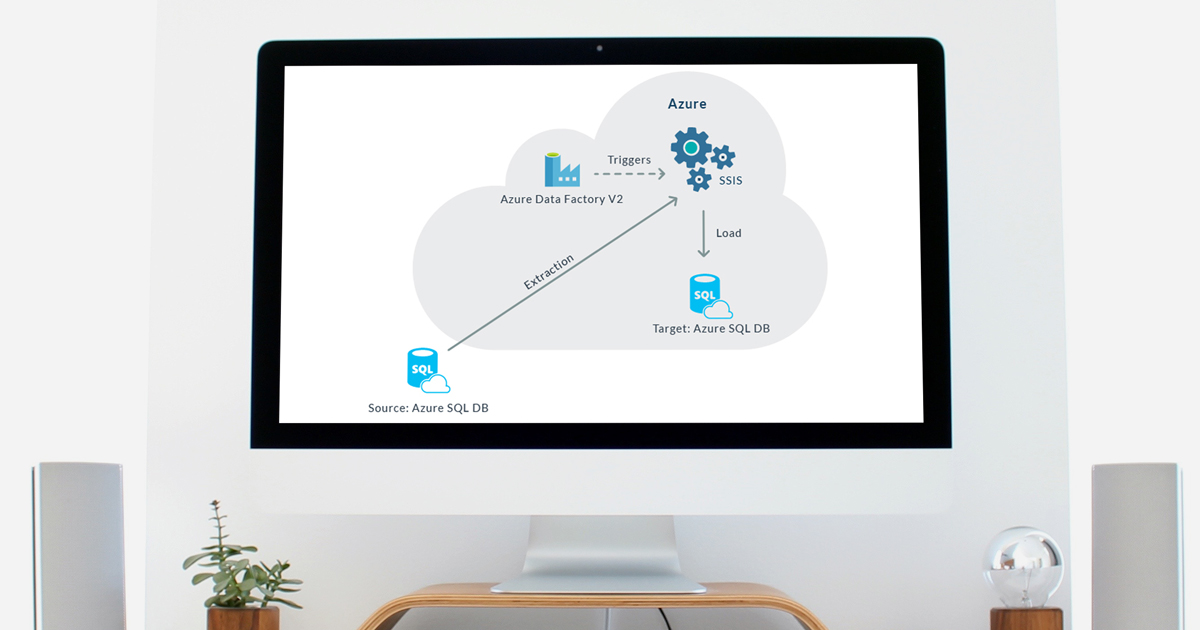
Figure 7: Diagram of the system deployed on Azure
3. Monitor SSIS package executions on Azure
Now that our package is in Azure, how can we check that everything works? There are many tools:
- Azure Data Factory Monitor: here we can track all the pipeline executions of our Azure Data Factory and see whether or not the activities of a pipeline have been successfully executed.
- Integration Services Catalogue: on SSMS we expand Integration Services Catalogue, right-click on SSISDB and select Reports > All Executions. This will load a page with information of all the executions of SSIS Packages;for more detail we can click on All messages.
- Querying the Target Table: because we are capturing the date of execution through our pipeline, we can simply query the target table and check the date of the last records inserted. We expect the datetimes in our table to match those obtained from Azure Data Monitor.
Conclusion
After performing a Lift and Shift migration to Azure we can safely say that the services live up to their potential. Thanks to Azure SSIS Integration Runtime, we moved our current system to a much more flexible architecture in a few steps.
Furthermore, we saw how straightforward it is to combine our SSIS packages with other Azure Data Factory activities (i.e. Azure Databricks, Azure Machine Learning Studio, Azure Data Lake Analytics, etc.) once deployed on Azure. This expands the analytical possibilities of our pipelines.
At ClearPeaks, we are experts on BI,Big Data and Machine Learning, both on premise or on Cloud, and we have already helped many clients along their Cloud journeys. If you need any help migrating your analytic pipelines (BI,BD and ML) to the Cloud, don’t hesitate to contact us – we’ll be glad to help you!