20 Dec 2023 Building a Custom Database Change Management (DCM) Tool for Azure DevOps
Most modern software applications and data platforms include a database layer, so when new versions are released the database schema needs to adapt accordingly. However, handling database schema changes might be a challenging task, especially if you want to implement a Continuous Deployment (CD) process, and this is why Database Change Management (DCM) is a crucial part of any project.
In this blog post, we are going to introduce a Python-based DCM tool, developed here at ClearPeaks. We will explore its functionalities, how it is implemented, and how to integrate it into a DevOps environment.
Background
When it comes to including database schema changes in a DevOps process, there are two types of deployment:
- Migration-based deployment: A commonly used method for versioning database changes is to capture every set of changes as a migration script, which is kept in version control. Each migration script has a unique sequence number, allowing you to apply migrations in the correct order. A control table records the migrations that have been executed. This approach allows you to version-control the database schema, and you can use a tool to apply the migration scripts to update the database to the desired schema version.
- State-based deployment: With this option, you store the data model and its state, at different points in time. A tool then determines what needs to be executed to update the database to a specific version.
The DCM tool developed by ClearPeaks and presented here today follows a migration-based deployment.
Benefits of Using a DCM Tool
There are several benefits of using a DCM tool in our projects: it allows us to track every update or rollback executed on the application database, which facilitates the troubleshooting of schema mismatches between the application and the database. We can also avoid execution errors by automating recurrent database operations, such as the execution of several DDL (Data Definition Language) statements, which would otherwise be executed manually.
DCM Tool Introduction
Overview
There are several parts to a DCM tool: in the schema shown in Figure 1, we can see the different components and steps during its execution. There are two repositories being used – DCM-tool contains the code of the tool itself, while DB-changes is the repository where all the database migration scripts are located. There is also a PostgreSQL server with two databases – one for our Application DB and the other that we want to manage. The Change history DB will serve as a control database to track all the DCM tool runs.
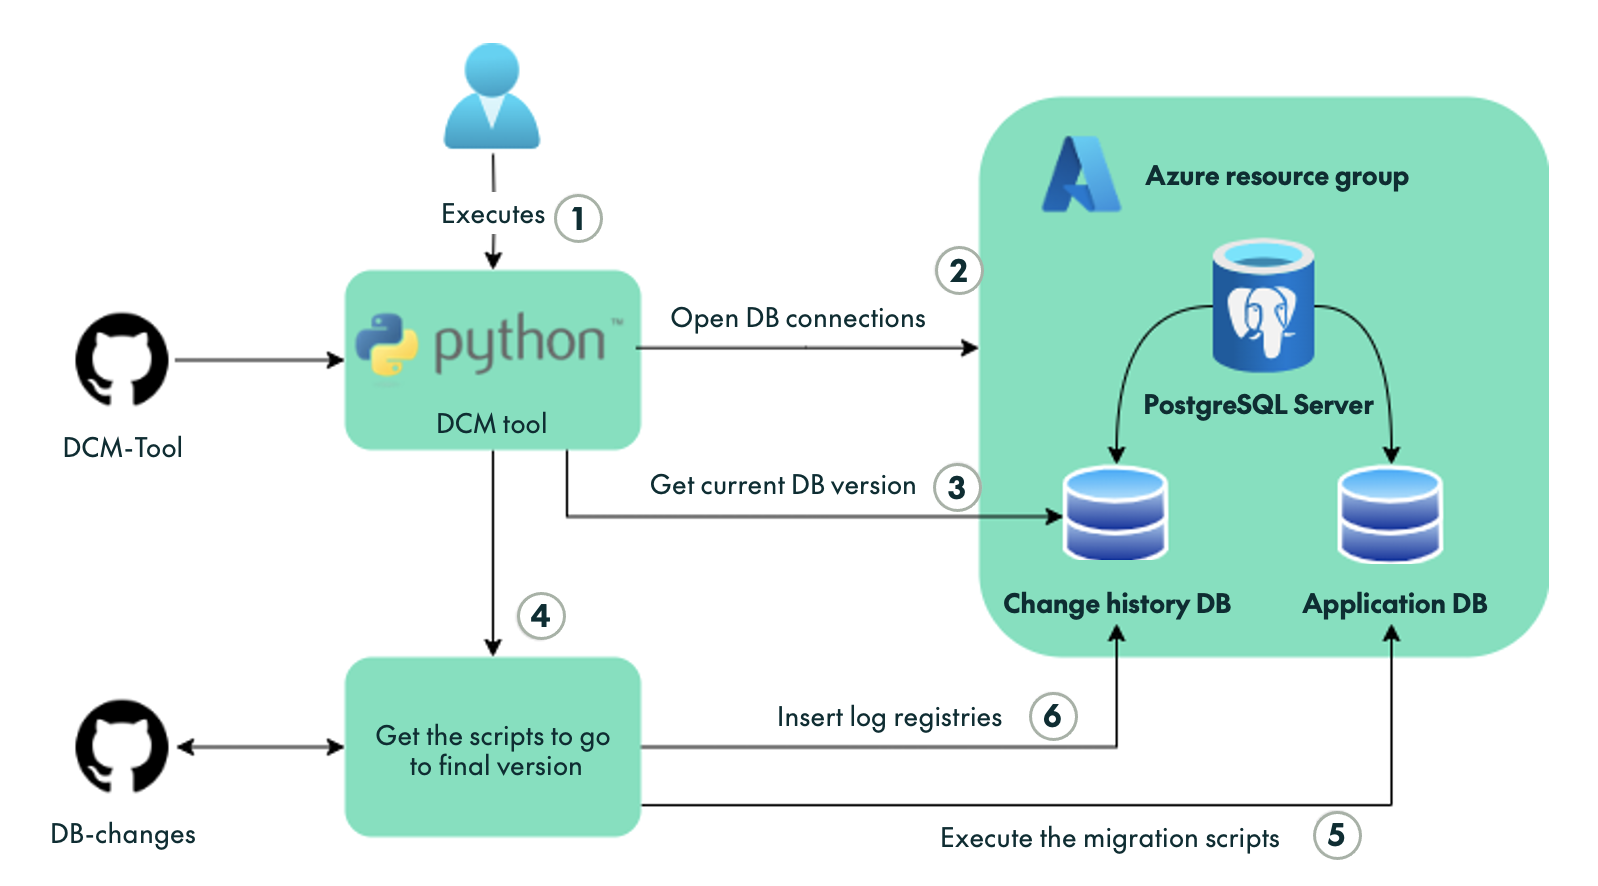
Figure 1: DCM tool Schema
The following points describe the steps involved:
- Step 1: Execution of the DCM tool – when running the DCM tool, you can specify several parameters, such as the desired final version to update the application database.
- Step 2: The DCM tool opens a connection to both databases.
- Step 3: Retrieval of the current application database version by querying the Change history DB.
- Step 4: The DCM tool reads the DB-changes repository to obtain all the required migration scripts needed to transition from the current version to the final one.
- Step 5: Sequential execution of the migration scripts on the Application DB.
- Step 6: Log the information about the executions into the Change History DB. We’ll look at this in more detail in a later section.
Change History DB
To track all the migrations applied to a database and to know its current version, we use a Change_History table where all changes applied are logged, along with execution information such as the time elapsed for the script, the user who executed the script, the checksum, and other relevant details.
This Change_History table can be stored in a dedicated external database or in a specific schema within the Application DB. The structure of the Change_History table has to be defined as follows:
Column name | Type | Example | |
|---|---|---|---|
| DATABASE | VARCHAR | postgres-public | |
| VERSION | VARCHAR | 1.1.1 | |
| DESCRIPTION | VARCHAR | First change | |
| SCRIPT | VARCHAR | 1.1.1__first_change.up.sql | |
| CHECKSUM | VARCHAR | 38e5ba03b1a6d2… | |
| OP_TYPE | VARCHAR | up | |
| ELAPSED_TIME | FLOAT8 | 0.04 | |
| STATUS | VARCHAR | Success | |
| INSTALLED_BY | VARCHAR | USER-1 | |
| EXECUTION_DATE | TIMESTAMPTZ | 2020-03-17 12:54:33.056 |
Table 1: Change_History table column description
The DATABASE column describes in which database the script is executed, and the values of this column are database_name-schema.
DB-changes Repository Folder Structure
The migration scripts are stored in a repository with the following structure:

Figure 2: Project folder structure
There is a folder for every database that we want to control where both types of migrations (up and down) are stored inside their respective folders. There is also a configuration YAML file (explained below) for each database, where some data about the databases (host, port, user) and a few parameters to define the behaviour of the execution need to be set.
Naming Convention
The migrations scripts used to control all the schema versions follow a standardised naming convention, which helps prevent code errors during the execution of the DCM tool.
Script naming format: X.X.X__short_script_description.up.sql
The naming convention has the following rules:
- Version: a unique version number with dots separating as many number parts as you like.
- Separator: __ (two underscores).
- Description: a description with words separated by underscores (cannot include two underscores).
- Suffix: sql or down.sql (depending on whether the script goes to a newer version or downgrades)
For example, a script name that follows this convention is 1.1.1__creata_dummy_table.up.sql.
Every script within a database folder must have a unique version number.
Each schema change is represented by two files, up and down. Updates will follow the upward order, while a rollback will follow the downward order.
1.2.3__initialize_schema.down.sql
1.2.3__initialize_schema.up.sql
2.0.0__add_table.down.sql
2.0.0__add_table.up.sql
DCM Tool Configuration File
The DCM tool has been developed in Python utilising various classes to manage different logics. To connect to the databases, execute scripts, and log the execution records in the control table, the tool makes use of the open-source library psycopg2.
Apart from this, we need a configuration file too. The file is stored in the DB-changes repository and oversees storing the necessary parameters to connect to the different databases (host, port, user, database name, driver type) as well as setting some options to control the behaviour of the tool execution (version to go to, if rollbacks are enabled, or the path where the migration scripts are located). For each database managed by the DCM tool, there should be a configuration YAML file. Here is the list of available configurations in the config.yaml file:
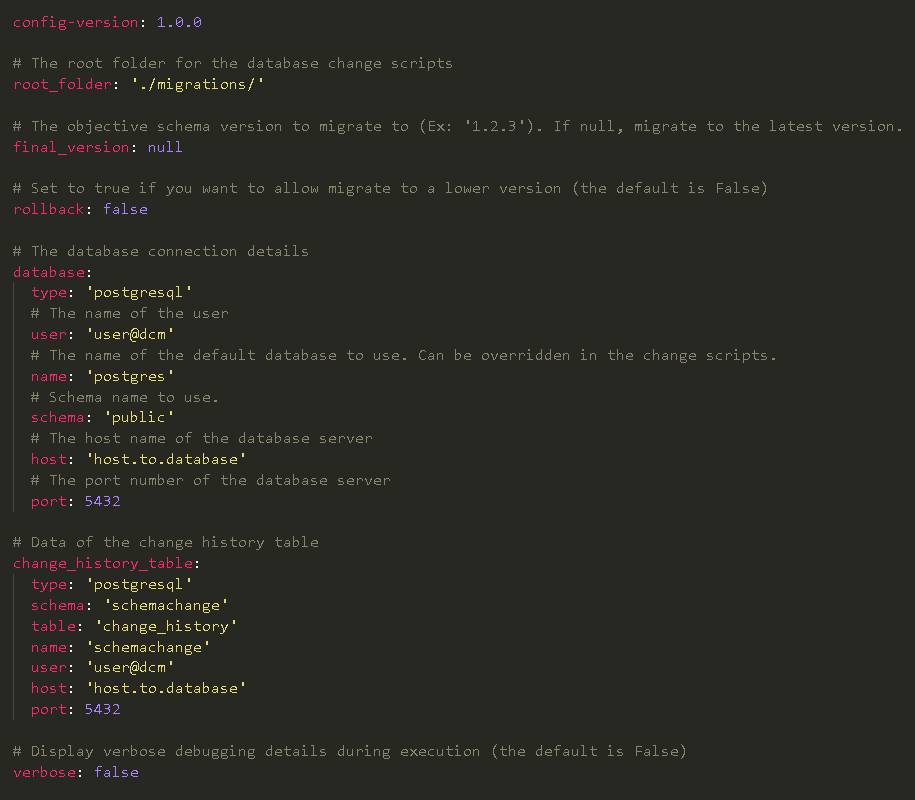
Figure 3: Example of configuration file
DCM Tool Functionalities
The DCM tool provides the following functionalities:
- Get the current Application DB version.
- Update the Application DB to a specific version.
- Update the Application DB to the latest available version.
- Downgrade/rollback to previous versions.
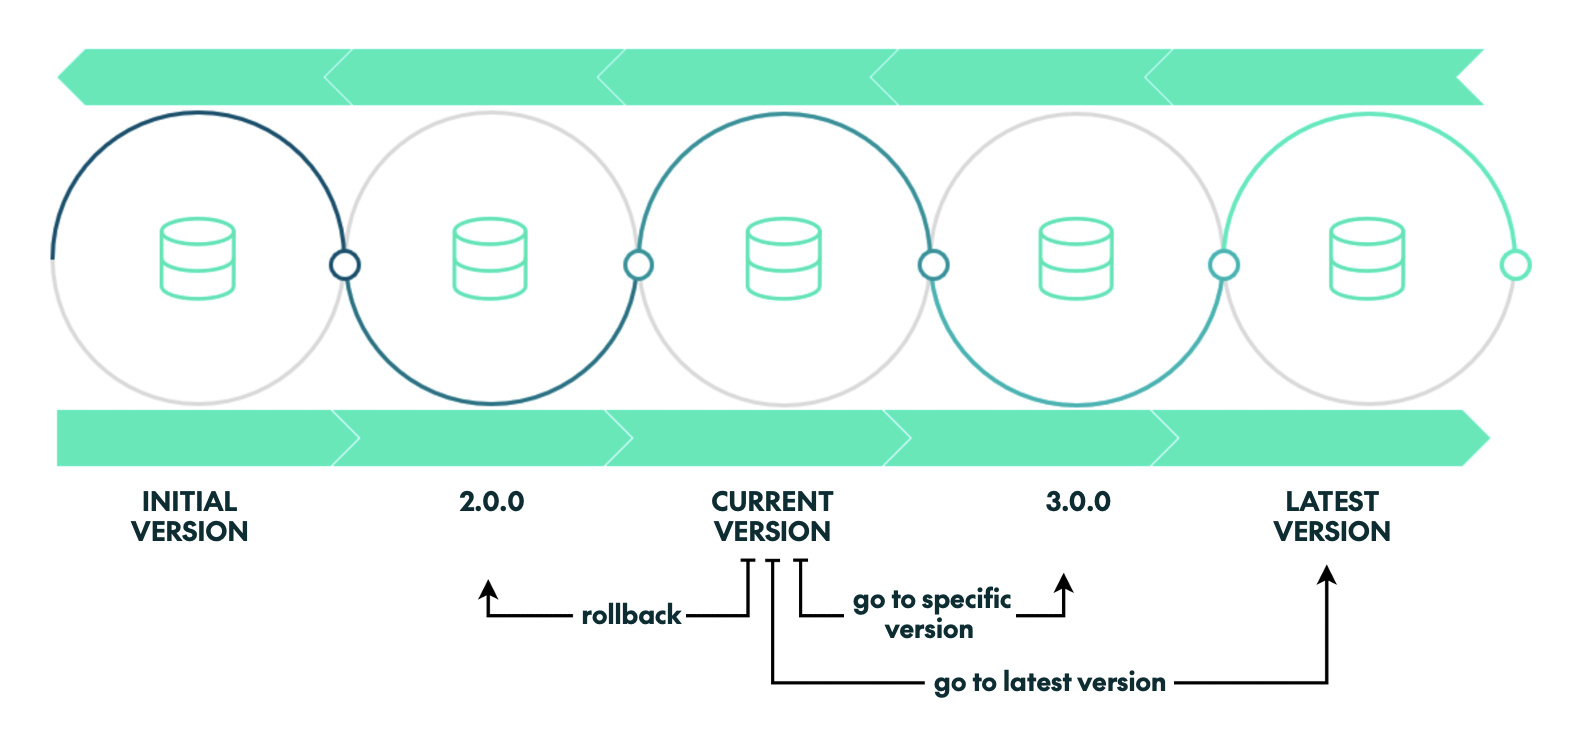
Figure 4: Implemented functionalities
Example of a DCM Tool Execution
Now let’s see how the DCM tool is executed, and the parameters it can take. From the root of the DCM tool folder, if we just want to know the current version (-cv option) of the application database, we can use the following command:
$ python src/cli.py
-cv
-chdb *****
-c $PWD/../db-changes/databases/postgres-1/config.yaml
As options to the script, we must pass the password to the database where the Change_History table is located using the option –chdb and pass the path where the configuration file of that specific database is located using the option –c or – -config and the path. If the working directory where the script is executed is the folder where the configuration file is located, there is no need to specify the path.
The output of the execution is:
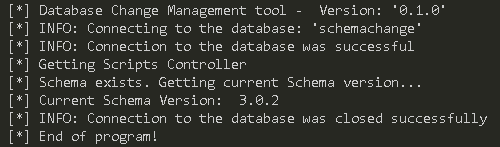
Figure 5: Output DCM tool execution to get the current database version
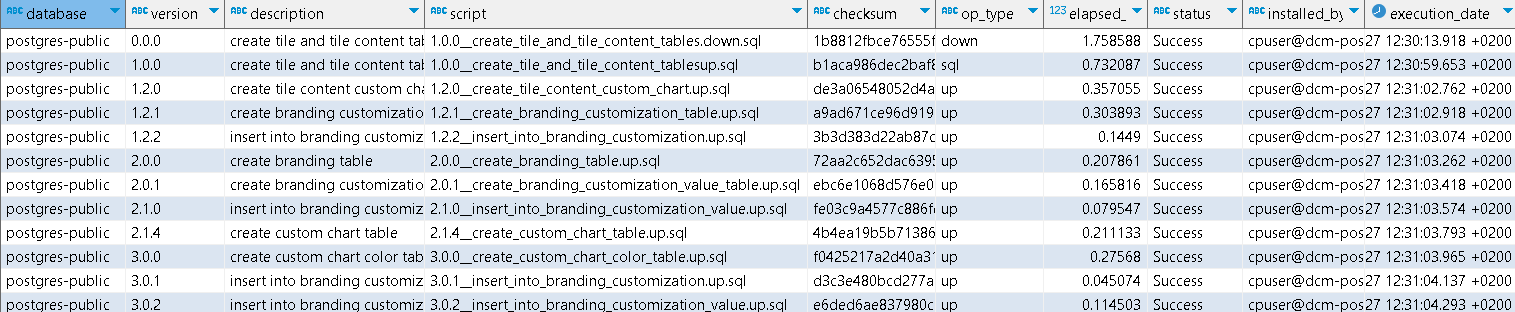
Figure 6: Change history table at version 3.0.2
In Figure 6, all executed scripts to go from the initial version 0.0.0 to the current 3.0.2 are shown. If we want to update an Application database to a specific version, it can be done using the option –fv:
$ python src/cli.py
-fv 4.1.1
-mdb *****
-chdb *****
-c path/to/databases/postgres-1/config.yaml
-r path/to/databases/postgres-1/migrations/
In addition, we need to add the password to the Application database using the option –mdb and specify the path where the migration scripts are stored using –r. If the version is not specified, the database will be updated to the latest version available.
This is the output of the execution:

Figure 7: Output DCM tool execution to update database

Figure 8: Change_History table before updating from version 3.0.2 to 4.1.1
If you want to execute a downgrade to a specific version, the option –rb must be set, and the command is:
$ python path/to/dcm/tool/cli.py
-fv 2.0.0
-rb
-mdb *****
-chdb *****
DevOps Integration
In this section we’ll look at how the DCM tool can be included in a CI/CD pipeline. We chose Azure DevOps for this task, as it provides seamless integration with Azure Resources and various version control systems such as GitHub, GitLab, and more, where our repositories can be stored.
Figure 9 shows the schema of the CI/CD process:
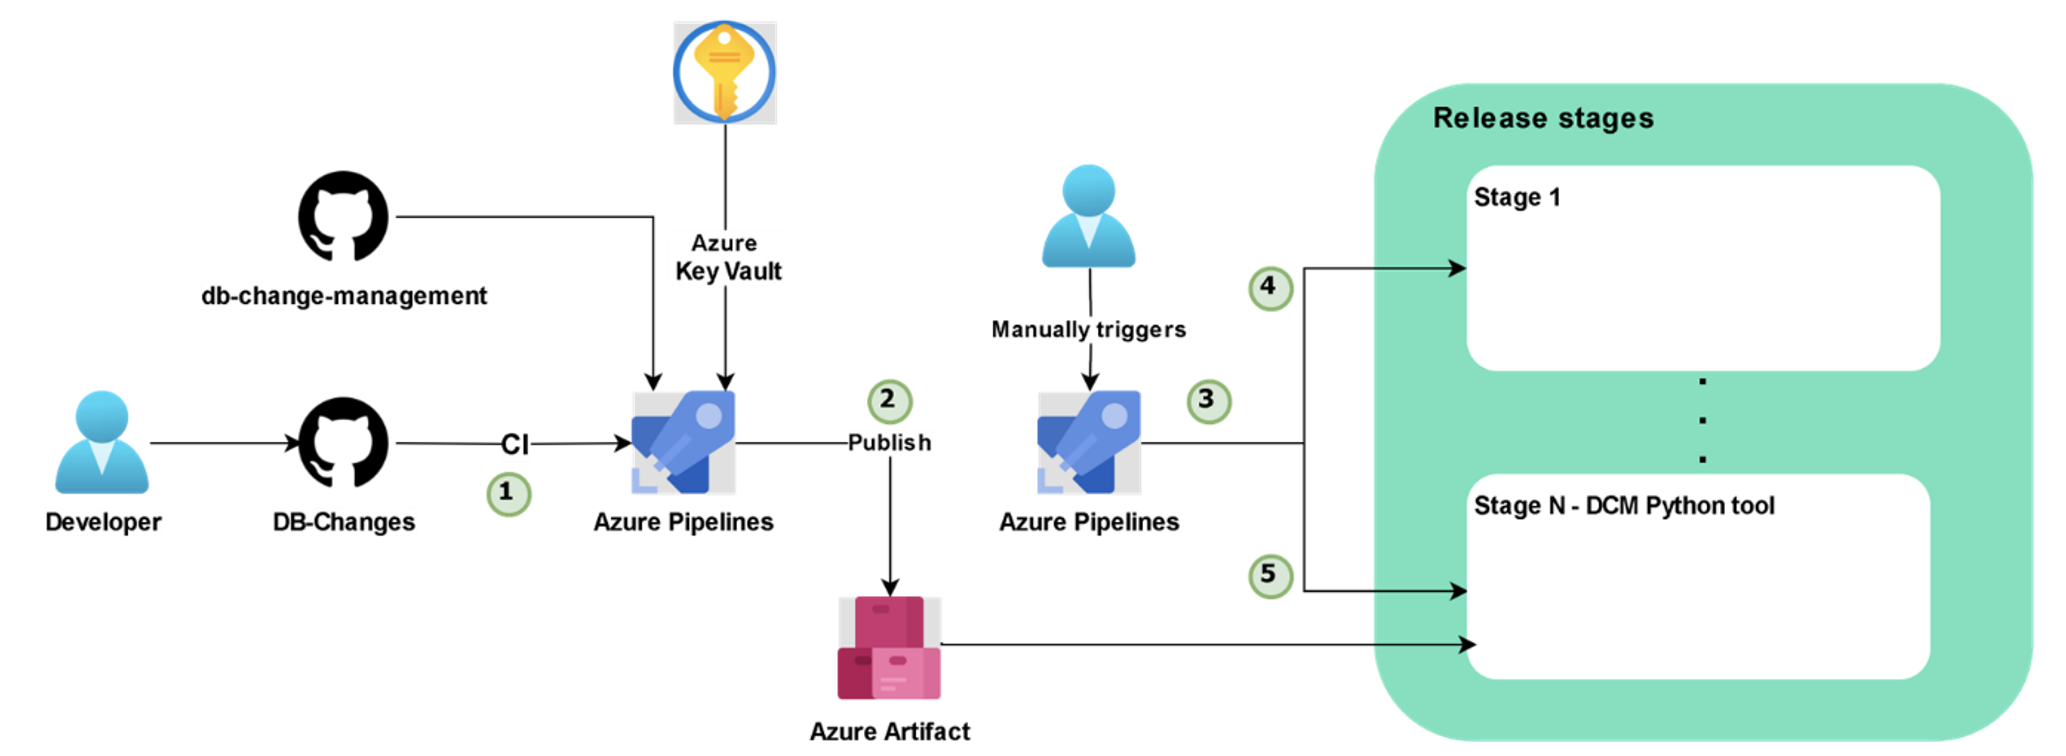
Figure 9: Schema of Azure DevOps DCM tool integration
We are going to describe all the steps of the schema in Figure 9, so that we can see how everything is connected. In Step 1 of Figure 9, after a change in the repository, the CI of the DB-Changes will be triggered. Figure 10 shows the YAML file in charge of the trigger:
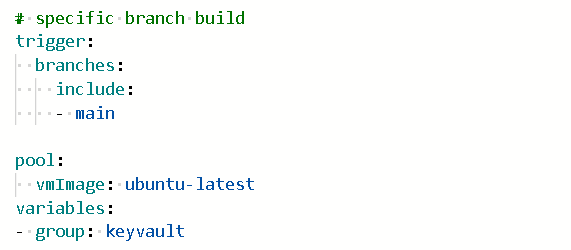
Figure 10: azure-pipelines.yml trigger and VM set
An Ubuntu virtual machine is used for the task of executing the pipeline. The database passwords are stored in an Azure Key Vault resource. In our Azure DevOps project library, we created a variable group called keyvault, that is linked with the Azure Key Vault to retrieve the key-secret pair.
In Step 1 of Figure 11, the CI of the DB-Changes pipeline executes the following steps:
- Clone the DCM-tool repository where the tool’s code is stored.
- Update pip and install the dependencies.
- From the root of the Application database that we want to update, execute the Python script with the desired options. In this step we can only execute the script to get the current version of the database and check that everything is working as it should be:
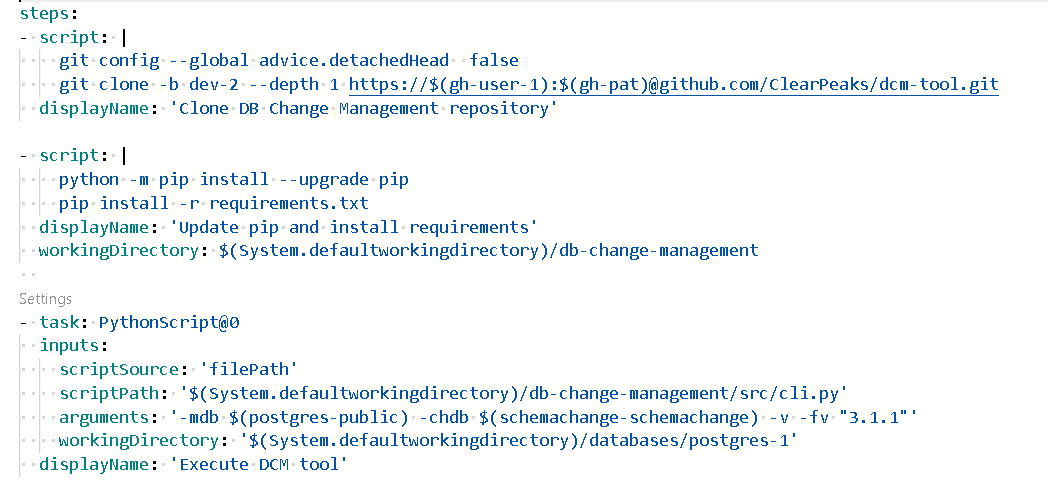
Figure 11: azure-pipelines.yml DCM steps
In the next step of the pipeline, which corresponds to Step 2 of Figure 9, an Azure Artifact is published, enabling its use in further steps outside this pipeline. All the necessary files are stored in the Artifact, including the migration scripts (up and down), the configuration files for each Application database, and the code of the tool:
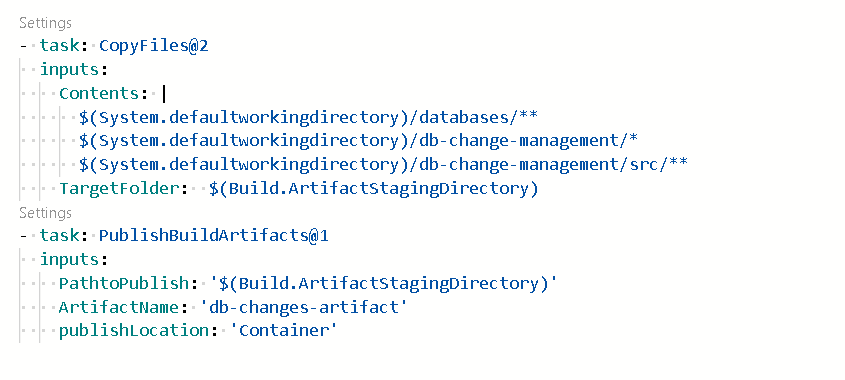
Figure 12: azure-pipelines.yml Artifact creation
Once the first pipeline has finished, the Artifact will be published and accessible from any application release.
Steps 3, 4 and 5 of Figure 9 are implemented in the Azure DevOps pipeline of Figure 13, where you can observe the creation of a release that uses the published Artifact. In an Azure Release, multiple stages can be created to differentiate the jobs that need to be executed:
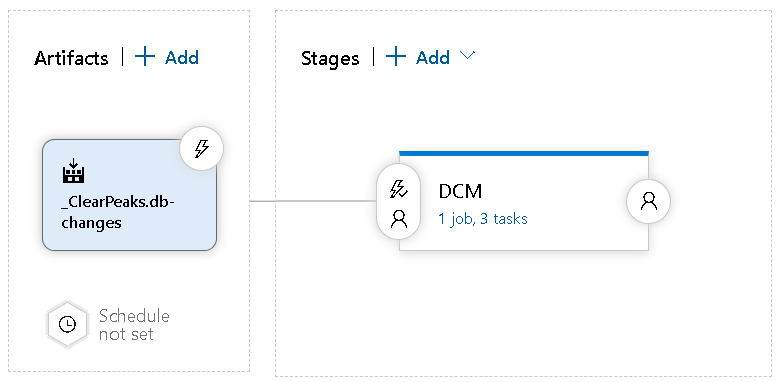
Figure 13: Azure DevOps Release tasks editor
In Figure 14, you can see the three different tasks that involve the DCM stage of the release.
- Azure Key Vault: get the secrets from the linked Key Vault.
- Install the tool’s dependencies.
- Execute the tool as a Python script with the desired options. This step will connect to the Application database and run all the SQL statements to migrate the database from one version to another:
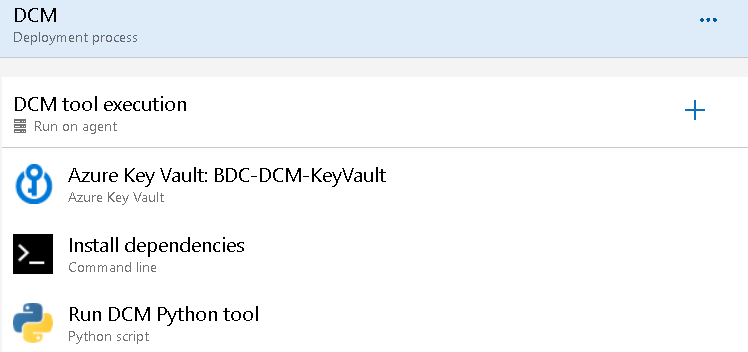
Figure 14: Azure DevOps Release DCM Stage tasks
If your application has several databases to manage, you only need to add one extra stage to the release pipeline for each database. When executing the tool, set the working directory to the folder where the migration scripts for that specific database are located.
Conclusions
In this blog post, we have explained the main functionalities of a DCM tool that we have developed, along with its integration in a DevOps environment. Setting up the tool certainly requires more effort than managing database changes manually, but once it’s been set up and tested it will significantly reduce the time and complexity of updating your database versions, and it will also provide efficient tracking and control over all the changes.
Thank you for reading this blog post – we hope you found it to be a useful introduction to Database Change Management and its importance in managing your databases. If you have any question or doubt, just contact us and our experienced team of experts will be happy to help you out!