03 Apr 2024 End-To-End MLOps in Azure
Integrating Artificial Intelligence (AI) and Machine Learning (ML) into company systems is easier said than done: numerous challenges emerge when productionalising a machine learning model, at every step of its lifecycle. Some of these difficulties include retraining the model quickly to incorporate improvements, keeping track of metrics and parameters, model versioning and comparison, and its deployment. Addressing these challenges effectively is what makes a successful project.
In this article today we’re going to present a seamless, productive way of dealing with these difficulties using the ClearPeaks MLOps (Machine Learning Operations) methodology in Microsoft Azure. We’ll show you a real customer use case, demonstrating a full, end-to-end implementation of this paradigm. Needless to say, for privacy reasons, we’ll be working with a fictional dataset similar to the original. The implementation is not closely connected to the use case, so it can be readily adapted to other scenarios, effectively making it a blueprint.
The MLOps Methodoly
Drawing on the concept of DevOps, and significantly influenced by the Data Engineering field, the MLOps methodology aims to address the challenges of continuous integration and continuous deployment (CI/CD) when engineering ML solutions, as shown in Figure 1 below.
Once an initial ML model has been developed, it is unlikely that it will remain effective indefinitely: at some point, perhaps after a few months or even weeks, the data may change, or your objective may be slightly different. This is generally known as model decay, where the model’s performance diminishes over time, as indicated by a decrease in the metric of interest, such as accuracy, mean squared error (MSE), or F1 score. This usually means that the model should be retrained, evaluated, then redeployed. Readapting quickly and smoothly to these requirements is at the heart of MLOps. When successfully implemented, the model becomes more reliable and maintainable, as its lifecycle is streamlined, and modifications can be incorporated easily.
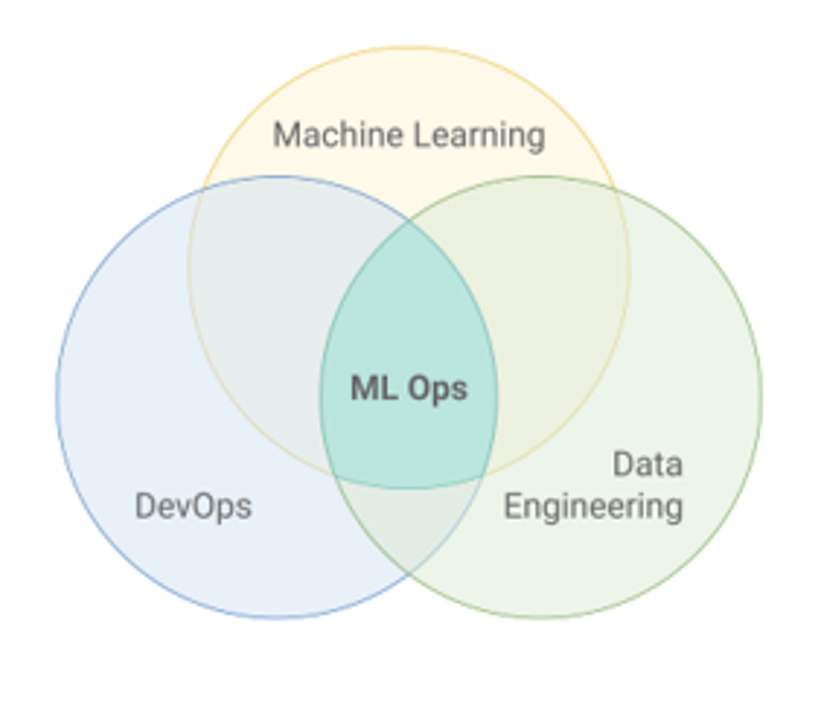
Figure 1: MLOps as an intersection of ML, DevOps, and Data Engineering
This way of working is becoming a standard in the ML industry, with the body of documentation growing every day, and more and more people and organisations getting on board. Here at ClearPeaks, we follow the standard industry MLOps best practices, shaped by our unique experience and expertise gained developing and productionalising ML use cases.
Why Azure?
Azure offers Azure Machine Learning, an AI service designed especially for the end-to-end implementation of ML use cases. This service integrates lots of tools that work together perfectly and cover the main needs of enterprise-level ML use cases: data preparation, building and training ML models, validation and deployment, and monitoring.
Let’s take a quick look at some of the tools that Azure ML provides:
- To save the raw data, the datastore is ideal. We can then partition it into a training and testing dataset and register these as data assets. These assets facilitate versioning and maintain a much richer collection of information about the dataset.
- To experiment with and build ML models, notebooks (the equivalent of Jupyter Notebooks) can be of great use.
- To train the models, different compute engines can be created and jobs can be sent to them.
- If the process is complex enough, the code can be divided into different components, each with its own associated environment and version, which can then be assembled with a pipeline.
- For the deployment, a natural option is to use an endpoint, either real-time or batch, or we can integrate it as part of other services such as Data Factory.
- Finally, monitoring can be done in many ways, for instance by using dataset monitors.
In addition, Azure DevOps will also be leveraged. We will employ this service as a continuous integration tool, although its potential is much greater, offering efficient teamwork capabilities and its own software development framework. In our case, Azure DevOps will be used to orchestrate the different parts of the MLOps implementation in a single pipeline and connect to GitHub, which will allow changes in the code repository to trigger the pipeline.
Use Case Overview
In short, our use case focuses on boosting profits from a marketing campaign; we are using the Marketing Campaign dataset from Kaggle, which is similar to the customer’s real dataset. It consists of 2,240 observations and 28 different variables. Each observation corresponds to a person, and the variables provide information on different spending patterns, personal details, and whether they have accepted previous (similar) offers or not.
Our goal, then, is to develop an ML model capable of predicting who will respond to the offer based on personal information, which effectively means getting to know the people interested in the company’s products. This can be very useful, for example, in a “flash offer” scenario, where every day a subsample of customers is selected for the presentation of a special limited-time offer, with the model helping to choose the subsample. Figure 2 gives us a simplified visualisation of this goal:
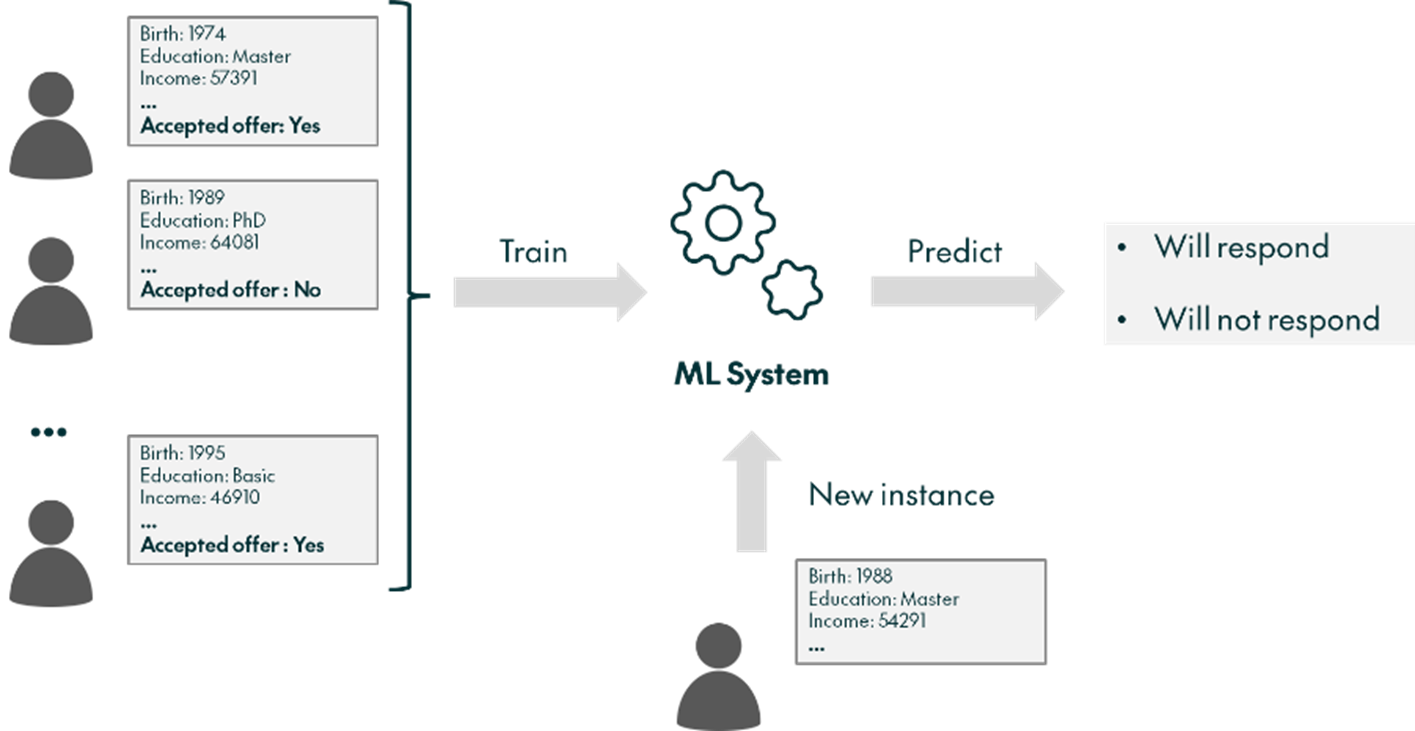
Figure 2: Schematic representation of the Marketing Campaign use case goal
As we will see, our MLOps methodology will enable the model to be easily adapted to the unpredictable nature of a production environment. Changes will be necessary, but once implemented, there will be a new, ready-to-consume model, all automated, with minimal friction. This includes automatically retraining, evaluating, and deploying the model; in other words, it means that the model will be sustainable and robust over time.
Solution Overview
The solution consists of different steps, each with a well-defined function. These steps are orchestrated by the main pipeline in Azure DevOps, which executes them in order once triggered. The first to be executed is the Azure ML pipeline, a small pipeline (don’t confuse it with the bigger DevOps pipeline) which encapsulates the pre-processing, feature engineering, retraining, and testing phases in different components. The next step compares the newly trained model to previous models, then promotes it to the production stage if it turns out to be better. The third and final step is deployment, where the model is deployed to an endpoint and the traffic is updated, as we can see in Figure 3:
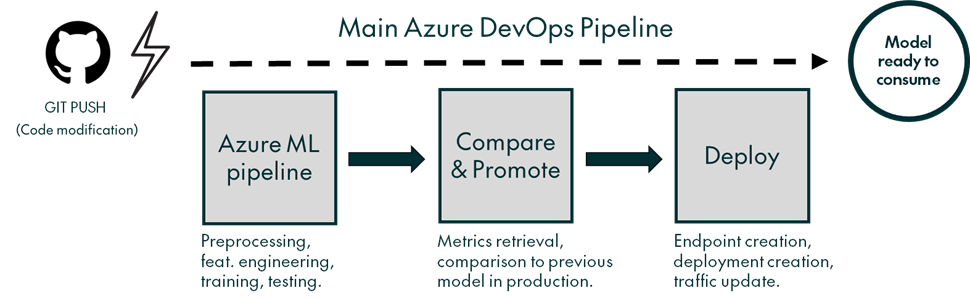
Figure 3: Simplified schema of the solution, showing the different steps of the main Azure DevOps pipeline
Triggering the main Azure DevOps pipeline can be fully customised. In this implementation, the trigger is simply a change in the “main” branch of the associated GitHub repository.
In parallel to the Azure DevOps pipeline, a data drift detection system has been set up, consisting of a recurring, scheduled execution of a data drift detection job, using a dataset monitor. This provides metrics, graphs and alerts for the prompt detection of any data distribution problems.
As well as the different technologies already mentioned, the open-source MLflow platform is used extensively to facilitate managing the model’s lifecycle, incorporating concepts such as model versioning and tagging. MLflow also seamlessly integrates with Azure, making it a better option than similar alternatives. So, to summarise, the general technological landscape needed to implement the solution presented here looks like this:
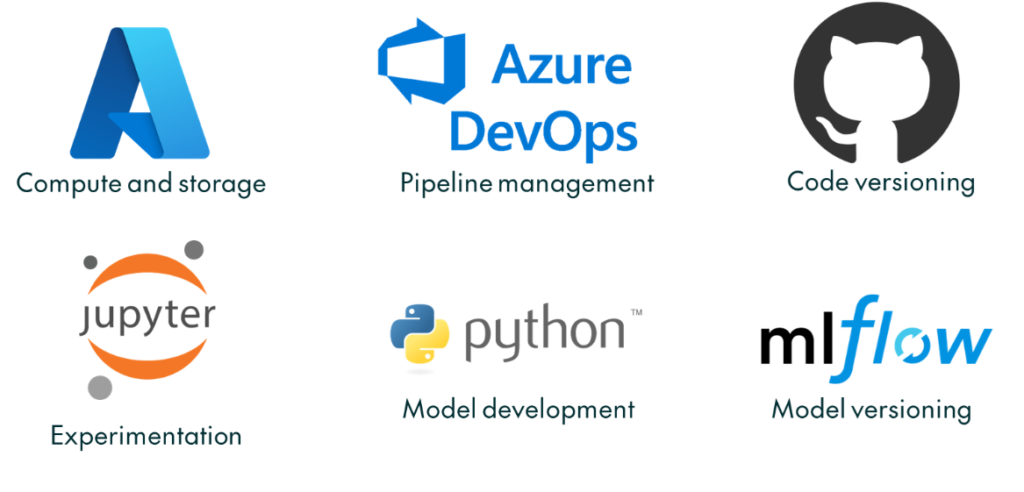
Figure 4: Main technologies used in the proposed solution
The original model underwent several iterations following MLOps practices and was ultimately replaced by a Random Forest model, which showed superior performance. However, since the specifics of the model are beyond the scope of this blog post, we will not delve into these details.
In summary, our proposed solution automates the entire process, from modifications in the model or data processing to the full retraining and deployment of the updated model, ready for use.
The Azure DevOps Pipeline
This is the heart of the project, serving a dual purpose: firstly, it facilitates the triggering of certain processes if the code is modified, and secondly, it serves as an orchestrator for the different components. This is why Azure DevOps must be correctly connected to the GitHub repository with the model’s code, and to the Azure workspace where the data and compute are.
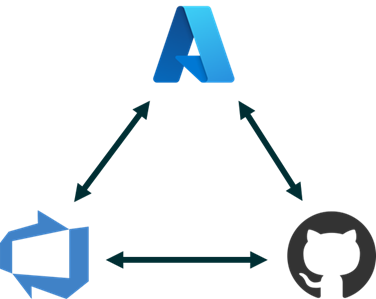
Figure 5: The necessary interconnectedness of Azure, Azure DevOps, and GitHub
These connections involve creating a GitHub-type connection using the GitHub Azure Pipelines App, and an Azure Resource Manager connection which connects directly to your Azure subscription, specifically to the workspace where the ML resources are located. The latter connection employs a Service Principal, used in Azure to perform the necessary automated tasks.
Once everything has been successfully connected, a single YAML file (inside the GitHub repository) will suffice to define how and when everything will be executed. This means setting up different tasks such as installing dependencies and using the Azure Command Line Interface (CLI) to send the corresponding jobs to the Azure compute resources. As everything is connected, this last step will be significantly easier. For example, Figure 6 shows how to send a particular job, which in this case corresponds to the comparing and promoting phase, although we would do basically the same for other phases as well:

Figure 6: Extract from the YAML file that controls the Azure DevOps pipeline, showing how to execute a script from the GitHub repository using Azure credentials
Now let’s see how each step works in more detail!
The Azure Machine Learning Pipeline
The pipeline is our first step and it’s pure ML: pre-processing, feature engineering, training, and testing happen here, leveraging the capabilities of the pipelines and components features of the Azure Machine Learning Studio. The code is split into different Python files that perform different tasks, such as imputation, normalisation, or feature selection. These files are specifically designed so that they can be transformed into Azure components, which means adding some extra syntax around the ML logic.
To define the Azure ML pipeline (different from the main DevOps pipeline), a separate Python file is used, which consists of importing the individual files (corresponding to the components) and connecting inputs to outputs. In this file, the data source is specified, the pipeline is submitted, and the components are registered, so a new version is created every time they change. Figure 7 shows what the pipeline looks like inside the Azure Machine Learning Studio once everything has been set up:
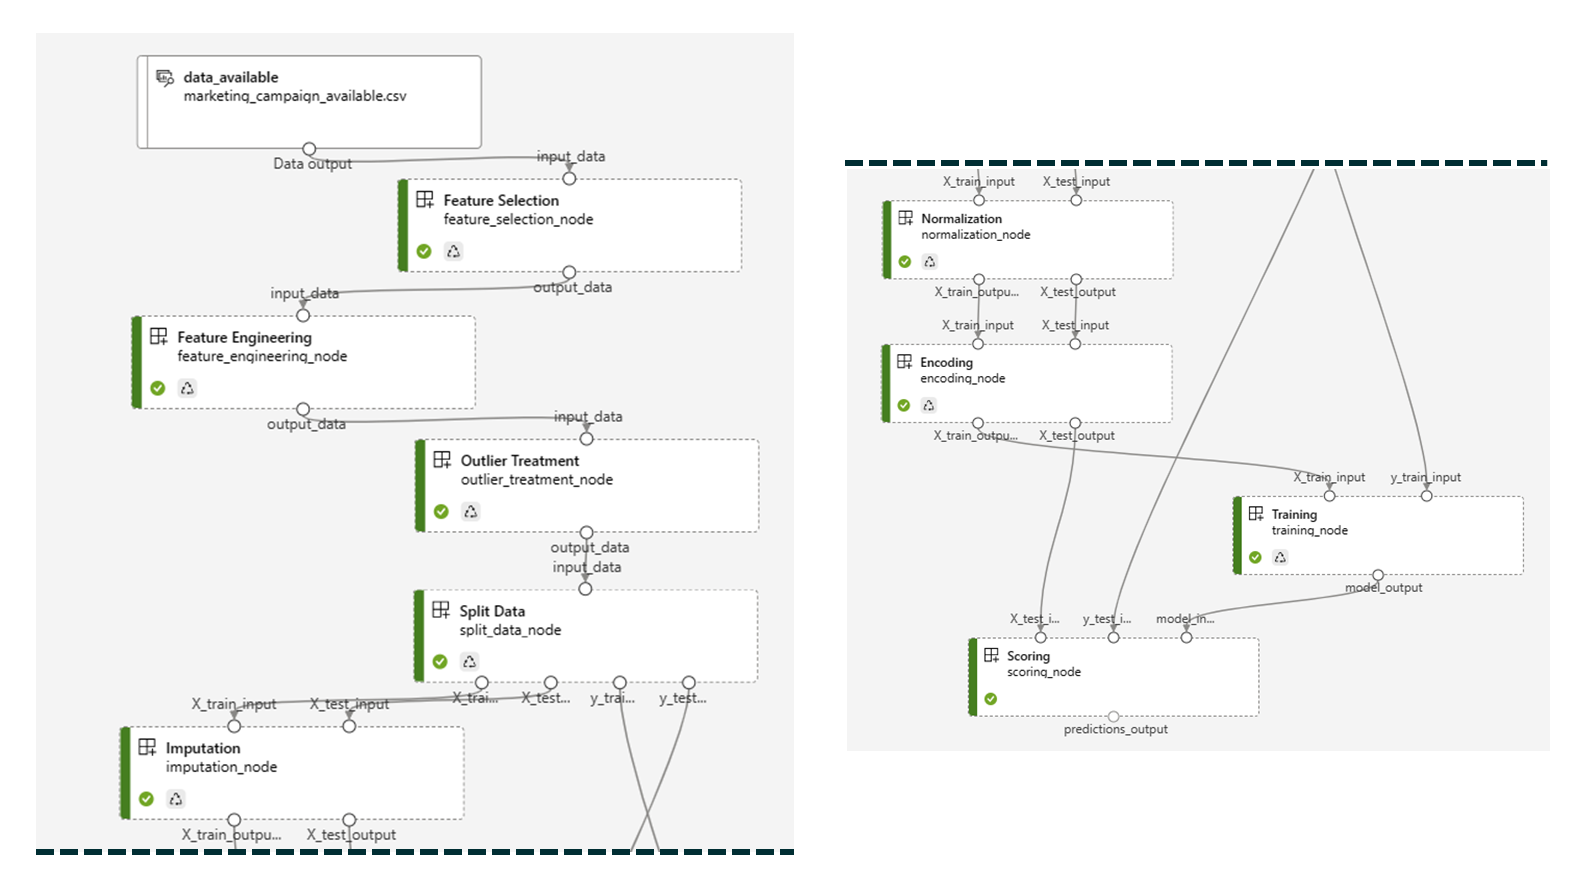
Figure 7: The Azure ML pipeline, encompassing the main Machine Learning steps
Inside the training and testing components, MLflow is used to register the new version of the model, save the hyperparameters used and log all the necessary metrics, such as the accuracy and F1 score, in this case. As MLflow is directly integrated with Azure, all this information is accessible through Azure’s systems, including the UI.
The data source, as mentioned, is specified in the same file that is used to define the ML pipeline. In this implementation, we have saved the training and testing data in an Azure Blob Storage associated with the same workspace as the compute, and then created the corresponding data assets, which is the usual way of working with data in Azure. Data assets simplify moving data around the different files and reduce the necessary authentication steps to use the data. Creating data assets is not limited just to using blob storages as sources of data: there are many other options, such as creating them from Azure File Share, Azure Data Lake, SQL databases, or web files located in public URLs, among other alternatives.
Maintaining the different ML steps separately in Azure components offers several benefits: firstly, it makes the process conceptually easier to grasp, allowing a clearer understanding of the code’s functionality. Secondly, the code’s inherent modularity greatly simplifies debugging. Thirdly, if necessary, we can isolate execution environments, associating a distinct YAML file with each component. And what’s more, we can see the execution times and logs for each component, facilitating the identification of future improvements.
Once the ML pipeline has finished executing, we’ll have a new model registered in Azure, fully trained and tested, with all the related information properly registered and easily accessible, so it can be compared to other models if necessary, in preparation for the next step.
How the Best Model is Always in Production
In this phase, the new model is compared to the previous model in production and, if it’s better, it is promoted using a tagging system managed by MLflow. More specifically, all the necessary metrics saved during the testing phase are retrieved for both the in-production and the new model, and then some logic is applied to decide whether the new model is indeed better or not. For instance, in this particular implementation, we compare the accuracy and the F1 score, and if both are better, then the new model is promoted:
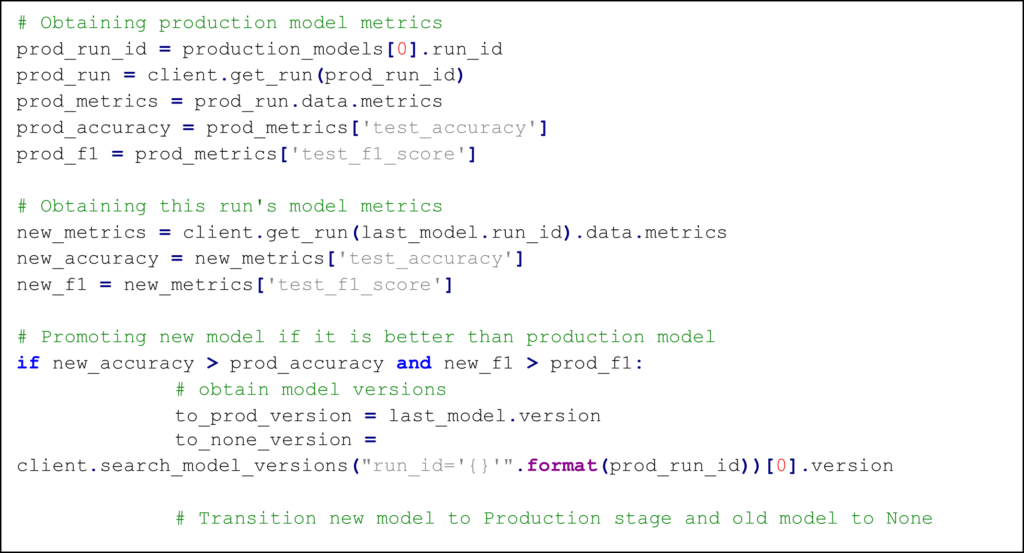
Figure 8: Code example from the compare and promote step, showing how the metrics from the model in production and the new model are retrieved and then compared
It is important to note that even if the model is promoted, this is only done symbolically, with tags using MLflow; the actual deployment of the new model is the next step.
The logic governing this phase is highly adaptable, allowing for the implementation of more complex conditions and checks to satisfy any quality standards.
Making the Model Available: Deployment
If the previous step has determined that the newly trained model is better than the model in production, then it should be deployed so it can be used, and once again we’ll leverage the existing capabilities in Azure ML to carry this out. Specifically, we’ll use the Azure endpoints functionality, which allows us to create an endpoint and deploy one or more models to it.
All the corresponding logic can be packed in a single Python file, which checks whether there is already an endpoint or not (if not, it creates one), then creates a new deployment for the new model and, depending on the existence of a prior deployment, updates the traffic accordingly. We can see the process below:

Figure 9: Code example from the deployment step, showing how different tasks are performed
The inference logic is encapsulated in a Python file (usually called the “scoring script”) associated with the deployment. This serves as the link between the new data and the trained model, pre-processing the new, incoming data before it’s fed to the model. MLflow can be used to log the models employed for normalisation and imputation as artefacts, ensuring the consistent application of these techniques at the time of inference. Nevertheless, there is a fully automated alternative, harnessing the inherent capabilities of Azure ML to automatically generate the scoring script.
Naturally, the general workings of the deployment phase can be expanded to incorporate more advanced techniques such as blue-green deployment, canary deployment, A/B testing, or an extensive array of unit tests to make sure everything is working correctly. As in the previous step, the logic is very malleable and can be adapted to specific needs.
Checking for Data Drift
In parallel with the Azure DevOps pipeline, a periodic check for data drift can be performed to ensure the model is still valid. Although still in its early stages, Azure ML offers a tool, Dataset Monitors, which enables checking for data drift between the training dataset and new data, or, in more general terms, between a baseline and a target dataset.
Our proposed implementation specifically uses the DataDriftDetector class, offering unique functionalities when working with AKS clusters, such as updating the datasets it compares. However, as this scenario does not apply to us, in our implementation we have sidestepped updating the datasets by creating a new class instance each time we want to check for data drift.
To integrate this, a notebook is first used to set up a scheduler which will be used to execute the data drift detection script periodically and automatically. The execution frequency can be customised as desired, depending on the particular needs of the scenario. In our case we opted for daily, as we expect new data to arrive on a daily basis. When the script is executed, the new data is retrieved, the datasets for comparison (baseline and target) are updated, the data drift detection job is sent to the compute, and the metrics are gathered.
Every time a data drift detection job is executed, we end up with metrics, graphs, and if data drift is detected, an email alert (which can be further customised). Figure 10 shows a few example results:
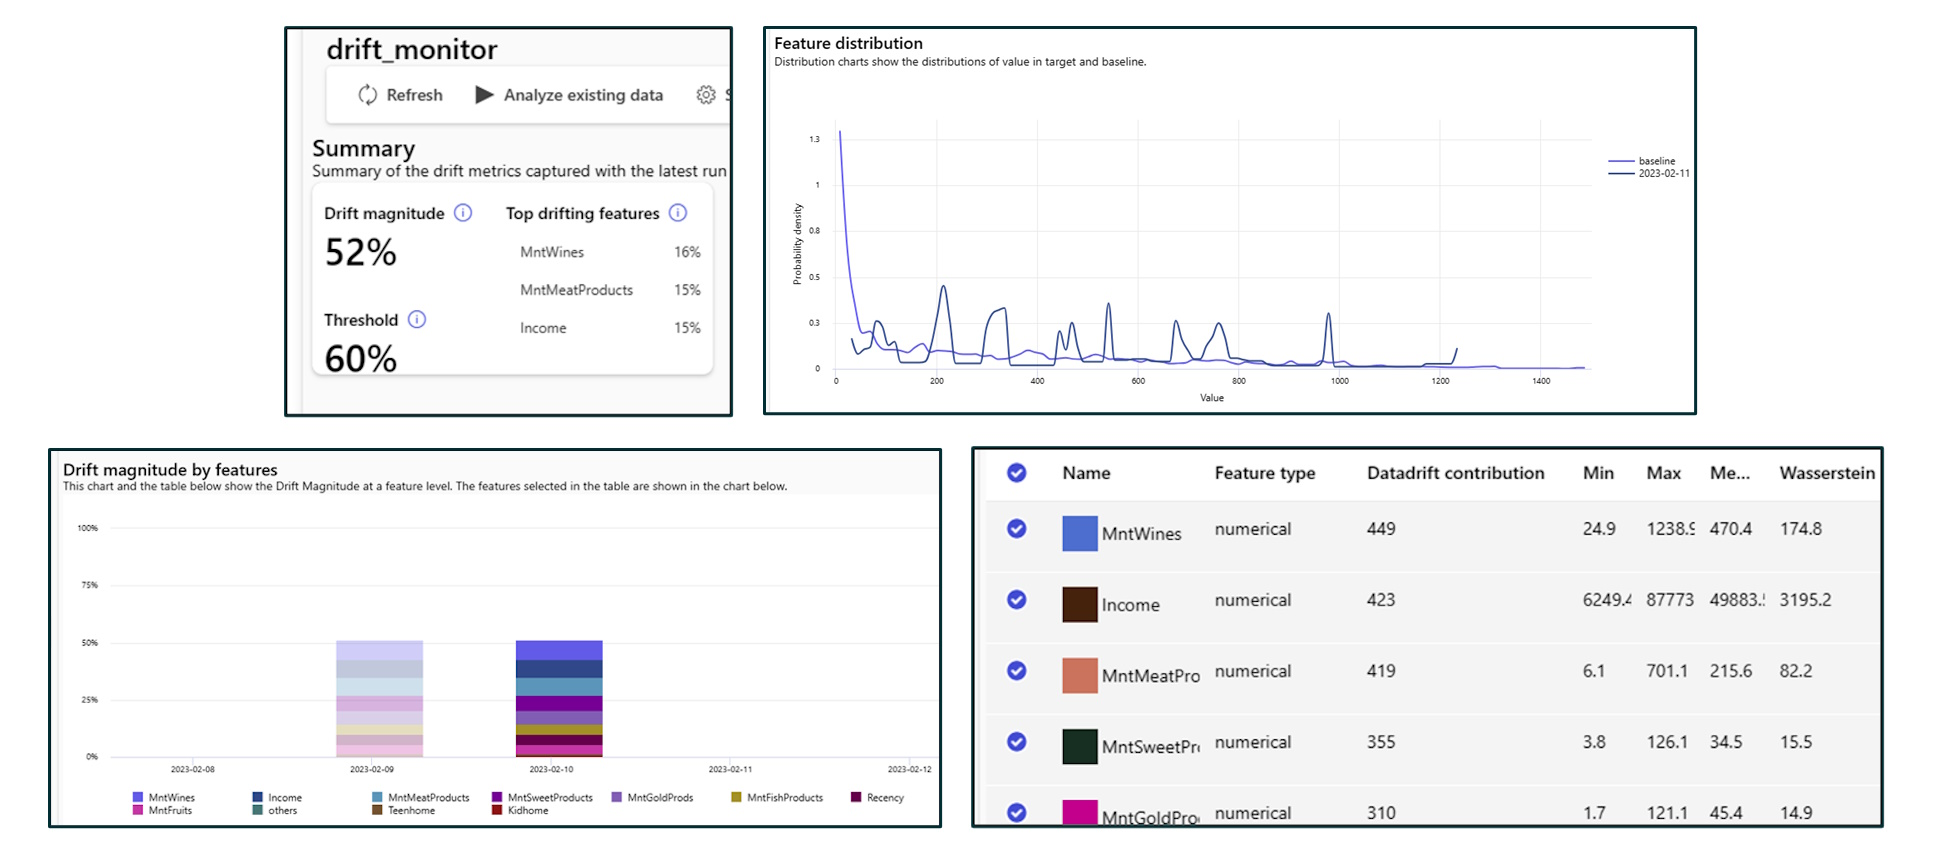
Figure 10: Different metrics and graphs provided by the Dataset monitor in Azure
The main metric aims to summarise, in a single number, the extent of difference across datasets, regardless of the volume of columns or observations. This is easy to grasp at a glance, but not a lot of information is available on how this number is calculated. The other metrics are simple statistics for each feature that gauge the variance in distributions. These include the calculation of the minimum, maximum, mean, Euclidean distance, and the Wasserstein metric.
These metrics can then be used to retrain the model automatically if necessary, using the new data obtained after model deployment. Naturally, this can only be done if we have access to the labels corresponding to the observations (the y-values). For example, in our flash offer scenario, we would know at the end of the day whether the customers have accepted the offer or not, so we could obtain the labels. When and how to retrain the model can depend heavily on the use case in question. In some instances, instead of automating retraining, it might be better to set up an alert and delegate this decision to an actual person.
This data drift implementation is key in the basic understanding of how data distributions shift, as well as identifying any issues warranting attention. While it is sufficient for numerous applications, there may be cases that need more advanced techniques such as data slicing or concept drift analysis. There are lots of methodologies to explore!
Conclusion
In this blog post, we have presented a solution that brings MLOps to life using Azure ML. Leveraging the different tools that this service offers, we have been able to architect an end-to-end pipeline that has taken an initial ML model to the next level, robust in face of the dangers of a production environment.
Now the model’s management is streamlined: making changes is easy, as the whole process is automated. Once this solution is up and running, we can focus our energy and time on the model, and what’s more, every step is transparent and can be fully controlled and adapted to specific requirements.
As we mentioned at the beginning, think of this blog post as a blueprint. Our particular use case was simply a way to illustrate the whole process. It’s really just a matter of how far you want to take it, and the precise goals and needs of each usage scenario – the possibilities are virtually limitless! If you’d like to see all this in action, watch our video on YouTube.
If you would like to know more about MLOps in Azure, and whether it might be the solution to your specific needs that you’ve been looking for, do not hesitate to contact us. Our team of experts are ready to help in building and implementing a solution tailored to your specific use case!