23 Jan 2012 Step-by-step on how to generate a Metadata Dictionary
In the process of building the OBIEE repository, there is a lot of information defined in there which eventually, we would like to make accessible for users without having to grant the access to the repository itself. The generation of the Metadata Dictionary will create a set of XML/HTML webpages with the documentation data about the objects in the repository and their relationships. Furthermore, the use of the metadata dictionary could be very useful when you are developing, or once everything is developed to check quickly the metrics, attributes, and dependences for the repository objects, with the only need of web browser. At the end of this blog article what we are going to obtain as a result is an automatically generated documentation, which is also linked properly within Answers. This feature is available for OBI 10.1.3.4.

Picture 01 Metadata dictionary – Name index
The first step is to open offline the repository in the Administration tool. Then go to the menu Tools –> Utilities –> Generate Metadata Dictionary
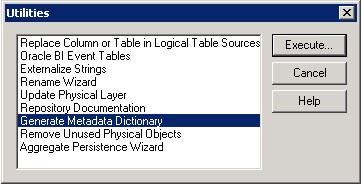
Picture 02 Generate Metadata Dictionary Tool
It will ask for a directory to place the xml files that it is going to generate.
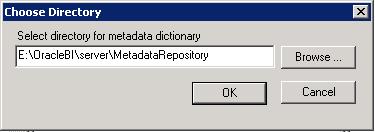
Picture 03 Generate Metadata Tool Choose Directory
Then, you have to copy them to your Presentation Server. Now, you have to place them where your application is deployed. For example, if you are using OC4J as Java application server, then you will have a path similar to this one: {BIHome}\oc4j_bi\j2ee\home\applications\analytics\analytics\res I have chosen a directory to place the resources for the web application (Analytics).
But you can choose any place under {BIHome}\oc4j_bi\j2ee\home\applications\analytics\ So far, the metadata will be accessible via Web browser from: http://BIpresentationServer:9704/analytics/res/YourRpdName/NameIndex.xml

Picture 04 Metadata Dictionary – Tree index
Finally, you have to edit your presentation server file, in order to say where your metadata is placed. Include the following text under the ServerInstance tag in your {BIEEDataHome}/web/config/instanceconfig.xml file: <SubjectAreaMetadata> <DictionaryURLPrefix>/analytics/res/</DictionaryURLPrefix>
</SubjectAreaMetadata>

Picture 05 Metadata Dictionary – Edit instanceconfig.xml file
After editing your instanceconfig.xml file you will have to restart your Presentation Server.

Picture 06 Metadata Dictionary – Answers before Reload metadata
When you click on Reload Server Metadata, you will have accessible the metadata information for the Subject Area that you have chosen.

Picture 07 Metadata Dictionary – Answers with links to metadata index
As you see above, it’s linked to the proper xml file published. When you click on it, it will open a new web browser window with the corresponding web page opened where you have clicked

Picture 08 Metadata Dictionary – Answers opening linked metadata index
Note: If problems arise, you should check that the access to the metadata dictionary is granted in your Presentation Server. To check this: Log in as Administrator in Analytics, go to Settings –> Administration select Manage privileges, and check Access to Metadata Dictionary is set to the users you want. By default this is set to everyone. The result is that you have in every column in Answers the information directly linked to the generated documentation and dependences of this field.

Picture 09 Metadata Dictionary – Answers linked metadata index
Of course, you can still browse whenever you want to check any information needed. This is a practical tool that lets you check the repository objects properties, attributes and dependences without having to open the Admin Tool.

Picture 10 Metadata Dictionary – Answers and repository objects information
It’s a common problem to have the metadata dictionary out of date because OBIEE doesn’t offer a way to update it automatically. So far, I have covered the set up and the manual copy of the files. Now, I am going to show you how to simplify the updating process. Let’s see how to automate the process of generating the metadata dictionary. Let’s create a file like this, which opens the rpd file and generates the metadata dictionary.

Picture 11 Metadata Dictionary – Automating export metadata index
Then when we call the Admin tool with /command option and this previous file as a parameter, it will create the metadata dictionary in the directory where we specified in the file. E:\OracleBI\server\Bin\AdminTool.exe /command E:\repository.paint\nQMetaDataExport.txt If we put it all together in a batch file which is called every week by the Windows Task Scheduler, then it will be done automatically.

Picture 12 Metadata Dictionary – Automating calling admin tool command line
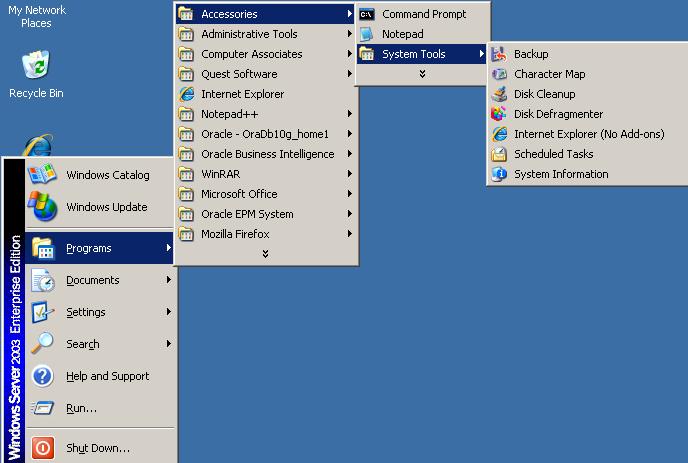
REM Generating the metadata dictionary E:\OracleBI\server\Bin\AdminTool.exe /command E:\repository.paint\nQMetaDataExport.txt REM Moving the metadata dictionary to the application server directory move /Y E:\repository.paint\paint E:\OracleBI\oc4j_bi\j2ee\home\applications\analytics\analytics\res In order to Schedule a Task, go to menu Start –> Accessories –> System Tools –> Scheduled Tasks
Picture 13 Metadata Dictionary – Windows Scheduler
Then click on Add Scheduled Task –> Browse –> select your .bat file and Open

Picture 14 Metadata Dictionary – Scheduling task
Now choose the frequency in which you want your Metadata to be updated.

Picture 15 Metadata dictionary – Scheduling task weekly
Choose the different details.

Picture 16 Metadata dictionary – Scheduling task details
Enter your user account for that system with privileges to schedule tasks.

Picture 17 Metadata dictionary – Scheduling task – User account
And press finish in the next screen to finalise the process.

Picture 18 Metadata dictionary – Scheduling task – Finishing
We have now our documentation updated automatically every week.

Picture 19 Metadata dictionary – Scheduling task – Finished
As shown in this blog article, scheduling the generation of the metadata repository documentation is easy and the value it adds is worthwhile. Users could access the repository information and the relationships between the different objects without accessing the OBIEE repository itself. Moreover, the links on Answers interface provide to the user who creates the report a useful and in-place link to the repository documentation which allows saving time. References:
Oracle documentation about the Metadata Dictionary: http://download.oracle.com/docs/cd/E10415_01/doc/bi.1013/e10416/metadatadict.htm#CIHEIJAC OBIEE Server Administration Guide, page 187:
http://download.oracle.com/docs/cd/E10415_01/doc/bi.1013/b31770.pdf
Robin Moffatt’s blog entry about Syntax for AdminTool.exe command line script: http://rnm1978.wordpress.com/2009/09/09/syntax-for-admintool-exe-command-line-script/