23 Nov 2020 How to spin up a CDP Data Hub cluster on Azure
Last year, Cloudera began their journey towards EDP, the Enterprise Data Platform, their goal being to provide a unique, powerful platform to fulfil all data-related requirements and solve all the typical issues that companies must tackle when it comes to data collection, processing, storage and analytics.
This ambitious project culminated in CDP, Cloudera Data Platform, a natural evolution of CDH and HDP, which we presented here. Today, the CDP landscape is already a great deal vaster, and new additions and enhancements are continuously announced.
In this blog entry, we want to show you how to spin up a CDP Data Hub cluster in Azure: we will walk you through the Azure account settings, the creation of the required Azure resources and the registration of a Data Lake and a Data Engineering Data Hub in CDP.
1. Setting up the Azure account
After an initial period of availability only on AWS, you can now spin up a CDP cluster on Azure. To do so, you first need to create an Azure application and a storage group with the correct credentials, to serve as the foundation of your CDP Data Lake and Data Hub. We will now explain the steps in detail.
First of all, make sure your Azure user has the right privileges. Cloudera suggests that you have full Owner permissions on the Azure subscription, and the Application Developer role in Azure AD.
Then, open a Cloud Shell, and run the following command. It will show you the details of your subscription. Note down the subscriptionId and tenantId, because they will be required later.
az account list|jq ‘.[]|{“name”: .name, “subscriptionId”: .id, “tenantId”: .tenantId, “state”: .state}’
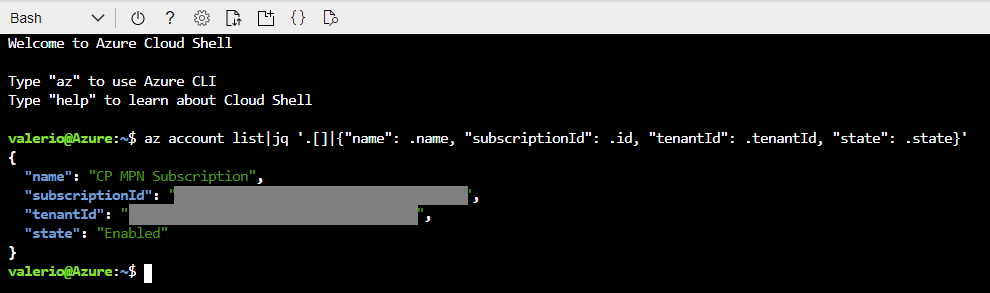
Figure 1: Subscription details displayed on the Azure Bash shell.
Copy the subscription ID, and run the command below, changing the last parameter. This will create an app, called cloudbreak-app, with the Contributor role. It will allow CDP to communicate safely with your Azure subscription and resource group (which we will create in a moment). This time, make sure you note down the appId and password.
az ad sp create-for-rbac –name http://cloudbreak-app –role Contributor –scopes /subscriptions/{subscriptionId}
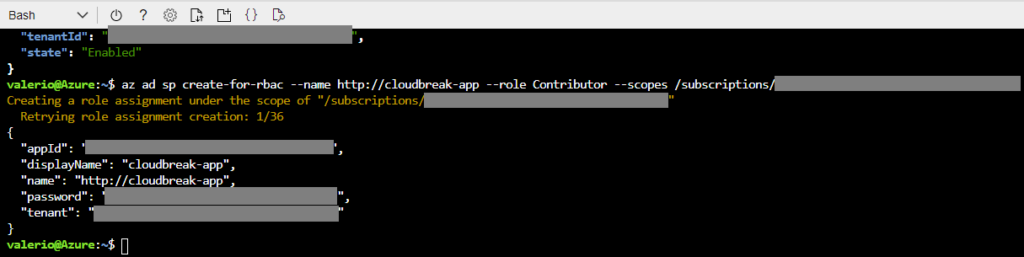
Figure 2: Creating the required application on Azure and assigning it the Contributor role.
At this point, we need to create the resource group, which will include a VNet, Azure Data Lake Storage Gen2, and 4 user-managed identities. Cloudera has prepared a template which we can easily deploy by clicking here. Select your subscription, give your resource group a name, and make sure you select the same region as your subscription. Remember to note down the resource group name that you use, because it will be required later.

Figure 3: Details of the custom resource group deployment generated by the script provided by Cloudera.
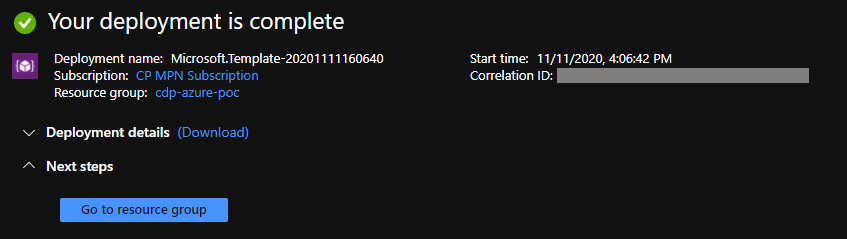
Figure 4: View of the completed creation of the resource group.
Once the deployment is complete, navigate to the resource group: you should see all the elements that we mentioned above. Above all, check for the 4 managed identities: if you can’t see them, just wait a few seconds and refresh the page.
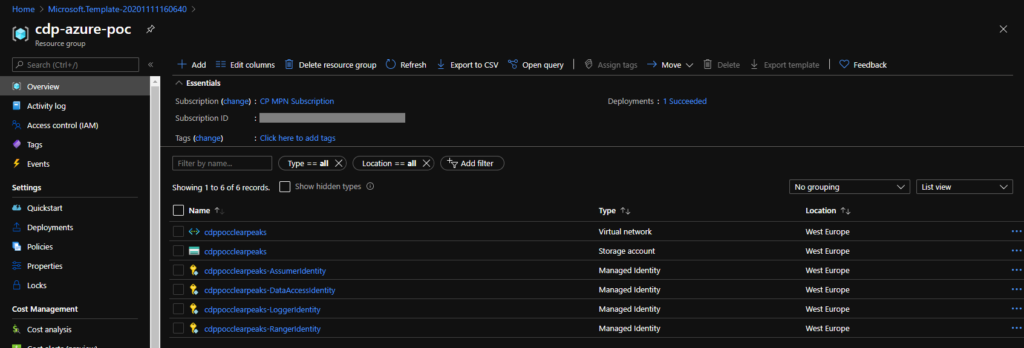
Figure 5: Details of the new resource group.
The next step requires you to run a few shell commands to assign some necessary roles to these resources. Cloudera provides a template of the script here, to be updated with your subscription ID, resource group name, storage account name, and the object IDs of the 4 managed identities you just created. However, it is actually easier to use the example below, since it generates most of the IDs programmatically, and you only need to edit the first two lines (subscriptionId and resource group name).
#!/bin/sh
export SUBSCRIPTIONID=”{subscriptionID}”
export RESOURCEGROUPNAME=”{resourceGroupName}”
export STORAGEACCOUNTNAME=$(az storage account list -g $RESOURCEGROUPNAME –subscription $SUBSCRIPTIONID|jq ‘.[]|.name’| tr -d ‘”‘)
export ASSUMER_OBJECTID=$(az identity list -g $RESOURCEGROUPNAME –subscription $SUBSCRIPTIONID|jq ‘.[]|{“name”:.name,”principalId”:.principalId}|select(.name | test(“AssumerIdentity”))|.principalId’| tr -d ‘”‘)
export DATAACCESS_OBJECTID=$(az identity list -g $RESOURCEGROUPNAME –subscription $SUBSCRIPTIONID|jq ‘.[]|{“name”:.name,”principalId”:.principalId}|select(.name | test(“DataAccessIdentity”))|.principalId’| tr -d ‘”‘)
export LOGGER_OBJECTID=$(az identity list -g $RESOURCEGROUPNAME –subscription $SUBSCRIPTIONID|jq ‘.[]|{“name”:.name,”principalId”:.principalId}|select(.name | test(“LoggerIdentity”))|.principalId’| tr -d ‘”‘)
export RANGER_OBJECTID=$(az identity list -g $RESOURCEGROUPNAME –subscription $SUBSCRIPTIONID|jq ‘.[]|{“name”:.name,”principalId”:.principalId}|select(.name | test(“RangerIdentity”))|.principalId’| tr -d ‘”‘)
# Assign Managed Identity Operator role to the assumerIdentity principal at subscription scope
az role assignment create –assignee $ASSUMER_OBJECTID –role ‘f1a07417-d97a-45cb-824c-7a7467783830’ –scope “/subscriptions/$SUBSCRIPTIONID”
# Assign Virtual Machine Contributor role to the assumerIdentity principal at subscription scope
az role assignment create –assignee $ASSUMER_OBJECTID –role ‘9980e02c-c2be-4d73-94e8-173b1dc7cf3c’ –scope “/subscriptions/$SUBSCRIPTIONID”
# Assign Storage Blob Data Contributor role to the loggerIdentity principal at logs filesystem scope
az role assignment create –assignee $LOGGER_OBJECTID –role ‘ba92f5b4-2d11-453d-a403-e96b0029c9fe’ –scope “/subscriptions/$SUBSCRIPTIONID/resourceGroups/$RESOURCEGROUPNAME/providers/Microsoft
.Storage/storageAccounts/$STORAGEACCOUNTNAME/blobServices/default/containers/logs”
# Assign Storage Blob Data Owner role to the dataAccessIdentity principal at logs/data filesystem scope
az role assignment create –assignee $DATAACCESS_OBJECTID –role ‘b7e6dc6d-f1e8-4753-8033-0f276bb0955b’ –scope “/subscriptions/$SUBSCRIPTIONID/resourceGroups/$RESOURCEGROUPNAME/providers/Microsoft
.Storage/storageAccounts/$STORAGEACCOUNTNAME/blobServices/default/containers/data”
az role assignment create –assignee $DATAACCESS_OBJECTID –role ‘b7e6dc6d-f1e8-4753-8033-0f276bb0955b’ –scope
You can either run these commands manually in the Cloud Shell or save the whole script as a .sh file and then run it.
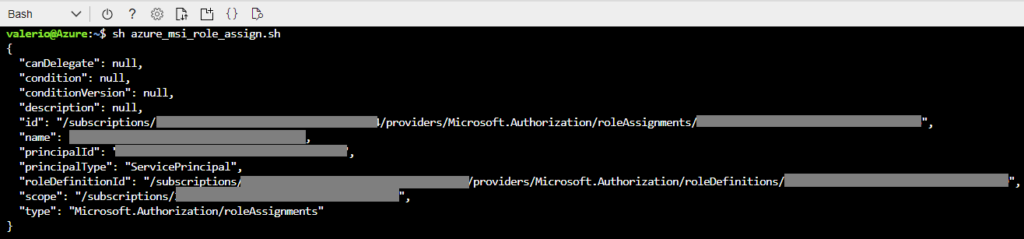
Figure 6: Assigning the necessary roles to the new resource group identities.
The last step is to create an SSH key. Of course, we could also use an existing one, but in the interest of performing and describing the complete list of steps, we will create one with the following command:
ssh-keygen -t rsa
This command will create a basic ssh RSA key and ask you to confirm (or change) the output name and location. If you want, you can create a stronger key, by following the SSH guide at this link.
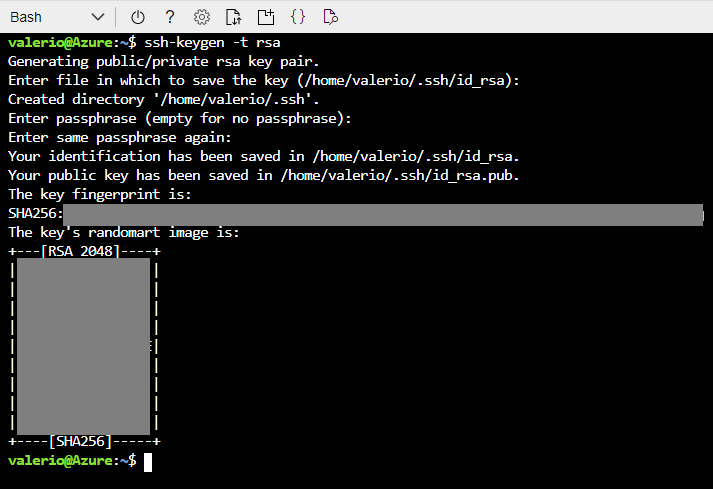
Figure 7: Generating an SSH key.
Go to the public key file and copy its content to a notepad; you’ll need it later.
2. Spin up a CDP environment
Your Azure account is ready, so now it’s time to move to the Cloudera Management Console.
First of all, you need to register the Azure credentials, which is simply metadata that CDP needs in order to identify the application you created in your subscription. Go to Environments / Shared Resources / Credentials, and create an Azure one by filling in:
- Name
- Description
- Subscription ID
- Tenant ID
- App ID
- Password
The first two are your choice; the others were noted down during the previous steps; you will also find the same commands we ran before. You can run the first one if you need to recover subscription and tenant Id, but not the second one, as it would try to create a new app. Click on Create to complete this step.
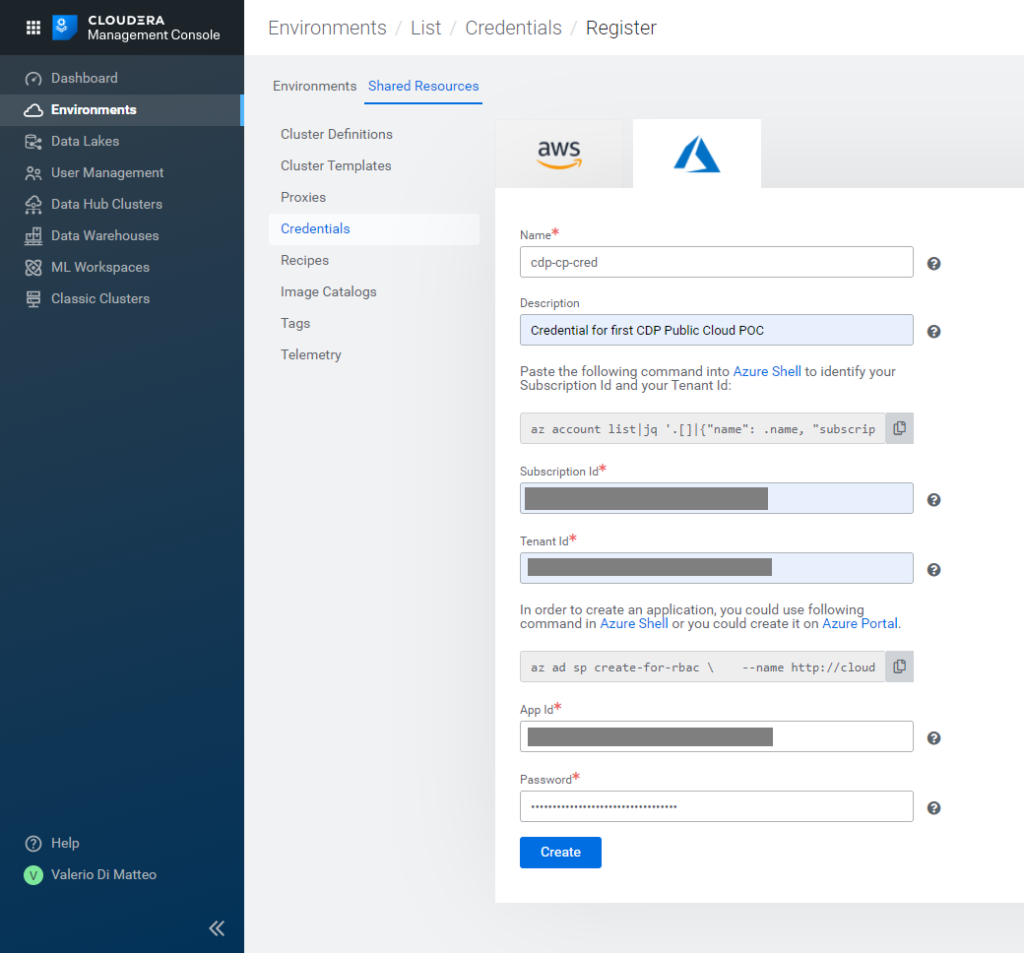
Figure 8: Creating Azure Credentials in the CDP Management Console.
Once the credentials have been saved, go back to the Environments tab and click on Register Environment. Specify a name and description, select Azure as the Cloud Provider, and select the credential you just created.
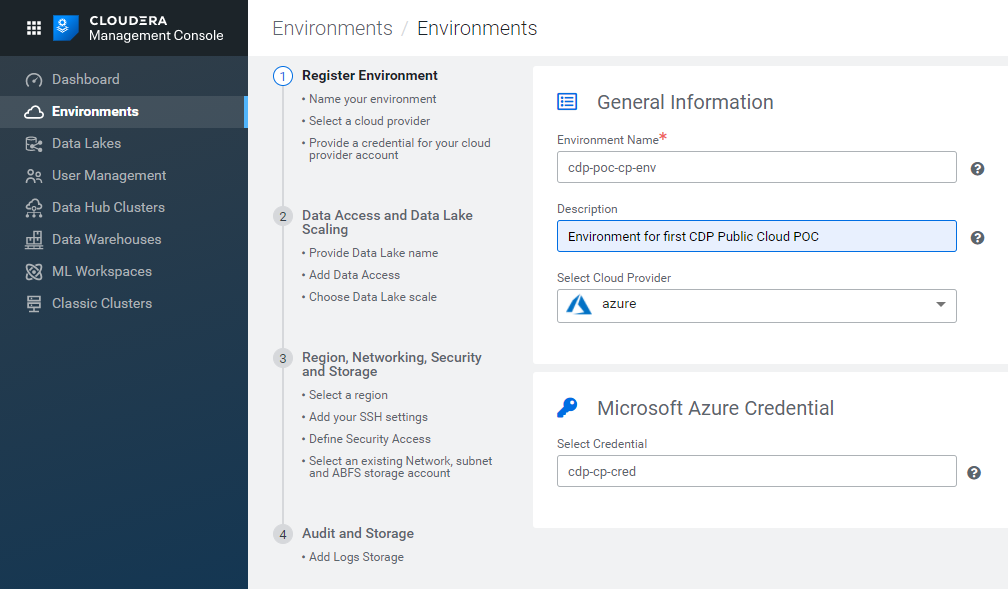
Figure 9: Registering an Azure environment in CDP, 1/5.
The next tab is where you have to define the Data Lake settings. Pick a name for your Data Lake and select the version (this is where you select the version of the Runtime, the collection of services that will be available in your cluster). At the moment of writing, the latest version is 7.2.2.
In the following section, select:
- the Assumer Identity: the one you already created in your Azure subscription is probably selected by default.
- the Storage Location Base: fill the white space with data@{StorageAccountName} (for example, in our case, data@cdppocclearpeaks).
- the Data Access Identity: select it from the dropdown menu (the default selection might once again be the Assumer Identity, so you are going to have to change it).
Finally, select the scale of your Data Lake. Our partner account has access to the Light Duty scale only; we will look into the details later.
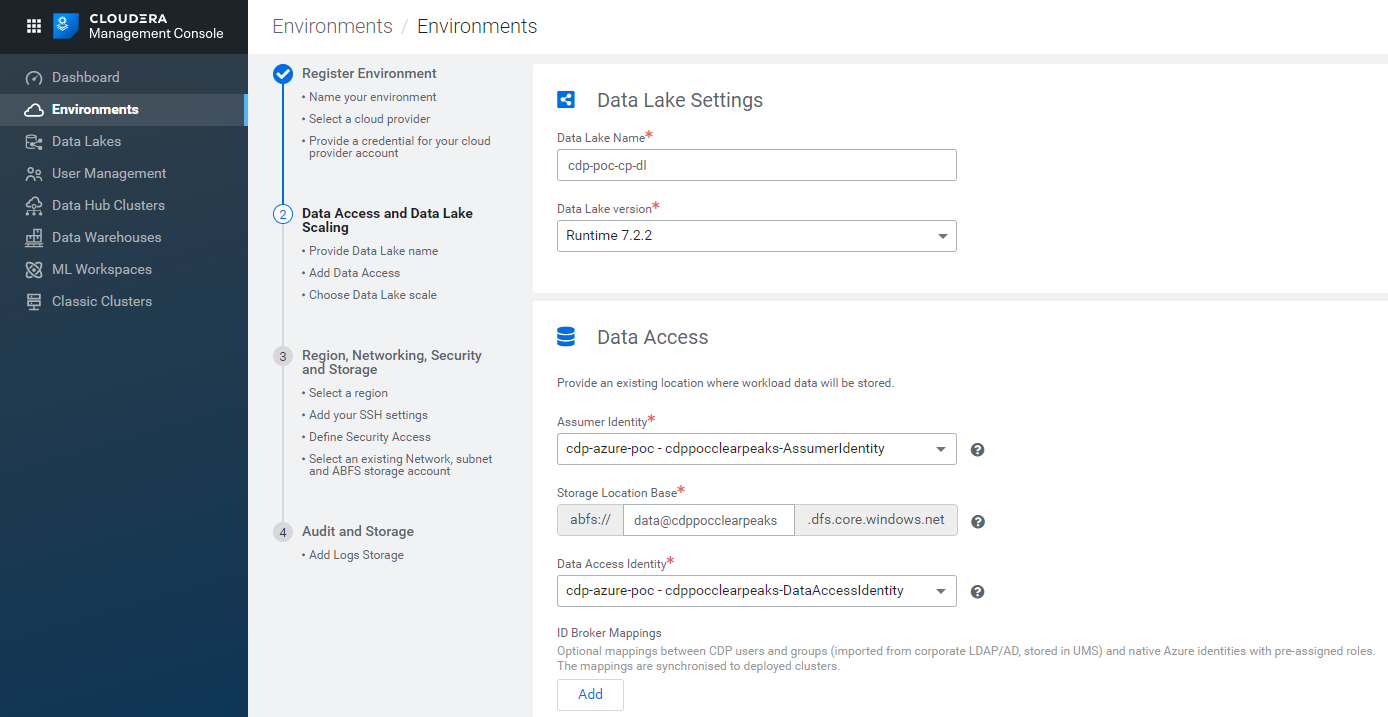
Figure 10: Registering an Azure environment in CDP, 2/5.

Figure 11: The Light Duty scale definition of the Data Lake we are creating.
Clicking on Next, we go to a slightly more technical tab, in which we have to select:
- the Region: it should be the same as the one you selected during the deployment of the Azure resources.
- the Network: select the one created in your Azure subscription, and leave the Subnets to default.
- Proxies: Do not use Proxy Configuration, default selection.
- Security Access Settings: Create New Security Groups, CIDR 0.0.0.0/0.
- SSH settings: under New SSH public key, paste the key you generated earlier.
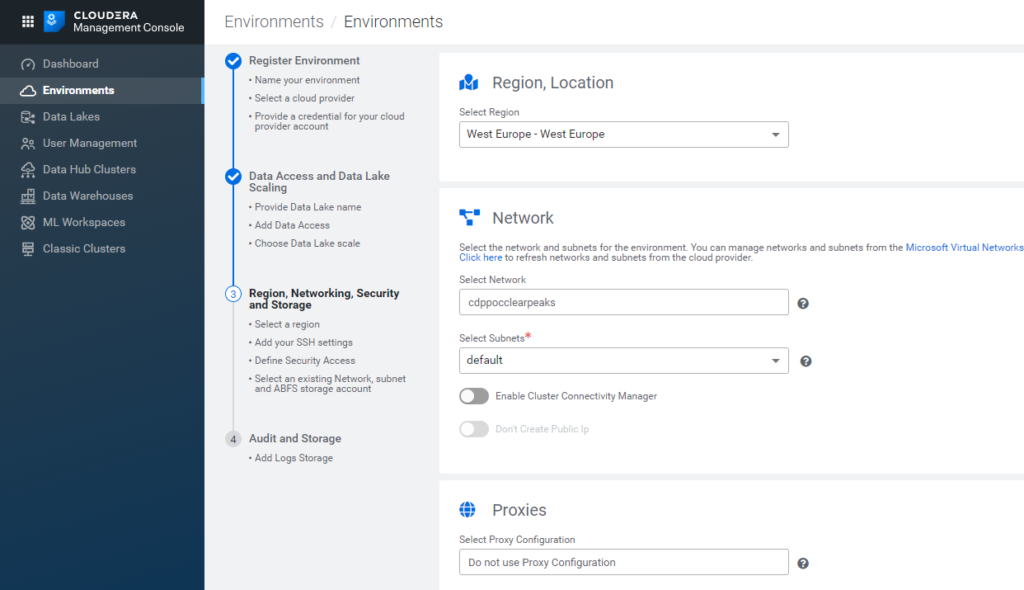
Figure 12: Registering an Azure environment in CDP, 3/5.
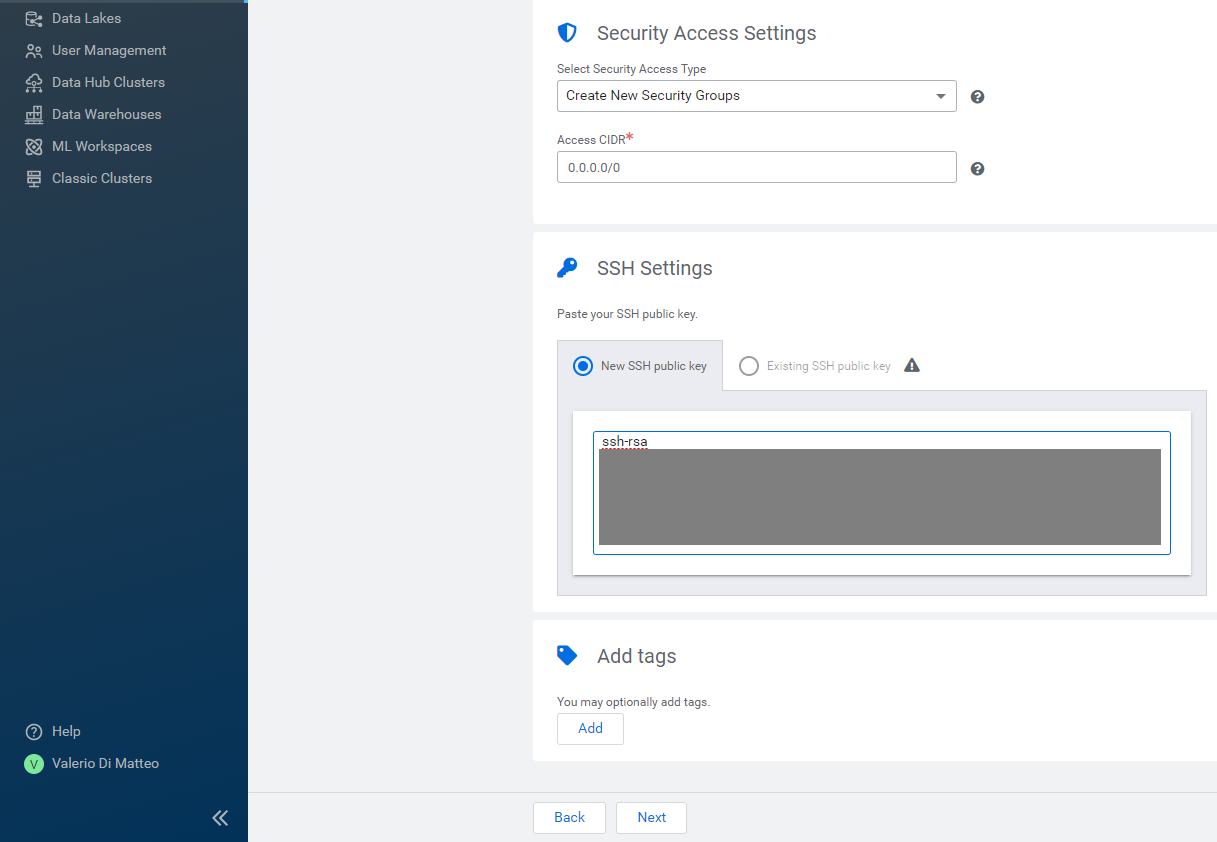
Figure 13: Registering an Azure environment in CDP, 4/5.
Finally, advance to the last tab, where you will have to specify:
- the Logger Identity: select it from the dropbox menu (again, the default selection might be the Assumer Identity, so make sure you pick the correct option).
- the Logs Location Base: fill the white space with logs@{StorageAccountName} (for example, in our case, logs@cdppocclearpeaks).
- the Ranger Access Identity: select it from the dropbox menu (once again, make sure you don’t leave a wrong default option by mistake).
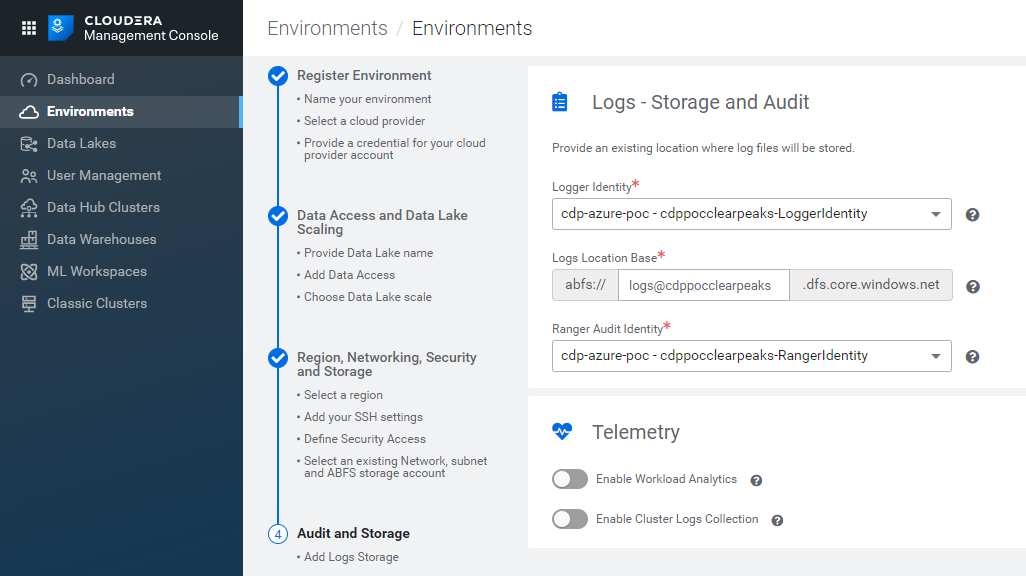
Figure 14: Registering an Azure environment in CDP, 5/5.
That’s it! Click on Register Environment and wait for it to be provisioned – this might take a couple of hours. In the picture below, you can see how your page should look when the process is over.
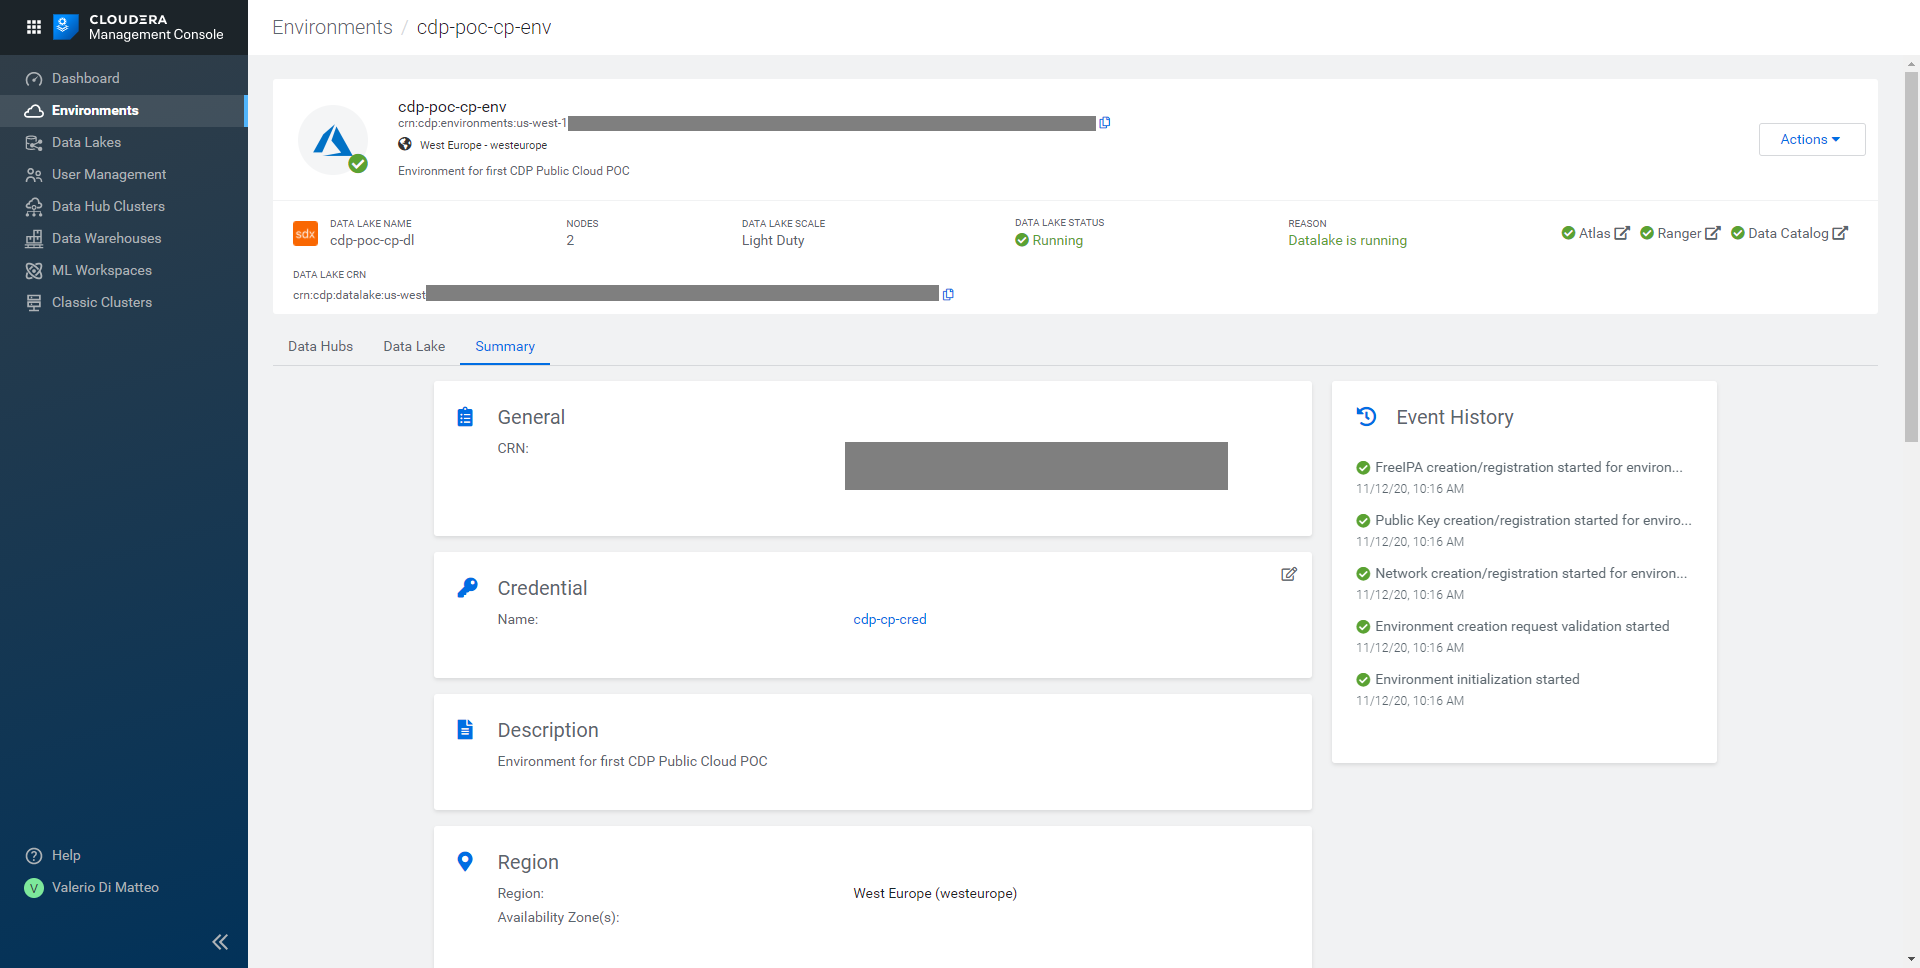
Figure 15: Our newly created CDP environment.
Clicking on the Data Lake tab, we can see its details, in particular the services that have been installed with it (like SolR, Ranger and Atlas; HBase is also installed, for the Data Lake’s own internal use).
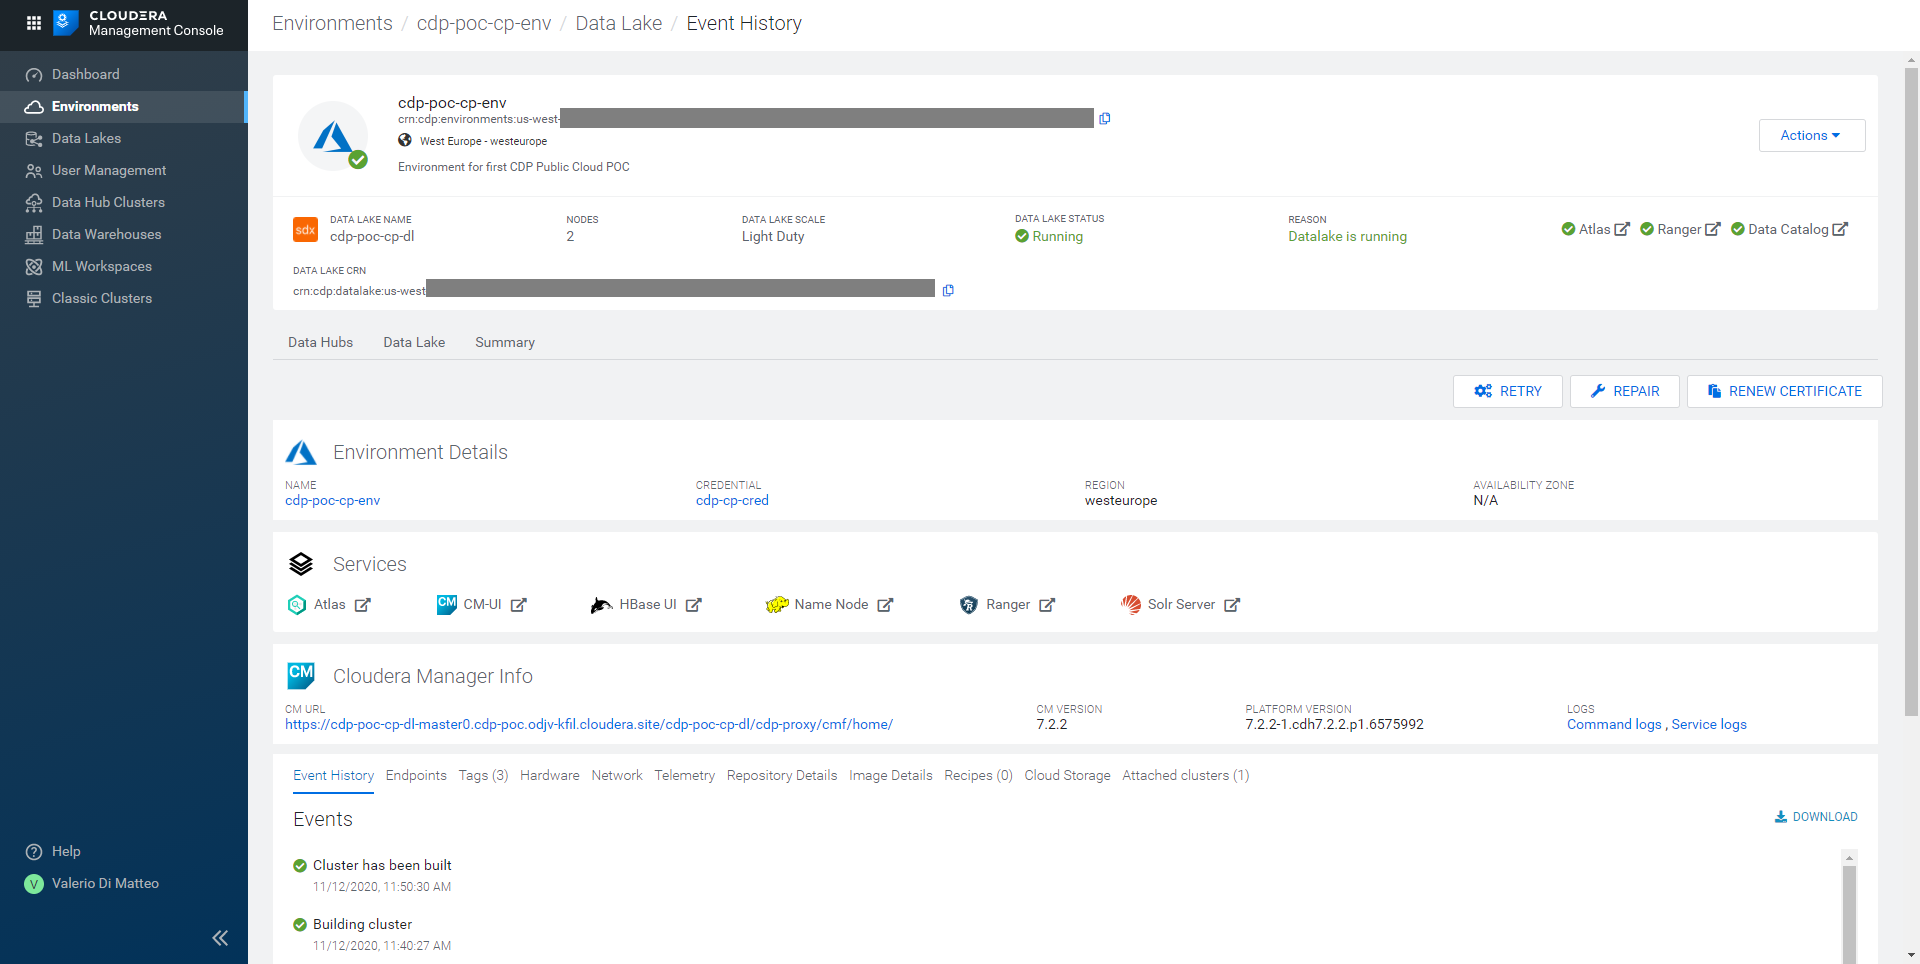
Figure 16: Details of the Data Lake tied to our Environment.
Navigating to Hardware, we can see the details of the resources provisioned by Azure for this Data Lake (remember, it is Light Duty scale).
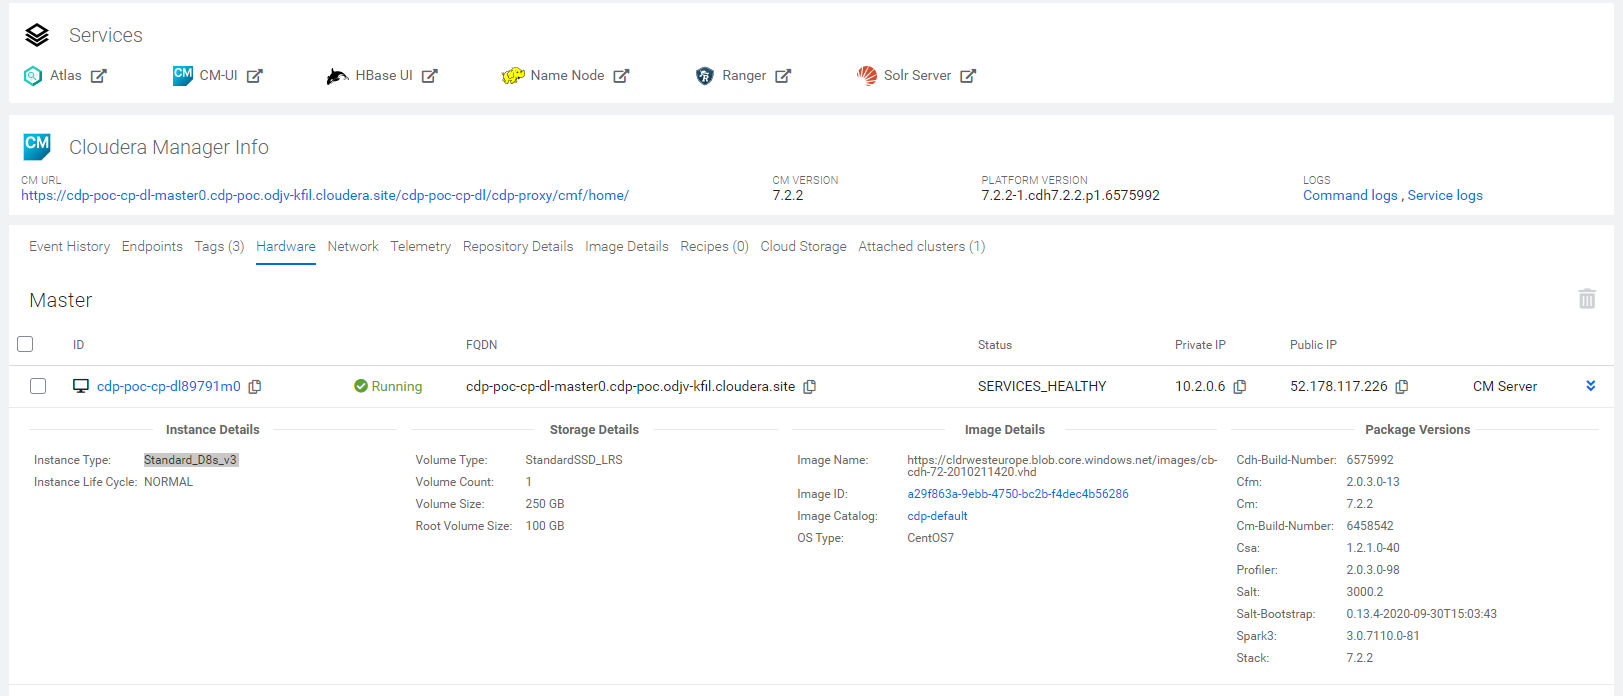
Figure 17: Hardware specs of the resources provisioned with the Data Lake.
3. Deploying a Data Hub
Now that our CDP is registered, we are ready to deploy a Data Hub cluster. It will sit on top of our newly created Data Lake, leveraging what Cloudera calls the SDX, the Shared Data Experience. Basic services such as Atlas and Ranger will be tied to the Data Lake, not the Data Hub, so that whatever service we decide to spin up (another Data Hub, or one of the Kubernetes-based Experiences), we will be able to utilize the same authentication, authorization, masking and RLA rules, as well as the data catalogue and lineage criteria already defined in our Data Lake.
On the left menu, go to Data Hub Clusters; select the environment over which the Data Hub will be built and then select one of the definitions. In our case, we go for a pre-made template definition: the Data Engineering for Azure. As you can easily see by selecting the option, it contains typical data engineering services such as HDFS, Yarn, Zookeper, Hive, Hue, DAS, Oozie, Spark, Zeppelin, Queue Manager, and Livy. You can also see that the template definition includes the Runtime version that we selected when we built the Data Lake; you must also give your cluster a name.
Note: make sure that the Runtime version associated with the cluster definition is the same as the one you selected during the Environment registration. If it’s not: go to your Data Lake details page, click on the Data Hub tab and try to create the Data Hub by clicking on the Create Data Hub button there.
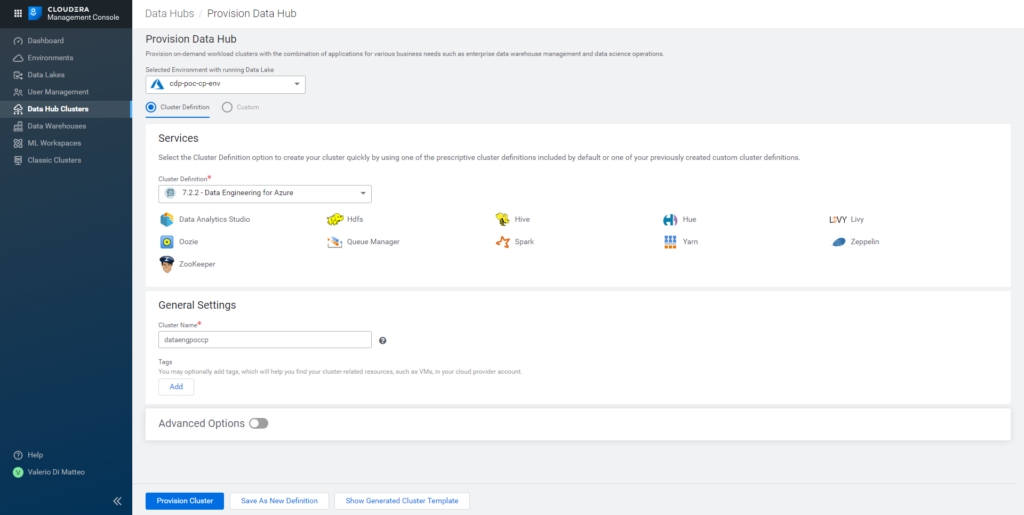
Figure 18: Data Hub creation page.
By opening the Advanced Options, we can see some more low-level details, especially the hardware that will be provisioned to spin up this cluster. In our case, the template includes 1 Master and 3 Worker nodes. Based on the instance type and count, you can estimate the cost of your cluster by using the Pricing Calculator at this link.
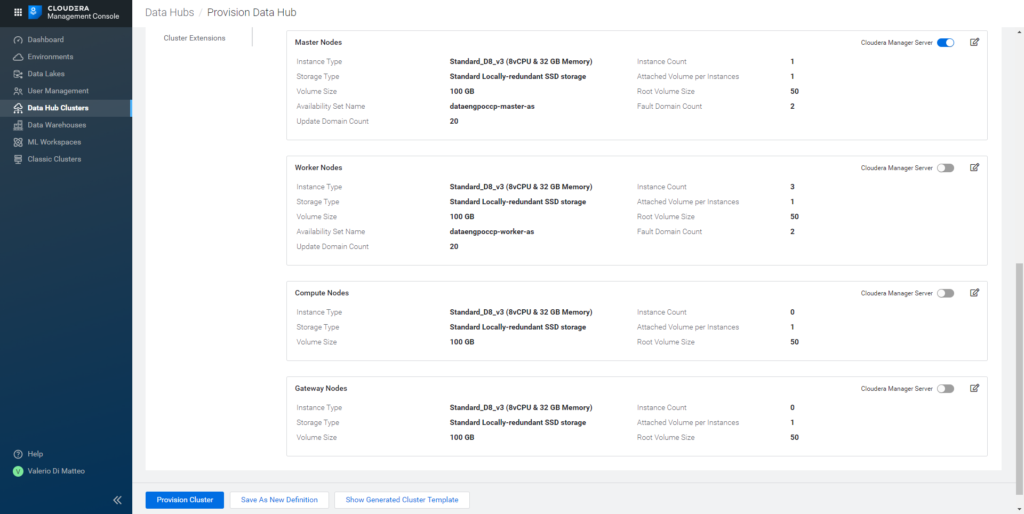
Figure 19: Hardware specs of the resources provisioned for our Data Hub cluster.
Click on Provision Cluster and wait for CDP to work its magic! In our case, it took around 40 minutes for the process to complete. In the picture below, you can see the interface as the Data Hub cluster is being built, with its details and complete list of services.
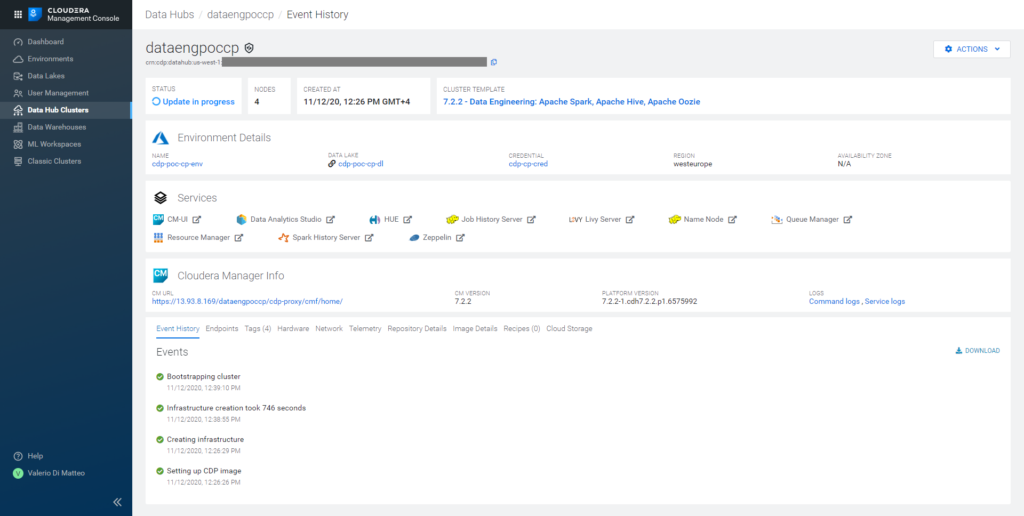
Figure 20: Details of our Data Engineering Data Hub cluster.
That’s it! Your Data Hub cluster is ready, and you are able to use it!
Next steps
We’ve seen how to set up a Data Engineering cluster in CDP on Azure. Of course, this was just an example, as CDP allows for many other possible templates to be deployed. For example, the Stream Messaging or Flow Management clusters for streaming scenarios, the Operational Database, and so on. You can find more details in the Cloudera official documentation.
In our next blog article we will dive into a very common scenario: applying data masking to Hive tables. We will see how easy and extremely fast it is to apply authorization rules on our data across the whole Data Lake using Ranger (thank you, SDX!).
If you have any questions, doubts, or are simply interested in discovering more about Cloudera and CDP, do not hesitate to contact us at ClearPeaks. Our certified experts will be more than happy to help you and guide you in your journey towards the ultimate Enterprise Data Platform!