23 Mar 2021 Installing CFM on CDH and Streaming Data to Hive Using NiFi and Kafka
Streaming has become an essential requirement in most of today’s organisations, where real-time data ingestion and analysis is paramount for decision-making at every level and across every vertical.
Anybody who has come into contact with such a scenario has undoubtedly used, seen, or at least heard of Kafka and NiFi. Kafka is the de-facto standard stream-processing platform, while NiFi is a very popular software for building pipelines between different systems (not necessarily belonging to the Hadoop ecosystem).
Cloudera, of course, has both tools under its umbrella, and offers them within the Cloudera Data Flow package (in its different shapes and forms, depending on the specific version of CDH/CDP you are using).
It is true, however, that even though they are widely used, there is not a lot of documentation online about how to install, use, and integrate all these components together from a very practical point of view.
Add to that the changing names (for example, NiFi is actually Cloudera Flow Management in CDF), and you can get a glimpse of how confusing it could be for a user to understand what needs to be done to set up a streaming platform and how.
In this article, we will try to fill this gap by showing you how to install CFM (NiFi) in a CDH cluster, and how to build a simple Kafka-to-Hive real-time platform. We will use:
- A Kafka console producer, streaming data continuously appended to a file by a Python
- A Hive table, to be created before-hand in order to store the data moved by NiFi.
- A NiFi pipeline, to capture and move this data using the PutHiveStreaming
Notes:
- To run this example, you need a CDF license to download and install the CFM
- Our cluster has 1 Zookeper node and 1 Kafka broker node. These are not optimal settings for production environments, and are only valid for development/testing
1. Installing Cloudera Flow Management
1.1. Enabling CFM services
Let’s assume we have a running CDH cluster (in our case, it is CDH 6.3.3). Navigate to the Local Descriptor Repository Path configured in Cloudera Manager. The default is /opt/cloudera/csd:
cd /opt/cloudera/csd |
Download the “custom service descriptors” for NiFi, NiFi Registry, and the NiFi Toolkit (although we will not cover the installation and usage of Toolkit in this blog).
wget http://archive.cloudera.com/CFM/csd/1.0.0.0/NIFI-1.9.0.1.0.0.0-90.jar wget http://archive.cloudera.com/CFM/csd/1.0.0.0/NIFIREGISTRY-0.3.0.1.0.0.0-90.jar wget http://archive.cloudera.com/CFM/csd/1.0.0.0/NIFICA-1.9.0.1.0.0.0-90.jar |
Remember, this repo needs to be whitelisted in order for you to be able to download it. In an enterprise environment, this might not be the case by default, so contact your Network or Security team. Once the download is over, change the permissions for all the CSDs and set the owner to the Cloudera Manager user. In our case, we kept the default name, which is cloudera-scm.
chown cloudera-scm:cloudera-scm NIFI*.jar chmod 644 NIFI*.jar |
After that, we can restart the Cloudera Manager Server service.
service cloudera-scm-server restart |
Once Cloudera Manager has successfully restarted, we to restart the Cloudera Management Service as well. From the Cloudera Manager Status tab, click the Restart icon or select Restart from the Cloudera Management Service drop-down (you will see the Stale configurations icon). This will ‘enable’ the services described by the CSDs we downloaded in Cloudera Manager. In the next section, we will see how to download and install them.
1.2. Installing CFM services
Now, let’s navigate to the Parcel Configuration page. From the navigation bar, click Hosts then Parcels, and then click the Parcel Repositories & Network Settings button.
From the Parcel Configuration page, in the Remote Parcel Repository URLs list, click + to add an additional row. Then, add the CFM parcel URL available from the Cloudera download location. For example:
https://archive.cloudera.com/CFM/parcels/1.0.0.0 |
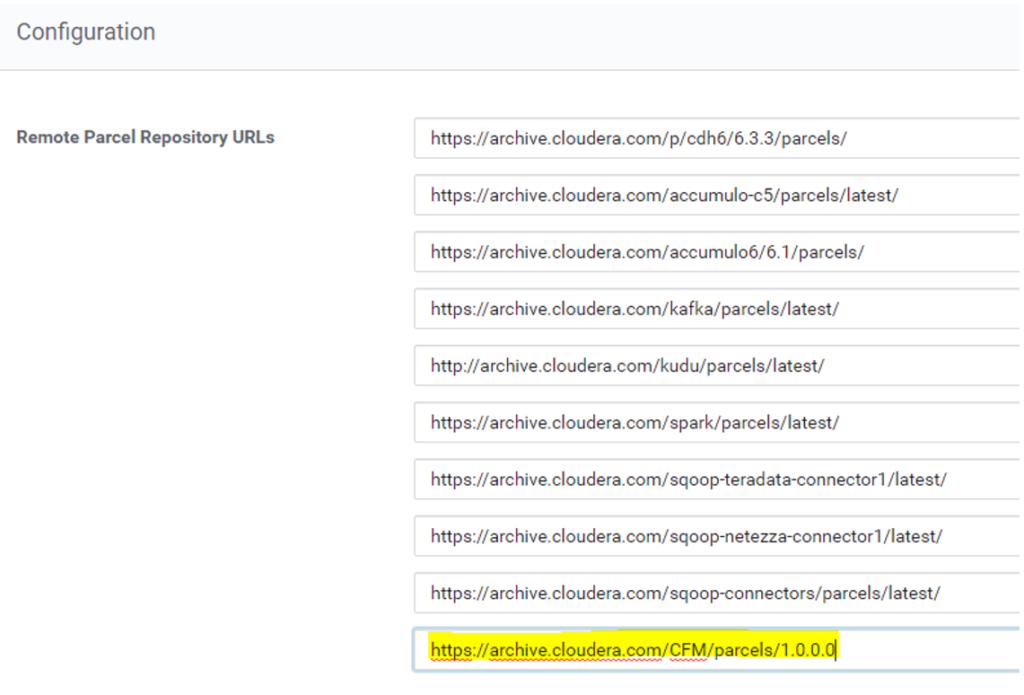
Figure 1: List of Remote Parcel Repositories to download CFM
Remember, this URL needs to be reachable from the Cloudera Manager node. In this same pane, you also need to specify Cloudera credentials and possible proxy settings. However, they should have already been specified when the cluster was first installed and are out of the scope of this article.
Next, click Save Changes. The new CFM parcel is now displayed amongst the set of parcels available for download on the Parcels page. From there, download, distribute, and activate it. The Download action downloads 1.6GB of files to the /opt/cloudera/parcel-repo folder of the CM node. The Distribute action distributes the parcels to the parcels folder, adding an additional 3.2GB (1.6 in parcels, and 1.6 in the hidden .flood sub-directory).
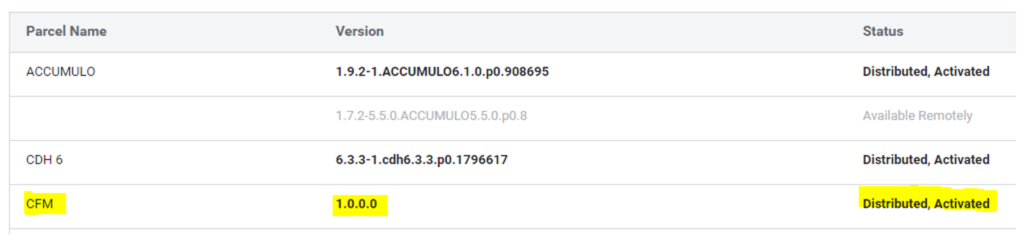
Figure 2: Parcels tab view after downloading and distributing CFM
1.3. Add and Configure CFM Services
Now that the parcels are downloaded, distributed, and activated, we can add the CFM role to one of our nodes. To do so, from the Home > Status tab, we select the drop-down to the right of the cluster and select Add a Service.
The first service we install is NiFi, corresponding to Flow Management. For demonstration purposes we only do it in one node, but you can install it in as many nodes as you require.
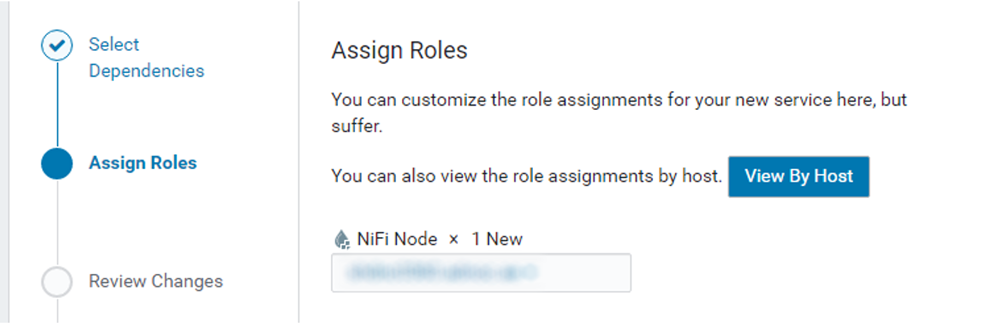
Figure 3: Assigning the NiFi Node role to the cluster host(s)
We continue this until the installation is complete. Then, similarly, we install the NiFi Registry. At the end of the process, we should see the two services up and running in our cluster with a healthy status.
The WebUI is now ready to be accessed. You can find it by navigating to the NiFi service and clicking on NiFi Node Web UI. If, right after starting the service, you see an ‘Invalid State’ message when trying to access the Web UI, just wait a few minutes and the error will eventually disappear.
2. Setting up the environment
Now that CFM is up and running in our cluster, we can move on to the actual pipeline development. To carry out our exercise, we essentially need 3 elements: a Kafka producer, a Hive table to store our streaming data, and the NiFi workflow (which will include the consumer).
2.1. Kafka producer
For the producer, of course, we have multiple choices. For simplicity, we will just set up a console producer, one of those that ship with Kafka out of the box. We will simulate the streaming data with a python script that continuously appends fake log messages to a file, and then feed this file to the producer.
First, we have to create a topic. The following commands show how to create, list, and describe a topic.
$ kafka-topics --create --zookeper <your_zookeper_node>:2181 --replication-factor 1 --partitions 1 --topic testTopic $ kafka-topics --list --zookeper <your_zookeper_node>:2181 $ kafka-topics --describe --zookeper <your_zookeper_node>:2181 --topic testTopic |

Figure 4: Creation and description of a Kafka topic
Note: When taking the above screenshot, we had changed the Kafka log level from INFO to WARN. These commands are otherwise extremely verbose.
Then, we have to create a producer. As mentioned, the producer will stream a file of fake logs, which we create with the Python script shown below.
import sys
import random
import datetime
import time

ipset = ['node01.com','node02.com','node03.com']
wordset = ['aaa','bbb','ccc','ddd','eee','fff','ggg','hhh','iii','jjj','kkk','lll','mmm','nnn','ooo','ppp','qqq','rrr','sss','ttt','uuu','vvv','www','xxx','yyy','zzz']
while True:
   myfile = open('simulated.log', 'a')

   ip = random.choice(ipset)
   timestamp = datetime.datetime.now().strftime("%Y-%m-%d %H:%M:%S")
   w1 = random.choice(wordset)
   w2 = random.choice(wordset)
   w3 = random.choice(wordset)

   myfile.write("%s,%s,%s,%s,%s\n" % (timestamp,ip,w1,w2,w3))
   myfile.close()
   time.sleep(0.1)
|
With the Python job running, we can create a console producer that reads from the log file in the following way:
$ tail -f simulated.log 2>/dev/null | kafka-console-producer –--broker-list <your_kafka_broker>:9092 --topic logsTopic |
Note 1: In a real scenario, the producer could very well not be part of the cluster. We can still run the above command, however, as long as we have any compatible version of Kafka on that node, and it can connect over port 9092 of the Kafka broker.
You can download the Kafka client from here. Once downloaded, unzip it as shown below:
$ tar -xzf kafka_2.13-2.7.0.tgz $ cd kafka_2.13-2.7.0 |
Inside the folder, there is a /bin sub-folder, where you can find all the kafka clients as .sh files. These are good for Linux systems, and can be run with the same command shown above. There is also a further /windows sub-folder, where the same clients are present as .bat files. These are good for Windows systems, and can be run as shown below:
$ ./kafka-console-producer.bat --broker-list <your_kafka_broker>:9092 --topic testTopic |
Note 2: In a cluster with only one broker and with a topic with replication set to 1, we need to change the offset.topic.replication.factor parameter, which by default is set to 3. Otherwise, the consumers will fail (note that they will not show any error in stdout: it can only be picked up from the Kafka server logs). This parameter is available in the Kafka configuration. Setting it to 1 will require a service restart. It will also trigger a warning, since it is not a recommended setting (you typically have more than one brokers in a production cluster).
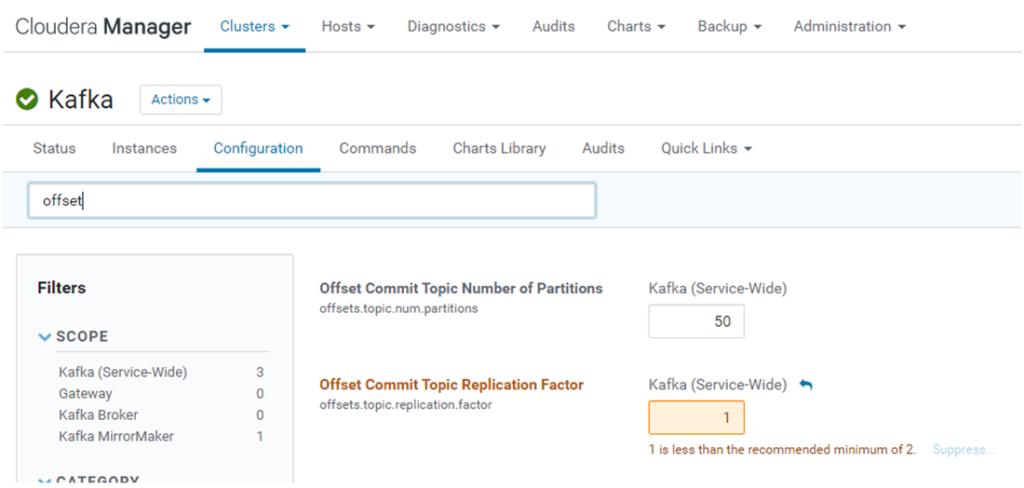
Figure 5: Changing the offset.topic.replication.factor parameter in the Kafka configuration tab
2.2. Hive table
The NiFi PutHiveStreaming processor that we will include in our workflow has certain prerequisites:
- The Hive table must be already existing
- It must be bucketed
- It must be transactional
- It must be in ORC format
Given these conditions, we go ahead and create the Hive table, respecting the structure of our log messages.
CREATE TABLE kafka_logs_nifi (
logTime TIMESTAMP,
logIP string,
logMsg1 string,
logMsg2 string,
logMsg3 string
)
CLUSTERED BY (logIP) INTO 3 BUCKETS
ROW FORMAT DELIMITED
STORED AS ORC
TBLPROPERTIES('transactional'='true')
;
|
Additionally, in order for this to work, we must set a few parameters in the Hive configurations in Cloudera Manager:
txn.manager = org.apache.hadoop.hive.ql.lockmgr.DbTxnManager
compactor.initiator.on = true
compactor.worker.threads > 0
Alternatively, we could also create a simple external table which does have such limitations. The NiFi pipeline would be different (a simple PutHDFS component would be enough, with no schema detection and format conversion), but of course, all the differences between external and managed tables (out of the scope of this article) would apply.
2.3. NiFi pipeline
Finally, with both producer and table already setup, we move on to the last piece of our exercise, which is the actual pipeline.
The complete flow is visible below. All the links between processors are based on the Success state, while all the other states are collected by a generic Funnel for monitoring purposes. We will now go on and describe each processor used.
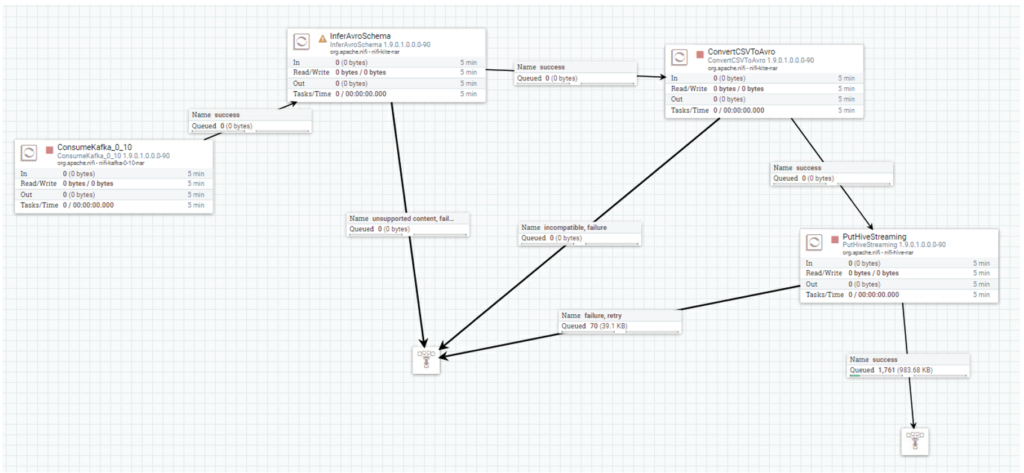
Figure 6: View of the complete NiFi flow
2.4. ConsumeKafka
This processor is required to listen to the Kafka topic in which our producer is sending log messages. It asks for the broker and the topic name. You also need to set a group ID, even though for our specific case it is not relevant. Security protocol is left to PLAINTEXT (for simplicity, we assume there is no authentication or Kerberization in the cluster).
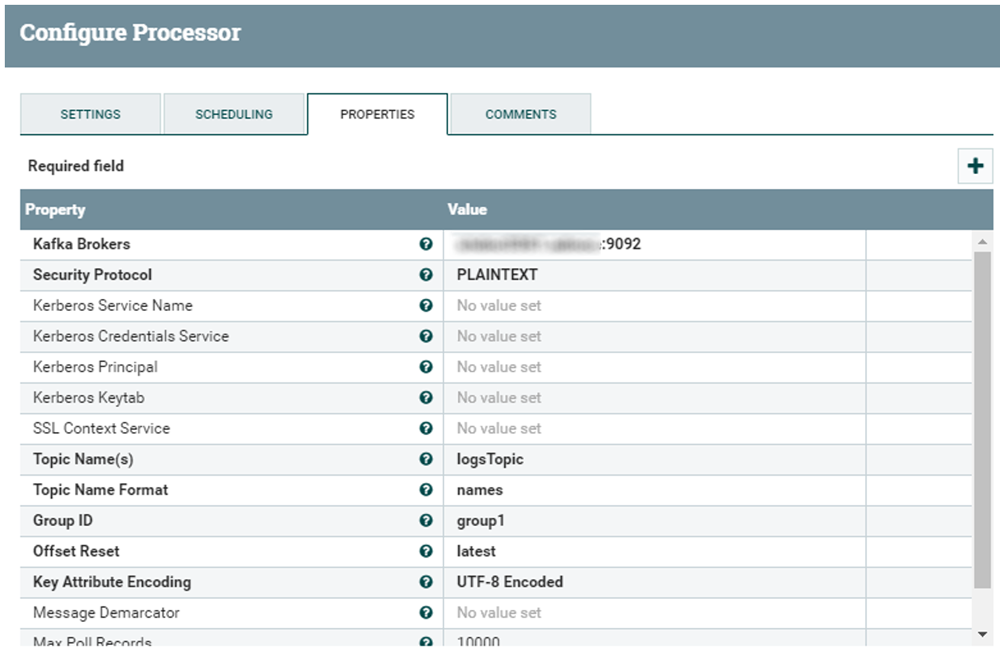
Figure 7: ConsumeKafka processor properties
2.5. InferAvroSchema
Our data is coming in CSV format, but we must convert it to accommodate the needs of the PutHiveStreaming processor. To do so, we first detect the schema of the coming messages and pass it on to the conversion processor. We need to specify flowfile-attribute in the Schema Output Destination setting, so that we can refer to it in the next processor. Then, we set csv as Input Content Type; and finally, we specify the schema manually and leave the header option as false, since our stream does not have any header that could allow for its automatic detection.
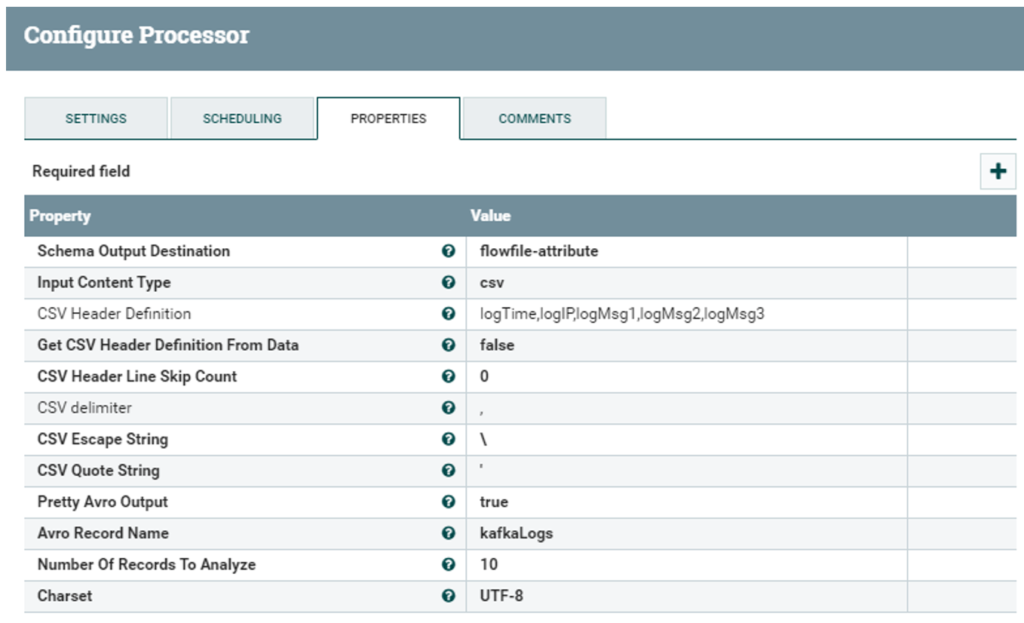
Figure 8: InferAvroSchema processor propertiese
2.6. ConvertCSVToAvro
This is where the actual conversion happens, once the schema has been detected. This processor needs the path to both the hdfs-site.xml and the core-site.xml files (which should be the same in all nodes). Additionally, we pass the variable ${inferred.avro.schema} as the Record schema, which will include the schema as detected in the previous step (if we correctly set flowfile-attribute in the Schema Output Destination field). We leave the other options as they are, since they already comply with our required file format.
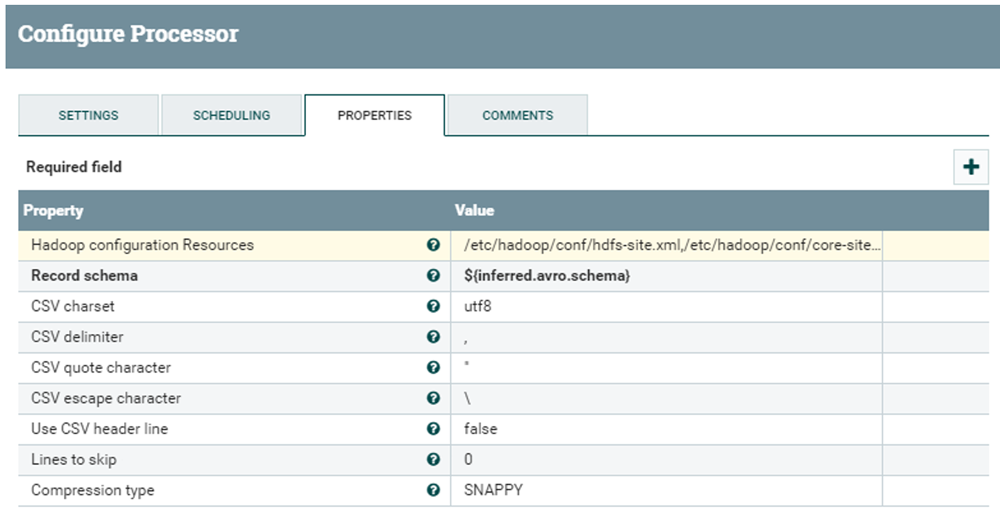
Figure 9: ConvertCSVToAvro processor properties
2.7. PutHiveStreaming
Finally, we setup the PutHiveStreaming processor. It requires:
- The Hive Metastore URI
- The hdfs-site.xml, core-site.xml and the hive-site.xml files
- The name of the database where we want to store data in Hive
- The name of the table which we previously created
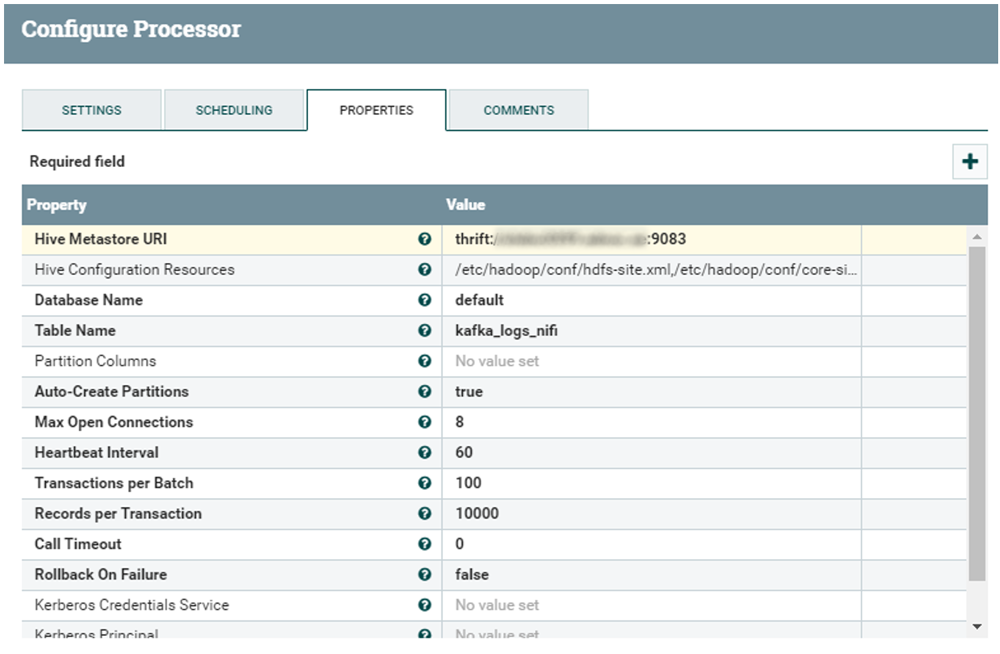
Figure 10: PutHiveStreaming processor properties
3. End result
Once our pipeline is built, we let the producer run and start the NiFi workflow. If everything is correct, we will see the data flowing from one queue to the other, eventually landing in our Hive table. Using Hue, we can see it as it is filled in real-time.
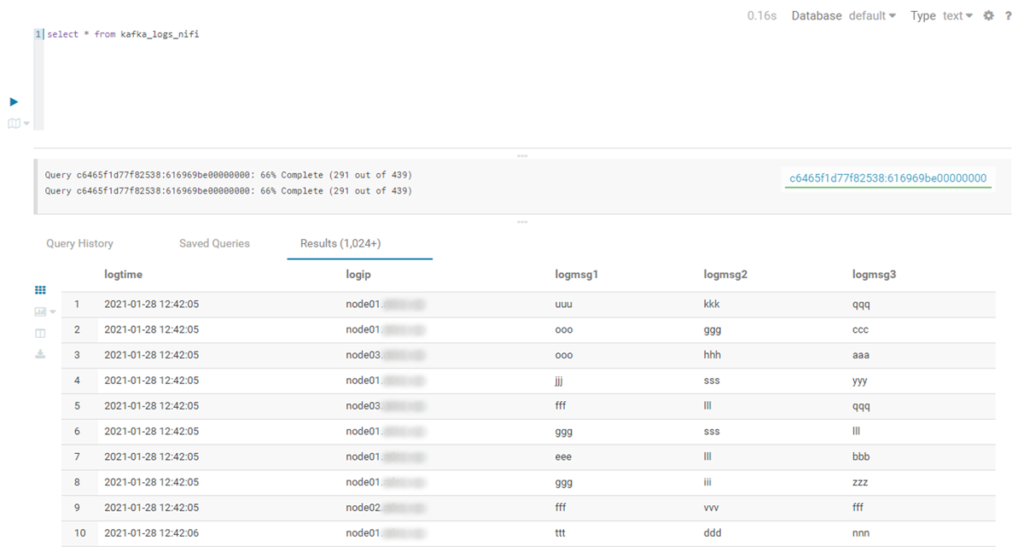
Figure 11: Querying the Hive table in Hue
Next steps
As explained in the article, we made a few choices in the definition of this pipeline, mainly for simplicity, but the number of combinations is virtually endless.
For instance, as we already mentioned, we could change the PutHiveStreaming processor for a simple PutHDFS one, and use a Hive external table with no restrictions. Or, to remain in the scope of demonstrating the integration of the various Hadoop tools, one could also think of substituting the NiFi workflow for a StructuredStreaming Spark job.
Cloudera’s offering for streaming solutions is really comprehensive, and we really encourage you to find out about it by searching for Cloudera Data Flow and all of its components.
If you have any questions, doubts, or if you would like to know more about Cloudera and its Data Platform in general, do not hesitate to contact us at ClearPeaks. Our certified experts will be more than happy to guide and support you on your journey towards the ultimate Enterprise Data Platform!