15 Mar 2023 Power BI & Snowflake Part 1: Connecting Power BI to Snowflake
Since its deployment back in 2012, many users have chosen Snowflake to store their data, thus allowing the use of Power BI to visualise it. In fact, if we want to use data from Snowflake in Power BI, we have two options:
- Import the data into Power BI.
- Create a DirectQuery in Power BI that gets the data from Snowflake when needed.
This also offers us many opportunities to optimise our resources, so in this first part of our series, we’ll explain how to connect Power BI to Snowflake and run through the best practices when doing so.
Connecting Power BI to Snowflake
There are native Snowflake connectors in Power BI that allow us to connect to a Snowflake computing warehouse, making it really easy to connect both tools.
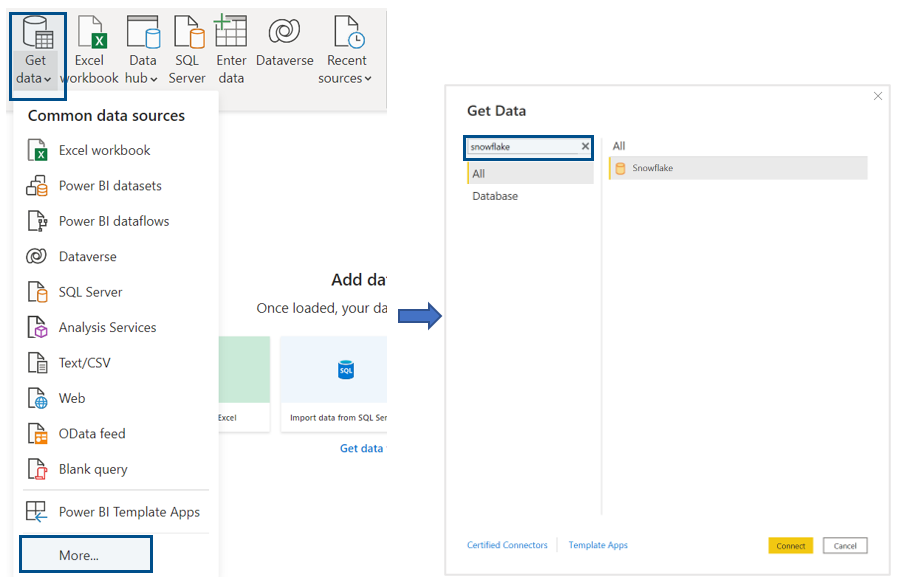
To do so, just select Get data from the Home ribbon, then click on More… and look for Snowflake in the new window that will appear.
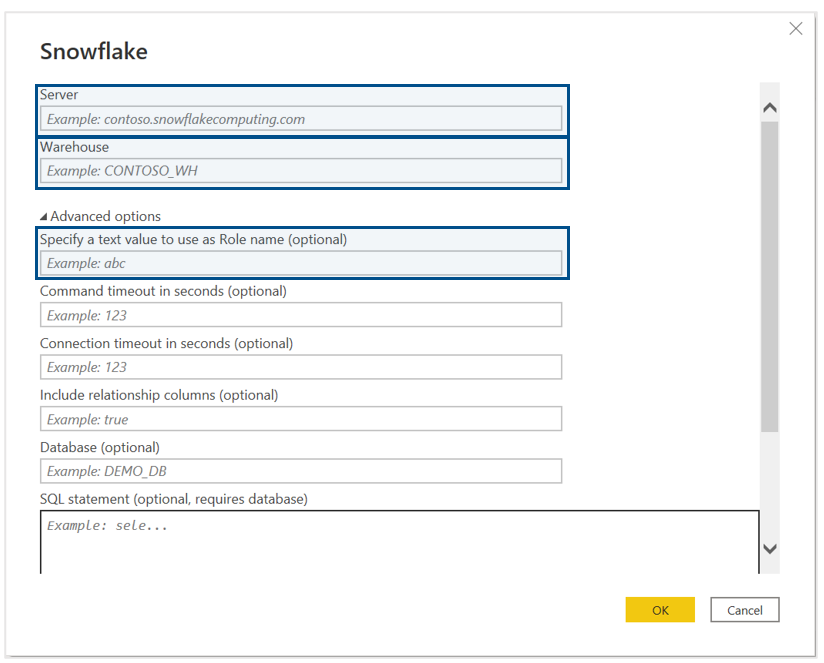
After selecting Snowflake and clicking on Connect, a new window will appear where we have to specify the Server and the Warehouse. Note that in the advanced options we can Specify a text value to use as Role name (optional) if the warehouse isn’t assigned to the default role.
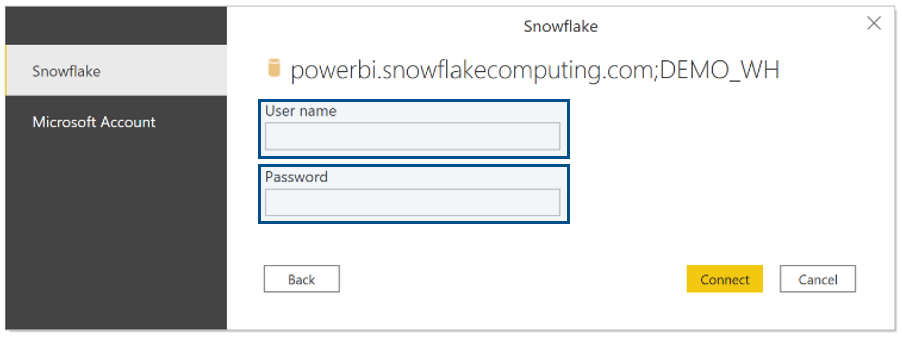
Once we have completed these fields and selected OK, we will be asked for our credentials. Here, we have to introduce our Snowflake User name and Password in the Snowflake option. Power BI also supports SSO access to Snowflake, the Microsoft Account option, which must be configured on the Snowflake side. However, that’s not really in the scope of this article, so if you want more information about SSO access, take a look at the Snowflake documentation on the topic.
It’s worth mentioning that once you enter a username and a password for a particular Snowflake server, Power BI Desktop will use those credentials in subsequent connection attempts. This can be modified by going to File > Options and settings > Data source settings.
Once we have successfully connected, a Navigator window will pop up, where we can select the tables that we want to connect to our dashboard. After selecting them, we can select Load or Transform data to open the Power Query Editor.
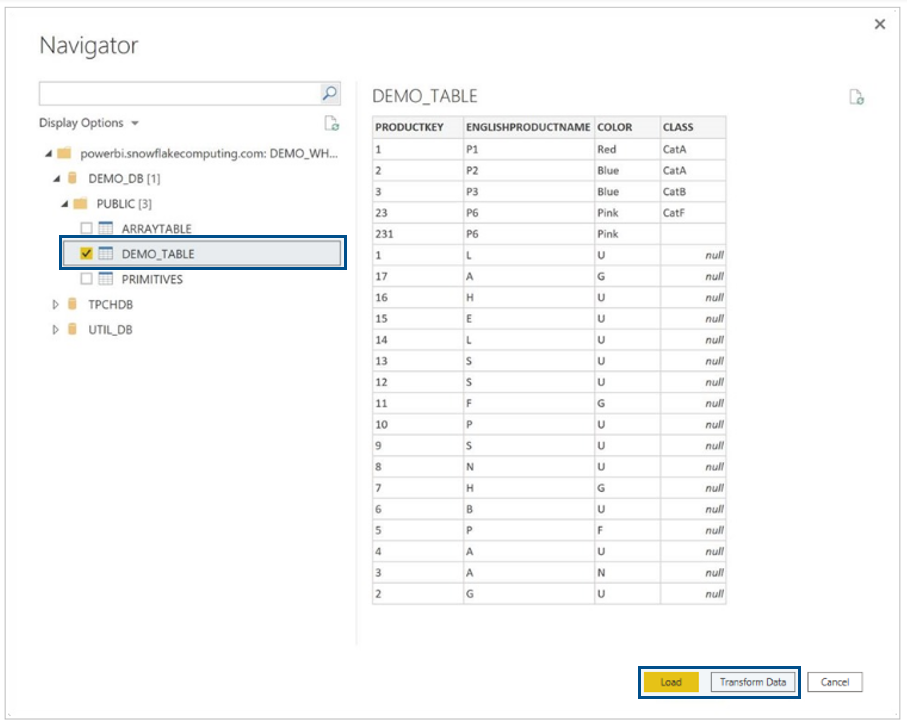
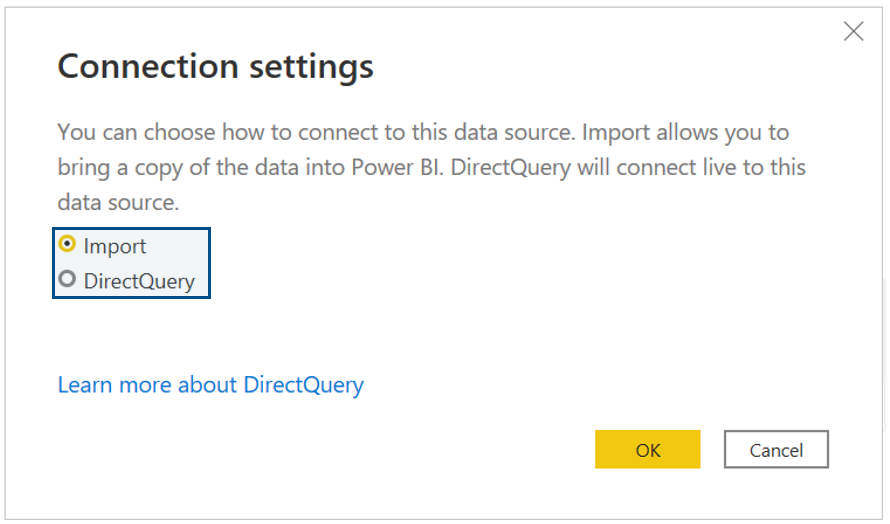
After we have selected the tables that we want to load, a new window will appear, asking if we want to Import the data or if we want to create a DirectQuery. We will discuss the differences between these two options later on in this article.
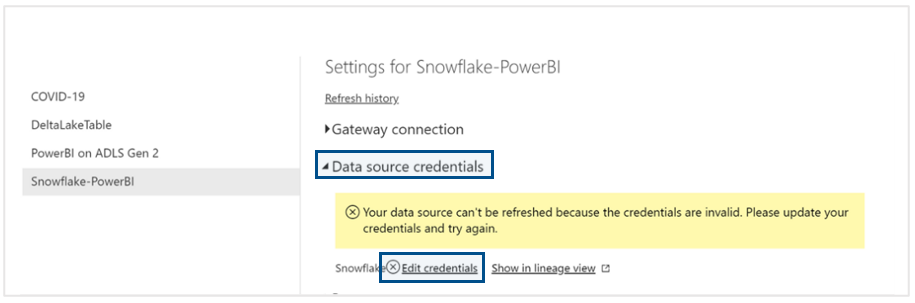
Finally, once we have published our report to Power BI Service, we must update the credentials on the dataset. To do so, we first need to go to Power BI Service, select the workspace where we published the dashboard, and then select Dataset > More options > Settings > Data source credentials > Edit credentials. Once we have entered our credentials, we will be able to refresh the report easily.
Data Storage in Power BI
As we said in the previous section, there are different ways in which Power BI can store Snowflake data. To be more specific, there are three types of storage mode: Import, DirectQuery, and Dual.
The use of one or another storage mode defines the model that is used. There are three different models: Import, DirectQuery and Composite, each with its own pros and cons.
On the one hand, with the Import storage mode a copy of all the source data is stored in the Power BI storage engine. An Import model is when all the data in the model is stored with the Import storage mode.
On the other hand, with the DirectQuery storage mode it’s the metadata of how the model is structured to query all the data sources that is stored. In this way, no actual data is stored in Power BI and the data is brought to Power BI when needed, every time the report runs. A DirectQuery model is when all the data in the model is stored with the DirectQuery storage mode.
Let’s compare both the Import and DirectQuery models:
Pros | Cons | |
|---|---|---|
Import model |
|
|
DirectQuery model |
|
|
As we said before, there’s a third way to store data in Power BI: the Dual storage mode. Tables with this setting can act as Import tables or as DirectQuery tables, depending on the context of the query that’s submitted to the Power BI dataset.
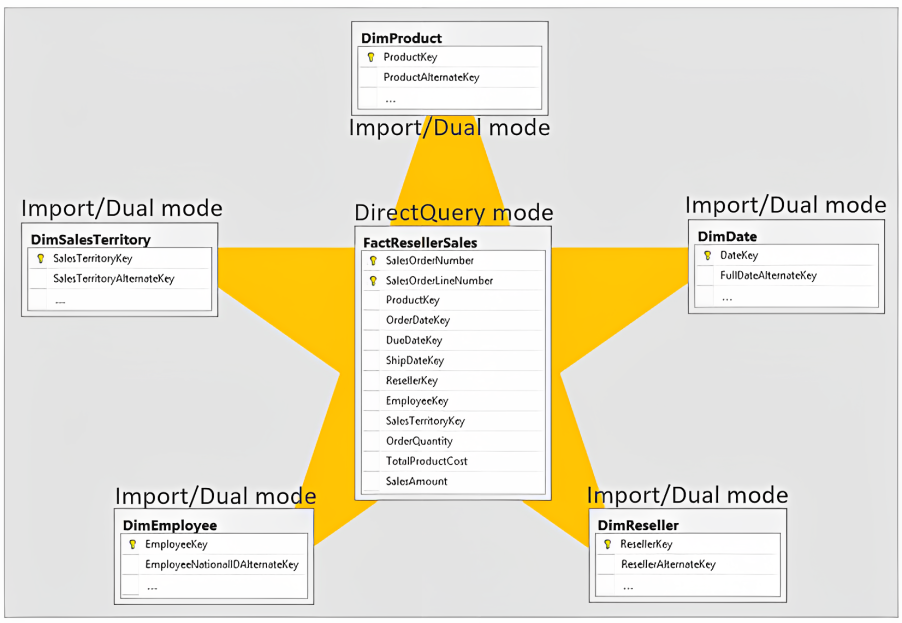
Finally, Composite models combine the Import and DirectQuery models to get the best of both. This means that each table in the model will be stored with the Import or DirectQuery mode as required. If we structure the data in a star schema, it’s good practice to set the fact tables in the DirectQuery mode and the surrounding dimension tables in the Import or Dual mode. The only problem with this option is that models can get complex and harder to maintain.
Best Practices
When making any sort of model, there are some best practices that we must bear in mind, especially when there is some sort of DirectQuery. On the Power BI side, the best practices are:
- Dimensional models: Instead of using BFTs (Big Flat Tables) that store all the data in a unique table, it’s better to use dimensional models (or star schemas). Dimension tables are cleaner and easier to use than BFTs, offer better granularity, and can lead to memory savings.
- Control the number of visuals: Each visual on a report page will generate its own DAX query. When using the DirectQuery mode, these DAX queries are translated to SQL and executed on the underlying Snowflake database, so it’s a good practice to limit the number of visuals on a report page.
- Limit interactivity between visuals: If we don’t limit interactivity between visuals, when we apply any type of filter to a visualization, it will affect other visualisations and thus generate new queries executed on the Snowflake database. A quick way around this is to use Query Reduction, accessed by going to File > Options and Settings > Options > Current File > Query Reduction. Query Reduction allows us to disable cross highlighting/filtering by default and to add an Apply button to each slicer/filter, or to the entire filter pane, so we can control when it filters.
- Use Composite models appropriately: As we said, there are some downsides to using Import models and DirectQuery models. In some cases, Import models will be better and in others, Composite models; the use of DirectQuery models isn’t so common.
- Control data size: Something as simple as reducing the cardinality of some columns may help Power BI compress data in its memory.
- Assume Referential Integrity: The Assume Referential Integrity option allows Power BI to generate more efficient SQL queries, generating inner joins instead of outer joins when generating the SQL code that is executed on Snowflake.
- Only use Bidirectional Filters when necessary: Although bidirectional filters can be useful, it’s important to only use them when necessary. Too many bidirectional filters can cause multiple tables to be affected by a single slicer selection, resulting in an increased number of SQL queries being generated.
- Only bring in the data necessary for the analysis
- Aggregations: With an aggregation, we can create a table that contains pre-aggregated data which can make our queries run much faster. There are two types of aggregations: User-Defined Aggregations and Automatic Aggregations.
- Incremental Refresh: When we have large tables to import into Power BI, incremental refresh allows us to retain only the latest part of the table (based on a date field) and to only refresh a smaller part of this first partition when the report is refreshed. This optimises the use of resources and the refresh time, which will be faster and more reliable. In the next part of this series, we will explain incremental refresh in more detail.
From the Snowflake side, the best practices are:
- Warehouse: Have a warehouse dedicated to Power BI queries and size it appropriately.
- Materialised views: Can help with query performance; more information on this topic can be found here.
- Search optimisation service: Can help with query performance when working with high-cardinality dimension columns; more information can be found here.
- Setting a clustering key: Important on large fact tables.
- Set columns as not being nullable if they will never contain null values.
- Result caching: Reuse a query result when it’s repeated; more information on this here.
- Use a specific identity: Use an identity that can only access the required data when connecting from Power BI to Snowflake. This will usually involve specifying a Snowflake role and database in the advanced options section of the connection dialog.
- Location: To reduce network latency, we must consider the location of our Power BI Tenant or Premium and the location of our data in Snowflake.
- Dynamic M parameters: With this we can bypass the Power BI SQL generation layer, passing selections made in slicers and filters in our report to Snowflake. This gives us more control over how Power BI generates its SQL, and details can be found here.
- Maximum connections per data source: The default value is 10 when not using Power BI Premium, where the value is 30. This can make a noticeable difference to performance in reports with many visuals or when some visuals generate slow queries.
- Max intermediate rowset count: You can change the maximum number of rows that can be returned by a SQL query in DirectQuery mode with Power BI Premium.
Conclusion
That’s it for the first article in this series. Both Power BI and Snowflake are useful, powerful tools and, as we have seen, easy to connect. This can lead to great features that will help us to achieve our goals.
In the next article, we will explain how to use one of these features in Power BI: hybrid tables. These tables are useful to visualise large sets of historical data combined with real-time data.
So, if you are interested in learning more about this topic, check out the next article – and if you want to know more about the connections between Power BI and Snowflake, simply contact us and we will be happy to help.
