
20 Jul 2020 User impersonation for Zeppelin in a kerberized HDP cluster
Apache Zeppelin is a web-based notebook that enables interactive data analytics with various languages and tools via the use of interpreters. For example, users can set up a Hive or Spark interpreter to explore and analyse their data easily in their favourite way, all in a user-friendly, interactive notebook interface.
In this blog article we will explain how to correctly set up the Shell, Hive and Spark interpreters in order to enable user impersonation in a kerberized Hortonworks Data Platform (HDP) cluster.
This is the result of an installation, configuration and optimization exercise we did for a customer of ours, with the help of various Cloudera experts; we were dealing specifically with Zeppelin 0.8 installed in the 3.1.0 version of HDP.
1. User impersonation
User impersonation is a key feature in many production environments. When installed in the HDP cluster, the Zeppelin service is set up to use a service user (zeppelin) which, by default, runs all the notebooks and jobs. However, this is probably not the desired scenario; we want our users to run their jobs with their credentials, in order to apply all defined permissions and privileges correctly: authorization to access certain folders, privileges to create a database or to select a certain table, or even to be assigned the defined minimum resources by YARN (much more complex if everybody is launching jobs under the same service user).
Enabling impersonation is not a straightforward exercise, especially in a kerberized environment. As you might know, throwing Kerberos authentication into the mix often causes a certain overhead in services configuration (that’s the price we have to pay for a secure environment). Moreover, the steps required are slightly different for each interpreter.
As mentioned, below we will explain how to achieve impersonation for the following three interpreters:
- Shell
- Spark
- Hive
In all cases, we will edit the interpreter binding. For more information about the different options, you can refer to this link.
2. Impersonation in Shell
The Shell interpreter (%sh) is useful for a number of basic tasks that a user might want to perform in their notebook: explore their home folder, set up an environmental variable, access jar files stored in the node where Zeppelin is running, or transfer files between the node and the HDFS.
In order to allow all of this in a controlled and secure way, we want our users to run Shell commands with their own identity. By default, this is what would happen if we tried to run a Shell command without setting the user impersonation:

Figure 1: Shell commands run as Zeppelin user, without impersonation
As you can see, everything is run as the Zeppelin user. To correctly set up the impersonation, we need to execute the following steps:
- In Ambari, go to Zeppelin Notebook / Configs, and expand the advanced zeppelin-env section. The very first parameter is a text box called zeppelin_env_content. The content of this parameter is what can be effectively found in the zeppelin-env.sh file in all the cluster nodes in which we installed Zeppelin.
The last line (by default, as commented) tells us how to set up a variable to run the interpreter as the web user; we do so by making sure we append the following line:
export ZEPPELIN_IMPERSONATE_CMD=’sudo -H -u ${ZEPPELIN_IMPERSONATE_USE;R} bash -c ‘ - We save the change, and restart the Zeppelin service, as Ambari suggests. This will make sure that the new configuration is propagated to all the Zeppelin nodes, and that the zeppelin-env.sh files are updated.
- In every node that is hosting Zeppelin, we add the Zeppelin user as sudoer:
- vi /etc/sudoers
- Append line: zeppelin ALL=(ALL) NOPASSWD: ALL
- We go back to Zeppelin, and with a user with admin privileges, we go to our Shell interpreter and we edit it as follows:
- Binding option = per user / isolated
- User impersonate = true
- working.directory.user.home = true
- shell.auth.type = KERBEROS
- shell.keytab.location = /etc/security/keytabs/zeppelin.server.kerberos.keytab
- shell.principal = zeppelin@YOUR.DOMAIN
The last two steps can be edited to represent your real scenario.
- We save and then restart the interpreter.
Now, going back to our notebook, we try to run the previous commands again. If the steps were executed correctly, the result should be similar to this:
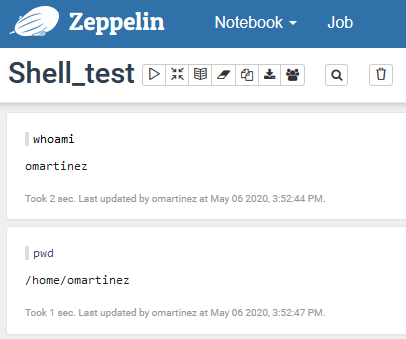
Figure 2: Shell commands run with user impersonation.
Users are now able to run commands as themselves. They can even access the HDFS, but bear in mind that you might have to set up a Kerberos ticket for this. Zeppelin doesn’t allow you to type the password in the prompt, so either do so through a keytab, or do something like echo ‘password’ | kinit (a bit unconventional but it does the job).
3. Impersonation in Spark
The Spark interpreter (%spark) is arguably the most common in Zeppelin, as it allows users to explore and analyse their HDFS data with Spark code in a comfortable and user-friendly web-based notebook.
However, the Spark interpreter doesn’t work out-of-the-box. We need to set it up and, of course, we need to enable user impersonation. Users only need to access the folders and files for which they have permission; furthermore, they need to be able to run jobs with their own credentials in order to allow a correct resource distribution by YARN.
With an admin user, let’s go to the Interpreters settings again, and edit the Spark interpreter:
- Binding option = per user / isolated
- User impersonate = true
- SPARK_HOME = /usr/hdp/3.1.0.0-78/spark2
- Or whatever is your right path. Add the property if not present already.
- spark.keytab=/etc/security/keytabs/zeppelin.server.kerberos.keytab
- spark.principal=zeppelin@YOUR.DOMAIN
- Or whatever principal name represents your scenario.
Once done, save and restart the interpreter. Now let’s try a simple Spark command and see under whose credentials it is running. If all the changes are correct, we should see something similar to this:
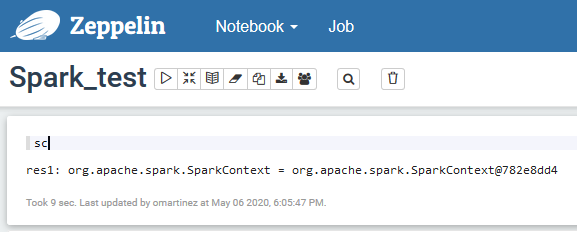
Figure 3: Spark commands executed with user impersonation.

Figure 4: Spark job running with user impersonation
Note that for Spark, there is no need to edit the ZEPPELIN_IMPERSONATE_CMD variable or to set the Zeppelin user as sudoer. However, if you have to do this for some other interpreter, it won’t be a problem.
4. Impersonation in Hive
The Hive interpreter is essentially a customized version of the JDBC one. To create it, we can modify the existing JDBC interpreter or use it as a template to create a new version and then perform a few modifications. The steps to follow are described below (note that some of them are also needed for the Shell interpreter, so skip them if they have been applied previously):
- In Ambari, go to Zeppelin Notebook / Configs, and expand the advanced zeppelin-env section. The very first parameter is a text box called zeppelin_env_content. The content of this parameter is what can be effectively found in the zeppelin-env.sh file in all the cluster nodes in which we installed Zeppelin.
The last line (by default, as commented) tells us how to set up a variable to run the interpreter as the web user. We do so, by making sure we append the following line:
export ZEPPELIN_IMPERSONATE_CMD=’sudo -H -u ${ZEPPELIN_IMPERSONATE_USER} bash -c ‘
- We save the change, and restart the Zeppelin service, as Ambari suggests. This will make sure that the new configuration is propagated to all the Zeppelin nodes, and that the zeppelin-env.sh files are updated.
- In every node that is hosting Zeppelin, we add the Zeppelin user as sudoer:
- vi /etc/sudoers
- Append line: zeppelin ALL=(ALL) NOPASSWD: ALL
- We go back to Zeppelin, and with a user with admin privileges, we go to our Hive interpreter and edit it as follows:
- Optional: Set per user / isolated binding in the options
- This time we don’t need to enable the User Impersonate option, so you might leave the binding as it is. Note that in some cases, depending on the session time-out configurations, the per user / isolated scoping actually causes some issues with long-running sessions.
- Remove hive.user and hive.password properties, if present.
- Set the following interpreter options, adding those who are not present by default:
- proxy.user.property = hive.server2.proxy.user
- driver = org.apache.hive.jdbc.HiveDriver
- url = your HiveServer2 jdbc URL
- This is available in Amabari. Go to the Hive service, and check the corresponding property in the Summary page
- jdbc.auth.type=KERBEROS
- jdbc.keytab.location= /etc/security/keytabs/zeppelin.server.kerberos.keytab
- jdbc.principal= zeppelin@YOUR.DOMAIN
- Optional: Set per user / isolated binding in the options
The last two steps can be edited to represent your real scenario.
- We save and then restart the interpreter.
If we now try to run any Hive query, we will see how Hive correctly picks up the permissions as they are set in Ranger for our specific user.
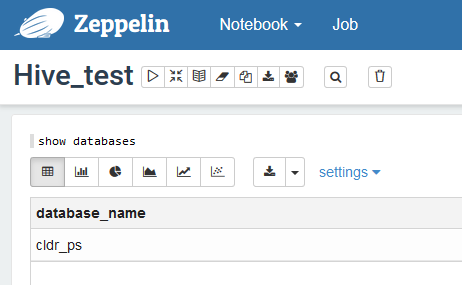
Figure 5: Limited access to databases due to user’s Ranger permissions.
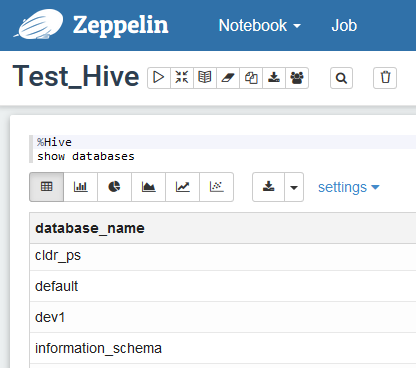
Figure 6: Other users can see more databases, not visible to the first user.
Note that in this case, we need to edit the ZEPPELIN_IMPERSONATE_CMD variable and set the Zeppelin user as sudoer (obviously, there is no need to repeat these steps if they have already been done). However, other Hive-specific settings needed to be defined: amongst them, the default.proxy.user.property is the one allowing for the impersonation to take place.
Conclusion
As we have seen, enabling user impersonation can require different steps depending on the interpreter. Our guide should be valid in most cases, but each scenario might need adjustments depending on the specific configuration, especially with Kerberos involved.
These, however, are not the only alternatives we have: other solutions can potentially be applied. For instance, Hive impersonation can also be enabled by setting the user credentials in the Credentials setting of Zeppelin, for every user that we want Zeppelin to impersonate; or, we can avoid the step where we set Zeppelin as sudoer by enabling passwordless ssh for Zeppelin and every user that we might want to impersonate. For Spark, another option would be to use the Livy interpreter.
As with many other aspects of a Big Data cluster, the right solution really depends on your specific needs and your specific settings, which may vary vastly from case to case.
If you have any questions or if you are looking for support, do not hesitate to contact us at ClearPeaks, and we’ll be happy to put our expertise at your disposal.
