11 Jul 2023 Building Serverless Machine Learning Solutions in AWS: From Model to REST API
When you look at the list of requirements for the development of any machine learning (ML) solution, you’ll always find these two: storage capability for large amounts of data and computation resources for complex operations. And in many cases, you will also want a serverless setup so that you can forget about infrastructure and focus on the business value that your ML solution will bring. Amazon Web Services (AWS) offers all this and more!
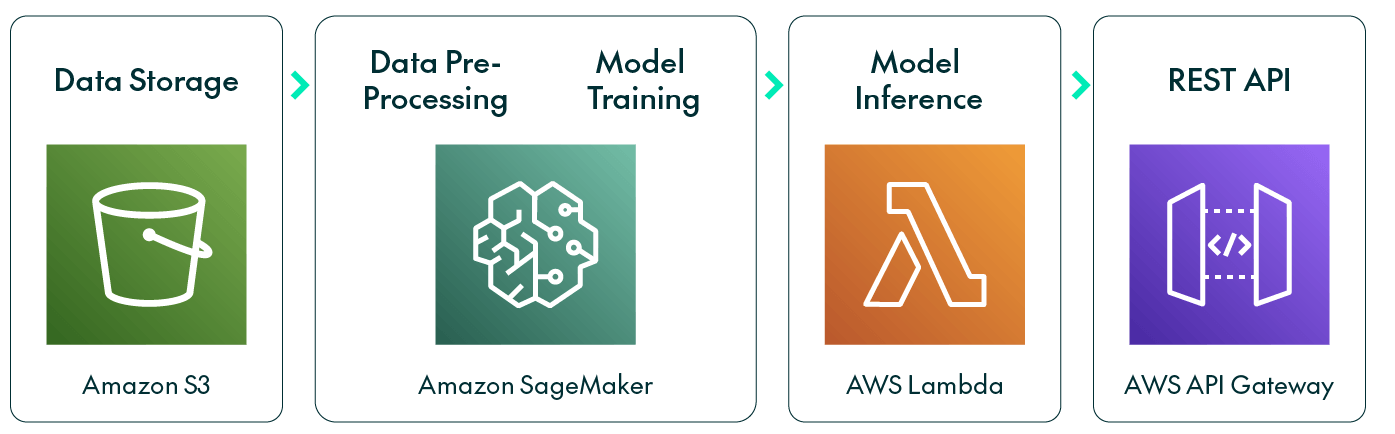
In this blog post, we’re going to go through how to build a serverless ML solution with AWS tools. With a recommender model as a sample use case, we’ll show you how to create an ML solution from scratch, using services such as S3 and SageMaker, as well as how to create a REST API to get your predictions on demand and to scale, thanks to Lambda and API Gateway.
Building an ML Solution in AWS
AWS offers so many services that identifying the ones you need can be a bit tricky. For a particular ML problem, the right choice of services will depend on the exact requirements; however, if you need to store large amounts of data, S3 is the obvious choice.
When it comes to ML, AWS suggests starting with SageMaker, a suite of services focused on end-to-end solutions, such as SageMaker Ground Truth for labelling data, SageMaker Canvas for building models on prebuilt ones, or SageMaker Serverless Inference for deploying models.
The primary point of entry is SageMaker Studio, which provides an environment where you can use Jupyter Notebooks or RStudio to process the data, and then launch a new instance or container to train the model, with the flexibility to choose different sized instances for both training and processing tasks.
SageMaker has its own ML library with predefined models. Calling these models launches a new instance with the specified algorithm and trains it with the given data, like other common ML libraries. One notable feature of SageMaker, for those lacking in-depth ML expertise, is SageMaker Autopilot, capable of building and training models from your data automatically.
Once the model has been trained we can deploy it to run inferences in SageMaker, which will build an endpoint that can be called as many times as you wish with different input data. In our specific use case, we had to preprocess the input data before running an inference, so to streamline the process and trigger both the preprocessing and the model inference by simply calling a task, we leveraged the powerful AWS Lambda, and to let end users access predictions through a REST API, we employed Amazon API Gateway.
Use Case
Our example use case is based on a fashion recommendation problem and it will help you to understand how it all works. Recommenders are a widely used models in online shopping and on-demand movie platforms, trying to offer the user the best experience possible through well-tailored recommendations. And remember, if a customer has to sift through thousands of items to find what they are looking for, they’re less likely to buy anything than if products are suggested to them.
With this use case, we’ll be working with a table of transaction data, containing customer_id, article_id and the date of the transaction, plus two extra tables with customer and article metadata, offering a deeper description of each item and customer.
Development
Data Storage
We must first create an S3 bucket for the project where we will upload the data; all the model outputs will be stored there too. Once the S3 bucket has been created, we can upload the data and start with the preprocessing.
ML Model
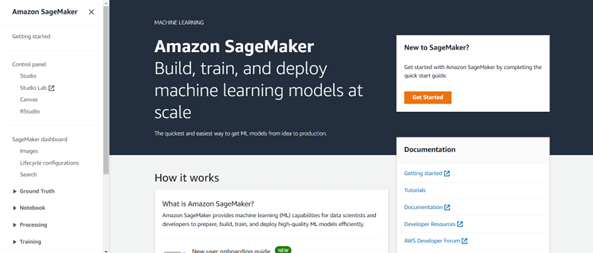
We will be using SageMaker, so first we must open Amazon SageMaker in the AWS console:
In the left panel we can see all the available SageMaker features; in our case we will go to SageMaker Studio > Launch SageMaker Studio. We will have to add a new user in the control panel and fill in the user profile as necessary. It is important to keep the selected execution role name, as we will have to grant this role read and write permissions for the S3 bucket we created in order to access the data from SageMaker.
Once the new user has been added, we can launch SageMaker Studio, and we now have to choose between Studio and Canvas. The Studio option will open a Jupyter Notebook where we will be able to run Python code cells and plot results. The Canvas option will open a list of data files, and by selecting one you can create a model with just a few clicks. SageMaker Canvas is a way of building ML models without coding, simply adding blocks to a pipeline.
Tip: if you are using SageMaker Canvas, log out every time you stop using it as if you don’t log out, it will keep running and increase costs!
For this project we used SageMaker Studio, and you can find a brief review of the basic pieces of code needed to train a simple ML model below.
Note that before starting the training we did some data preprocessing in order to obtain a meaningful feature space representation, with all the features scaled from 0 to 1 to enhance the performance of clustering methods. The process might change depending on the data, so we haven’t included it here, but it can be easily done with the basic Python libraries.
1. First, we connect with the S3 bucket and read the training data: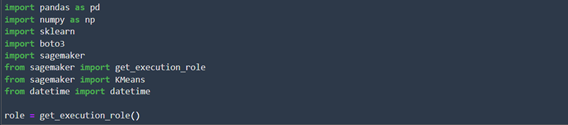

2. Define the model structure, in our use case, K- We are going to use the model from the SageMaker library: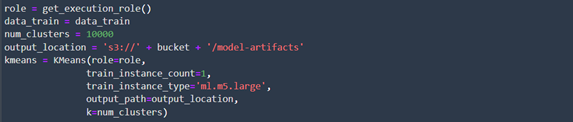 In this case we will be saving all the model outputs in the S3 bucket, inside a folder named ‘model-artifacts’. We must also indicate which instance are we going to use to train the model.
3. Train our model with the loaded data: The specified job name will be the name of the folder created inside the specified output_location and the training outputs will be stored there.
4. If we are in a new Jupyter session and all the variables have been restarted, we will have to load the trained model. We will need the weights and the model image we obtained from the training process. In our case, as we used a model from the SageMaker library, we don’t need the image as it is already defined:

5. When the model has been loaded, we can proceed with its deployment and run inferences:
![]()
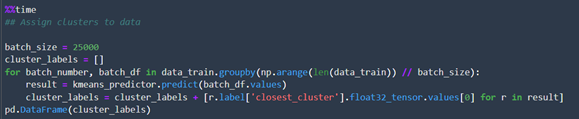
6. Finally, to generate predictions with our trained model, we just have to call the predict function from the predictor we created before. However, this function has a data size limit, so if we want to run inferences on the entire dataset, like in our use case where we want to assign clusters to each data entry, we must process the data in batches:
7. Once the inference process is complete, we’ll delete the endpoint as its existence increases costs:

So far, we have created an S3 bucket, uploaded our dataset to it, trained a K-Means model with SageMaker, saved the weights, and deployed the model by creating an endpoint allowing us to run inferences and obtain predictions.
Lambda Function
As we mentioned above, we did some preprocessing to get the data in the desired format, an embedding vector for each customer. So, when we want to make predictions with new data and obtain recommendations, we must input this data to the model as a customer-embedded vector.
To do so, we will incorporate a code snippet that will transform the input data into the desired format. Additionally, the inference result will provide the cluster ID assigned to the input data, and to generate a list of recommended items, we will need to consider the most frequently purchased items within the assigned cluster.
We wanted to build an end-to-end system where the user could enter the input data, in our case a customer id, and the system would return the list of recommended items. Now we’ll build a Lambda function that can run these processing steps along with the model inference – this is how:
1. Go to AWS Lambda > Create a function > Author from scratch and set a function name and the language you are going to use, in our case Python 3.7. You can also set an previously created execution role or create a new one. The selected execution role must have permissions to see the SageMaker endpoint and, if necessary, the S3 bucket where your data is
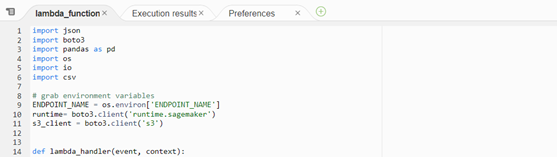
2. Now that the function has been created, we can start adding the necessary Python code. Before the lambda_handler definition we should import the necessary libraries and set up some environment variables:
Tip: We have imported some basic Python libraries, but as they aren’t installed, we need to add them as layers in the Lambda function. Go to AWS Lambda > Layers > Create Layer, then upload a zip file with the previously downloaded .whl file of the required library. Finally, to add this layer to our Lambda function, navigate to the bottom of the code and select Add a layer:

3. Once we have set up the environment, we can start with the lambda_handler The input data is going to be passed through the event variable, and in our case we will read the customer_id from which the recommendation list needs to be generated:

4. The next step is to preprocess the input data before running the model inference. In our case we will load the feature representation for the specific customer_id from a table stored in our S3 bucket:

5. With the data now in the correct format, we just have to call the endpoint we built in SageMaker:

Tip: Remember that the Lambda function can only be executed when the endpoint is up and running. You can delete it when the function is not going to be used any more in order to avoid extra costs.
6. Finally, the inference result can be postprocessed if necessary and returned as the function result: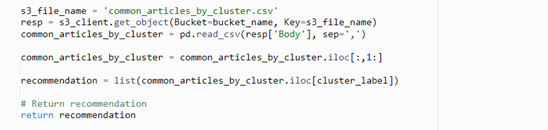
To test the Lambda function, click on the Test button and select Configure test event:

With this setup, we will be able to run an inference of the model with the desired data with its processing done at the same time. A Lambda function can have a URL so it can be called from a browser by any user.
Depending on how we want to use this ML solution, we might want to build a REST API integrating everything, so that we can build a friendly user interface or even call it from another application.
API Gateway
To create this REST API, we can use the AWS API Gateway tool, following these steps:
- API Gateway > Create API > REST API.
- Fill in the API name and leave the rest of the parameters as they are > Create API.
- Create the resource by going to Actions > Create resource.
- Create the method by going to Actions > Create method. When creating the POST method, we have to set the integration type to Lambda function and type the name of the previously created Lambda function.
- Deploy the REST API by going to Actions > Deploy API.
At the end of this process, we will have a URL backed by a REST API that invokes our application and returns the prediction result, all using serverless services that are capable of scaling to a large number of requests per second.
Conclusions
In this blog post, we have seen how easy it is to use AWS SageMaker to build a machine learning system. We also have seen that it has many available features, so the tool can be adapted for lots of different users and ML problems.
We have seen that a SageMaker model can be called for inference in many ways, allowing us to choose the most suitable approach based on the specific requirements of our application. The SageMaker endpoint itself can be called, or we can also use a Lambda function to access it – or even better, we can wrap it all in a REST API with API Gateway.
We hope you’ve enjoyed reading this blog post, and that it’s been a useful introduction to building ML solutions in AWS. If you have an ML project in mind, but are unsure about the best approach to take, simply contact us and our experienced team of experts will be happy to help you out!