28 Dec 2023 Change Data Capture (CDC) with NiFi and Snowflake
Snowflake and Apache NiFi are two dominant technologies in today’s data landscape: the first offers cloud-based, user-friendly data lakehouse and analytics capabilities, whilst the latter is a de facto open-source standard for data movement and streaming solutions. It’s hardly surprising that they can be integrated with each other, unlocking many potential use cases and forming a powerful combination for any enterprise architecture.
We’ve already posted quite a few blog posts about these two technologies (check them out here!), but in today’s entry, we’ll explore how they can work together. Simulating a Change Data Capture (CDC) scenario, we will use NiFi to ingest new data and copy it to Snowflake, in real time, as it appears in the original source.
Note: the inspiration behind this blog post came from this YouTube video by Pierre Villard, director for Data in Motion at Cloudera.
Snowpipe and NiFi
To achieve this real-time data ingestion we will use Snowpipe, a serverless Snowflake service that allows to load data into a Snowflake table as soon as it is available in a stage, which is either a location in your Cloud Service Provider (Google Cloud, Azure or AWS), or a Snowflake-provided stage attached to your table or user. By creating a pipe with a simple COPY statement, you can ensure that the data loaded in the stage is automatically reflected in the desired table.
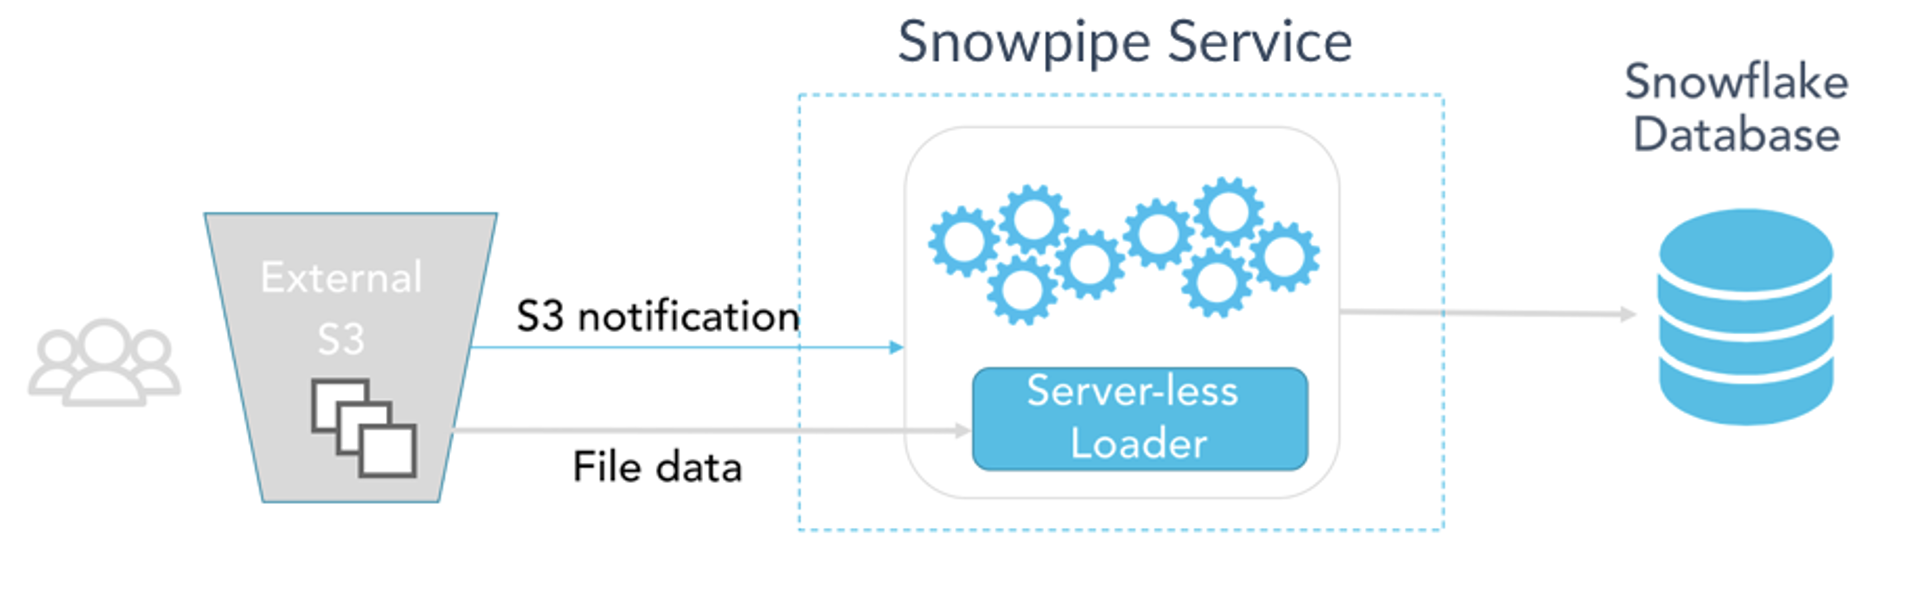
Figure 1: Snowpipe architecture (Source: https://www.snowflake.com/wp-content/uploads/2017/11/snowpipe-1.png)
NiFi’s integration with Snowflake harnesses 3 new processors designed specifically to work with Snowpipe:
- PutSnowflakeInternalStage
- StartSnowflakeIngest
- GetSnowflakeIngestStatus
These processors allow us to bypass the complexity and labour-intensive nature of traditional JDBC connections (for example, the classic PutDatabaseRecord processor), leading to reduced configuration time and increased performance.
We’ll take a proper look at these new processors when we describe our pipeline in the upcoming sections.
Preparing the Use Case
To build our simulated scenario, we use CSV files containing data from a public dataset (Ethereum Historical Dataset | Kaggle), generated from a Python code that we have set up to run every minute. These files are stored in a local directory on our laptop, where NiFi is running, constantly checking if new files have been created. When these files are created, the NiFi pipeline sends them over to Snowflake, as we will see below.
In Snowflake, we created a table where we want this data to be copied:
create or replace TABLE CLEARPEAKS.FINANCE.ETHEREUM (
	"Date" TIMESTAMP_NTZ(9),
	"Symbol" VARCHAR(16777216),
	"Open" FLOAT,
	"High" FLOAT,
	"Low" FLOAT,
	"Close" FLOAT,
	"Volume" FLOAT
);
After creating the table, we also created the pipe to be used by our NiFi ingestion pipeline by running the following command. Notice how the CSV file details are part of the pipe definition:
create or replace pipe CLEARPEAKS.FINANCE.ETHEREUM_PIPE auto_ingest=false as COPY INTO ETHEREUM FROM @%ETHEREUM FILE_FORMAT = (TYPE = 'CSV', SKIP_HEADER = 1, FIELD_DELIMITER = ',', FIELD_OPTIONALLY_ENCLOSED_BY = '"');
Lastly, we downloaded the three new Snowflake native NiFi processors (and the required services) from the following links:
https://mvnrepository.com/artifact/org.apache.NiFi/NiFi-snowflake-processors-nar
https://mvnrepository.com/artifact/org.apache.NiFi/NiFi-snowflake-services-api-nar
https://mvnrepository.com/artifact/org.apache.NiFi/NiFi-snowflake-services-nar
To set them up, we placed these NAR files in the lib directory of the NiFi installation folder. This location serves as a repository for various libraries and extensions that NiFi relies on for its operations. After restarting NiFi, the new processors and services are available for us to use.
The NiFi Flow
In the picture below we can see the NiFi flow that we used to run our CDC use case. On a high level, it consists primarily of two parts:
- Change Data Capture: The ListFile and FetchFile processors are a classic combo that allow NiFi to detect and fetch new files as they land in a specific location. This enables us to simulate the case in which a source application is releasing new files (in our case, the Ethereum data) which we want our NiFi pipeline to ingest in real time. Of course, this is not the only way to implement CDC: we could be using SFTP’s counterparts (ListSFTP and FetchSFTP), or even QueryDatabaseTable, to detect newly added or updated rows in a database table. Other hybrid solutions are also possible (for example, using Oracle Golden Gate and Kafka).
- Snowpipe ingestion: This part is based on the three new processors that we mentioned earlier: PutSnowflakeInternalStage, StartSnowflakeIngest and GetSnowflakeIngestStatus. Respectively, as their names suggest, we use them to put the data in a Snowflake stage, to trigger the start of the related Snowpipe pipe, and then to query the status of the pipe until it completes:
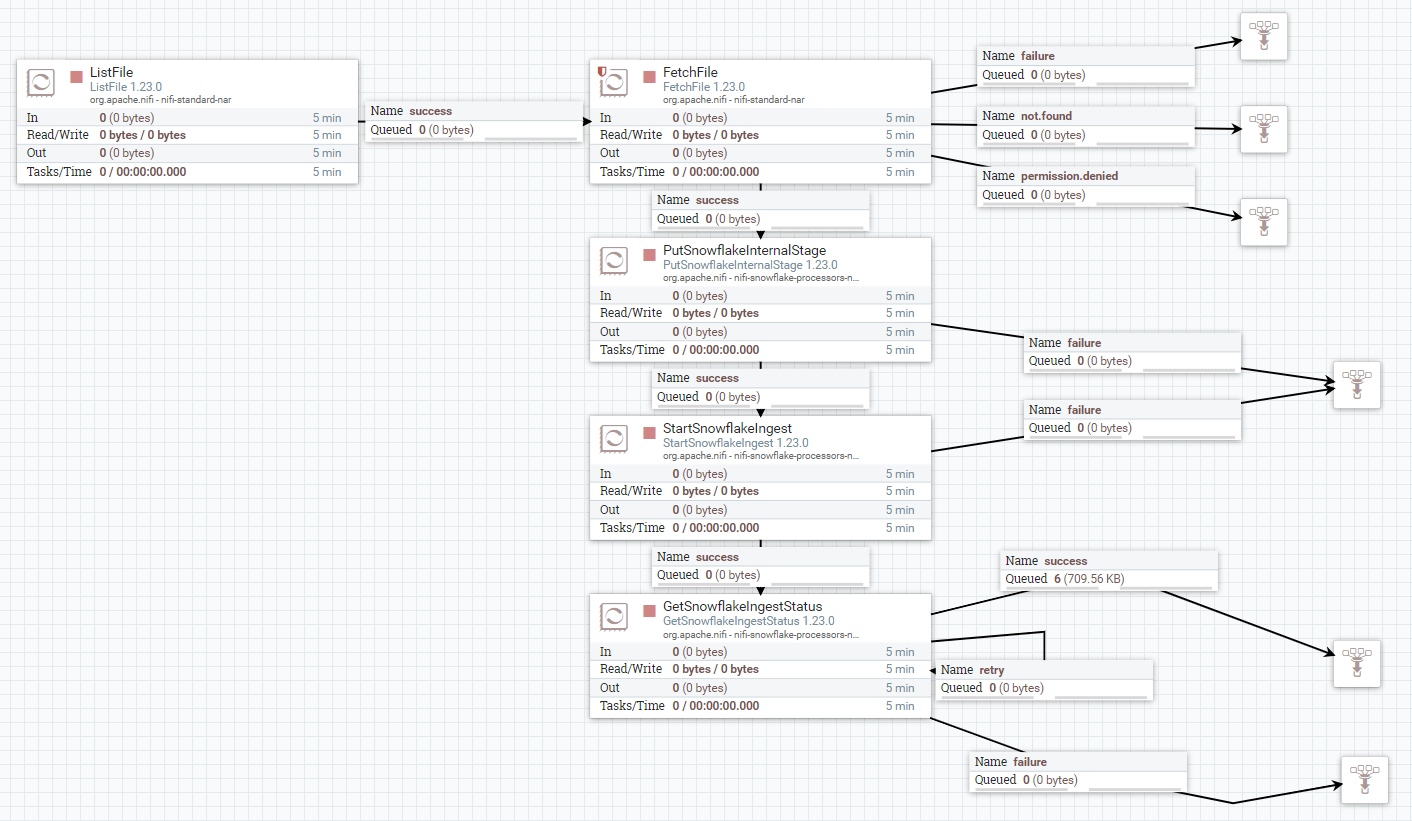
Figure 2: NiFi Flow
Let’s take a detailed look at the settings of each of these processors.
ListFile Processor
The ListFile processor is able to list all the contents of a local directory, filtered (if required) by name, type, path, age, or timestamp. By selecting the Tracking Timestamps option for the Listing Strategy parameter, we make sure that only new files are considered at every execution. We could potentially filter by type by changing the regex to include only the files whose names end with .csv, but in our case, we know that nothing else will land in that directory.

Figure 3: ListFile processor configuration parameters
FetchFile Processor
The FetchFile processor works in tandem with ListFile. Using the incoming FlowFiles’ attributes to construct the absolute path and name of the files to fetch, it accesses the local directory and generates a FlowFile for each and every one of those files:

Figure 4: FetchFile processor configuration parameters
In the image below we can see an example of some files fetched after a few executions of the above processors, as visible in the FetchFile output queue:

Figure 5: List queue including all CSV files ingested by the FetchFile processor
These are the files that we now pass to the new Snowflake processors, for ingestion into our Snowflake table.
PutSnowflakeInternalStage Processor
The PutSnowflakeInternalStage processor makes sure that the incoming FlowFiles are copied to a Snowflake stage. As we can see below, its configuration is very straightforward: all it requires is a connection to Snowflake (provided as a Controller Service), the type of Snowflake internal stage, and the stage details. In our case, we select the Table type, and thus we provide the name of the Snowflake database, along with the schema and table to which this stage corresponds. After running this processor, our CSV files will be copied to this stage:
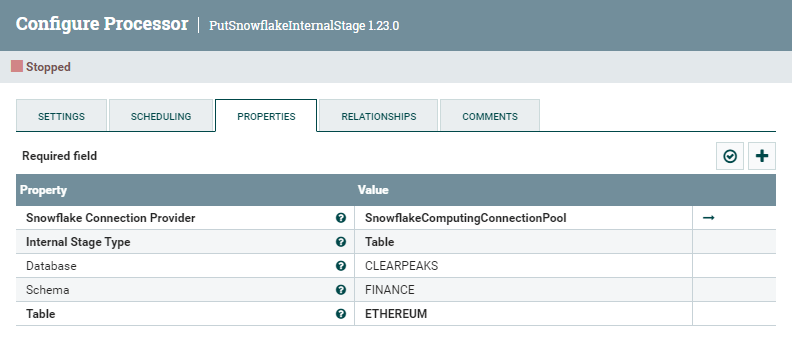
Figure 6: PutSnowflakeInternalStage processor configuration parameters
Note that the Table stage is an internal stage in Snowflake, so we did not have to create it (more details available here).
Below you can see the details of the Snowflake Connection Provider, which essentially consists of a JDCB connection string (‘jdbc:snowflake//’ + the account URL) plus the username and password to connect to it:
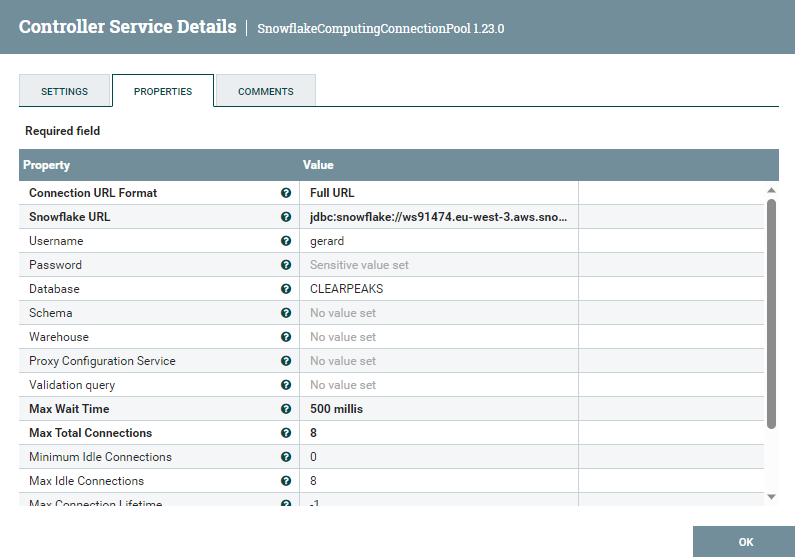
Figure 7: Snowflake connection provider details
StartSnowflakeIngest Processor
At this point, our files are in the Snowflake stage, but these records do not appear in our table yet. To make this happen we need to start the Snowpipe pipe, and the StartSnowflakeIngest processor does exactly that. Its configuration requires only an existing Ingest Manager Provider Controller Service:
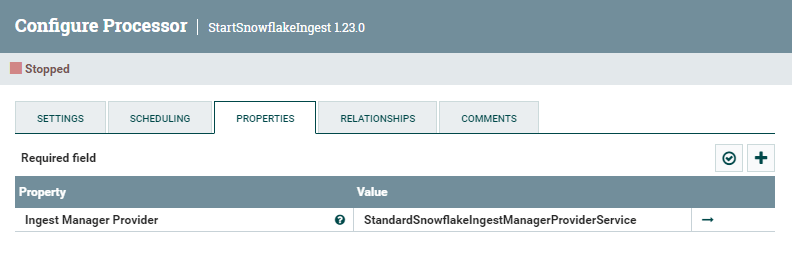
Figure 8: StartSnowflakeIngest processor configuration parameters
The settings for the Ingest Manager Provider are shown below. We need to input the Snowflake URL, the username, the pipe details (database, schema, and pipe name) and a StandardPrivateKeyService:
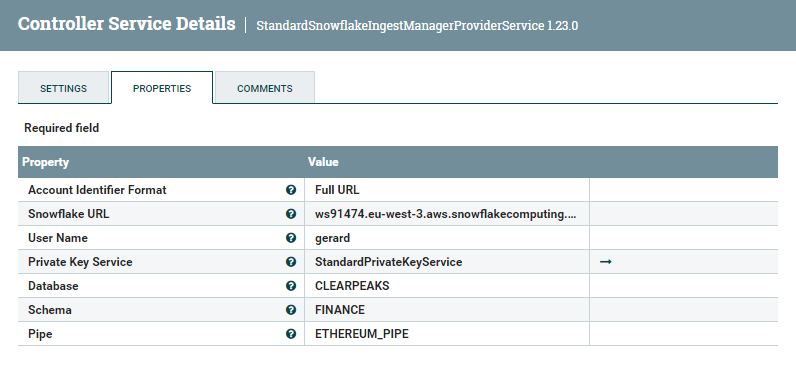
Figure 9: Snowflake ingest manager provider details
The StandardPrivateKeyService is required to connect to the Snowflake API (which is what the StartSnowflakeIngest processor really does under the hood). It requires a key file, or alternatively, a key and a key password:
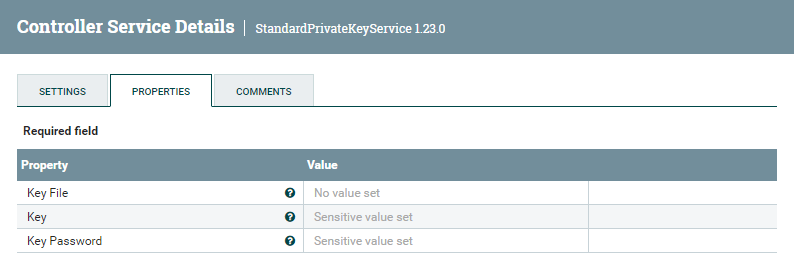
Figure 10: Private key service details
To build one, we follow the steps provided by Snowflake at this link. These steps are relatively straightforward, and at the end if you run the DESC USER command on your user you should see an output like this:

Figure 11: Execution of the DESC USER command after generating a Key pair
All we need to do now is to copy the generated private key, together with its password, in the Key and Key password parameters of the Private Key Service.
Now that everything is ready, we can start the processor. However, note that the result of the ingestion is not immediately available: with the next processor, we wait until the pipe has completed its job.
GetSnowflakeIngestStatus Processor
The GetSnowflakeIngestStatus processor, as mentioned above, allows us to check the status of our pipe and to get notified when the ingestion is completed. As we can see below, all it requires is the Ingest Manager Provider created earlier:
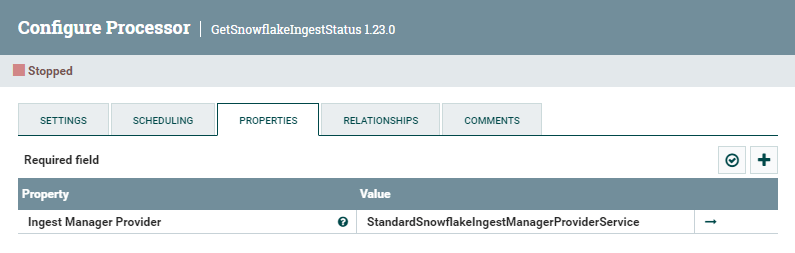
Figure 12: GetSnowflakeIngestStatus processor configuration parameters
While it runs, the FlowFiles representing the CSV files that are being ingested are kept in the retry list queue until the ingestion is completed and they are subsequently moved to the success list queue; and now the process is over!

Figure 13: GetSnowflakeIngestStatus processor configuration parameters
Querying the Data in Snowflake
Once our pipeline has completed, we can go to Snowflake and run a Select query on our target table to confirm that the ingestion was indeed successful:

Figure 14: Result of the Select query on the Snowflake table after the ingestion HAS completed
If we keep our NiFi pipeline running, newly created CSV files are automatically added to this table, as our ListFile and FetchFile processors are detecting them when they land in the local directory and then pushing them down the pipeline to be ingested into Snowflake.
Conclusion
In this blog post, we’ve seen how the new NiFi processors for Snowpipe allow us to easily build a real-time CDC scenario where new data is automatically and seamlessly ingested into Snowflake. As we mentioned, we simulated an easy case with new files being added to a local directory, but many more (and possibly more articulated) use cases are possible in NiFi, thanks to its total flexibility and ease of use. It’s also great to see how a modern tool like Snowflake opens the door to such integrations, with services like Snowpipe along with a powerful API.
Here at ClearPeaks, we’re passionate about both technologies, and our certified, field-tested experts are ready to assist you. Should you require support or wish to delve deeper into the intricacies of NiFi and Snowflake, please do not hesitate to contact us!