
19 Oct 2017 Configuring SSL for OBIEE 12C
Why SSL for OBIEE
This article deals with how to configure SSL for OBIEE 12c. The SSL (Secure Sockets Layer) enables the communication between the application server and the client via an encrypted link.
While deploying the OBIEE in an organization, we must ensure the SSL is configured using the client’s certificates in order to make sure the interaction between the browser and application server is private, since the BI dashboards contain data confidential to the organization.
1. High-Level Steps to enable SSL for OBIEE 12c
Before getting into the hands on, let’s understand the high level steps involved in this configuration:
| • | Generating the required certificates and keystores for SSL communication |
| • | Configuring Weblogic Admin Server, Node Manager and Managed Server for SSL |
| • | Configuring Internal WebLogic Server LDAP to Use LDAPs |
| • | Configuring Internal WebLogic Server LDAP Trust Store |
| • | Disabling HTTP |
| • | Configuring OWSM to use t3s |
| • | Enabling Oracle BI EE Internal SSL for BIEE |
2. Assumptions
We assume OBIEE 12c is installed and configured in a Windows/ Linux server with the DSN – obiee12c.clearpeaks.com. The BI services are accessible with default OBIEE 12c ports.
3. End to End SSL configuration for OBIEE 12c
3.1. Generating the required certificates and keystores for SSL communication
| • | Create a folder under Oracle Home where OBIEE 12c is installed. For E.g. /ssl |
| • | Set the environment variable PATH to include the JAVA_HOME/bin directory. |
WINDOWS:set JAVA_HOME=<path to JAVA install root> set PATH=%JAVA_HOME%/bin;%PATH% UNIX: export JAVA_HOME=<path to JAVA install root> export PATH=$JAVA_HOME/bin:$PATH |
| • | Create Java key store: Invoke the Java keytool utility to create a java key store. For example: |
keytool -genkey -alias <alias> -keyalg RSA -sigalg SHA256withRSA -keysize <key_size> -keypass <password> -keystore <keystore_name>.jks -storepass <password> -storetype <store_type> -validity <days_of_validity> |
| For example: |
> keytool -genkey -alias obiee12c -keyalg RSA -sigalg SHA256withRSA -keysize 2048 -keypass Clearpeaks123 -keystore obiee12c.jks -storepass Clearpeaks123 -storetype JKS -validity 365 What is your first and last name? [Unknown]: obiee12c.clearpeaks.com What is the name of your organizational unit? [Unknown]: admin What is the name of your organization? [Unknown]: Clearpeaks What is the name of your City or Locality? [Unknown]: Abu Dhabi What is the name of your State or Province? [Unknown]: Abu Dhabi |
| • | Create a Certificate Signing Request (CSR). Use the following command to create a Certificate Signing Request: |
keytool -certreq -v -alias <alias> -keyalg RSA -sigalg SHA256withRSA -file <filename> -keypass <password> -keystore <keystore> -storepass <password> |
>keytool -certreq -v -alias obiee12c -keyalg RSA -sigalg SHA256withRSA -file root_cert_req.csr -keypass Clearpeaks123 -storepass Clearpeaks123 -keystore obiee12c.jks Certification request stored in file root_cert_req.csr &nbsp; Submit this to your CA &nbsp; |
| • | Submit this CSR to the signing authority board and in return, the root, intermediate and server certificates will be provided. |
| • | Import the CA into the Java Keystore. Use the following command to import the root, Intermediate and server certificate to the Java Keystore. |
| » Import Root Certificate |
keytool -import -trustcacerts -alias <alias> -file <cacert_file> -keystore <keystore> -keypass <password> -storepass <password> |
>keytool -import -trustcacerts -alias rootca -file rootca.pem -keystore obiee12c.jks -keypass Clearpeaks123 -storepass Clearpeaks123 ..................................... .................................... Trust this certificate? [no]: yes Certificate was added to keystore. |
| » Import Intermediate Certificate |
keytool -import -trustcacerts -alias <alias> -file <cacert_file> -keystore <keystore> -keypass <password> -storepass <password> |
>keytool -import -trustcacerts -alias interca -file interca.pem -keystore obiee12c.jks -keypass Clearpeaks123 -storepass Clearpeaks123 Certificate was added to keystore |
| » Import Server Certificate |
keytool -import -alias <alias> -file <servercert_file> -keystore <keystore> -keypass <password> -storepass <password> |
>keytool -import -v -alias server -file server.cer -keystore obiee12c.jks -keypass Clearpeaks123 -storepass Clearpeaks123 Certificate reply was installed in keystore |
| • | Use the following command to verify whether the keystore contains the certificates |
keytool -list -keystore <keystore> -storepass <password> |
>keytool -list -keystore obiee12c.jks -storepass Clearpeaks123 |
| In case if the key store contains chain of certificates, use the following command: |
>keytool -list -v -keystore obiee12c.jks |
3.2. Configuring Weblogic Admin Server, Node Manager and Managed Server for SSL
3.2.1. Configuring Weblogic Admin Server for SSL
| • | Stop all the BI services using server script – stop.sh |
./stop.sh |
| • | Start the admin server only by using the following command |
> ./start.sh –i Adminserver |
| • | Log in to WebLogic console. |
| • | Click Lock and Edit. |
| • | Select Environment > Servers. Click on Admin Server. |
| • | In the ‘General’ tab, update the Listen Address with the DSN – obiee12c.clearpeaks.com. |
| • | Check ‘SSL Listen Port Enabled’. ‘SSL Listen Port’ : e.g. 9501 (make sure the port is available) |
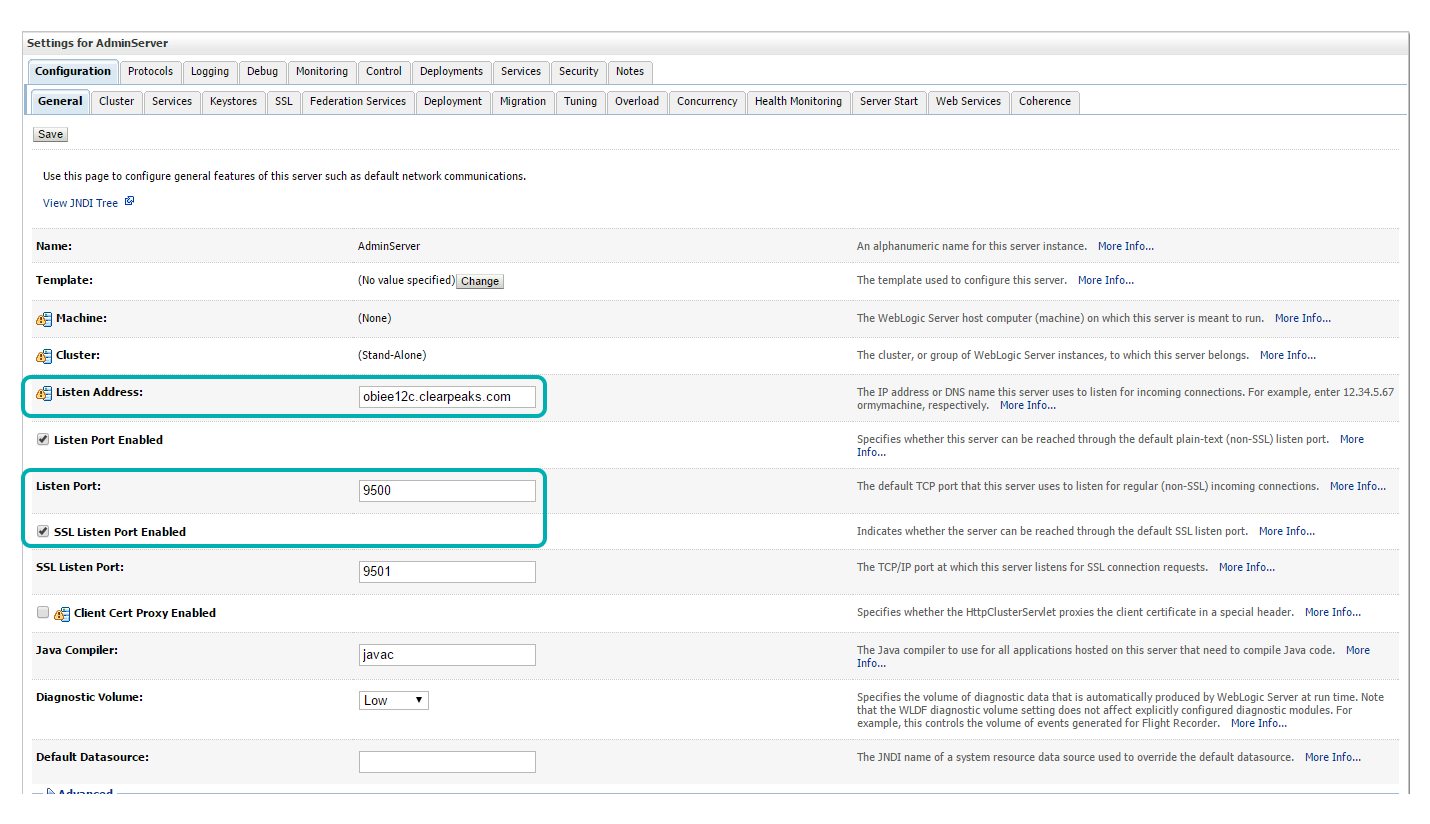
| • | Click ‘Save’ |
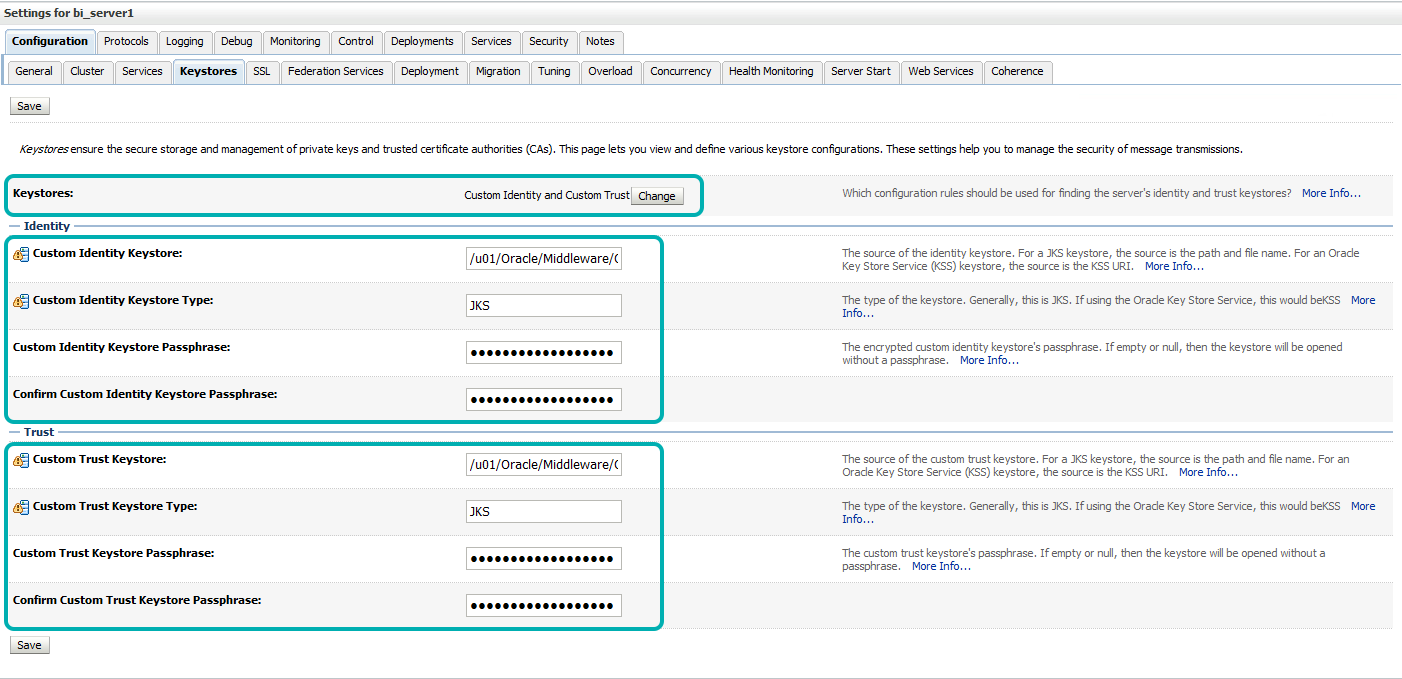
| • | Select Keystores’ tab and click the ‘change’ button to select Custom Identity and Custom Trust for keystores. |
| Update the details as follows. |
| » ‘Custom Identity Keystore’: <path_to_keystore> eg. <ORACLE_HOME>/ssl/ obiee12c.jks » ‘Custom Identity Keystore’: JKS » ‘Custom Identity Keystore Passphrase’: <storepass_pwd> e.g.: Clearpeaks123 » ‘Confirm Custom Identity Keystore Passphrase’: <storepass_pwd> e.g.: Clearpeaks123 » ‘Custom Trust Keystore’: <path_to_keystore> e.g. <ORACLE_HOME>/ssl/obiee12c.jks » ‘Custom Trust Keystore Type’: JKS » ‘Custom ‘Custom Trust Keystore Passphrase’: <storepass_pwd> e.g.: Clearpeaks123 » ‘Custom ‘Confirm Custom Trust Keystore Passphrase’: <storepass_pwd> e.g.: Clearpeaks123 » ‘Click ‘Save’. |
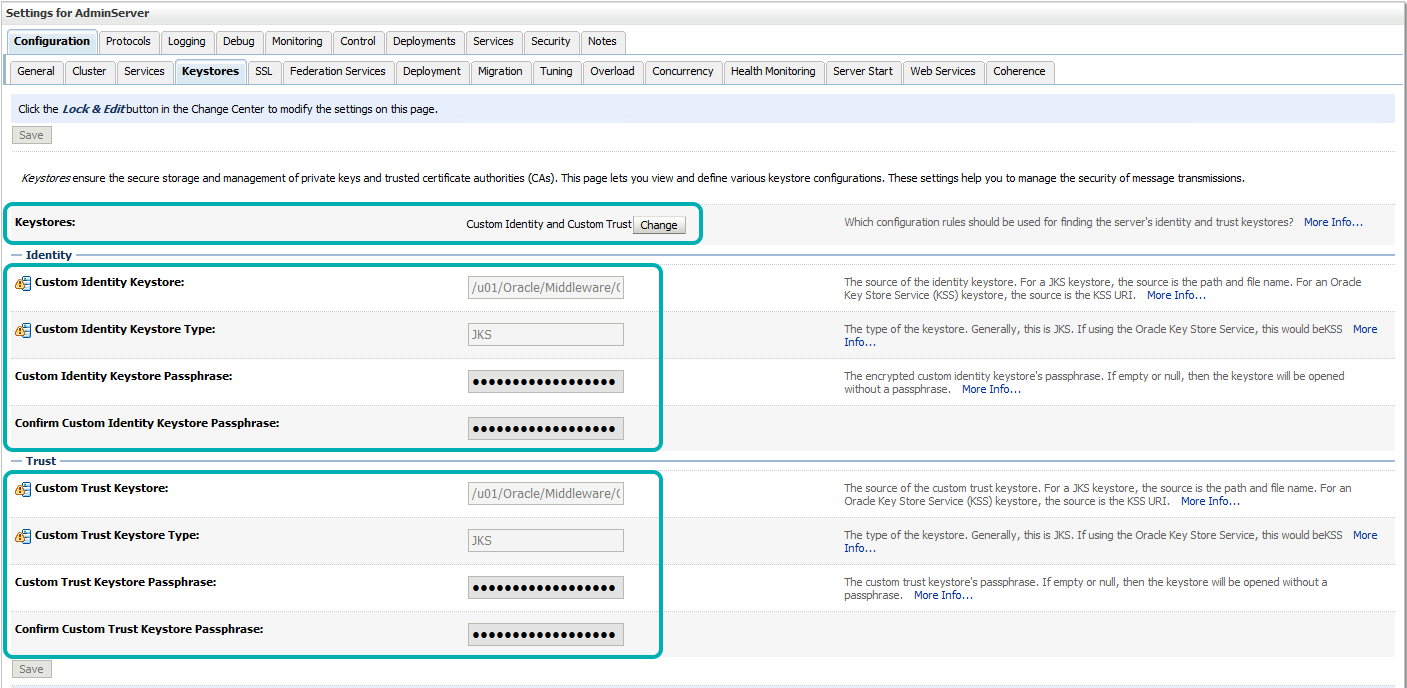
Note: In this, example the Custom Identity Trust keystore and Custom Trust Keystore are same.
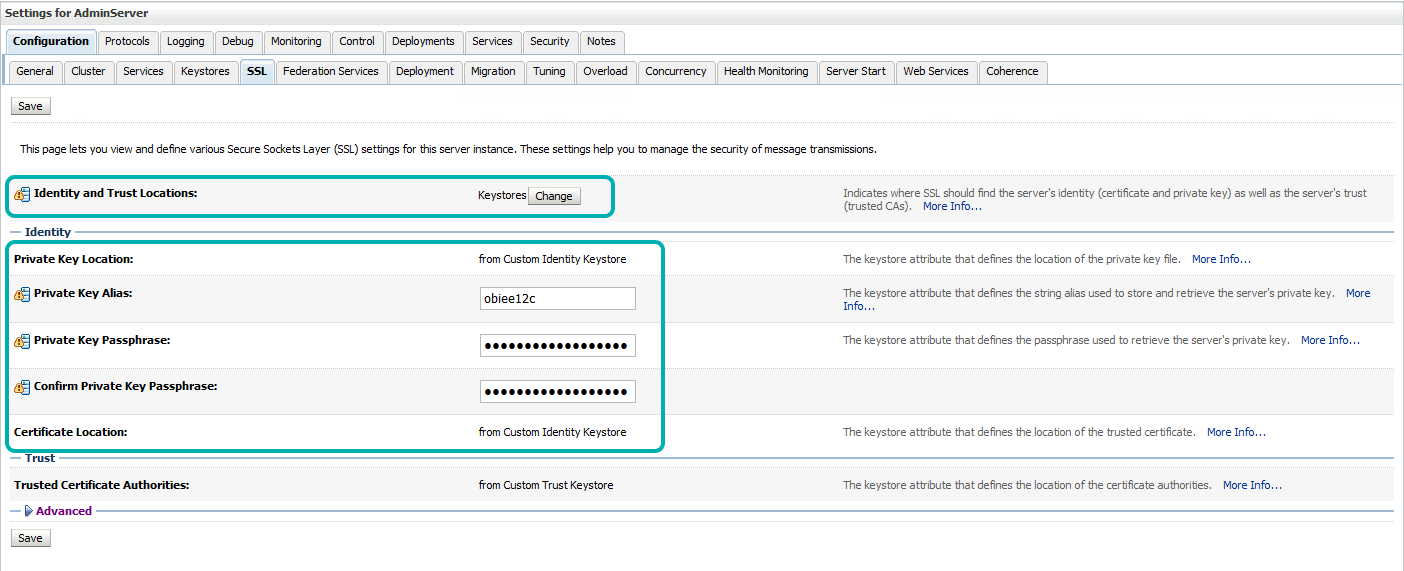
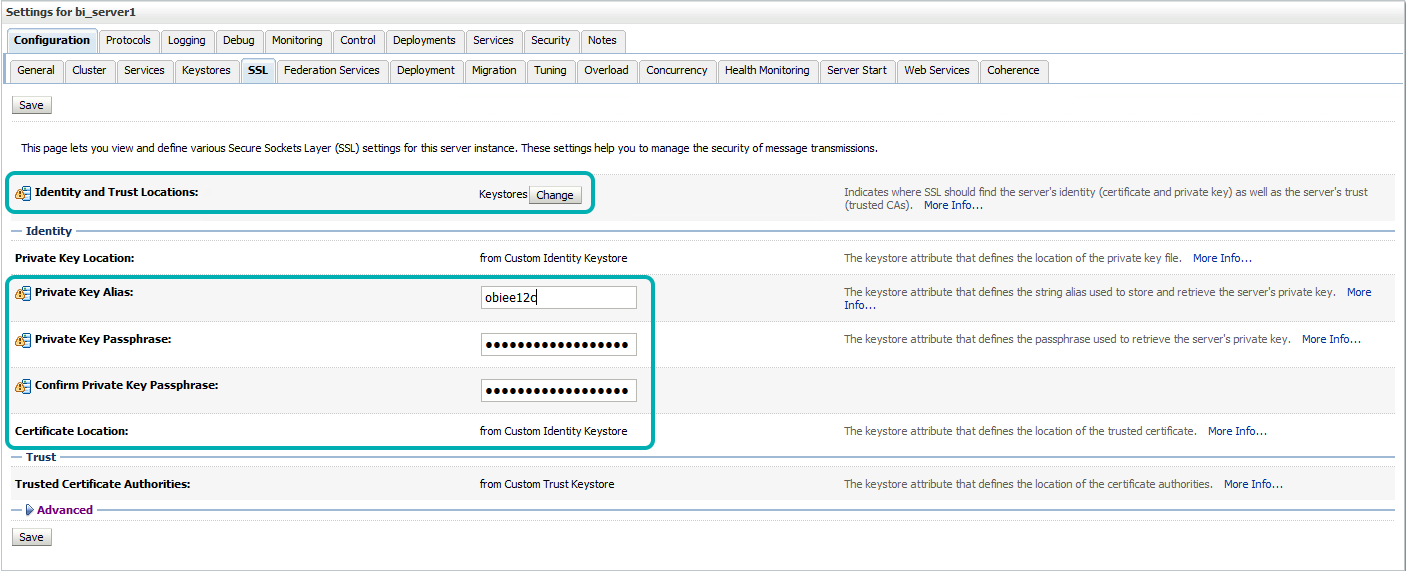
| • | Select the ‘SSL’ tab and enter the relevant information based on Step 1. |
| » ‘Private Key Alias’: <alias_given_when_creating_key> e.g. obiee12c » ‘Private Key Password’: <keypass_pwd> e.g. Clearpeaks123 » ‘Confirm Private Key Password’: <keypass_pwd> e.g. Clearpeaks123 » Click ‘Save’ |
3.2.2. Configure Managed Server for SSL
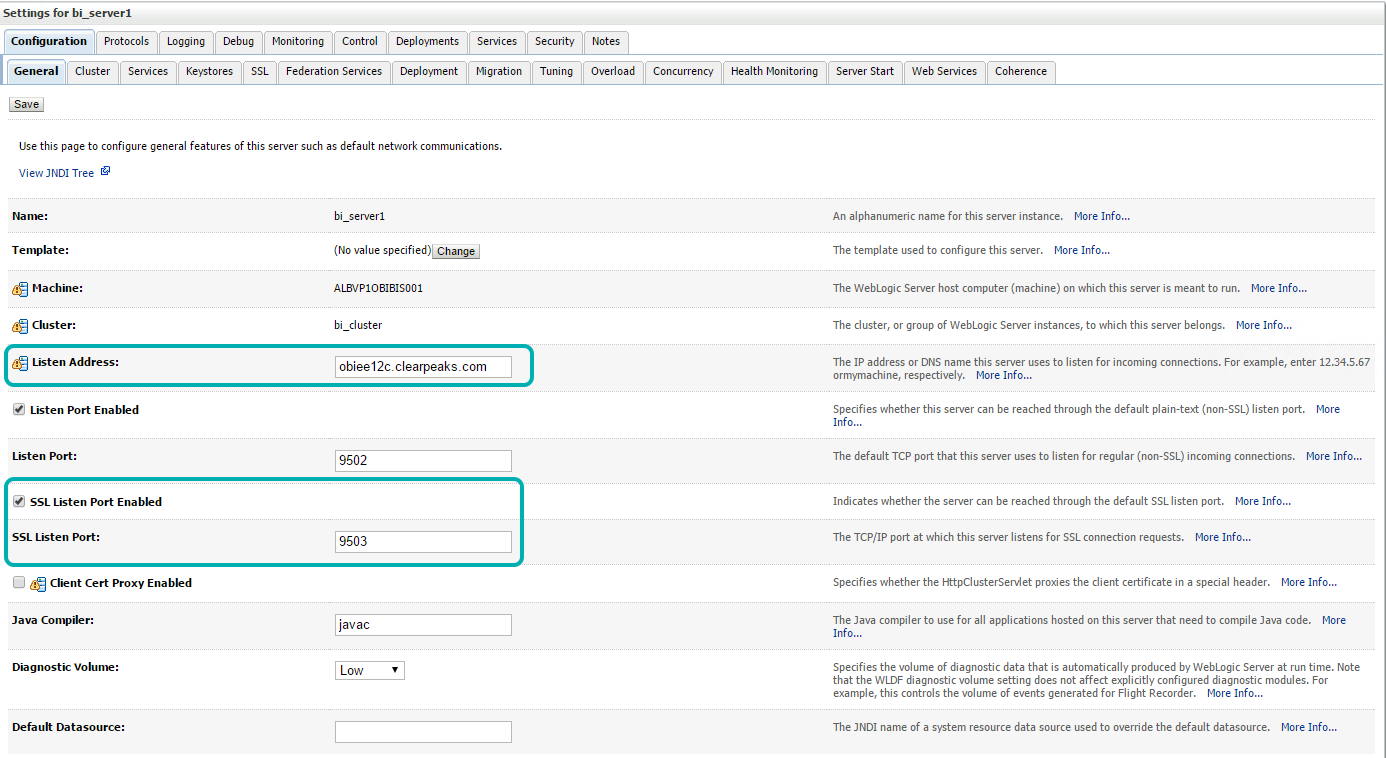
| • | Select Environment > Servers. Click ‘Managed Server bi_server1’ |
| • | Perform the same changes done on the general tab in the Admin server described in the earlier step, by selecting the 9503 port for SSL (if available) |
| • | Select the keystores tab and perform the changes as done in the keystore tab for Admin server and Click ‘Save’ |
| • | Select the SSL tab and perform the changes as done in then keystore tab for Admin server and Click ‘Save’ |
3.2.3. Configure Node manager for SSL
| • | Update the nodemanager.properties in <DOMAIN_HOME>/nodemanager folder with Custom Identity Keystore and Custom Trust Keystore details |
KeyStores=CustomIdentityAndCustomTrust CustomIdentityKeyStoreFileName=<Path to the Keystore> CustomIdentityAlias=<Keystore Alias> CustomIdentityPrivateKeyPassPhrase=<Key Passphrase> CustomTrustKeyStoreFileName=<Path to the Keystore> |
| For example> |
KeyStores=CustomIdentityAndCustomTrust CustomIdentityKeyStoreFileName=<oracle_home>/ssl/obiee12c.jks CustomIdentityAlias=obiee12c CustomIdentityPrivateKeyPassPhrase=Clearpeaks123 CustomTrustKeyStoreFileName=<oracle_home>/ssl/obiee12c.jks |
| • | Import the Public certificates (root and intermediate) to Java Standard Trust Store, /jre/lib/security |
>keytool -import -trustcacerts -alias rootca -file <oracle_home>/ssl/rootca.pem -keystore cacerts -storepass changeit >keytool -import -trustcacerts -alias interca -file <oracle_home>/ssl/interca.pem -keystore cacerts -storepass changeit |
3.3. Configuring Internal WebLogic Server LDAP to Use LDAPs
| • | Make sure WebLogic Admin and Managed Servers are up and running |
| • | Login to EM. Click weblogic domain>Security >Security Provider configuration |
| • | Expand the Identity Store Provider |
| • | Click ‘Configure’ |
| • | Click ‘+’ or ‘Add’ to add a new property |
| • | Select ‘ldap.url’ from the list. Enter the value’ ldaps://:’ |
| For e.g.: ‘ldaps://obiee12c.clearpeaks.com:9501′ |

| • | Click ‘Ok’ |
3.4. Configuring Internal WebLogic Server LDAP Trust Store
| • | Expand the Identity Store Provider |
| • | Click ‘Configure’ |
| • | Expand the Identity Store Provider |
| • | Click ‘Configure’ |
| • | Click ‘+’ or ‘Add’ to add a new property |
| • | Select virtualize from the list. Enter “true” as the value |
| • | Click ‘OK |
| • | Make sure virtualize=true is set, as you are explicitly pointing the Administration Server |
| • | Restart all the BI services |
| • | Create LDAP Trust Store “adapters.jks” |
| • | Set the following environment variables |
>export ORACLE_HOME=<Oracle_Home> >export WL_HOME=<Oracle_home> /wlserver >export JAVA_HOME=<path to JAVA install root> >export PATH=$JAVA_HOME/bin:$PATH >cd $ORACLE_HOME/oracle_common/bin |
./libovdconfig.sh -host obiee12c.clearpeaks.com -port 9500 -domainPath <Oracle_home> /user_projects/domains/bi -userName |
| • | Import the SSL certificates into ‘adapters.jks’ created in the <DOMAIN_HOME>/config/fmwconfig/ovd/default/keystores folder |
3.5. Disabling HTTP
| • | Login to Admin Console |
| • | Lock and Edit |
| • | Navigate to Environment > Servers > Admin Server |
| • | In the Admin Server General tab, uncheck ‘Listen Port’ |
| • | Click ‘Save’ |
| • | Navigate to Environment > Servers > bi_server1 |
| • | In the Managed Server bi_server1 general tab, uncheck ‘Listen Port’. Click ‘Save’ |
| • | Navigate to Environment > Cluster > bi_cluster |
| • | Click Replication Check the ‘Secure Replication’ |
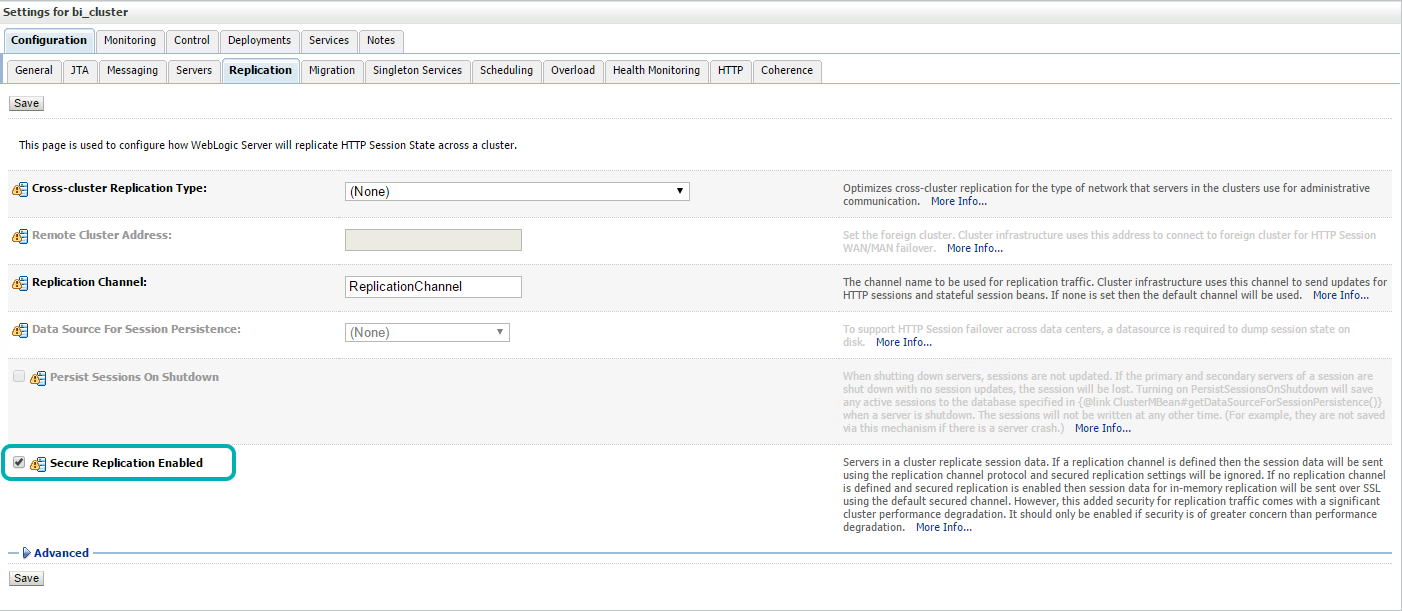
| • | Click ‘Save’ |
| • | Activate changes |
| • | Restart the BI services |
3.6. Configuring OWSM to Use t3s
| • | Login to EM |
| • | Select WebLogic domain, and cross component wiring, components |
| • | Select component type, OWSM agent |
| • | Select WebLogic domain, and cross component wiring, components |
| • | Select the row owsm-pm-connection-t3 status ‘Out of Sync’, and click ‘Bind’. The HTTP(s) OWSM link is not used when using a local OWSM |
| • | Select ‘Yes’ in the pop-up box |

| • | Confirm by accessing the policy via the validator: https://obiee12c.clearpeaks.com:9503/wsm-pm/validator |
3.7. Enabling Internal SSL for OBIEE
| • | Stop all the BI services |
| • | Execute the following command – /bitools/bin/ssl.sh | .cmd script to enable internal SSL for OBIEE |
>./ssl.sh internalssl true |
| • | Restart the BI services |
| • | Validate the internal ssl configuration by running the following command |
>./ssl.sh report |
4. Validating the SSL configuration
| • | Try accessing the Weblogic console, EM, analytics and visual analyser with the configured SSL ports |
| » WebLogic Console |
| » EM Console |
| » BI Presentation Services |
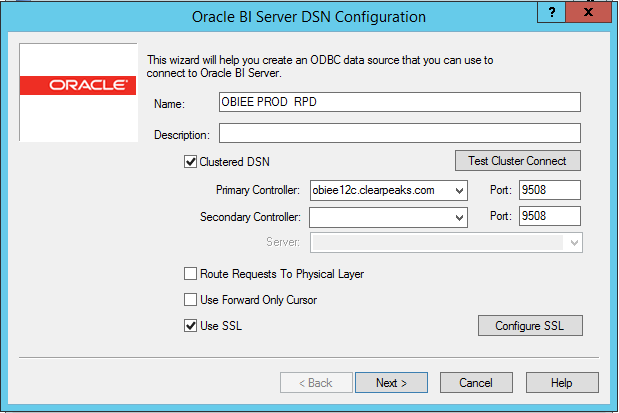
| » Configure the DSN with ‘use SSL’ checked and try opening the RPD online |
In case if you are configuring the SSL for OBIEE 12c – 12.2.1.0.0, Add the following entry to the file <Oracle_home>/bi/modules/oracle.bi.commandline.tools/scripts/data-model-cmd.sh
TRUST_STORE=”<Oracle_Home>/ssl/obiee12c.jks" TRUST_STORE_PW="Clearpeaks123" |
Conclusion
Configuring SSL in OBIEE 12c is quite a long and tedious process since it involves multiple restarts that may fail if the certificates are not properly imported to the keystore. Always make sure the server ports to be configured for OBIEE SSL are open and available for clients.
Some organization may not use the intermediate certificates. In such cases, the root and server certificates are sufficient to perform this configuration. Last but not least, make sure the keystore directory has apt permissions set for the BI system to access the keystore and certificates.
Click here if you would you like to know more about how to configurate SSL for OBIEE.