30 Mar 2023 Efficient Azure Blob Storage Fetching with NiFi
NiFi is definitely in fashion, with more and more organisations embracing it as their data movement platform (in most cases thanks to the enterprise-ready Cloudera Flow Management offering, available in both the Cloudera Private or Public Cloud form factors).
Here at ClearPeaks we’ve been doing some really cool stuff with NiFi for our customers, but it’s hard for our team to find the time to share their knowledge. Nevertheless, we’ve managed to find a few moments to put together some NiFi articles for our blog.
In today’s post, we’re going to run through an alternative way of using NiFi to fetch data from Azure Blob Storage (the Azure data lake) that, from a NiFi point of view, is more efficient than the default option.
Let’s start by looking at the default approach for reading data from Azure Blob Storage in NiFi, which is based on using the ListAzureBlobStorage processor together with FetchAzureBlobStorage processor. The first processor frequently lists blobs in an Azure Storage container for added or updated objects, and the details of the listing are attached to an empty FlowFile that can be passed to the second processor, which fetches the data.
While this approach works well enough, we need to understand what is happening under the hood. As we said above, the first processor frequently lists blobs in an Azure Storage container, so this processor will be listing for new or updated objects as often as scheduled (and depending on the number of objects in the container this can take some time), using compute resources which, in some scenarios (for example, when new objects appear infrequently) are wasted, as the processor keeps listing the same data over and over again.
Our customer was concerned about this waste of resources and wanted to optimise the approach to employ minimum resources on useless operations (since our customer had a small cluster on public cloud and wanted to use the smallest cluster possible to save on cloud costs).
We started thinking of alternative approaches to optimise how to fetch data from Azure Blob Storage in NiFi. Our first idea was to leverage an Azure function triggered by Azure Blob Storage events, discussed here. In this approach, an Azure function is run every time a file is added or updated in Blob Storage, and we would need to code the function (for example, in Python) to send the file as an HTTP request to NiFi.
This approach is conceptually like an implementation we did for another customer in a Google Cloud project, but it requires creating the function code – and our customer didn’t want to code anything outside NiFi.
The second idea was inspired by Snowflake’s Snowpipe approach on Azure. Essentially, we configure an Azure Storage Queue as the handler for the Azure Event Grids to which Azure Storage events are sent; then we get NiFi to read from the Storage Queue with the GetAzureQueueStorage processor.

From a NiFi perspective, this approach, i.e., listening to a queue, is more efficient than constantly listing a storage container.
Below you can see the exact steps you need to follow to implement this approach. All initial steps must be done on the Azure side with the Azure CLI:
1. Enable the Event Grid Resource Provider in the Azure Account:
az provider register --namespace Microsoft.EventGrid
az provider show --namespace Microsoft.EventGrid --query "registrationState"
2. Create a Storage Account for the Storage Queue:
az storage account create --resource-group --name --sku Standard_LRS --location --kind StorageV2
3. Create a Storage Queue:
az storage queue create --name --account-name
4. Export the Storage Account and Queue IDs for reference (the data_storage_account_name is where the new data objects arrive):
export storageid=$(az storage account show --name  --resource-group  --query id --output tsv)
export queuestorageid=$(az storage account show –name  --resource-group  --query id –output tsv)
export queueid="$queuestorageid/queueservices/default/queues/"
5. Install the Event Grid Extension:
az extension add --name eventgrid
6. Create the Event Grid Subscription:
az eventgrid event-subscription create \
--source-resource-id $storageid \
--name  --endpoint-type storagequeue \
--endpoint $queueid \
--advanced-filter data.api stringin CopyBlob PutBlob PutBlockList FlushWithClose
Note that right now we are subscribing to the entire data storage account, so we will get a message in the queue for any blob created there. If we want to limit it to, for example, only a certain container within the storage account, we could add an additional advanced filter like “–advanced-filter data.url StringBeginsWith https://<data_storage_account_name>.blob.core.windows.net/<container_name>/”
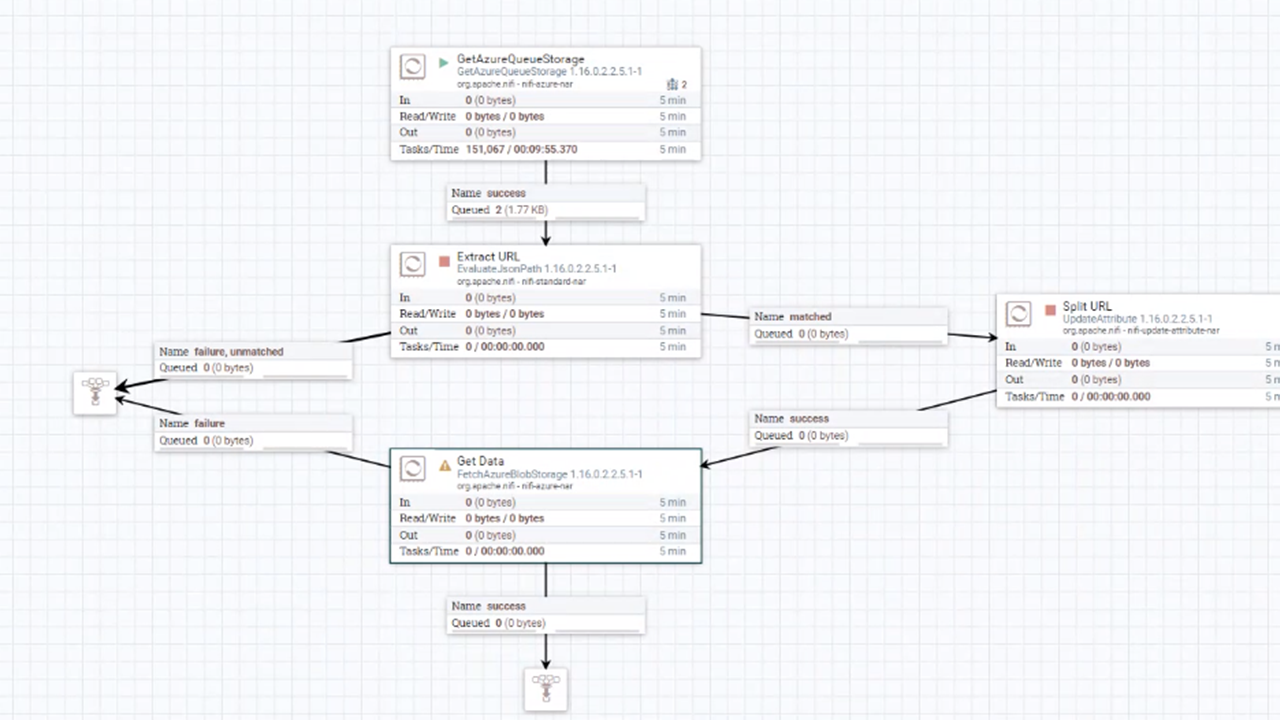
7. Finally, configure a GetAzureQueueStorage processor accordingly in NiFi. Note that after getting the message, we must extract the URL that points to the new object and then we can use FetchAzureBlobStorage to fetch the actual file. To do that, we can use an EvaluateJSONPath processor to extract the URL, and then an UpdateAttribute processor to prepare the attributes for the fetcher.
And that’s all you need! Happy (and efficient) Azure Blob Storage fetching! We hope you have enjoyed this blog and found it useful.
Here at ClearPeaks, we are experts in NiFi and the entire Cloudera stack, as well as Azure, AWS, Google Cloud Platform, and Oracle Cloud. If you require help with any of these platforms, don’t hesitate to contact us and our team of certified experts will be happy to help you!
