19 Dec 2022 Exploring Cloudera Data Flow on AWS
In the first part of this series we demonstrated how to deploy a Cloudera Data Platform Public Cloud Environment on AWS and leverage the DataHub we deployed previously to build a NiFi flow that streams real-time data into the data lake. We also visualised this data in real time with rich, intuitive dashboards built on Data Visualization – and all in the same environment in the public cloud.
Today we will take it a step further and deploy these flows on Cloudera DataFlow Public Cloud, which is a data service (previously called Data Experience) in CDP Public Cloud.
We will perform multiple deployments of the same NiFi flow that we built in the previous blog post in a matter of minutes, creating KPIs to monitor these flows and leveraging the power of the cloud for auto-scaling and fast provisioning.
Cloudera Data Flow for Public Cloud (CDF-PC)
Powered by Apache NiFi on Kubernetes, Cloudera DataFlow for Public Cloud (CDF-PC) is a cloud-native data distribution solution: users can connect to any data source, ingest and process their data, and distribute it downstream. The data distribution flows can be version-controlled and deployed from a central catalogue to auto-scaling Kubernetes clusters. Additionally, KPIs can be defined to track important metrics to monitor flow deployments from a central dashboard.
CDF PUC Architecture
Cloudera DataFlow is two-tier, where the flow deployments that process the data are provisioned in a CDP environment that corresponds to the infrastructure in the cloud provider account, while product capabilities like the Dashboard, Flow Catalog, and Environment Management are hosted on the CDP Control Plane.
A Kubernetes cluster, Kubernetes Operators, and the DataFlow workload application in the cloud account are all created and configured by DataFlow when we enable it for one of our registered CDP environments.
Users can introduce flow definitions into an environment after DataFlow has been successfully enabled for it. Deploying a flow definition creates a dedicated NiFi cluster on Kubernetes, allowing us to treat NiFi flows as isolated deployments.
Flow deployments process data in our cloud account while running the NiFi flow logic. As a result, the CDP Control Plane is not traversed by data that is being processed by a flow deployment.
The Control Plane, where the Dashboard is shown, receives heartbeats from flow deployments that provide data on the health and performance of the system:
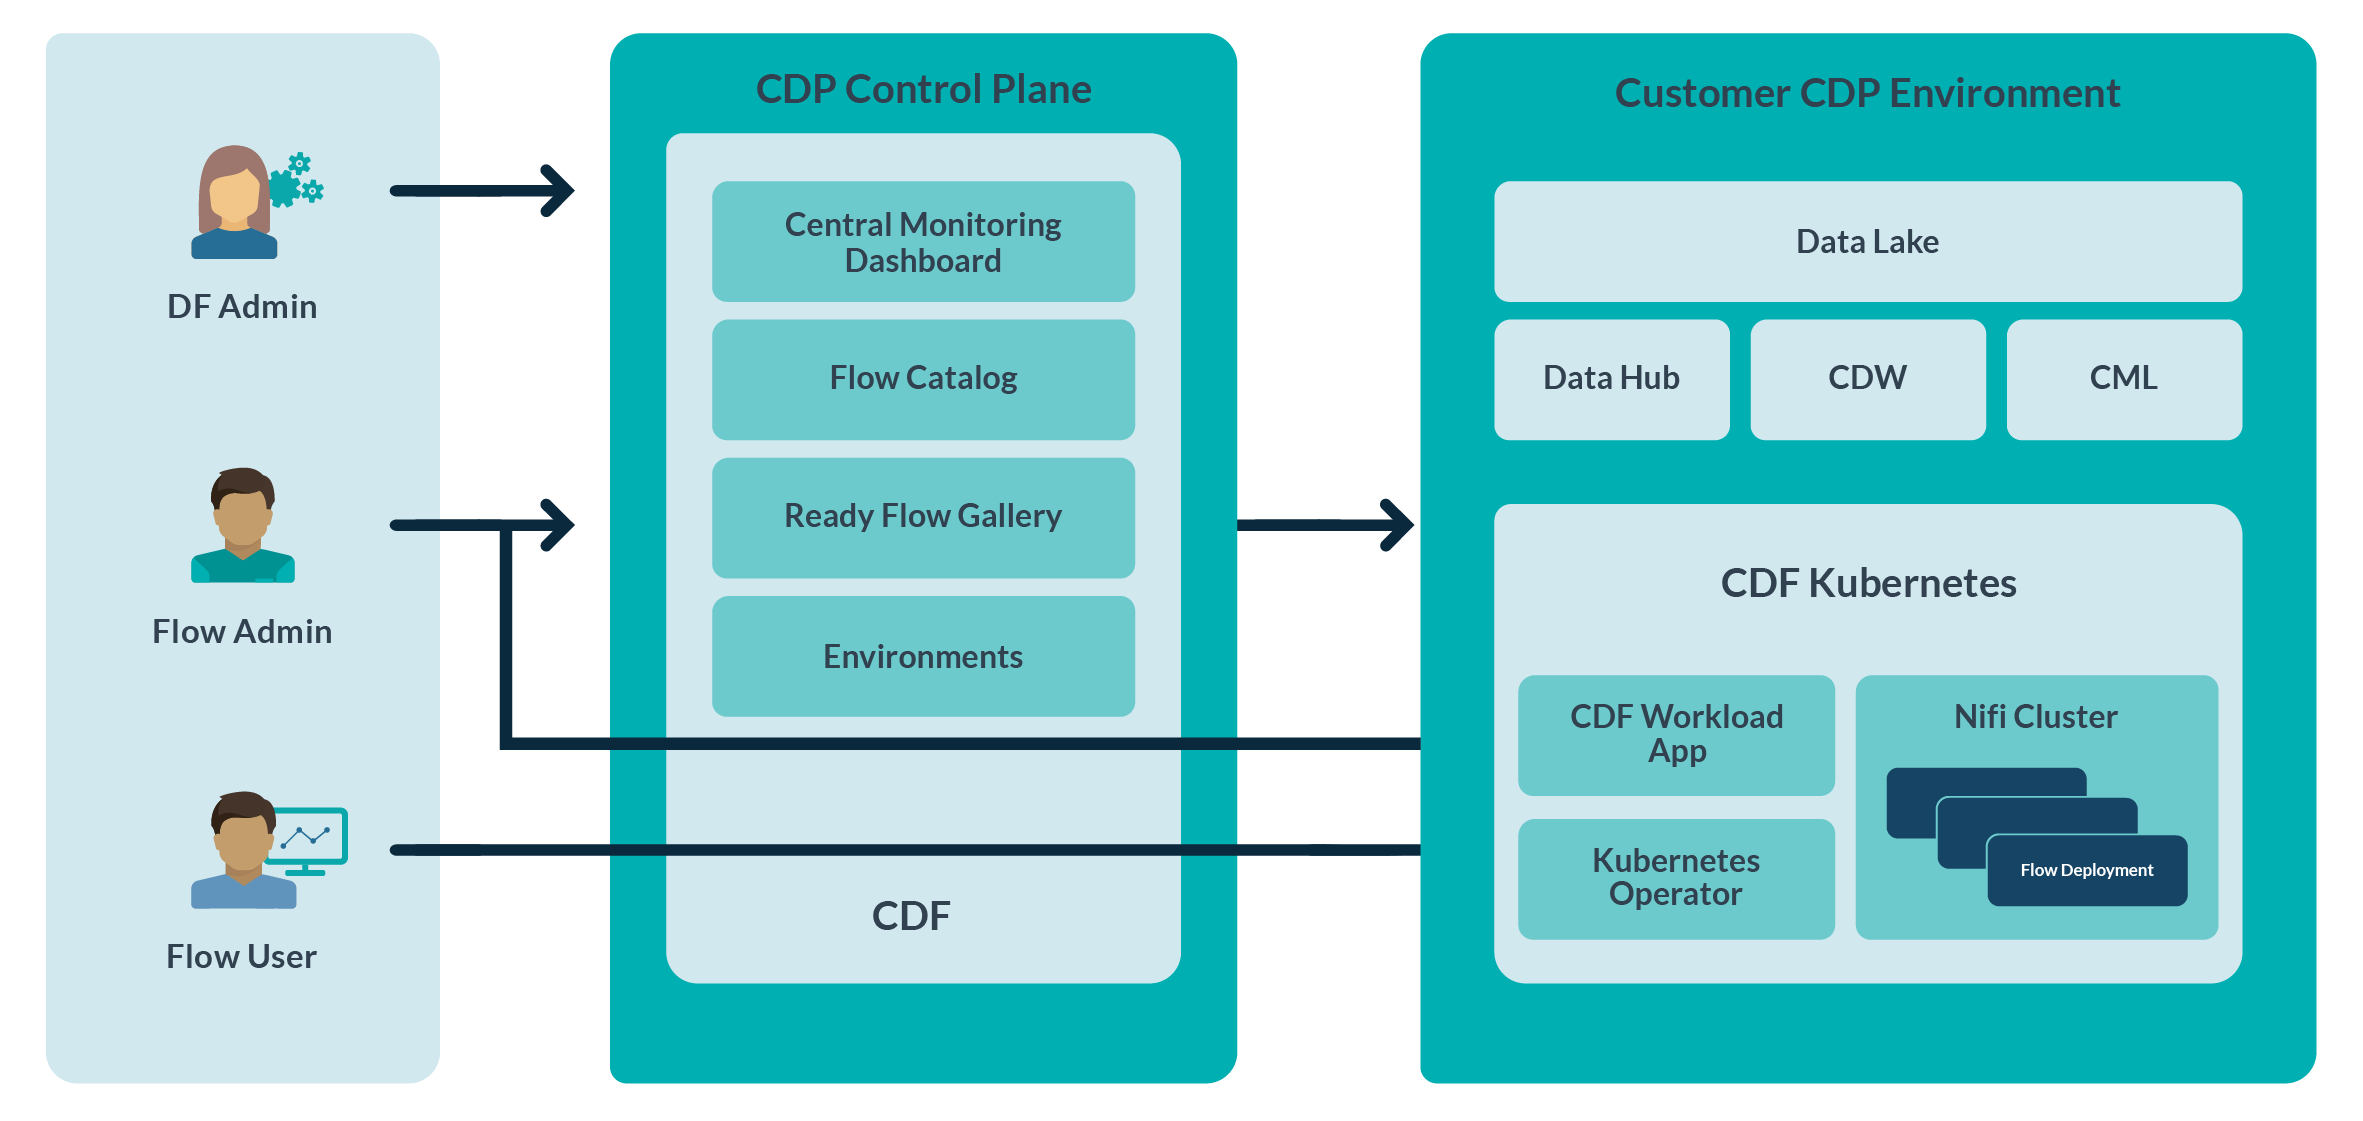
Figure 1: Architecture – Cloudera Data Flow Public Cloud
Use Case
For this blog post we will refer to the use case shown below:
- The NiFi distribution flow will pull data from a REST endpoint at blockchain.com to fetch real-time order book info for multiple cryptocurrency symbols.
- The NiFi flow will perform routing, splitting, and merging, before delivering data directly to the cloud provider storage, in our case S3 buckets (AWS).
- Create an external Hive table using a Virtual Warehouse pointing to the S3 location and visualise this data via Data Analytics Studio (DAS).
- Visualise the data using the Data Visualization service – that’s not covered here, but it is in the previous blog post in this series.
Role-Based User Authorisation
Before we begin with DataFlow, we need to provide the right set of permissions to our CDP users.
Below you can see the various roles related to DataFlow in CDP PUC:
- DFCatalogViewer: enables the user to view and search flow definitions and ReadyFlows.
- DFCatalogAdmin: enables the user to import and manage flow definitions in the DataFlow Catalog and add ReadyFlows to the DataFlow Catalog.
- DFAdmin: enables the user to manage the lifecycle of a DataFlow environment.
- DFFlowAdmin: enables the user to manage flow deployments and deploy flow definitions.
- DFFlowUser: enables the user to view, search, and monitor deployed flows.
These roles can be found by navigating to Environments > Actions > Manage Access:
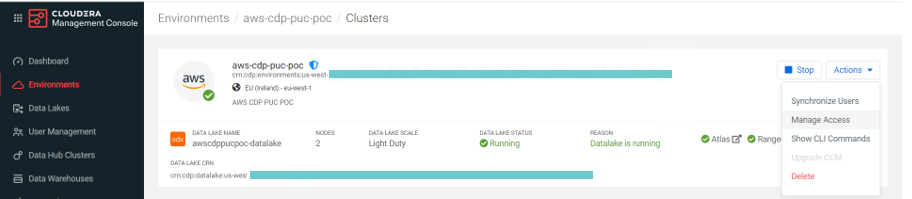
Figure 2: Manage Access
CDF PUC Environment
Next, we need to enable our environment for DataFlow. We can do this via the UI or CLI; in this blog post we will use the UI.
We navigate to the DataFlow service from the management console and enable it via Environments > AWS environment name > Manage DataFlow > Actions > Enable DataFlow:

Figure 3: Enable CDF
On the Enable DataFlow page, we can configure our deployment by selecting our desired capacity, networking options, Kubernetes API Server Endpoint Access, and Tags.
While it is not the ideal configuration, we will keep it simple for this blog post and enable a public endpoint for our DataFlow deployment with minimal Kubernetes nodes and a limited auto-scale capacity. Of course, we fully understand enterprise security needs in real life and can deal with them by deploying with private endpoints and private subnets.
Below are the configurations we chose for our DataFlow service:
- Capacity : Minimum: 3, Maximum: 3
- Worker Node Subnets : Any
- Enable Public Endpoint : Yes
- Load Balancer Subnets : Any
- Keep the other options as default.
For more detailed information, please refer to the step-by-step guide in the official documentation.
Enabling the environment will take from about 45 minutes to an hour. Once our environment has been enabled, we can view the details and monitor its health immediately using the Details tab:
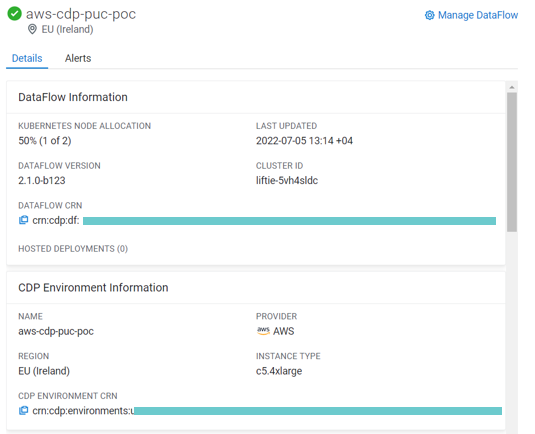
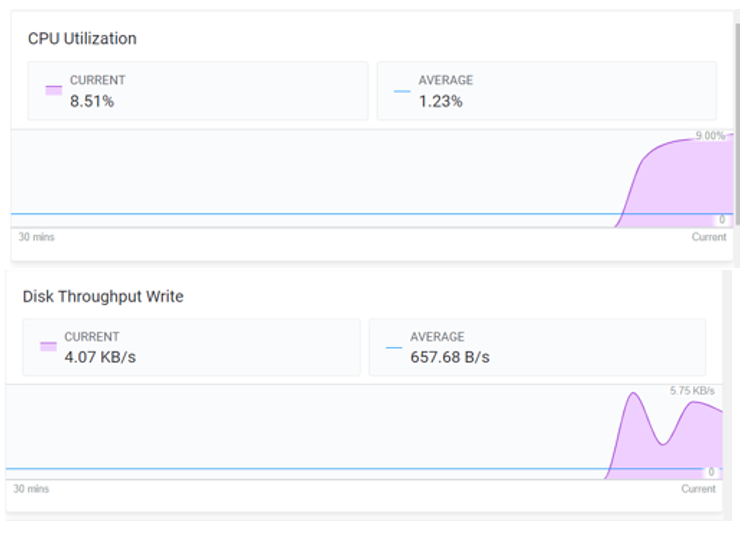
Figure 4: DataFlow Information and Metrics
Now that the environment is enabled and deployed, we can proceed with flow deployment:
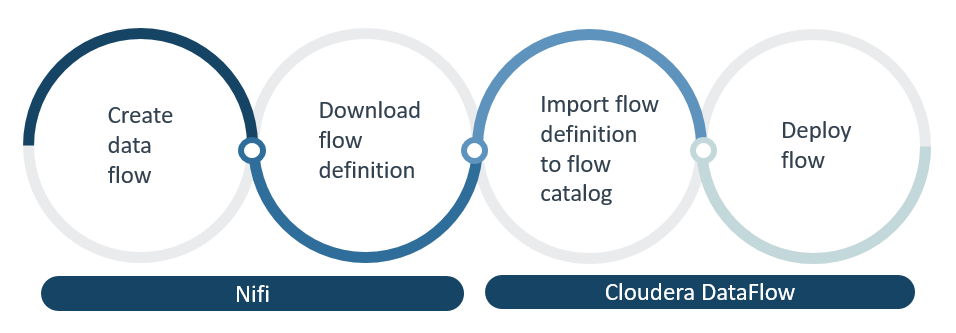
Figure 5: DataFlow Lifecycle
Next, we’ll go through each of the steps in the DataFlow lifecycle.
Create the DataFlow
Our DataFlow is already ready from the previous exercise, but we will make one change so as to interact directly with the cloud provider instead of the CDP components. We’ll replace PutHive3Streaming with the PutS3Object processor in order to store data directly into the S3 bucket. The idea is to create an external table on top of the S3 path and visualise it in the existing dashboard in Data Visualization.
Back to our use case, in the PutS3Object processor we provide the path in the bucket field and provide the access key ID and secret access key of the user with permission to store data in this S3 bucket. This can be retrieved from the AWS IAM console:
- Bucket : {bucketName}/data/warehouse/tablespace/external/hive
- Region : EU (Ireland)
- Access Key ID : {From AWS IAM console}
- Secret Access Key : {From AWS IAM console}
We also add the MergeRecord processor to merge single flow files into a bigger flow file to avoid small file problems, and the ConvertRecord processor to convert the flow files from JSON to Parquet.
You can refer to and download the flow definition here.
Optimise NiFi Flow for DataFlow Deployment
Cloudera DataFlow allows the deployment of NiFi flows built anywhere, but for it to work optimally, certain flow definition best practices must be followed. They are detailed in the official guide.
Let’s check that our flow has followed the best practices.
Flow Isolation
We ensure our flow is isolated from other flows by including it inside a process group called ‘Crypto Demo_withS3’:

Scope of Controller Services
We define all controller services within the scope of the process group so that whenever we download a flow definition, any controller services that are defined outside our process group are not exported with the definition.
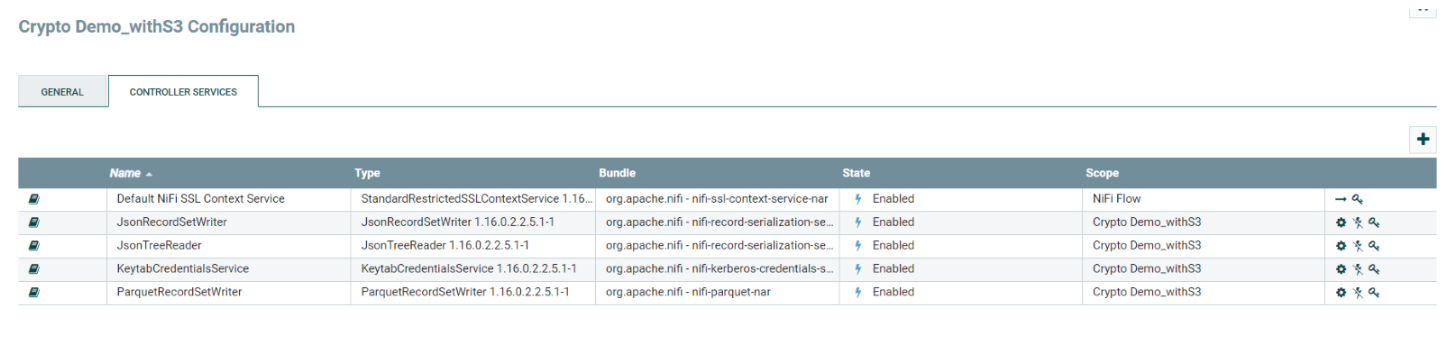
The sole exception is the default NiFi SSLContextService, which is established as an external controller separate from the process group. This is because DataFlow automatically establishes a new SSLContextService in the root process group with the necessary details of the target environment at the time of deployment.
Parametrisation
We ensure that our process group is portable by parameterising all the processors and controller services configurations.
We create a parameter context called ‘Crypto_demo_parameters’ and set it as the process group parameter context. Then we define all parameters required by the flow in this parameter context and reference them in the individual processors.
There are other considerations to be taken into account while developing flow definitions, such as inter-process group communication, configuring inbound connection support, using the CDP environment parameter, etc., which are not relevant to this example. Nevertheless, you can check out the exhaustive list in the official documentation.
Download Flow Definition
Once the flow is ready, we download the flow definition. A flow definition represents the data flow logic which was developed in Apache NiFi.
We download by right-clicking on the process group and selecting Download Flow Definition: this downloads a JSON file that can then be imported into the DataFlow Catalog.
Importing Flows to the Flow Catalog
The Flow Catalog is where we can browse, discover, and manage flow definition versions. It is also where we can deploy and reuse our flow definitions across multiple environments.
In the DataFlow service, we import the JSON file from Catalog > Import Flow Definiton:

Figure 6: Import Flow Definition
Deploy Flow Definition
From the Catalog, select the Bitcoin_orderbook_ingest flow and click on Deploy. It will ask us to select the environment where we want to deploy the flow, so we select our AWS environment and proceed. This opens the deployment wizard, where first we give the deployment a unique name for identification purposes.
Now we’ll go through the main steps of the wizard and describe the settings that we chose for our deployment.
NiFi Configuration
We select the NiFi runtime version we want to deploy our flow in, and leave Autostart Behavior enabled as we want our flow to start as soon as it’s deployed. We keep the other info as default, as there’s neither an inbound connection in our flow nor a custom NAR:
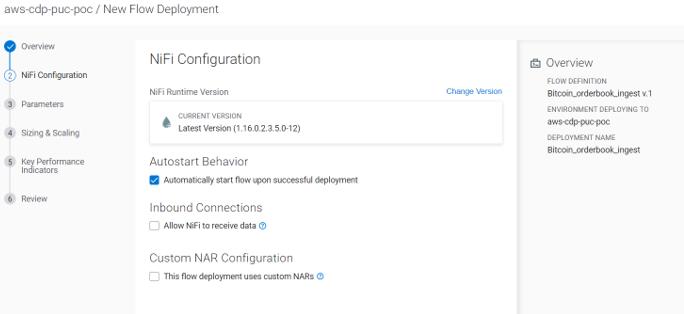
Figure 7: NiFi Configuration Tab
Parameters
DataFlow detects all the parameters defined in the parameter context and allows the user to provide runtime values for these parameters. This offers a great deal of flexibility in terms of deploying the same flow with different parameters in isolated environments.
The wizard also detects if a parameter is file-based, and if so, allows the uploading of files which it will deploy locally on the server where the flow will be deployed.
Sizing and Scaling
We select ‘extra small’ as the size of the NiFi cluster we want our flow to run in. The options are available in “t-shirt sizes”, i.e. XS, S, M, and L.
We also select auto-scaling and the min and max nodes.
KPIs
One of the best features of DataFlow in Public Cloud is the introduction of KPIs. KPIs are a critical monitoring tool in CDF to provide a real-time view of our DataFlow performance.
We’ll define two KPIs in our case: one to track the input data in the entire flow, and the other to track the flow files queued on a specific connection. We’ll also define an alert for both KPIs to notify us if the input data is less than 1 MB/sec for at least 5 minutes, or if there are more than 10 flow files in the specified connection for at least 5 minutes.

Figure 8: Create KPIs
This is a much-welcomed feature since it wasn’t particularly easy to implement before!
Review and Deploy
Next, it’s time to review the flow and deploy it into production.
After the flow has been deployed we can view it from the central dashboard. The flow was auto-started as we selected that option during the deployment.

Figure 9: Flow Deployed
We can also track the metrics we defined during deployment, or create new KPIs.
Apart from the defined KPIs, a set of predefined metrics such as CPU and core use are also tracked and can be monitored in the System Metrics section:
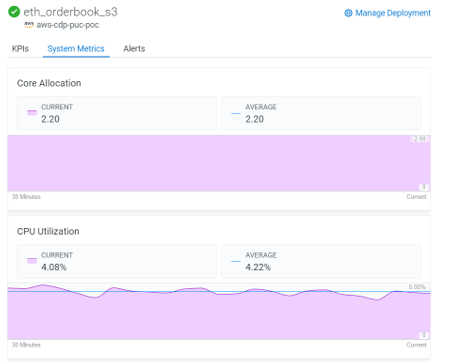
Figure 10: System Metrics
Another interesting feature is that once the flow has been deployed, DataFlow allows us to navigate to the deployed NiFi cluster and view the NiFi flow in the UI. The is helpful in cases where deeper analysis is required for issues in the flow, like in “traditional” NiFi.
Multi Deployment
Another interesting possibility here is to deploy the same flow from the Catalog into multiple flows which ingest data from different APIs for different cryptocurrency symbols such as ETH, MATIC and APE.
We simply change the parameter during every deployment to accommodate different symbols, define cluster size as required, and customise KPIs for the specific deployment:
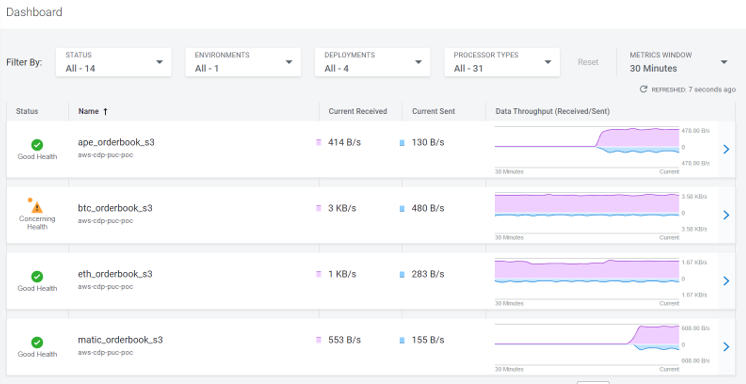
Figure 11: Multiple CDF Deployments
This allows us to have multiple deployments for the same flow, where each deployed flow is isolated from the others and can be tracked separately. We can also view the tracked KPIs for each DataFlow individually.
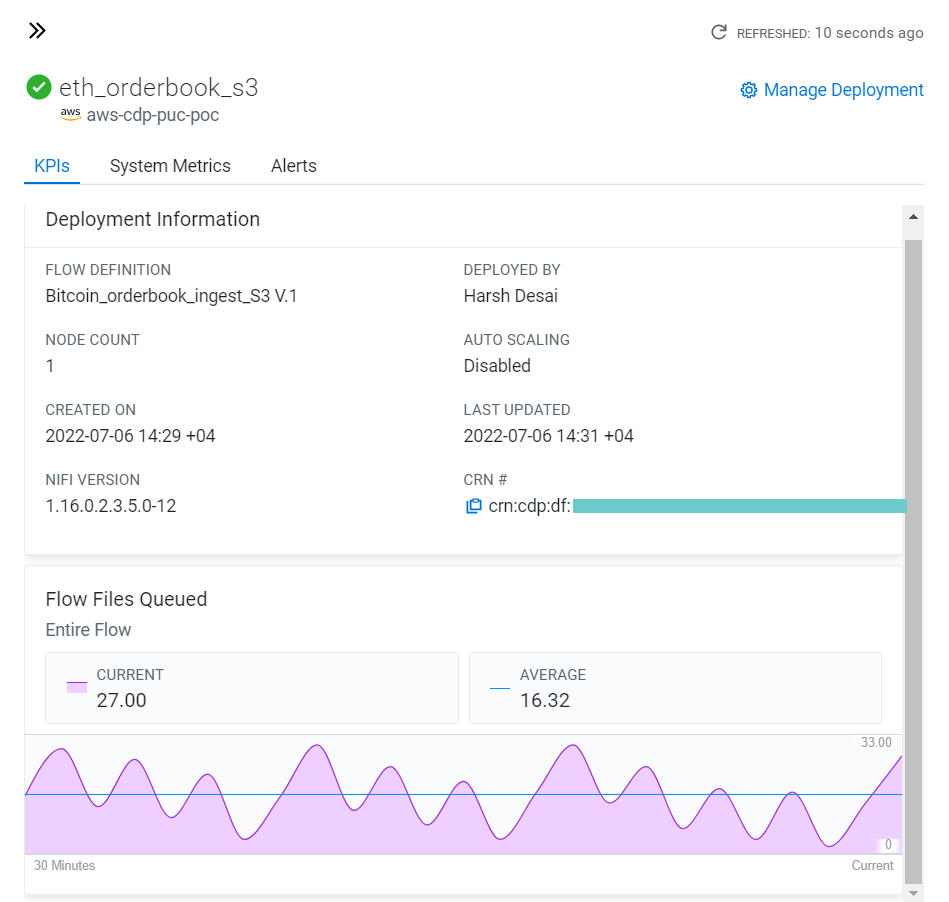
Figure 12: KPI monitoring
Querying the Order Book Data
Now that the flow is running, we can try to query the target to see what the result looks like. First we create an external table pointing to the S3 location where the DataFlows are ingesting data, then we start the Virtual Warehouse we created last time in the Cloudera Data Warehouse service and access DAS to create the table:
CREATE EXTERNAL TABLE order_book_external (
operation string,
symbol string,
entry_date string,
px double,
qty double,
num double
)
STORED AS PARQUET;
Querying the table, we see the various cryptocurrency symbols that are ingested by the DataFlow deployments:
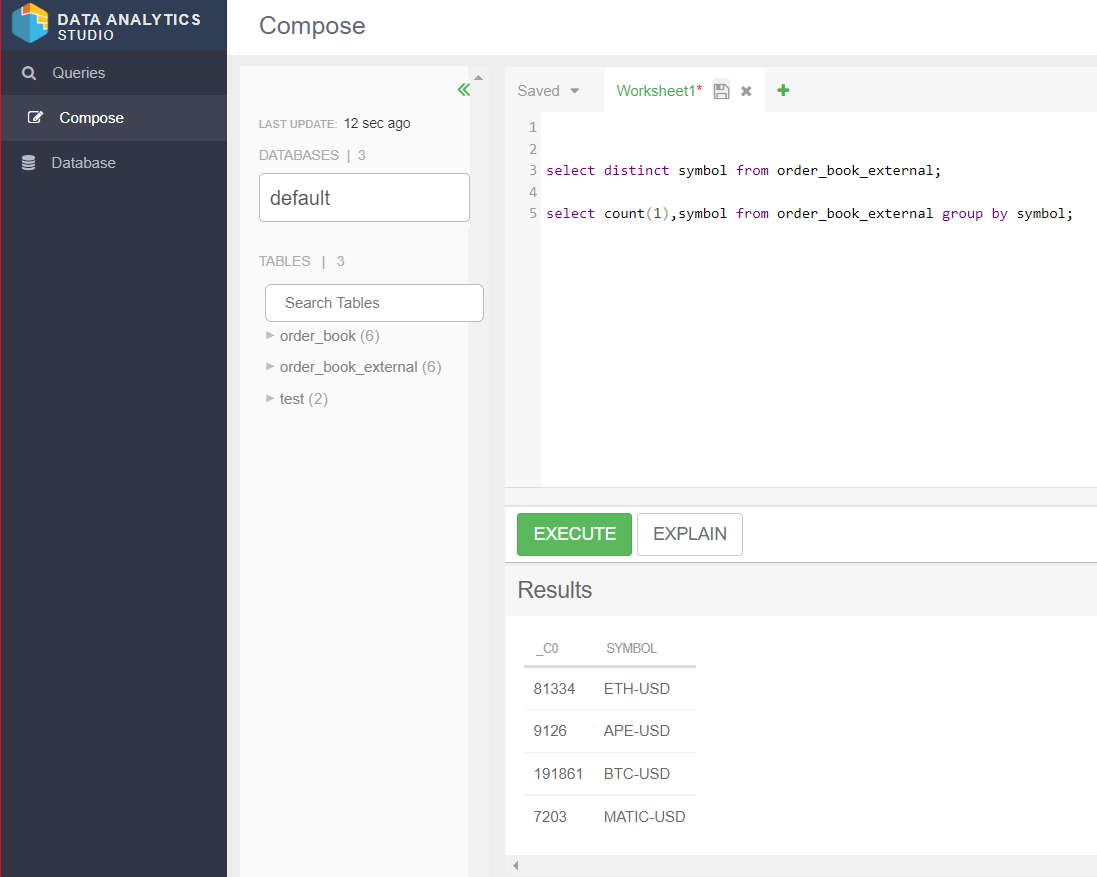
Figure 13: DAS
Now we can change the table in the previously created Data Visualization dashboard to visualise the data ingested by the DataFlows. The how-to can be referred to in the previous blog post in this series.
Behind the Scenes
Finally, now that our flows are deployed and running, we can have a look at what resources were provisioned on our cloud provider during our activity.
So, to enable the DataFlow service with the capacity of 3 Kubernetes nodes, CDP would deploy an EKS cluster on AWS, with 5 nodes that would spin 5 EC2 instances: 1 for the CDF workload application, 1 for the Kubernetes Controller and 3 nodes for the NiFi cluster.
We can validate this on the AWS EC2 instance dashboard:

Figure 14: Resources in AWS
Conclusion
In this article we have enabled and deployed Cloudera DataFlow for Public Cloud on AWS. We tweaked a NiFi flow we had previously created to interact directly with S3 storage and deployed this to the DataFlow service. We also leveraged parametrisation to simulate a multi-flow deployment by changing the value of the parameters defined in the flow. If you want to see this in action, watch our YouTube video!
In addition, we could monitor the health of the flows and the cluster using the KPIs and metrics facilitated by DataFlow.
We have only just scratched the surface of this really powerful Cloudera tool, and are confident of being able to leverage it for universal data distribution implementations from edge to cloud in our further projects.
We hope you found this blog post useful! Here at ClearPeaks our expert and certified Cloudera consultants can architect and deploy the right set of tools for your business to leverage. Please contact us if you’d like to know more about what we can do for you.
