07 Feb 2024 DBT and Snowflake Implementation for Data Transformation
Businesses are constantly struggling to manage and process enormous amounts of data effectively in today’s data-driven world. By orchestrating workflows and turning raw data into insightful information, data engineers play a crucial part in meeting this challenge, and a robust, adaptable stack of technologies will help them to accomplish this goal.
In this blog post, we will develop a data transformation process solution for a telecom customer using a sample dataset. The sample dataset from Maven Analytics is composed of 2 CSV files, with churn customer data relating to a fictional telecom company. This dataset resembles the typical dataset that our customer has in their database. The purpose of the solution is to provide summarised views for use in a BI tool, which will improve the speed performance of the final dataset.
To solve the problem that our customer has, we will examine the trifecta of data engineering tools — the Airflow stack for orchestrating data pipelines, DBT for data transformations, and Snowflake as the data warehouse — that has been gaining enormous industry popularity. With this combination, data engineers have all the tools they need to organise their data workflows, promote teamwork, and ultimately produce actionable insights that will lead to business growth.
Technologies
Airflow: A Data Orchestration Powerhouse
Apache Airflow is an open-source platform for authoring, scheduling, and monitoring complex data workflows programmatically. Its strength is its ability to handle complex dependencies, making it ideal for orchestrating data pipelines with multiple tasks and workflows. What’s more, integration with various data sources and destinations is a breeze thanks to Airflow’s rich ecosystem of connectors and plugins.
One of Airflow’s key features is its DAGs (Directed Acyclic Graphs) architecture, visually representing the workflow and its dependencies, allowing data engineers to gain a clear understanding of the pipeline’s structure, making it easier to identify and resolve any bottlenecks or other issues that might arise during processing.
Moreover, Airflow enhances team collaboration by offering a unified platform where developers, data scientists, and other stakeholders can contribute and share their workflows, ensuring transparency and improving the efficiency of data engineering processes.
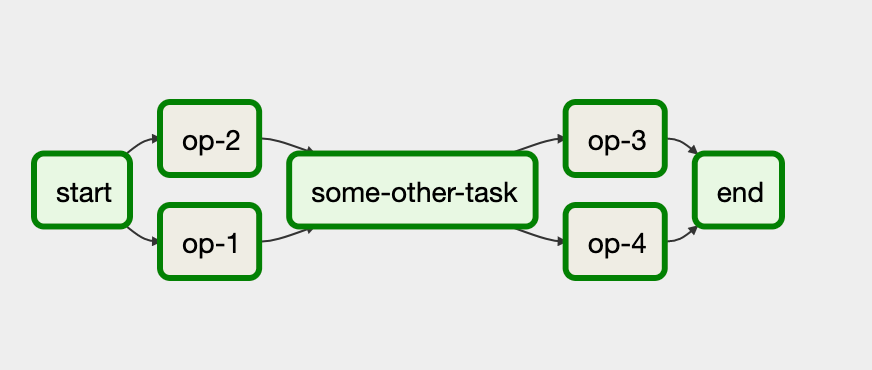
Figure 1: DAG example (Source: https://dev.to/arunkc/get-started-with-apache-airflow-1218).
DBT: Transforming Data
In the realm of data transformations, DBT (data build tool) has emerged as a game changer. It is an open-source tool that enables data engineers and analysts to transform data using SQL queries whilst following best practices in software engineering.
DBT’s implementation of version control for data transformations is one of its most significant advantages. Data engineers can use DBT to treat transformations as code and manage them via Git, ensuring that changes are well-documented, reproducible, and easy to roll back if necessary, enhancing both the reliability and predictability of the data transformation process.
DBT supports modularisation alongside version control, enabling engineers to break complex transformations down into smaller, more manageable units known as DBT models, promoting reusability and also simplifying the maintenance of the data transformation logic, reducing the chances of errors and inconsistencies.
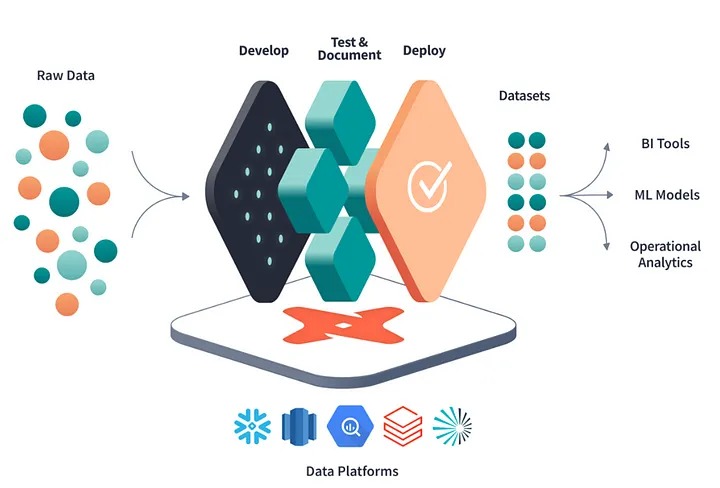
Figure 2: DBT Modus Operandi (Source: https://www.getdbt.com/).
Snowflake: Modern Data Warehouse Empowerment
Traditional data warehousing solutions often struggle to keep up with the demands of modern data processing as the data engineering landscape evolves. In this context Snowflake, a cloud-native data warehouse, has become increasingly popular thanks to its exceptional performance, scalability, and concurrency.
Snowflake’s innovative architecture separates storage and compute, allowing engineers to scale resources independently as necessary. This elasticity ensures peak workload performance without incurring unnecessary costs during idle periods.
Furthermore, Snowflake’s multi-cluster architecture allows for seamless simultaneous processing, making it an ideal choice for organisations with multiple teams running workflows simultaneously. What’s more, its built-in support for semi-structured formats like JSON and Parquet improves its ability to handle diverse and complex data sources.
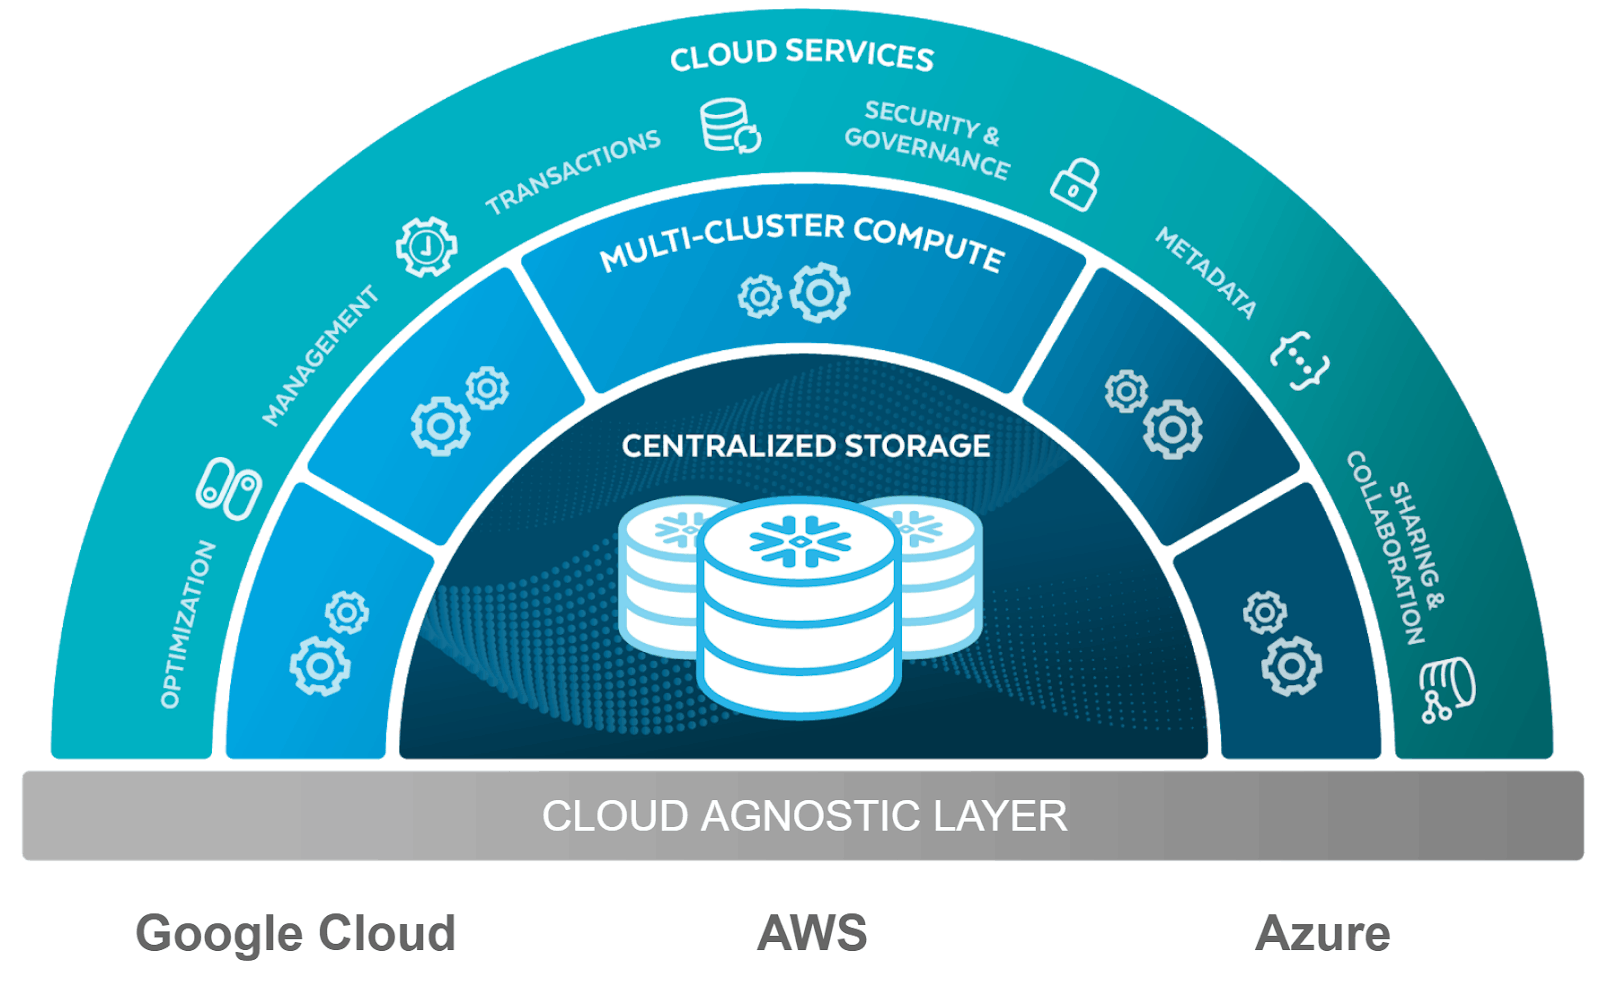
Figure 3: Snowflake layer structure (Source: https://www.snowflake.com/en/).
Use Case
In this use case, we’ll look at how the powerful combination of Apache Airflow, DBT, and Snowflake can be used to build a data pipeline. Our goal is to load raw data into Snowflake, process it using DBT transformations, and then deliver clean, ready-to-use datasets for BI visualisations. This workflow will demonstrate the smooth integration of these cutting-edge data engineering technologies from start to finish.
You can see the entire project at https://github.com/ClearPeaks/poc-dbt-airflow-snowflake.
We decided to use a sample dataset from Maven Analytics, composed of two CSV files, containing churn customer data from a fictitious telecoms company. The main CSV file has 38 columns including personal, contractual and revenue data about every customer in the state of California; a total of 7,043 customers are listed. The second CSV file is composed of just two columns, one for the various customer zip codes from the preceding file and the other detailing the population numbers for each zip code.

Figure 4: Architecture.
Requirements
This article assumes that you are familiar with Snowflake, DBT and Airflow, as well as database management, containerisation, and DAG execution. You will also need the following items:
- Snowflake account
- Docker Desktop
- Python 3
- Astro CLI
To install Astro CLI, consult this link.
Setting Up the Snowflake Environment
First, you need a data platform to set up the warehouse that is going to host the data to be transformed. In our case we will be using Snowflake because it’s an ideal place to perform an ELT process.
Starting from scratch, you should ideally create a trial account with the Enterprise edition, which includes the ACCOUNTADMIN role. The choice of cloud provider and region are up to you.
The raw data will be loaded into Snowflake by Airflow. First, we need to set up a database, a warehouse, and a specific role responsible for all the transformations within Snowflake. It’s important to note that, in Snowflake, the term ‘warehouse’ refers uniquely to a cluster of computational resources tasked with performing operations on the data, such as executing SQL functions, DML operations, or stored procedures, rather than its conventional meaning. This setup will be executed using worksheets in the Snowflake UI.
Once you are logged into Snowflake, go to Worksheets in the left menu, and then click on + in the upper right side of the screen to create a new worksheet where you can run your queries.
Initiate your setup by executing the following SQL queries:
1.	CREATE WAREHOUSE COMPUTE_WH;
2.	CREATE DATABASE POC_DBT_AIRFLOW;
3.	CREATE ROLE INTERNALPOC;
Once this step is finished, you are ready to ingest some data.
Configuring the Connection Between Airflow, DBT and Snowflake
First, set up the project’s directory structure and then initialise the Astro project. Open the terminal and execute the following commands:
1.	mkdir poc_dbt_airflow_snowflake && cd poc_dbt_airflow_snowflake
2.	astro dev init
This step will create the files necessary to run Airflow in an empty local directory. Once the Astro project has been created, open the Dockerfile, and add the following lines:
1.	RUN python -m venv dbt_venv && source dbt_venv/bin/activate && \
2.	pip install --no-cache-dir dbt-snowflake && deactivate
The dbt-snowflake package automatically includes dbt-core.
It is essential to include the Snowflake provider and Cosmos in the requirements.txt file to ensure proper integration, so the following lines will need to be added:
1.	# Astro Runtime includes the following pre-installed providers packages: https://docs.astronomer.io/astro/runtime-image-architecture#provider-packages
2.	astronomer-cosmos==1.2.1
3.	apache-airflow-providers-snowflake==5.1.0
Once the Astro project has been configured, the DBT project will need to be configured in order to run it in the Airflow environment. If you already have a DBT project, just create a folder called dbt inside the dags folder. If you are starting a new DBT project, follow the steps below:
- Create a new folder called dbt in the dags folder of the Astro project.
- Create another folder called dbtproject inside the dbt
- Generate a yml file in the dbtproject folder which will be configured later.
- Now create a subdirectory within dbtproject named models. This is where you will store the DBT models that define the transformations to be applied to your raw data.
- The final stage of the setup will be done in the Airflow UI. In the terminal, write the following command:
1. astro dev start
This command will start 4 Docker containers for the different Airflow components:
– Postgres: Airflow metadata database.
– Webserver: Responsible for charging the Airflow UI.
– Scheduler: Responsible for monitoring and triggering the tasks.
– Triggerer: Responsible for triggering deferred tasks.
You will now see the following message:
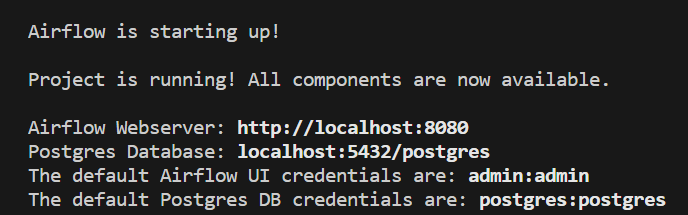
Figure 5: Message when the Astro project starts.
In your browser, use the URL provided for the Airflow Webserver and introduce your credentials.
Go to Admin -> Connections and choose the appropriate connection type, along with the necessary parameters to establish a connection to Snowflake. The parameters needed to connect are:
- Connection Id: Assign a name for the connection.
- Connection Type: Select Snowflake.
- Schema: Specify your schema name.
- Login: Enter your username.
- Password: Enter your password.
- Account: Enter your account identifier.
- Warehouse: Specify the warehouse name.
- Database: Enter the name of your database.
- Region: Indicate your region.
- Role: Enter your Snowflake role.
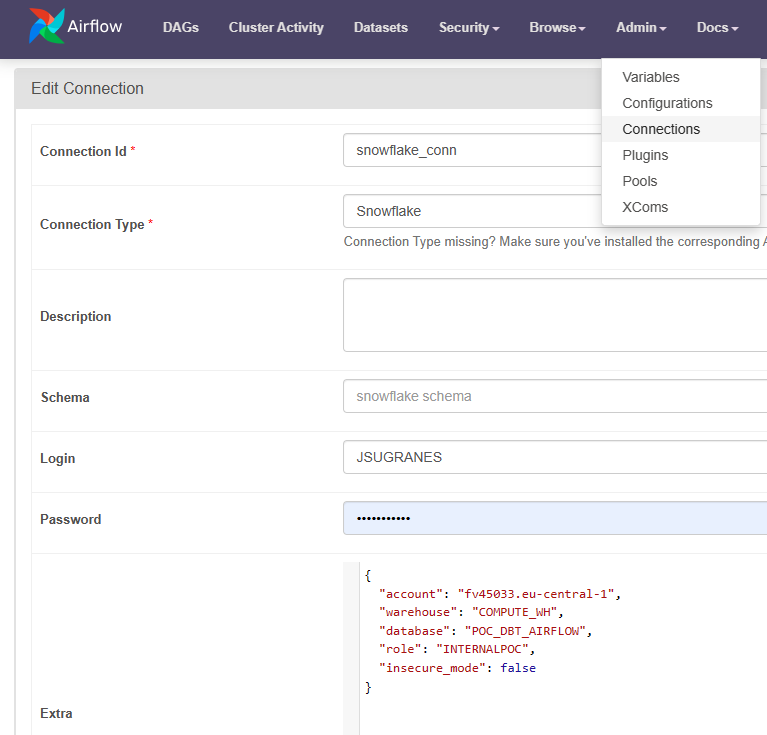
Figure 6: Connection setup in Airflow.
DBT Transformations
As previously mentioned, our focus is on delivering summarised and aggregated views to the BI platforms, facilitating analysis by various business departments. Beyond mere transformations, DBT enables us to construct the database structure in Snowflake. For details on the code used for transformations and macros, please consult the GitHub repository link.
By configuring the dbt_project.yml file in the DBT project alongside a macro file, three schemas will be created in Snowflake. These schemas will store different stages of the data, acting as folders in the Snowflake environment.
- Bronze: Raw data loaded from CSV files with the correct data type.
- Silver: Intermediate stage of dataset; joins and column cleaning.
- Gold: Final dataset stage – the data is now ready to be used in BI tools.
For this use case, complete the dbt_project.yml file with the code below:
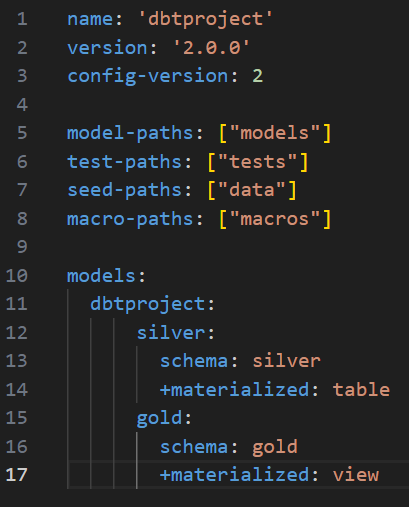
Figure 7: Dbt_project.yml.
Note that the Bronze schema was not mentioned in the configuration file; this is because the Bronze schema is designated as the default schema for loading the models/files in the DAG that will be outlined later. In this case, only the files located in the data folder will be stored within this schema.
You must also include the name of the project, as well as the paths to the folders where you store the different files that will be used in it, like the raw files where you are extracting the data from or the macros. You can also define how you want your models to materialise in Snowflake – whether as a view or a table.
In this use case, we will store the CSV files that serve as the raw data in the data folder, and we will also build two macros, one called generate_schema.sql to create a custom schema where the models of a certain folder will be stored, that works in conjunction with specifying the schema under the folder’s name. The other, called set_query_tag.sql, will create a ‘query tag’ for each query executed in Snowflake, which can be used to analyse spending in the Snowflake account.
The DBT transformations proposed in this use case are briefly discussed below:
– Silver Layer
- Telecoms Customers Churns: This model integrates data from three CSV files, each containing customer IDs. It focuses on consolidating columns related to numbers and customer information, ensuring a unified view of customer churns.
- Zip Code Population: This view mirrors the data found in the telecom_zipcode_population CSV file, presenting population information by zip code.
-Gold Layer
- Full Telecoms Customers View: In this view we join the Telecom customers churns run with the Zip Code population run to consolidate all the information in the dataset in one view.
- Zip Code Information View: In this view we create an intermediate step where we join two CSV files from the dataset, serving as a preparatory step for subsequent aggregated views.
- Unlimited Data Customers View: This view specifically filters for customers who have opted for unlimited data in their internet service plans.
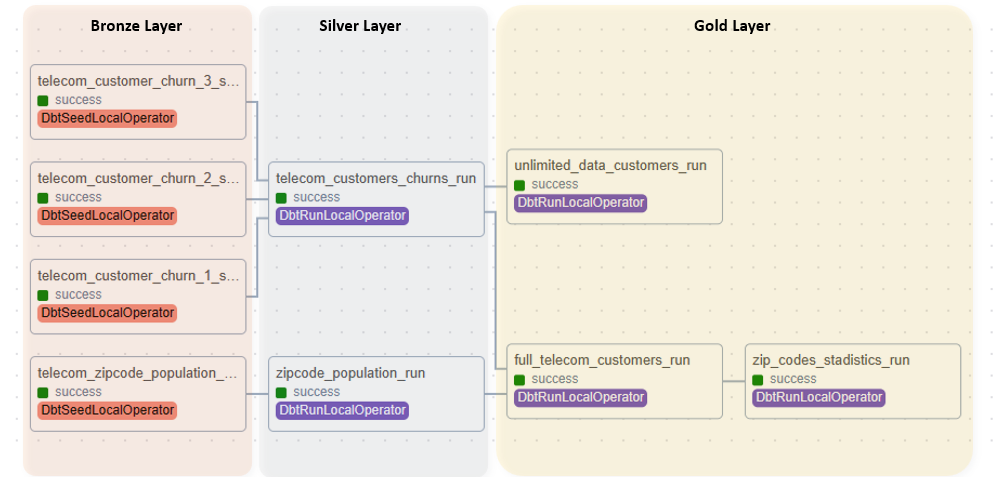
Figure 8: Schemas and model structure.
Airflow DAG
Let’s break down the Airflow DAG code that orchestrates the data transformations with Snowflake and DBT:
1. profile_config = ProfileConfig(profile_name=‘default’,
2.	                         target_name=‘dev’,
3.	                         profile_mapping=SnowflakeUserPasswordProfileMapping(conn_id=‘snowflake_conn’,
4.	                                                    profile_args={
5.	                                                        ‘database’: ‘POC_DBT_AIRFLOW’,
6.	                                                        ‘schema’: ‘BRONZE’
7.	                                                        },
8.	                                                    ))
9.
10. with DAG(
11.	    dag_id=‘poc_dbt_snowflake’,
12.	    start_date=datetime(2023, 10, 30),
13.	    schedule_interval=‘@daily’,
14.	):
15.
16.	    e1 = EmptyOperator(task_id=‘pre_dbt’)
17.
18.	    dbt_tg = DbtTaskGroup(
19.	        project_config=ProjectConfig(‘/usr/local/airflow/dags/dbt/dbtproject’),
20.	        operator_args={‘install_deps’: True},
21.	        execution_config=ExecutionConfig(dbt_executable_path=f’{os.environ['AIRFLOW_HOME']}/dbt_venv/bin/dbt’,),
22.	        profile_config=profile_config
23.	    )
24.
25.	    e2 = EmptyOperator(task_id=‘post_dbt’)
26.
27.	    e1 >> dbt_tg >> e2
Figure 9: DAG Code.
- Profile Configuration: We configure a Snowflake connection profile that includes the target database and schema where DBT transformations will take place.
- DAG Definition: We create an Airflow DAG named py which is scheduled to run daily, starting on October 30, 2023.
- Task Definitions: The DAG consists of three tasks:
- pre_dbt: A placeholder task that can be used for any pre-DBT processing.
- dbt_tg: A custom task group representing the execution of a DBT project, including settings for project location, dependency installation, and Snowflake profile configuration.
- post_dbt: Another placeholder task which can be used for post-DBT processing.
- Task Dependencies: These dependencies are established using the >> operator. The flow is from pre_dbt to dbt_tg and then to post_dbt.
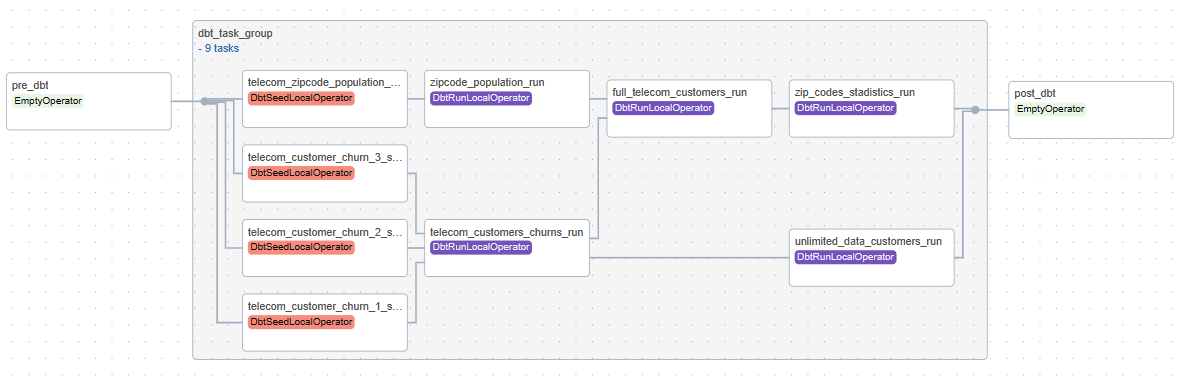
Figure 10: DAG schema structure.
On completing all the transformations, we can see that the folder structures in Snowflake and the local setup are mirror images of each other. This synchronicity is due to the settings specified in the DBT files, particularly the generate_schema.sql macro and the settings within the dbt_project.yml file, as seen in the preceding section. These configurations enable us to seamlessly replicate the project-defined tables and schemas within the Snowflake cloud environment.
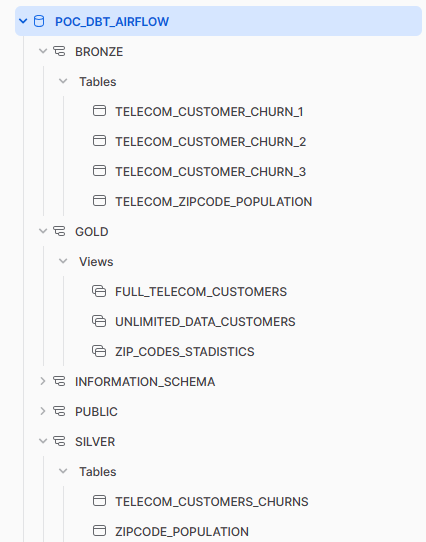
Figure 11: Snowflake structure after DAG has been successfully run.
Lessons Learned and Best Practices
Having completed our PoC successfully, we’ve learned a great deal about best practices with the technologies we used, and we’d love to share these insights and run through the tools we employed in the process.
Best Practices in Airflow
Providers for Tool Orchestration: Providers are used to connect to various third-party tools, enhancing Airflow’s core functionality. They often come with custom configuration options and the ability to deliver notifications about the status of DAGs or tasks. Users also have the option to create and share their own providers with the Airflow community.
Execution Frameworks: Airflow supports two types of executors: local and remote. The local executor is suitable for small-scale deployments and runs task instances in parallel on a single machine. The remote executor, with options like CeleryExecutor and KubernetesExecutor, is ideal for scalability and handling distributed workloads.
ELT Framework: An ELT framework enables the centralisation of data in a chosen platform. Transformations are automated within this platform, saving time and resources. This approach offers greater scalability when compared to the traditional ETL process, particularly when data usage and storage requirements change over time, given that cloud platforms enable easy scaling to meet evolving needs.
Best Practices in DBT
Staging Layer: Set up a staging layer that mirrors the structure of the source data, acting as a bridge between the source and the project components, simplifying maintenance and facilitating updates within this layer rather than throughout the entire project.
Common Table Expressions (CTEs): Leverage CTEs to segment and alias transformation logic, improving query organisation without sacrificing performance. CTEs act as pass-throughs, aiding in troubleshooting and query adjustments.
Use of Directories: Implement and follow specific directory structures and conventions within your DBT project to streamline model configurations, encouraging better organisation and also facilitating the execution of model runs by selecting from specific directory paths.
Ref Function: Use the ref function in DBT to identify dependencies, thereby maintaining model order and lineage clarity. This is invaluable for complex multi-step transformations, ensuring consistent table and view selections.
Testing Feature: Test your models to validate desired transformations and verify source data values, thus ensuring data quality and accuracy.
Best Practices in Snowflake
Standard Ingestion Pattern: Follow the standard ingestion pattern by first uploading data files to a stage, then loading them into a Snowflake transient table or view, and finally transforming the data for storage in a permanent table. Stages act as repositories where data files are temporarily stored before being loaded into a Snowflake table or view. They can be internal (within Snowflake) or external (hosted on an external cloud provider). For handling both structured and unstructured data with greater flexibility, consider adopting an ELT approach. Use COPY commands or Snowpipes for efficient data loading, and use transient tables to detect errors during the process.
Track Task Performance: Use Query Tags to monitor query executions over time. Tagging queries enables the tracking of task performance, helping identify issues and inefficiencies, particularly in multi-step transformations. Set the session query tags at the beginning of queries and unset them at the end for effective tracking.
Resource Management: Optimise auto-suspend policies for virtual warehouses to reduce credit consumption. Determine the auto-suspend time based on user benefits from cached data and the acceptable lag time when starting a virtual warehouse (typically 1-2 seconds). Short auto-suspend times are suitable for warehouses used in data loading and transformations. Implement resource monitors for better control and automatic actions, such as email notifications or warehouse suspension on reaching usage limits.
Budget and Focus: Define your budget and allocate resources strategically, prioritising data loading and transformation. Snowflake provides detailed consumption statistics that can be exported to BI tools to create reports.
Conclusions
The integration of Airflow, DBT and Snowflake using Cosmos was a great success, leveraging the best of each tool:
- Snowflake, a versatile data platform, was ideal for storage and computational purposes.
- DBT, a reliable transformation tool, helped with the tasks we wanted to perform on our dataset through its SQL code.
- Airflow, an orchestration tool for DBT, created complex dependencies between models and tasks.
Our solution, based on this example dataset, fulfils the transformation needs of our customer, and will be deployed to production soon. The version control feature of the solution is a key aspect for them, as the data analytics team will be able to work together on different transformation developments on their various datasets.
For future enhancements, setting up the integration without the need for Cosmos, thus reducing reliance on external tools, would be the next step towards simplifying the project.
Another move forward would be to create a more complex set of task dependencies. For example, implementing various stages in the DAG where the completion of one block of transformations initiates another set, rather than relying solely on date/time triggers, would fully harness the capabilities of a tool like Airflow.
Any questions about this blog post, or need some expert guidance on your data transformation journey? At Clear Peaks we’re dedicated to providing you with the insights and support needed to navigate the complexities of data analytics and transformation tools. Whether you’re looking to simplify your projects, integrate advanced functionalities, or explore the full potential of tools like Snowflake, Airflow, DBT, and more, our team of experts is here to help, so drop us a line today!