
12 Apr 2023 Using an SCD Type 2 Template in IICS
Informatica Intelligent Cloud Services (IICS) offers a variety of data manipulation templates to jumpstart your project. These templates are pre-built mappings that include the common steps and logic required to tackle some typical data integration, cleansing, and warehousing scenarios.
If you haven’t already read them, we recommend you take a look at our previous articles in this blog post series about the benefits and architecture of IICS, JSON to relational table data loading and OpenAPI Integration with IICS.
Mapping templates can be used instead of creating custom mappings from scratch. It’s a great way to optimise development efforts, since all the required transformations come pre-built and parametrised. However, using them can be challenging, as there are several variables that need to be set properly. In this article, we will explore the Slowly Changing Dimension (SCD) Type 2 Data Warehousing template.
Several other templates are available in IICS. They are classified in the following categories:
- Data Integration provides mapping templates for common integration patterns. For example, the Merge two data sources template is a mapping that merges two sources so that if a field in one source is empty, the value from the other source is used.
- Cleansing provides mapping templates for common cleansing patterns, such as checking the data quality and routing the valid and invalid data to different dynamically created targets.
- Warehousing provides mapping templates for common data warehousing scenarios, like the implementation of Slowly Changing Dimensions.
A Brief Introduction to Slowly Changing Dimensions
A Slowly Changing Dimension (SCD) is a dimension that stores and manages both current and historical data over time in a data warehouse. It is considered and implemented as one of the most critical ETL tasks in tracking the history of dimension records.
There are three main types of SCDs:
SCD Type 1 – Overwriting
The new data overwrites the existing data, so the existing data is lost as it is not stored anywhere else. This is the default dimension and you do not need to specify any additional information to create one.
SCD Type 2 – Creating Another Dimension Record
This SCD retains the full history of values. When the value of a chosen attribute changes, the current record is closed. A new record is created with the changed data values and this new record becomes the current record. Each record contains valid from and valid to and a flag to identify which record is active.
SCD Type 3 – Creating a Current Value Field
This type stores two versions of values for certain selected level attributes. Each record stores the previous value and the current value of the selected attribute. When the value of any of the selected attributes changes, the current value is stored as the old value and the new value becomes the current value.
Additional SCD Types can be considered, but their usage is more residual and they are mainly variations of the above three types. For example, SCD Type 4 is a combination of types 1 and 2, while SCD Type 6 is a hybrid of types 1, 2, and 3.
Implementation of an SCD Type 2 With the Available Template
Now we’ll focus on the SCD Type 2 template. This template will automatically create a mapping with all the transformations, but then we will need to define all the required parameters when creating the task. First, we should check the terminologies below:
- Surrogate key – numeric field of integer or bigint data type.
- Set of fields (or a single field) that represents the unique record identifier or the primary key of the source object.
- valid_from – represents the record validity start datetime; the starting value is ‘1900/01/01’.
- valid_to – represents the record validity end datetime; for the most current record, the value is set to ‘2099/12/31’.
- current_flag – represents the record status; ‘Y’ if this is the most recent version; ‘N’ – historical version.
- crc_num – Cyclic Redundancy Check number used to detect the changes.valid_from, valid_to, current_flag & crc_num must have exactly the same name.
NOTE: Multiple instances of the target connection and the target object are necessary to implement different target field map rules:
- insert a new record.
- insert a new version of the existing record.
- update the outdated record status and validity date.
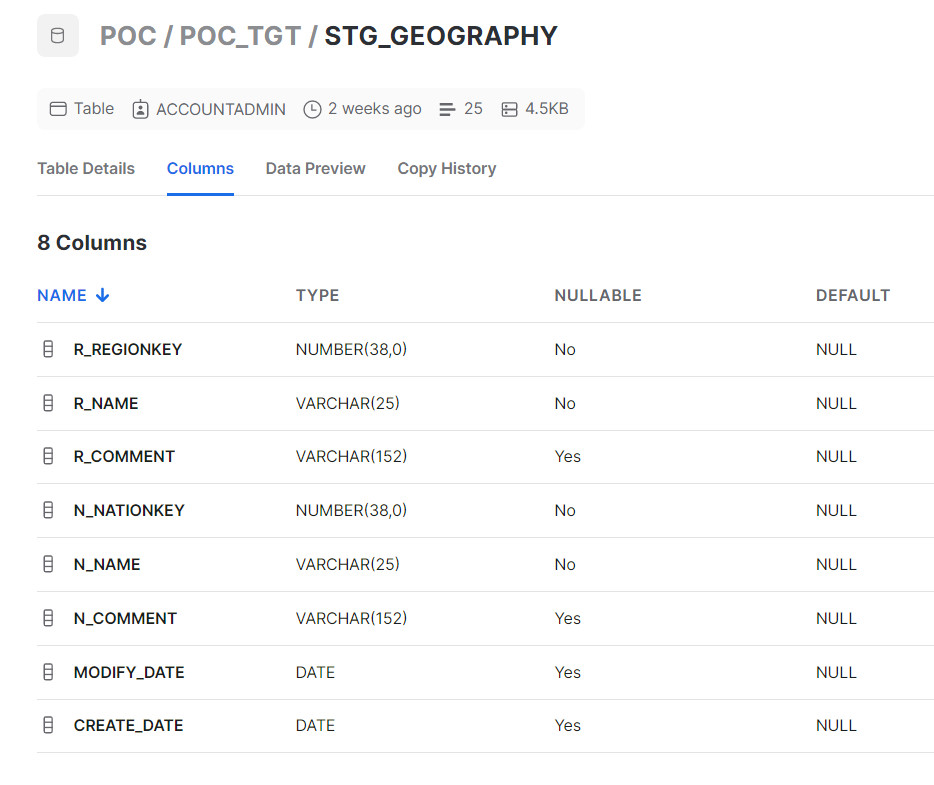
For the purposes of this blog post, we are using the table below as a source and Snowflake as the database:
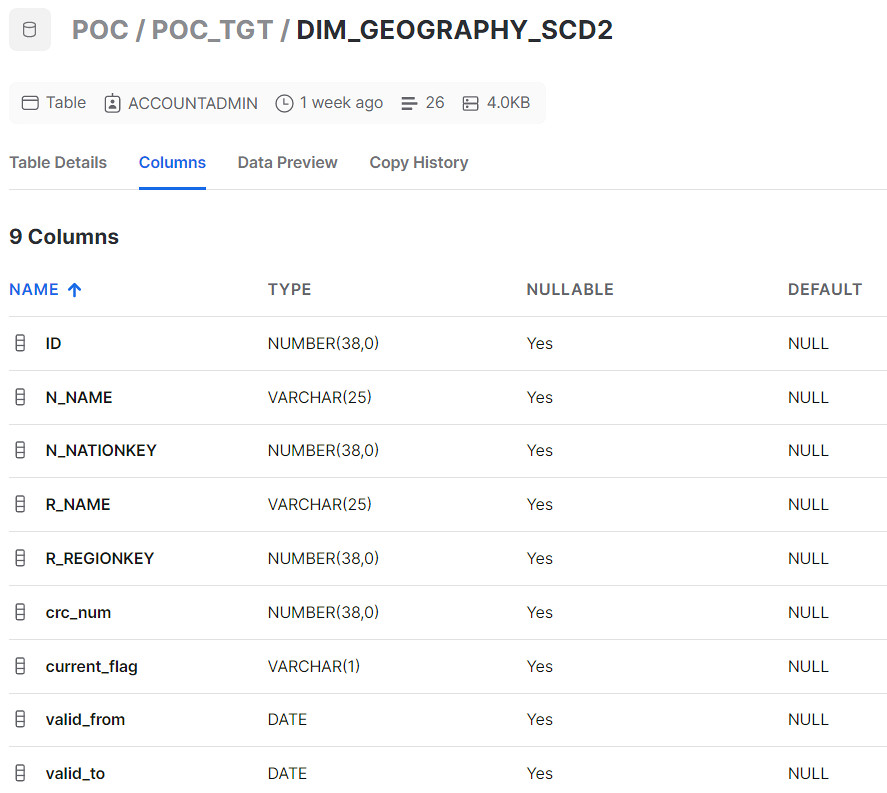
We are using the table below as our Target:
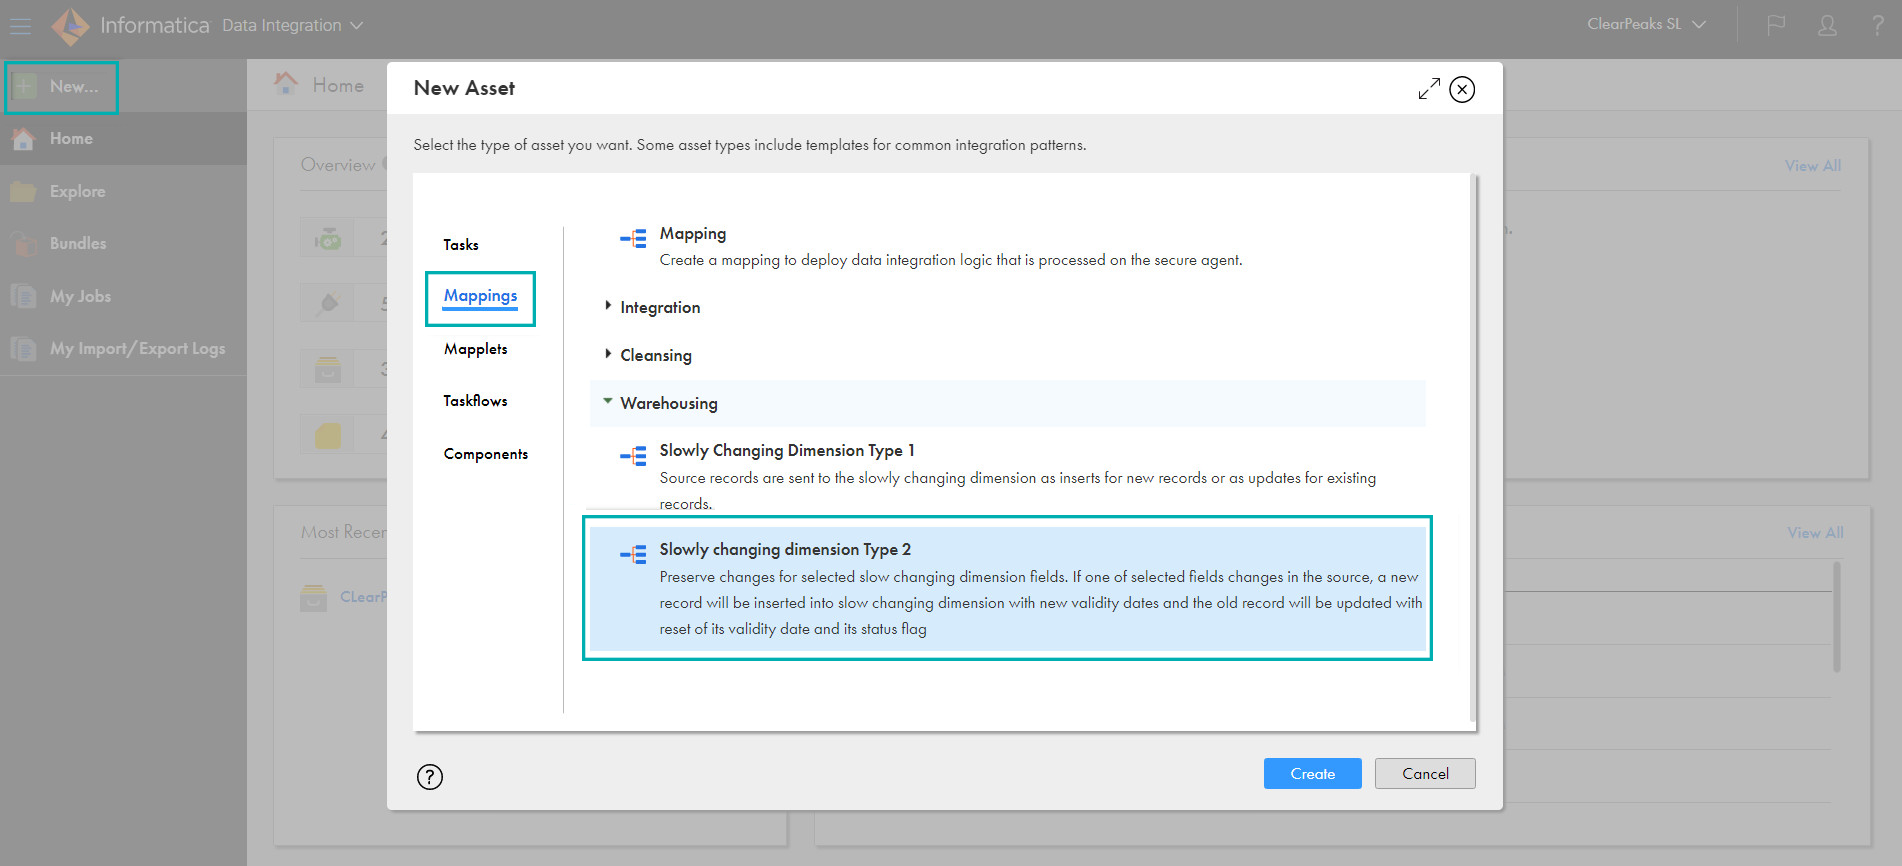
Please create your mapping by selecting Slowly changing dimension Type 2 like this:
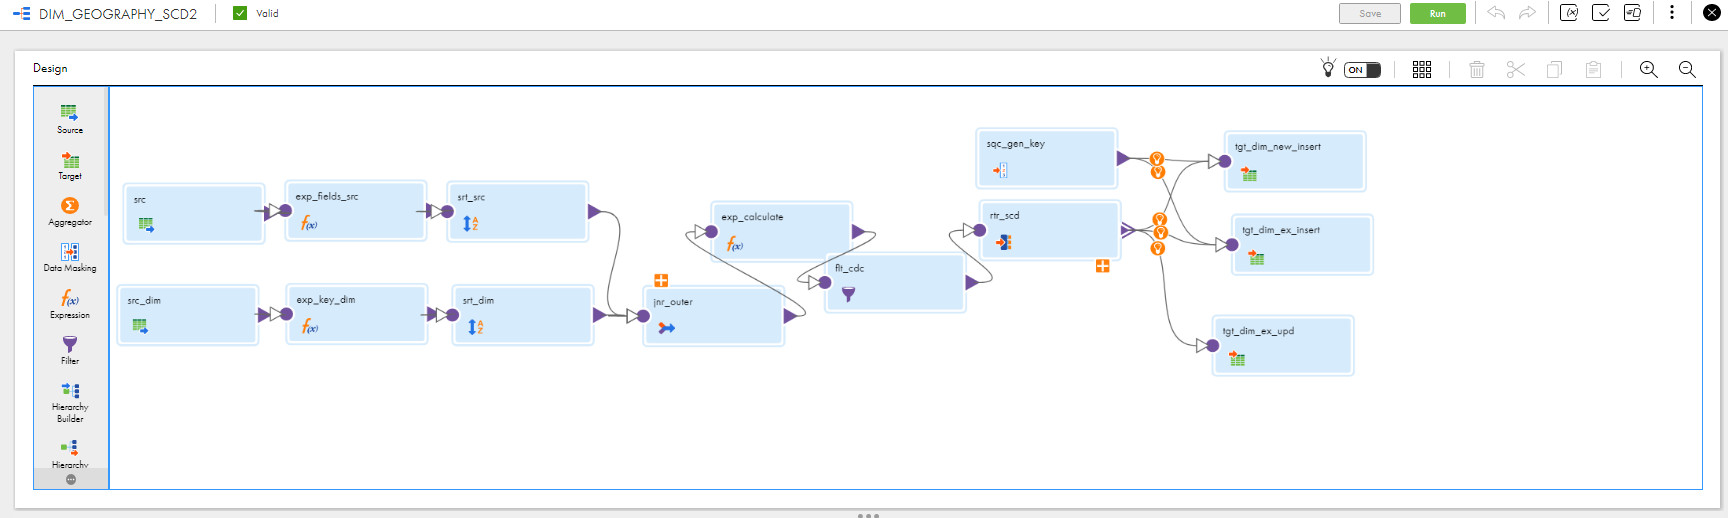
Name your mapping, then you’re all set to start your SCD Type 2 without touching the code at all. You are doing your ETL without developing it!
You can go directly to the creation of a Task for this mapping as shown here:
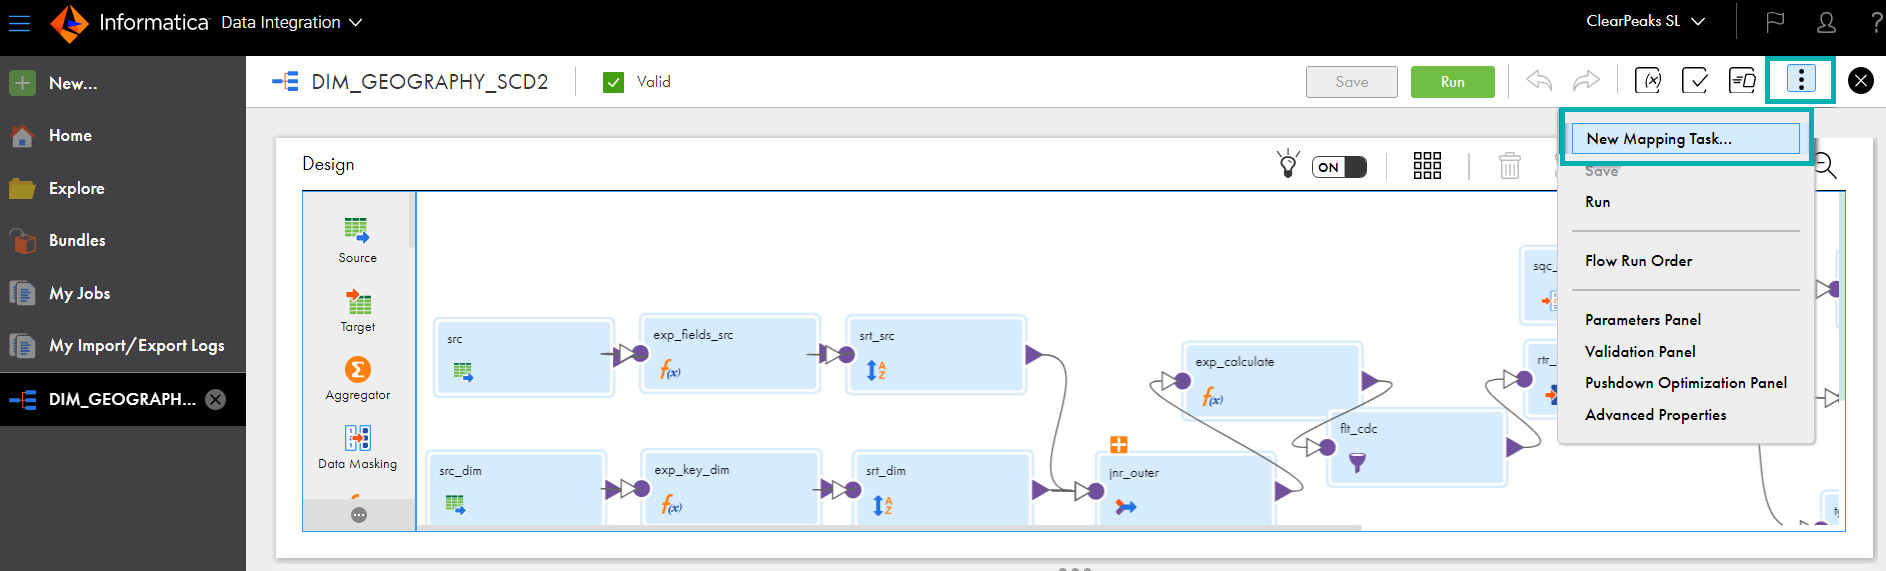
There are 6 steps:
First, we will define our mapping to the task with the proper runtime environment, then we will define our dimension and the Source for the same. Next, we will define our Target for new inserts, existing updates, and existing records, and then, in Input Parameters, we will define all the important parameters required, the core part of this task. Finally, we will check the Unique Sequence created for this and the Scheduling options too. Now let’s take a detailed look at each of these:
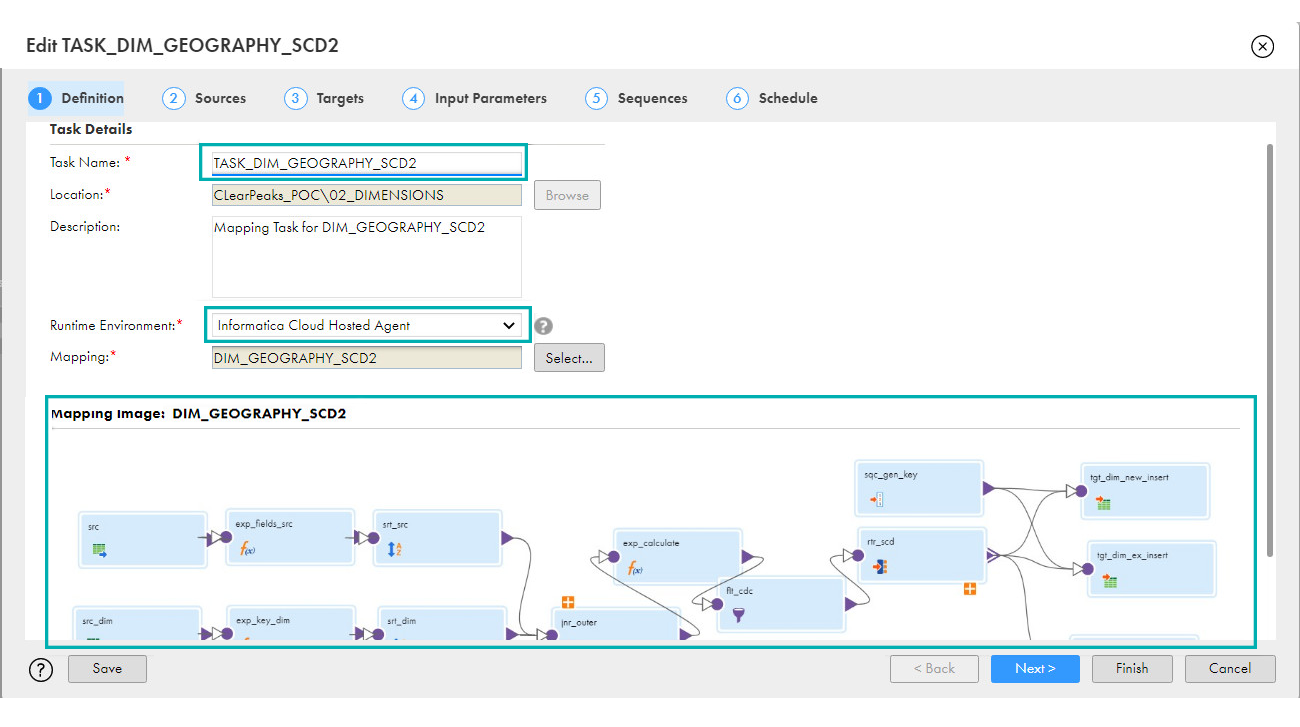
- Definition: Enter your Task name and select that mapping:

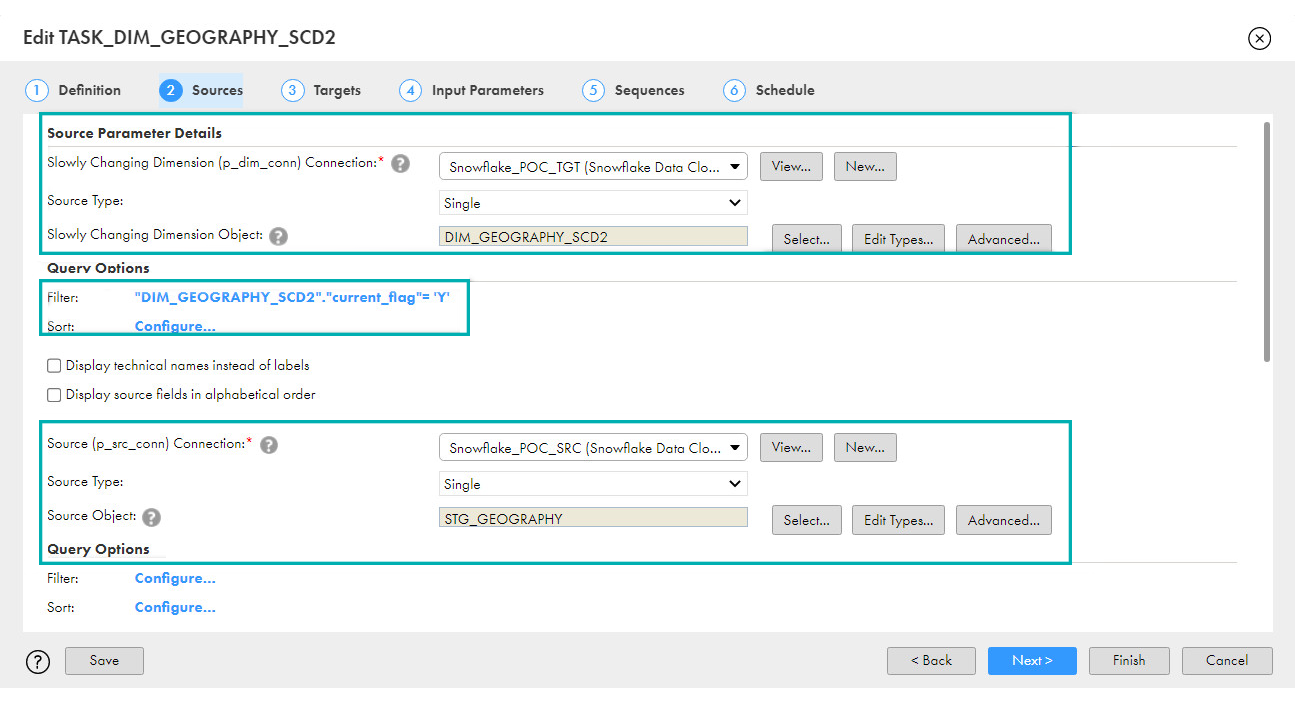
- Sources: You can select your Target Connection and Source Connection, as well as preview the columns:
 You can see that the values will be passed to variables p_dim_conn and p_src_conn. These variables are created by default and we just need to select values here.
You can also see that the default filter is an intelligent filter to select only active records, thus limiting the rows and reducing costs. - Targets: You need to select your Targets for New Inserts, Existing Updates, and Existing Inserts. You can also read the parameters for which it fills the values.You just need to add your Surrogate_Key to the Update Columns; this is a key option to select.

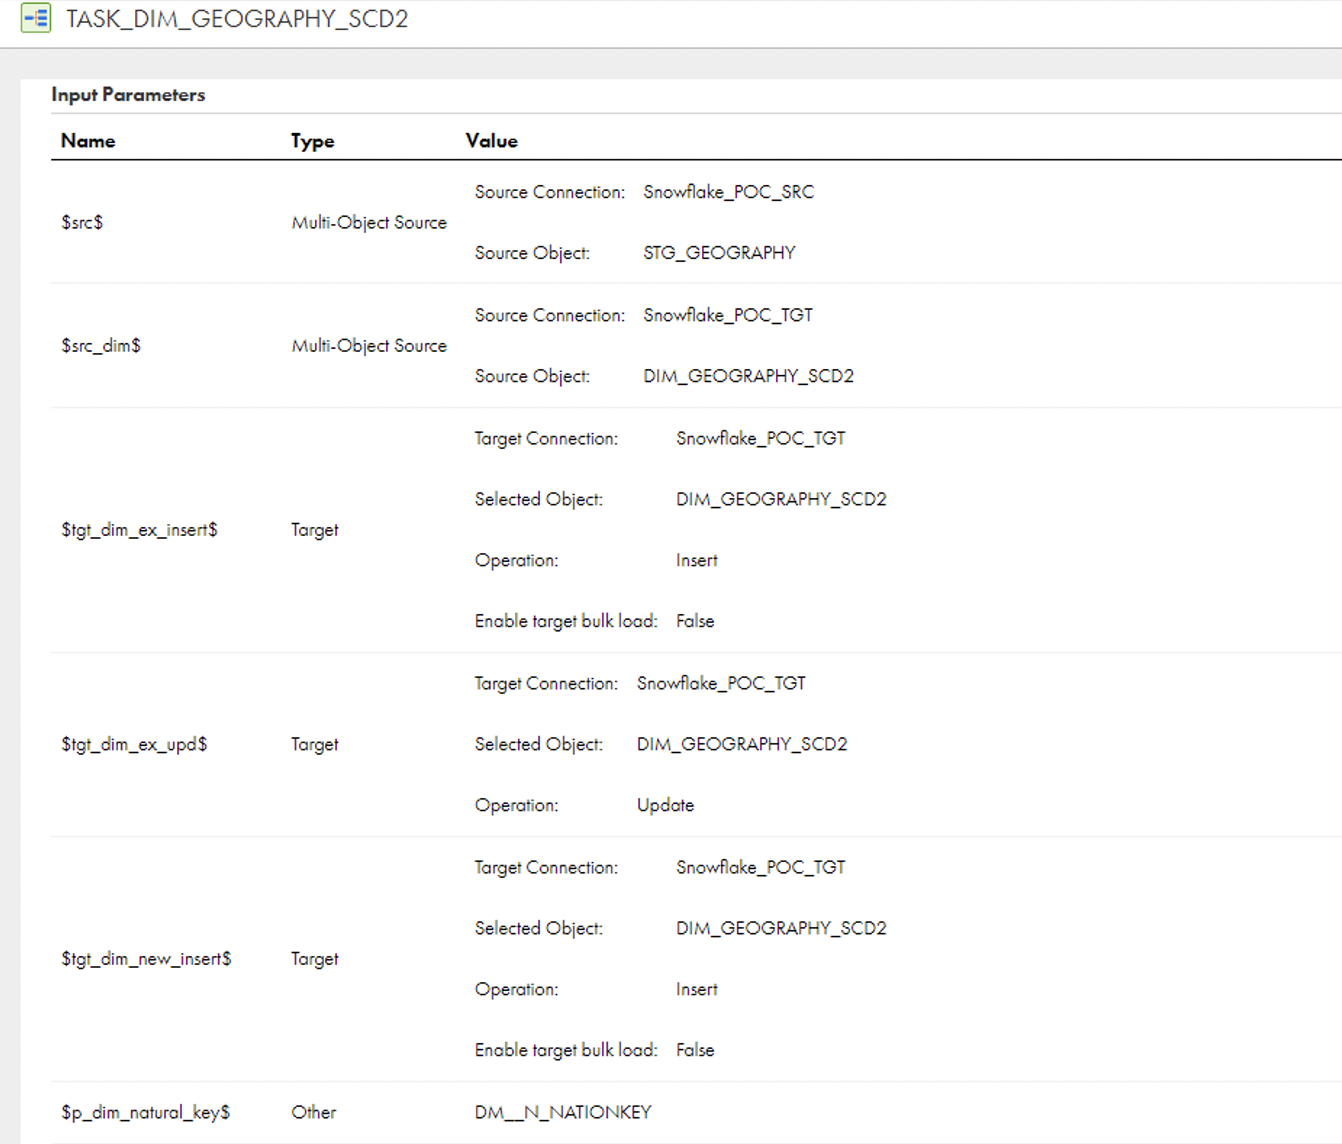
- Input Parameters: This is a very important tab, so pay close attention to each selection which will pass the value to the parameters.
Hovering over the symbol will display a tooltip with additional information regarding the parameter and the field that is expected to get assigned. This can be very useful if you’ve got some doubts about how to move forward, or just to validate what you’ve done:
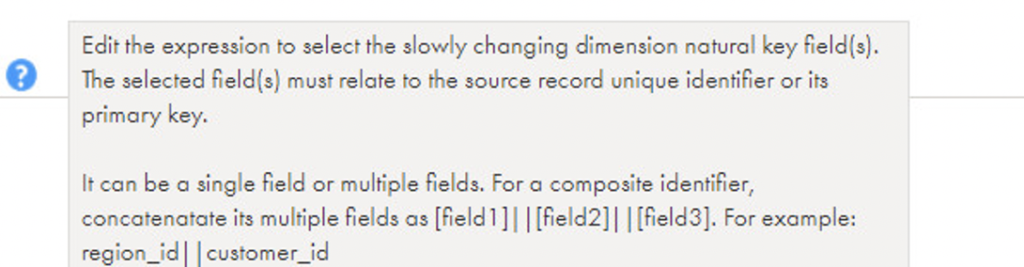
✓ p_dim_natural_key: Select your Source unique identifier. In our case it is: ✓ p_dim_surrogate_key: Select your Dimension Surrogate Key.
 ✓p_src_key: Select your Source Primary Key. You can have multiple column combinations too, but in our case, there’s only one:
 ✓p_src_scd_fields: Select the Source columns for which your organisation wants to keep track of changes.
 ✓p_field_map_ex_insert: You need to map your columns from Source to Target, and remember to map NEXTVAL in your dimension surrogate key. The columns valid_from, valid_to, current_flag, and crc_num will be mapped automatically, but if these columns are in upper case in your database, it may give you an error (missing these columns).
  ✓p_field_map_ex_update: Map your surrogate key here; the rest will be mapped automatically.
 ✓p_field_map_new_insert: Map your columns from Source to Target and map NEXTVAL in your dimension surrogate key. The columns valid_from, valid_to, current_flag, and crc_num will be mapped automatically.
 CRC_NUM is a Cyclic Redundancy Check number that is generated in the backend with the combination of your unique columns in the source. It will compare this on every run to identify the changes.
- Sequences: One unique sequence is created for your primary target key:

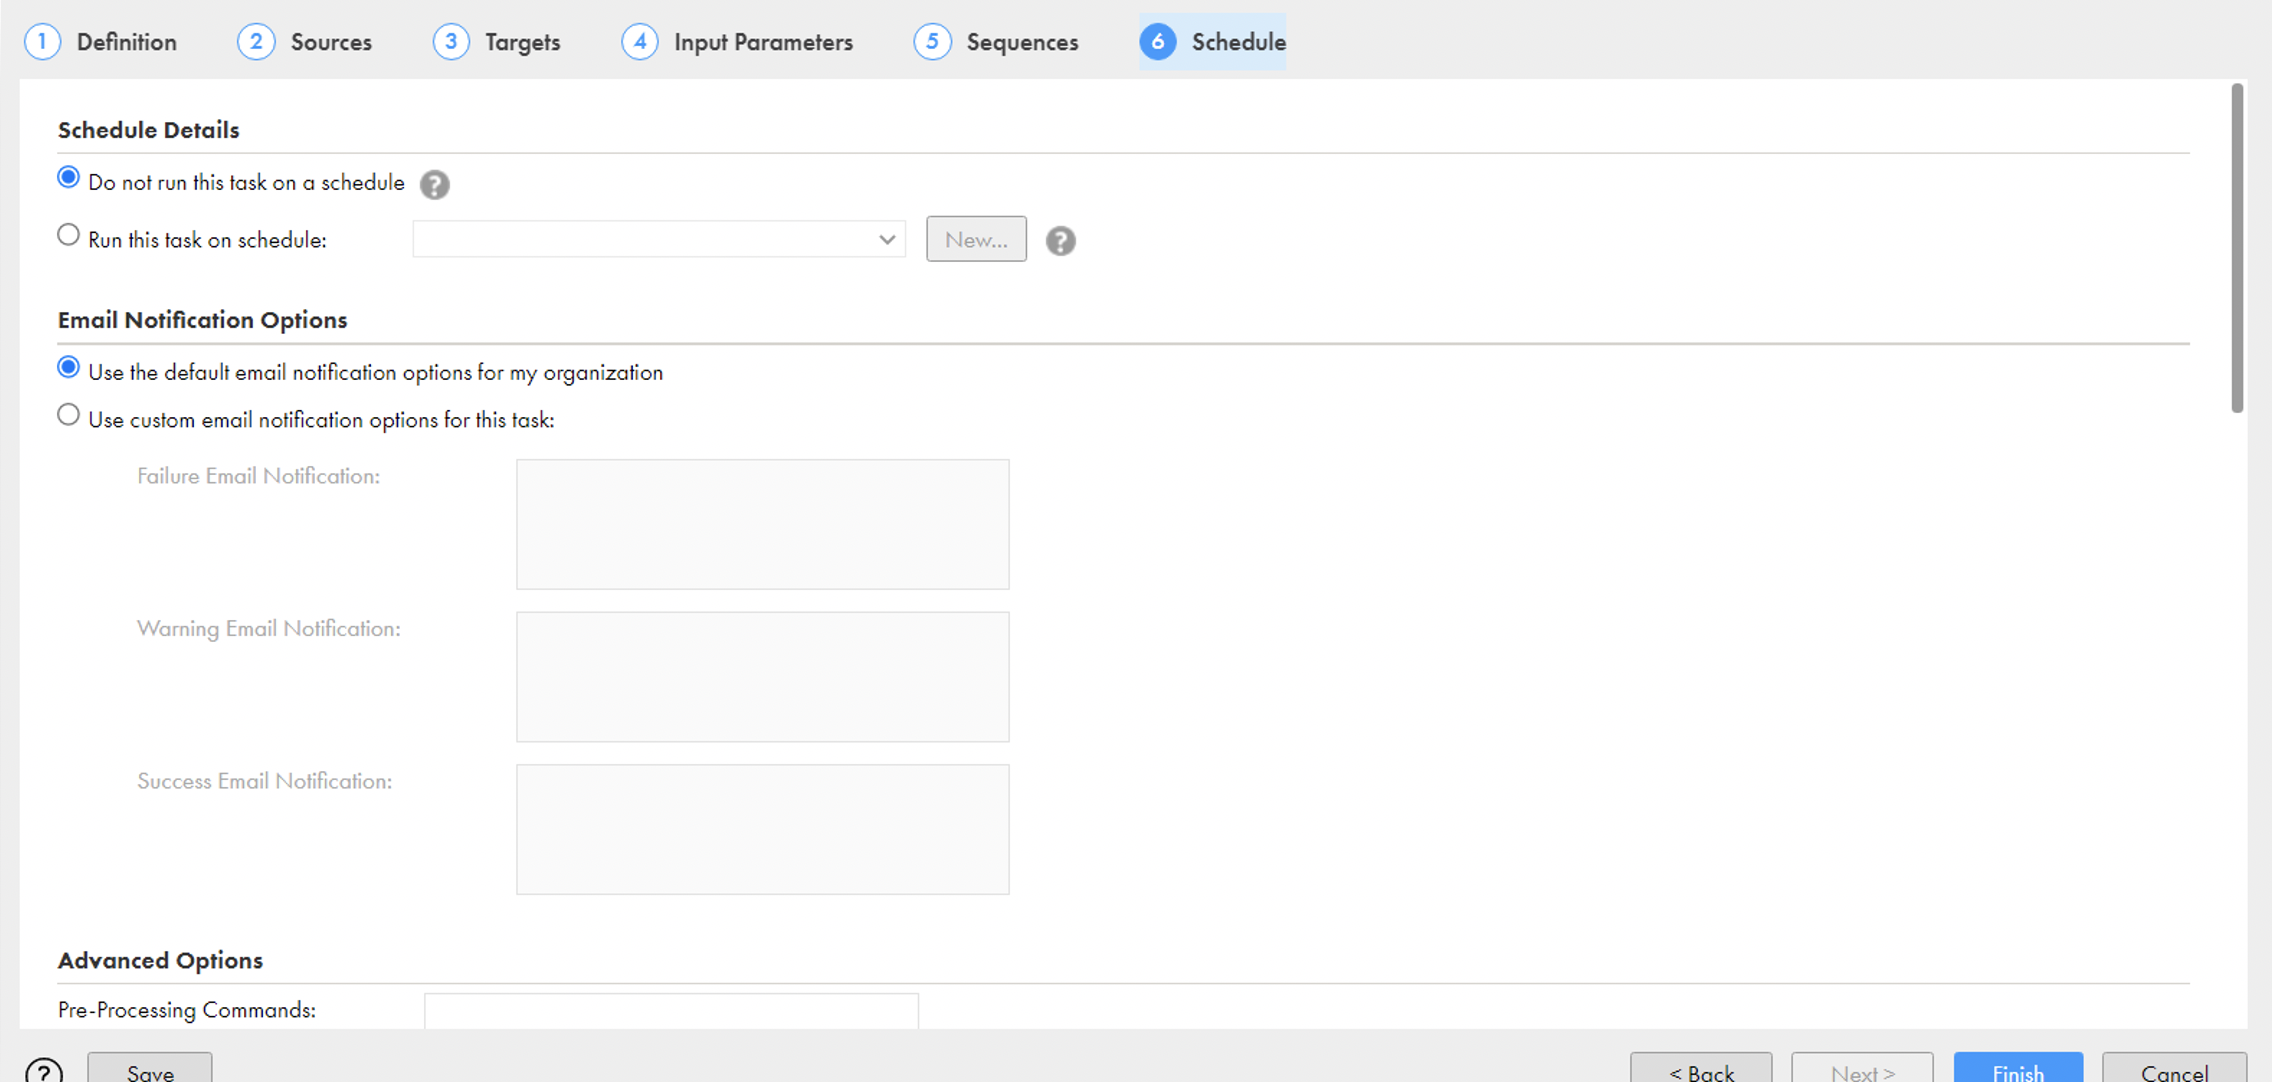
- Schedule: Here you can schedule the task and use more advanced options too:

- Definition: Enter your Task name and select that mapping:
 You can see that the values will be passed to variables p_dim_conn and p_src_conn. These variables are created by default and we just need to select values here.
 ✓ p_dim_surrogate_key: Select your Dimension Surrogate Key.
 ✓p_src_key: Select your Source Primary Key. You can have multiple column combinations too, but in our case, there’s only one:
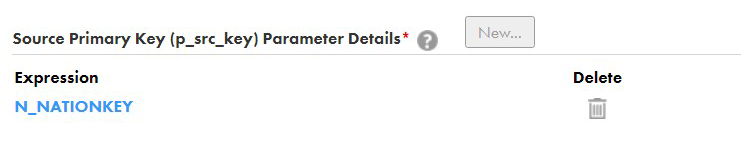 ✓p_src_scd_fields: Select the Source columns for which your organisation wants to keep track of changes.
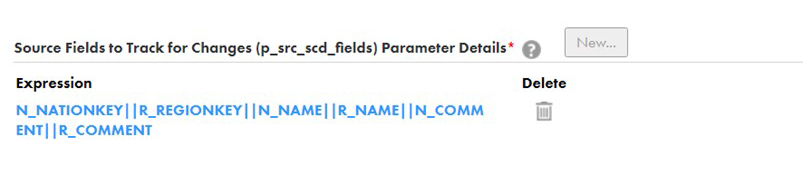 ✓p_field_map_ex_insert: You need to map your columns from Source to Target, and remember to map NEXTVAL in your dimension surrogate key. The columns valid_from, valid_to, current_flag, and crc_num will be mapped automatically, but if these columns are in upper case in your database, it may give you an error (missing these columns).
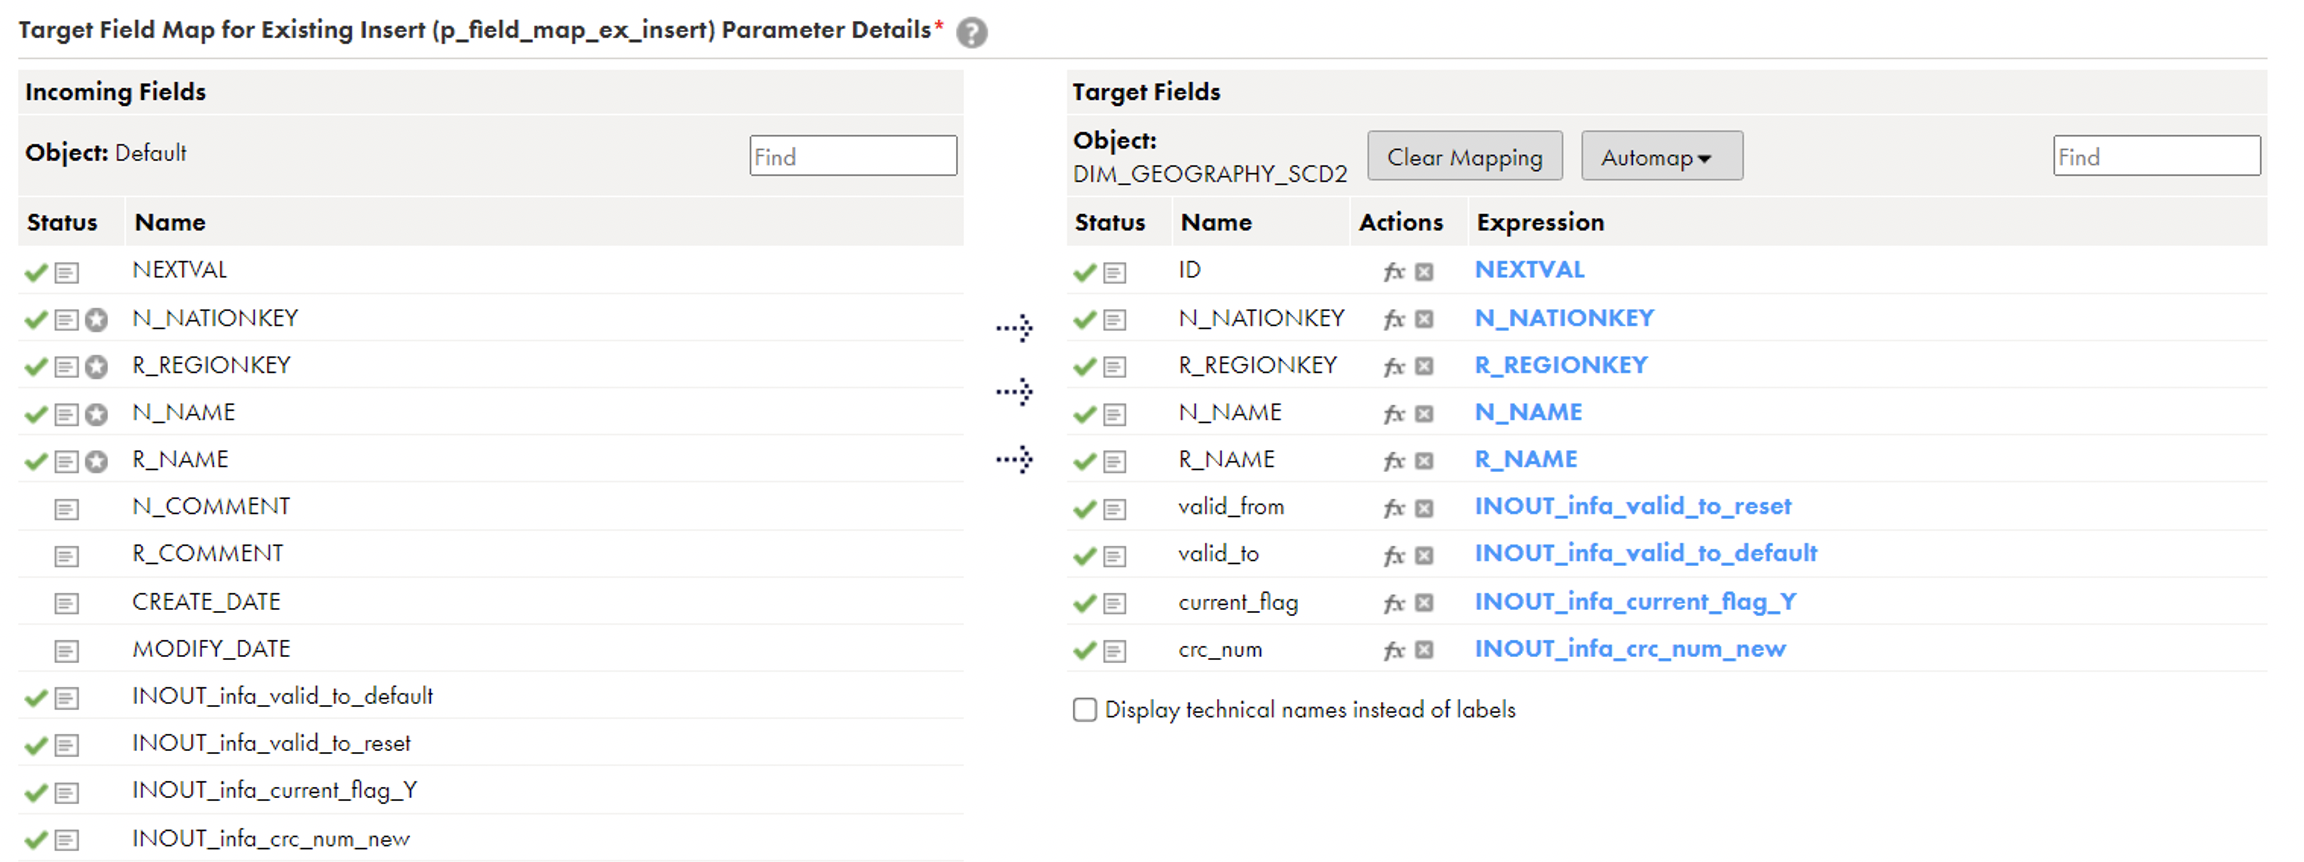 ✓p_field_map_ex_update: Map your surrogate key here; the rest will be mapped automatically.
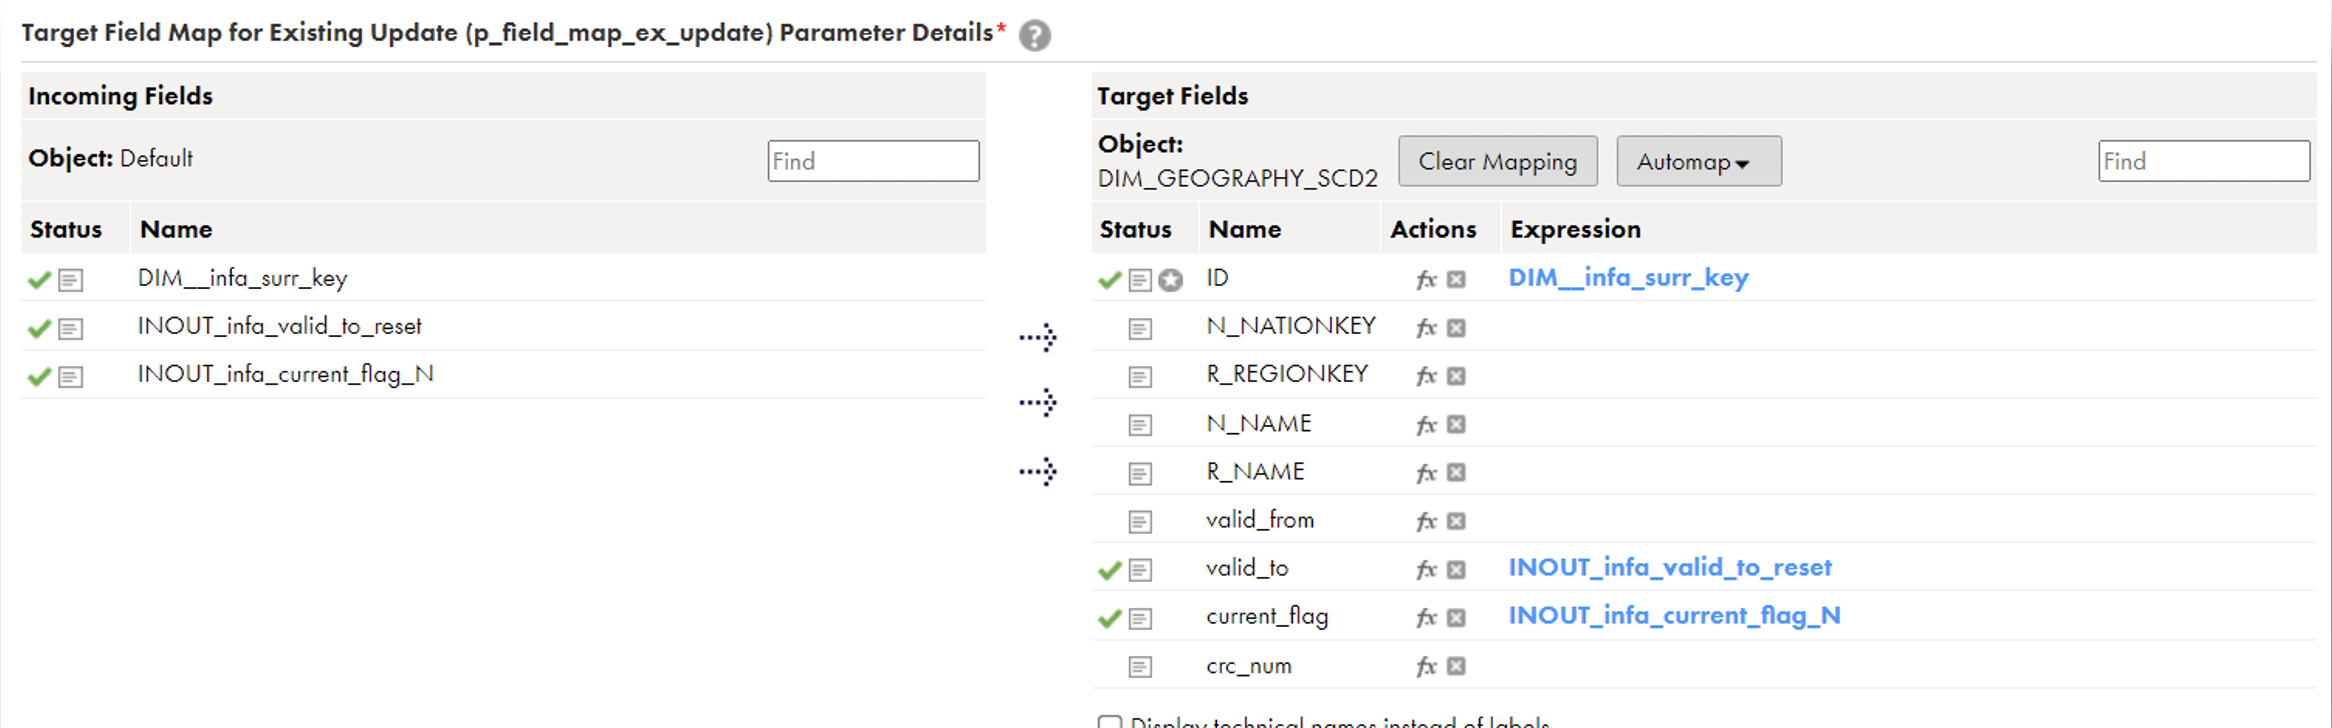 ✓p_field_map_new_insert: Map your columns from Source to Target and map NEXTVAL in your dimension surrogate key. The columns valid_from, valid_to, current_flag, and crc_num will be mapped automatically.
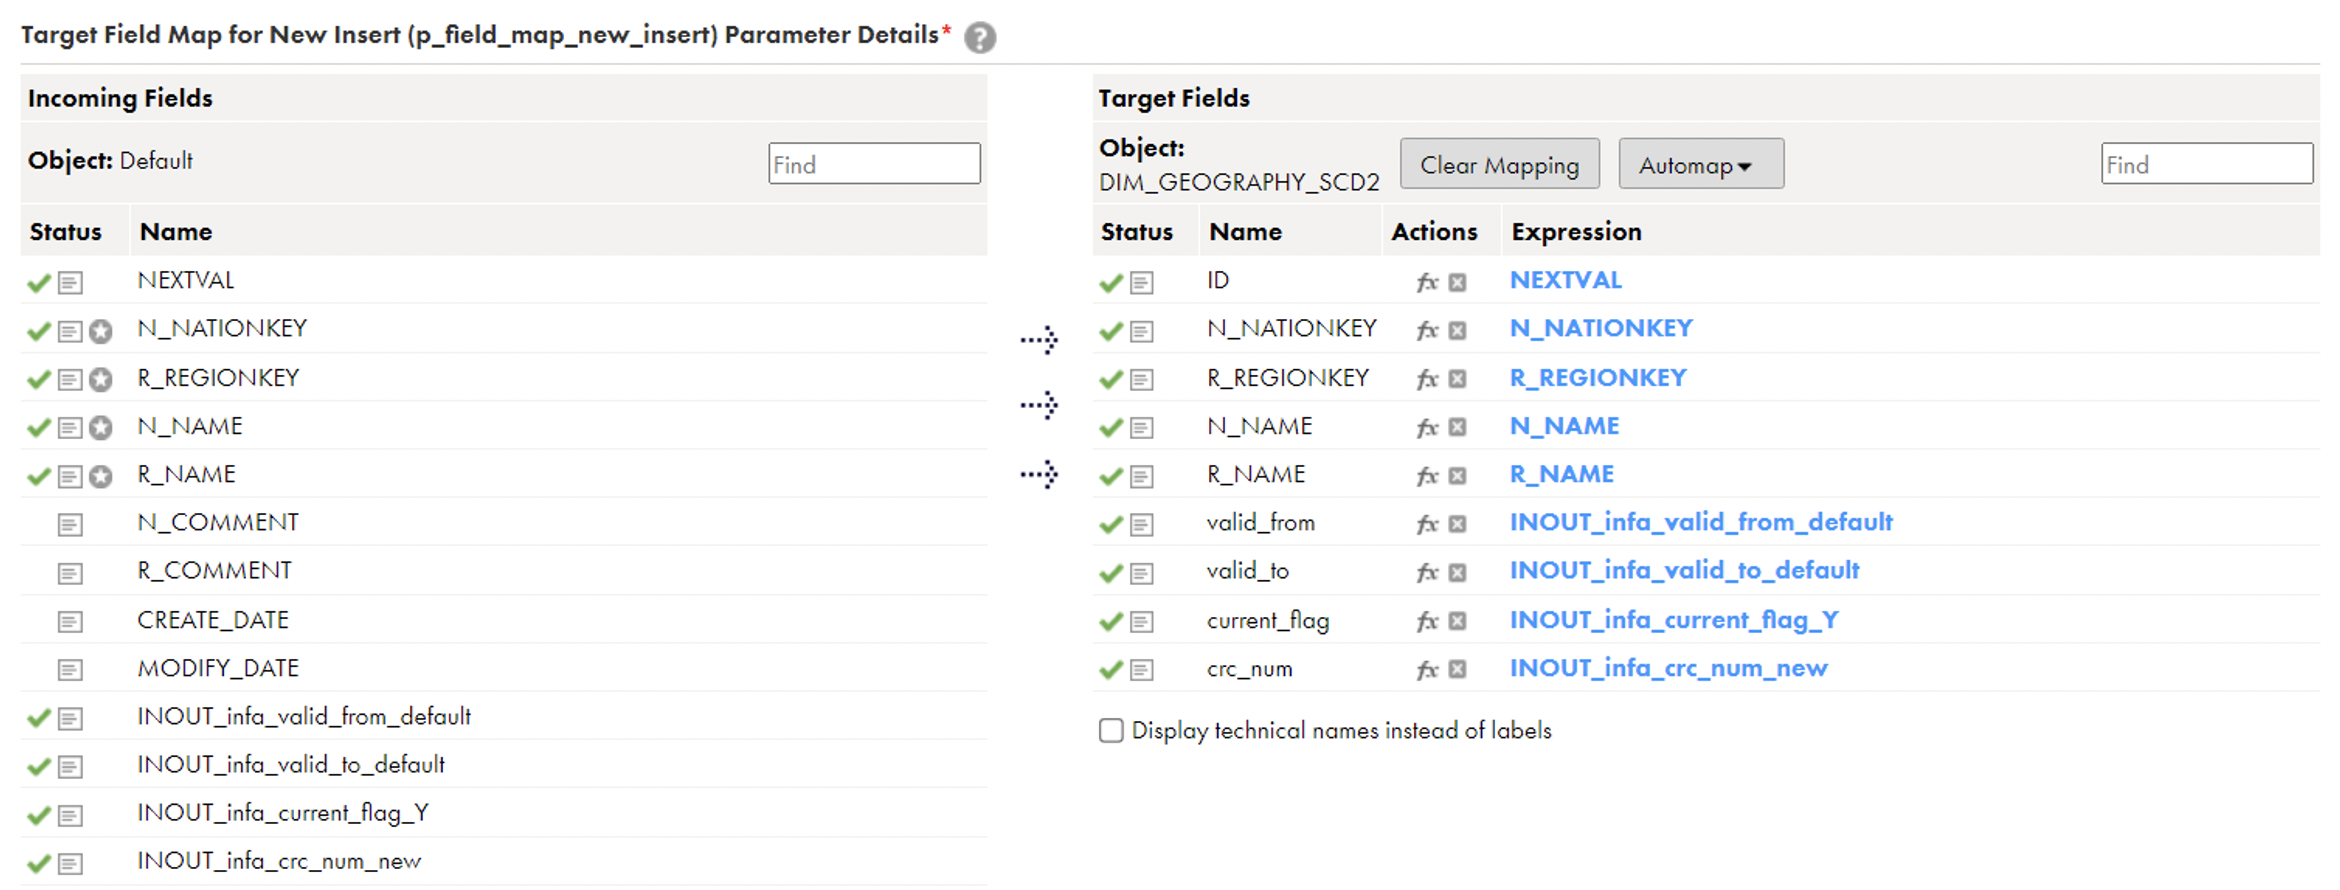 CRC_NUM is a Cyclic Redundancy Check number that is generated in the backend with the combination of your unique columns in the source. It will compare this on every run to identify the changes.
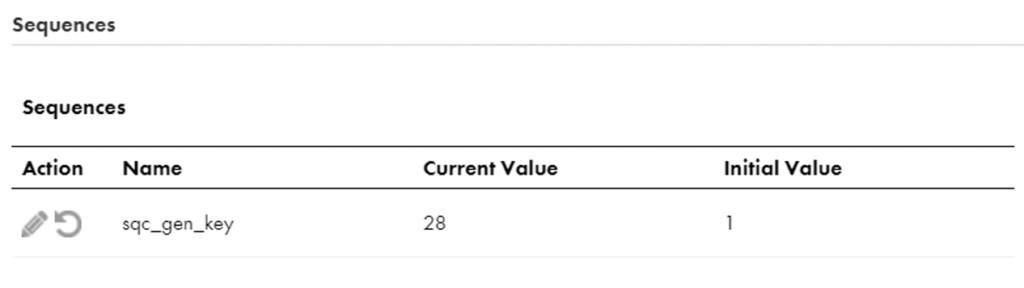
You’ve done it! Run your task and check your data in the target table.
To test that the SCD Type 2 logic is working as expected, you can update one record in the source table, making sure that at least one of the fields that you’ve defined as part of the p_src_scd_fields changes:

Now these values should be treated as new, and old existing values must be marked as N. Run your task again and check the data:

All parameter values can be checked, this is very useful for troubleshooting:
Informatica will manage the location of this parameter file in the cloud itself, so we don’t need to worry about that.
You can find more information on IICS parameters in the official documentation.
Conclusion
This concludes this blog post about implementing SCD Type 2 using the templates available in IICS. It’s a big time-saver for implementations and a bit challenging the first time, but worth it in the long run. And as it’s fully parameterised, we can reuse the same mapping with different tasks for all other SCD Type 2 dimensions, reducing development efforts!
Stay tuned for the next article in this series, where we are going to look at loading Open API data using IICS. If you would like to know more about the ETL/ELT Solutions we offer, simply click here to contact our team!
