
08 Mar 2023 Using the NiFi API to Start and Stop NiFi Processors from a NiFi Flow
In our blog, we have plenty of entries about Apache Nifi: how to use it, how to integrate it with other tools like Hive and Kafka, how to monitor it, how to automate its deployment, etc.
Today, in this blog post, we will show you how to use the NiFi REST API from within a NiFi flow, and leverage it to automatically start and stop (and in general, control) the processors in a flow.
Apache Nifi
First of all, let’s refresh our memory and take a look back at what NiFi is.
Originally an open-source Apache project, NiFi is nowadays one of the most popular tools for data movement across different systems, both for real-time and batch processing. Especially, countless enterprises and organisations around the world use it within their Cloudera Data Platform (CDP) deployments, where it is part of the Data Flow under the name of Cloudera Flow Management (CFM). However, the open-source version is fully functional and free, and you can even download and install it locally on your Windows machine if you wish (as we demonstrate here).
NiFi API
One of the best features of NiFi, aside from the countless ready processors and functionalities that can be used to build your data flows, is its ability to allow the developers to virtually build anything that is missing, by integrating custom processors, codes, or HTTP and API calls in their flows.
In this case, we will be leveraging the NiFi REST API, which gives a tremendous amount of control over most of the NiFi components.
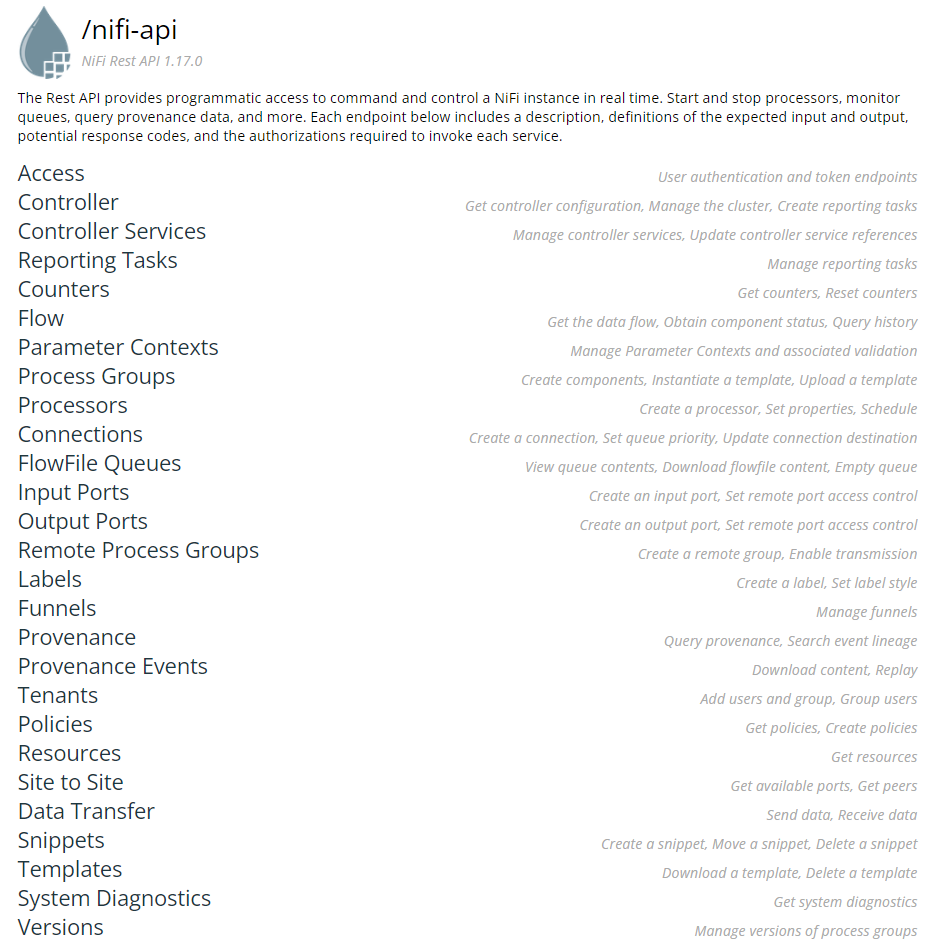
Figure 1: The various sections of the NiFi REST API
As we can see in the figure above, a multitude of actions can be done via API calls: accessing the environment, manipulating the flow elements, obtaining metrics and diagnostics, and so on.
All of these endpoints can be used via command line, from external applications, or even (as we will show now) from NiFi itself. After all, they are simply URLs to be called with certain parameters or settings, and we know that NiFi comes with the very useful InvokeHTTP processor which allows us to do just that.
This becomes a very flexible and powerful feature when we want to automate our API calls based on certain events within NiFi itself. For example, if we use the Site2Site protocol to build a comprehensive monitoring framework (as we show here), we will be perfectly able to detect metrics or events that we want to use to trigger certain actions on certain NiFi elements. In the next section, we will elaborate more on this concept and present the use case for our example.
Our Example
For our case, we thought of a simple scenario:
- On one side, we have some automatic flowfiles that are generated by certain events in NiFi. In our specific case, they are messages generated by the MonitorActivity processor, which are fired whenever a processor becomes idle for too much time or reactivates itself. However, this is just an example, and can be really anything else, depending on your specific case.
- On the other side, we have a NiFi pipeline which listens to these messages through a remote port, and then manipulates them to call the NiFi API that starts/stops the processor that generated them.
To illustrate this example, we will use 3 very common endpoints:
- [POST] /access/token, which creates a token for accessing the REST API via username/password
- [GET] /process-groups/{id}/processors, which returns a list of all processors in a given process group
- [PUT] /processors/{id}/run-status, which updates the run status of a processor (to start, stop or terminate it)
Below, we can see the details of each of these three endpoints from the API documentation.
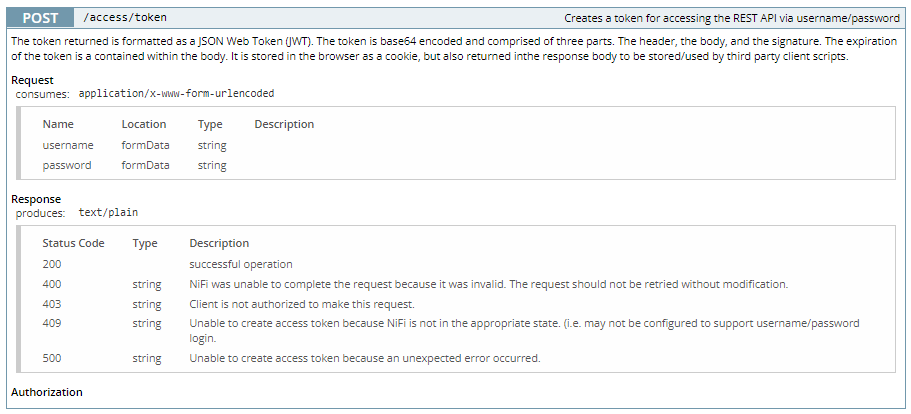
Figure 2: Details for the /access/token API endpoint
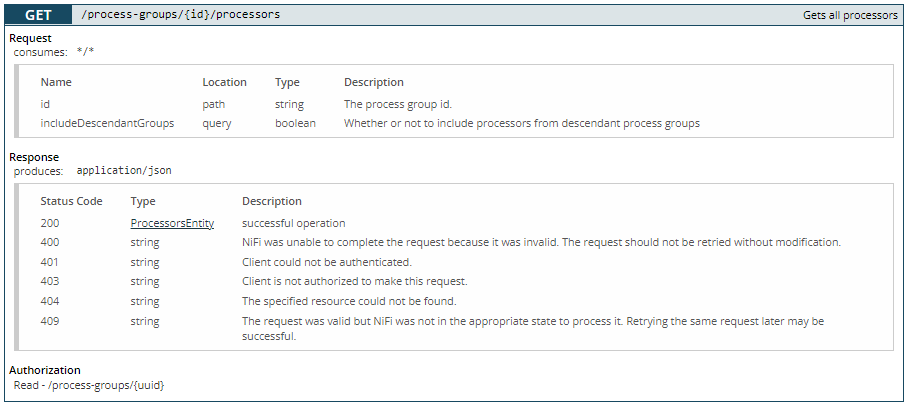
Figure 3: Details for the /process-groups/{id}/processors API endpoint
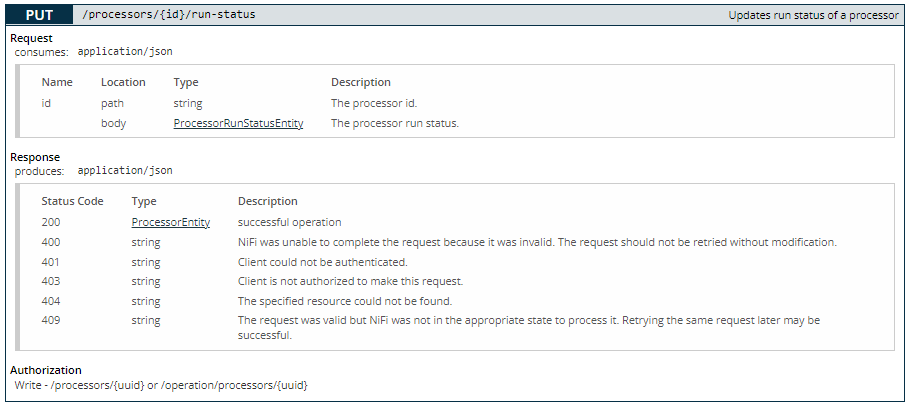
Figure 4: Details for the /processor/{id}/run-status API endpoint
Obtaining the Access Token
Assuming that we received a flowfile representing an event that should trigger our start/stop action as described for our scenario, the first thing we have to do is to authenticate ourselves to call the NiFi API endpoints. To do so, we request a token with endpoint #1, /access/token.
As we mentioned earlier, we can use InvokeHTTP to do so. This API call requires a payload with the username and password details, so we make sure that the input flowfile for InvokeHTTP contains them. For example, we can use ReplaceText, as shown below.
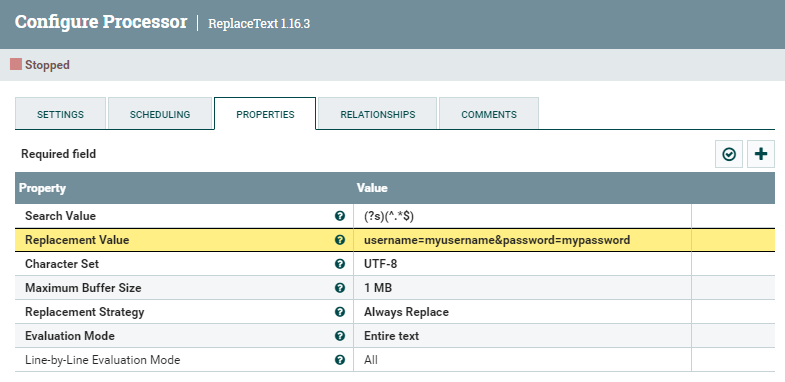
Figure 5: Details of the ReplaceText processor to prepare the payload of the API call to request an access token
Note: this processor completely replaces the content of the incoming flowfile. If you want to use some of that information to apply any logic (in our case, for example, to identify the processor to be started/stopped), you need to handle this in your flow. In our case, right before this processor, we have saved the process group ID where the flowfile was generated, in an attribute named processGroupId, using the EvaluateJsonPath processor. This attribute is carried with the flowfile and will be used in the next section.
Now that our flowfile contains the credentials, we use InvokeHTTP to actually call the API endpoint. The flowfile content will be sent as payload in our request. Mainly, we have to change 3 settings:
- HTTP Method: POST
- Remote URL: https://${hostname(true)}:8443/nifi-api/access/token
- Content-Type: application/x-www-form-urlencoded

Figure 6: Details of the InvokeHTTP processor that calls the NiFi API to request an access token
If successful, this request should return us a new flowfile, with the details of our Bearer token. This token is typically passed in the call to the API in a parameter called “Authorization”, so we can create an attribute with this very same name and build our Bearer token as shown below.
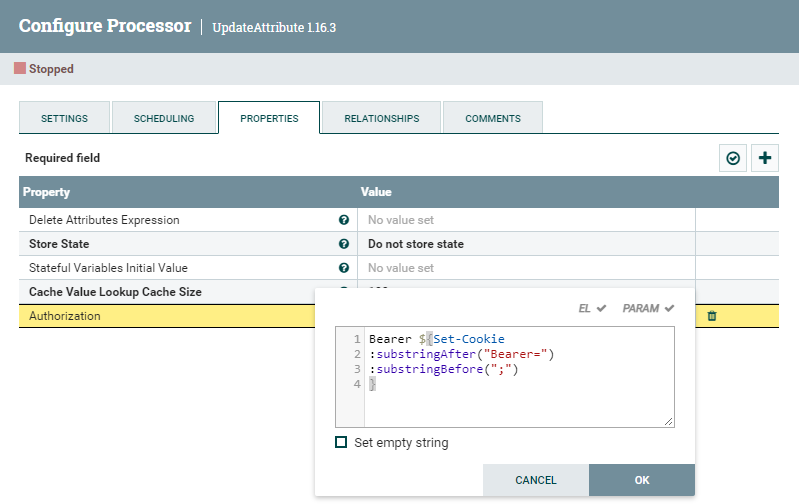
Figure 7: Building the Authorization attribute containing the Bearer token
In the next sections, we will use this Authorization attribute to make our API calls.
Identifying the Right Processor
At this point, we have a flowfile containing an attribute with the Bearer token we need to be authorised by the API, and another attribute with the ID of the process group where the event we are monitoring has been generated.
Since the action we want to perform is on a processor, we obviously want to get the information of the single processors inside that process group; and then also identify the specific processor that triggered the event we received.
Endpoint #2, /process-groups/{id}/processors, is what we need for this. Very simply, we build another InvokeHTTP processor, this time with the following settings:
- HTTP Method: GET
- Remote URL: https://${hostname(true)}:8443/nifi-api/process-groups/${processGroupId}/processors
- Content-Type: application/json
Note: ${processGroupId} was extracted earlier, as described in the previous note.

Figure 8: Details of the InvokeHTTP processor that calls the NiFi API to get the details of the processors within a process group
The response we receive, if all goes well, is a JSON with the details of all the processors in the given process group. At this point, selecting the one which we want to start or stop depends strictly on the logic we need to apply. A sequence of SplitJson, FlattenJson and QueryRecord processors is what we used to select our target, but explaining how to build this logic is not in the scope of this article.
Once we have identified the right processor, we need to make sure we extract two attributes from it: uri and version. These are needed to build the call to start or stop it. In the figure below, you can see how we did this using the EvaluateJsonPath processor.

Figure 9: Extracting the uri and version details required to call the API that starts or stops a processor
Starting and Stopping the Processor
Now we are ready to call the API endpoint #3, /processors/{id}/run-status, that starts or stops the processor.
This endpoint requires a specific JSON to be sent as payload of the PUT request. For example, if we want to stop the processor, we need to use:
{
    "revision":{
             "version":${version}
    },
    "state":"STOPPED",
    "disconnectedNodeAcknowledged":false
}
If we wanted to start the processor, we would instead use:
{
    "revision":{
             "version":${version}
    },
    "state":"RUNNING",
    "disconnectedNodeAcknowledged":false
}
Once again, we use ReplaceText to build this message, as shown below.
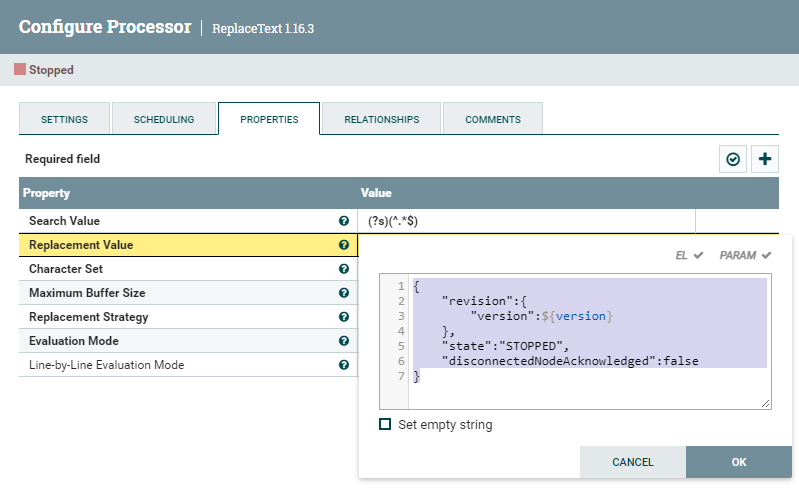
Figure 10: Details of the InvokeHTTP processor that calls the NiFi API to stop a processor
Now, we can use this flowfile as the input of another InvokeHTTP processor, with the following settings:
- HTTP Method: PUT
- Remote URL: ${uri}/run-status
- Content-Type: application/json
Note: the ${uri} attribute already contains the first part of the URL in the right format, with the right processor ID.
As soon as this processor is executed, we will see our processor’s status change.
Note that each time the status changes, the version of the processor increases as well. So, if for any reason you want to call a similar API endpoint on the same processor within the same flow, you need to remember to increase the version accordingly. For example, if you wanted to restart the processor after stopping it, you would have to use this payload:
{
    "revision":{
             "version":${version:plus(1)}
    },
    "state":"RUNNING",
    "disconnectedNodeAcknowledged":false
}
Of course, this does not apply if you repeat the whole process and get the information about the new version from a new call to the corresponding API. In that case, the version would already be updated.
Terminating a Processor
For completeness, we’ll also show you how to terminate a processor, which can sometimes be very useful. The process is very similar to the one above, and you only need the ${uri} parameter to do so:
- HTTP Method: DELETE
- Remote URL: ${uri}/threads
- Content-Type: application/json
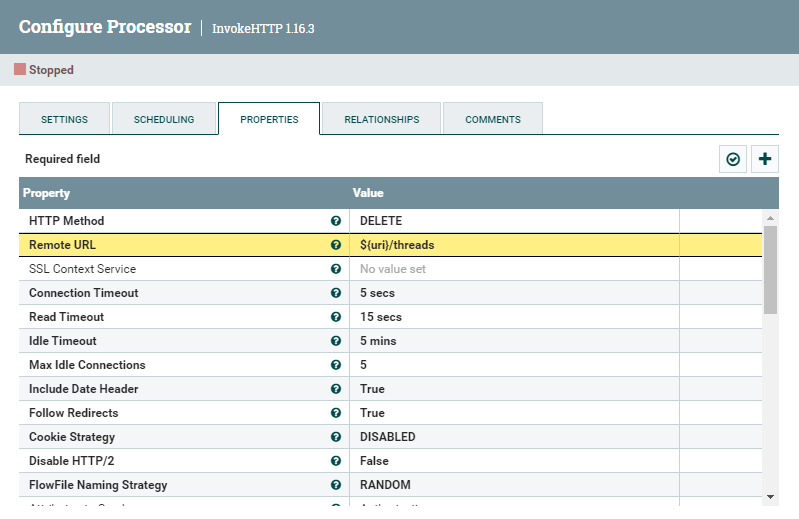
Figure 11: Details of the InvokeHTTP processor that calls the NiFi API to terminate a processor
Conclusion
This brief example shows how you can leverage the NiFi API within NiFi itself. Apart from the specific logic applied, which heavily depends on your use case, this is a very powerful tool to automate processes and actions based on events that happen in NiFi.
As mentioned, you could build a monitoring framework using the Site2Site protocol, remote ports and bulletins (as explained here), and programmatically identify events and trigger actions that are executed via API calls built using the very same flowfiles’ content and attributes. The applications in this sense are really limitless.
Here at ClearPeaks we are experts on NiFi, having used it in countless projects, and in all shapes and forms. If you have doubts or requests about this or other Big Data, BI and Advanced Analytics tool, do not hesitate to contact us – we will be happy to help!
