13 Nov 2019 Beyond standard ETL with Azure Data Factory – creating automated and pay-per-use ETL pipelines with REST API triggering
This article is a tutorial on how to create an end-to-end ETL process using (ADF) as our cornerstone tool, from the ingestion phase from an FTP server up to the presentation layer with Tableau. The aim of this article is to present the different issues one can face when creating ETLs with ADF, and what is the best approach to tackle them. A note bear in mind: we use version 2 of the Azure Data Factory service (ADFv2).
In this article we will provide examples on how to setup ADF to perform common operations that you may need to carry out while designing and implementing ETLs with ADF. There are other ways to achieve the same goals, but the approaches presented here are the ones we find most useful when working in real-life projects.
In this blog article you will learn how to:
- Add complex logic to your workflows, working with variables and parameters in ADF.
- Control the workflow of the ETL to run a Databricks cluster only when there is new data that needs to be processed, and taking advantage of cluster auto-termination to reduce the bill.
- Trigger Tableau Extract Refresh from ADF by calling the Tableau Server API.
- Monitor ADF executions using several available options.
1. System and Platform Requirements
To reproduce the tutorial presented in this blog post, you need the following resources:
- An Azure subscription (there are free trials available).
- An Azure Data Factory V2 service.
- An Azure Logic Apps service.
- An Azure Databricks service and a cluster.
- An FTP Server.
- A Tableau Desktop or Server to reproduce the visualization.
2. ETL Summary
The purpose of the ETL process is to automate the following steps:
- Read data from the source: In our case example, we will read CSV files from an FTP server. This is not the preferable option (direct ingestion in the data lake would be) but it is still a common practice in companies in order to ingest into the data analytical platform any kind of data which is not part of a database system. Some examples could be files prepared by business users to track specific information, or Excel exports from tools such as market analysis, ERPs, HR management tools, etc. In our case, the filenames contain date metadata that we need to keep in order to properly store the ingested file.
- Consider that in order to access the FTP server, as it is hosted on a corporate network, we are using a self-hosted Integration Runtime to transfer the data to the Cloud.
- Store the files in an intermediate file storage system. In our example we use the Azure Blob Storage service, that will act as a Data Lake, to store the raw data.
- The first step on our Pipeline is a Get Metadata activity that will give us the required information from the data sources.
- Once we get the name of each file, we run a ForLoop in which we check for each of the files when it was last modified.
- The following activity is an “if condition” which checks if the date that is on Last Modified accounts to the previous day
- If the result of the “if condition” is “Yes”, we proceed to copy the files from the FTP Server to the Blob Storage, if “No”, we do not copy the files
- If the “if condition” is “Yes”, a flag (boolean variable) is set to “True” which will trigger the ETL. This variable lets us execute the Databricks Notebook only when a new file has been uploaded.
- Use a data processing engine to transform and aggregate data: Azure provides several options to process the data. Services such as HDInsight, Databricks or even Azure Data Lake Analytics can do the job. For a detailed comparison of these technologies you can read our previous blog “Cloud Analytics on Azure: Databricks vs HDInsight vs Data Lake Analytics”. For the case scenario in the present blog article we have chosen Azure Databricks to process the files. Azure Databricks is a collaborative Apache Spark based service for big data analytics. We have chosen this service over Azure Data Lake Analytics because it is a fast, easy and collaborative environment which supports Python, Scala, R, Java and SQL and allows auto terminating the cluster when it is not being used. In our demo, we use Databricks to transform and clean the raw dataset, and perform the following actions:
- Transform the columns to their corresponding data types
- Add a Departure Date column with date as its data type
- Add an Update Date column to know the last update of the dataset.
- Data Warehouse: To simplify the setup, we are not using a dedicated database where the curated data is stored. Once the data is ready, we cache it directly to the visualization tool.
- A visualization tool that reads the processed data and presents it for end-users: In our case, Tableau reads the data directly from a Databricks table (through Spark SQL) before the cluster is auto-terminated. The extract is automatically triggered when the pipeline finishes, so we make sure that the data in Tableau is always up to date.
- Allow business users to manually execute the pipeline: This feature enables business users without technical knowledge on the pipeline to trigger its execution whenever they require to update the data. To do that, we use Azure Logic Apps, a serverless app service that lets us execute a trigger of a pipeline when an HTTP request is received.
3. The Dataset
In order to do an end-to-end demo using real data, we have used a dataset available in Kaggle of Flight Delays and Cancellations from the year 2015 in the USA (https://www.kaggle.com/usdot/flight-delays). We have simulated that each month, a CSV file is uploaded to the FTP Server and ingested by the pipeline. Once the data is processed and available in the visualization tool, we will be able to analyse the delays suffered by each airline and its root causes.
4. ETL step-by-step
4.1. Ingestion Layer
As mentioned, the ingestion layer consists of an FTP server, where a business user would upload the monthly file of Flight Delays and Cancellations. The business user also has the possibility of uploading the file any day of the month and to upload it several times. The only important thing here is that the filename must be consistent and agreed with the ETL developer. In our case, the ETL will extract the year and month from the filename to save the files with a logical hierarchy in the storage service.
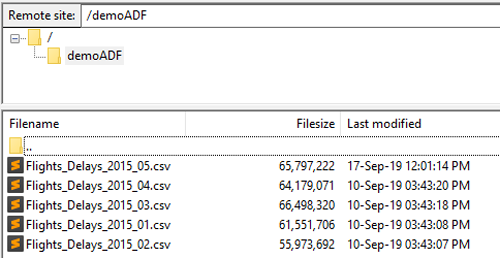
Figure 1: Screenshot of the FTP server folder where the user would upload the input files
4.2. Pipeline – ETL
The ETL is orchestrated by Azure Data Factory V2 and is scheduled to run once per day. But, why run it daily if the file would ideally be uploaded once a month or few times a month if the user modified one of the files? On the other hand, to make the latest version of the data available on the visualization tool on the same day, we cannot just run the ETL once a month. Additionally, we don’t want the Azure Databricks cluster to be started every day if there isn’t any change in the input dataset, because we would be spending money unnecessarily.
In order to solve this issue, we have developed an ETL which is executed daily, but it looks for the last modified date of each file in the FTP server, and only if the last modified date is equal to the day before execution, the ETL will copy the file to the cloud and execute the transformations in the cluster. By doing it in this way, we can run the ETL daily but only ingest the file to the cloud and start the cluster when there is a change in the data.

Figure 2: End-to-end ETL workflow
As mentioned, the first activity of the pipeline is a Get Metadata focused on Child Items, which will create an array of the filenames that exist in the specified FTP folder. An important thing to consider here is that the dataset object we need to create in ADF needs to point to the folder of the FTP so it can access all the files within the folder.
The following image shows the configuration of the Get Metadata activity and its output after its execution:
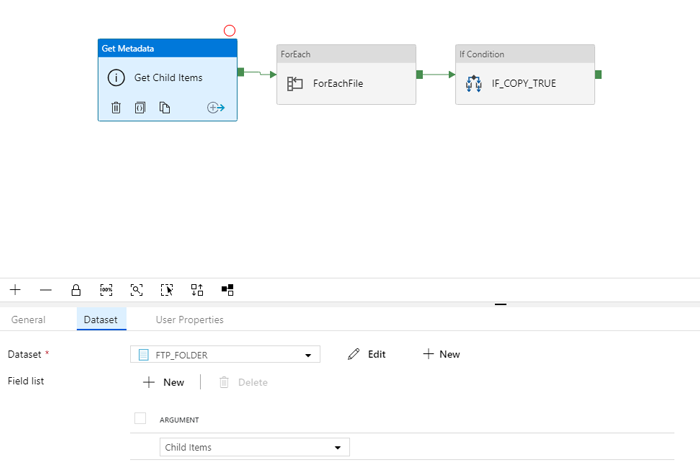
Figure 3: Configuration of the Get Metadata activity
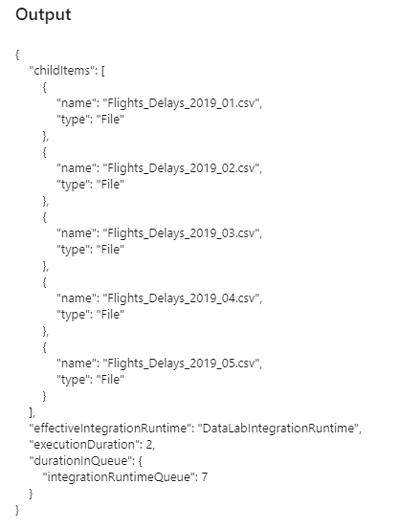
Figure 4: Example of the output of the Get Metadata activity
After creating the array of child items, we want to iterate through the filenames that exist in the FTP. For that purpose we have created the Activity “ForEach” and only copy those that were modified the day before the pipeline execution.
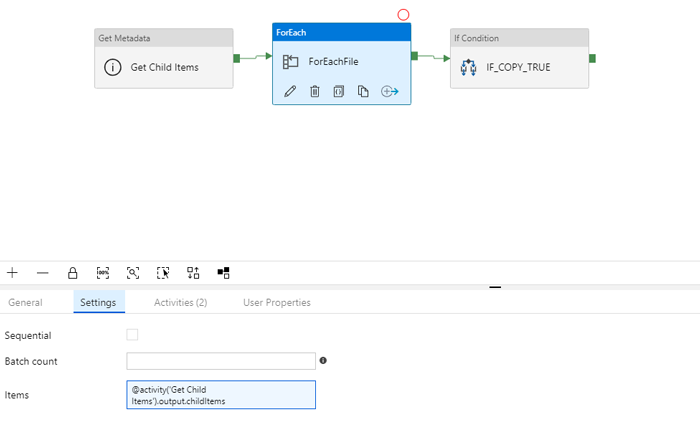
Figure 5: Configuration of the For Each activity
We have to create a ForLoop to iterate along the results of the Child Items activity. We will have to create a ForEach Activity with the following statement in the Items box:
@activity('Get Child Items').output.childItems
Then, inside the ForEach Activity, we access each individual filename and check the parameter Last Modified.
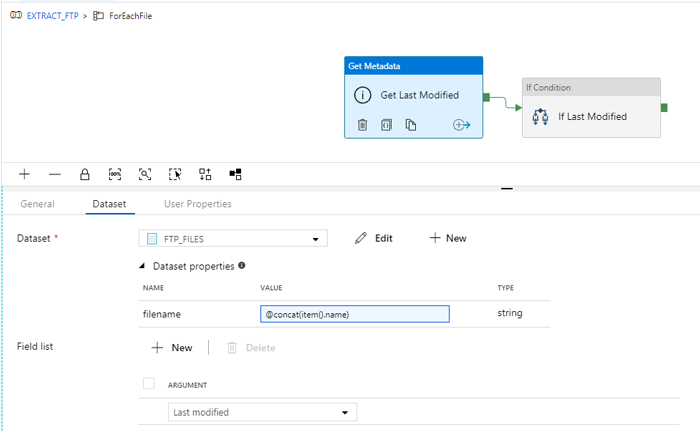
Figure 6: Configuration of the Get Metadata activity
In order to access the path to each file dynamically for each iteration. We define a parameter in the dataset object of the files on the server.
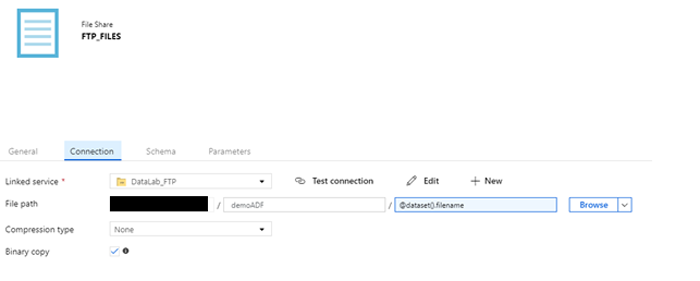
Figure 7: Configuration of the FTP Source Dataset (file level)
Remember, we had created a dataset object for the folder “FTP_FOLDER”, but now we will create another one that will point specifically to each file in each iteration “FTP_FILES”. You can do this by going to the Parameters tab in the dataset definition and creating a parameter that defines the filename. Then, in the Connection tab you can build a dynamic path using the new parameter of the dataset.
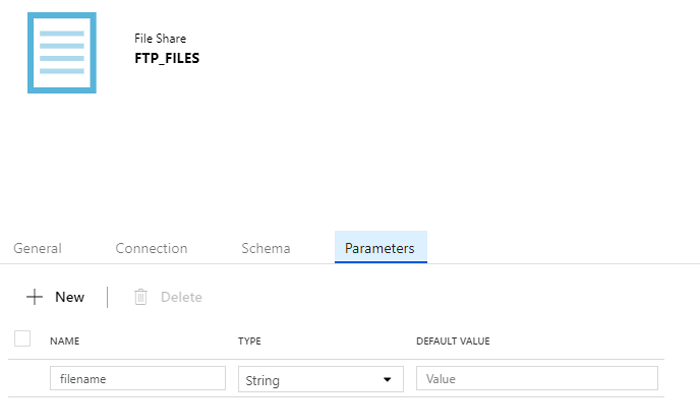
Figure 8: Configuration of the parameters of the dataset
The only thing we still need to do is to link each of the filenames to the dataset definition “FTP_FILES” during the iteration. We will do this in the definition of the Get Last Modified date:
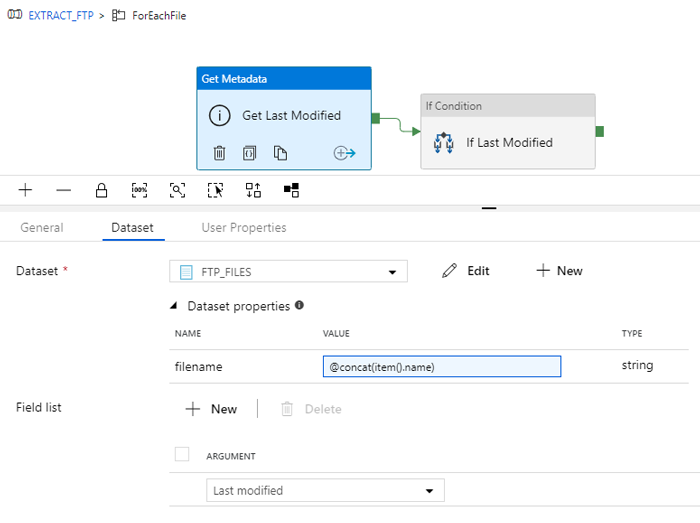
Figure 9: Configuration of the Get Last Modified date activity
Here, we have defined the parameter of the dataset with the current item of the ForLoop. In each iteration, the definition of the parameter will change and thus, so too will the definition of the dataset’s path.
After extracting the Last Modified date of the file, we have to implement the logic to compare it to the day before the execution. We will do this with an IF activity that only will be True if the Last Modified date is equal to the day before execution:

Figure 10: Configuration of the IF Statement activity
When the expression is True, the following activities are executed (remember that we are still inside the ForLoop) a Copy from FTP to the Blog Storage plus setting a variable.
@equals(
string(
  formatDateTime(
    activity('Get Last Modified').output.lastmodified,'d'))
,
string(
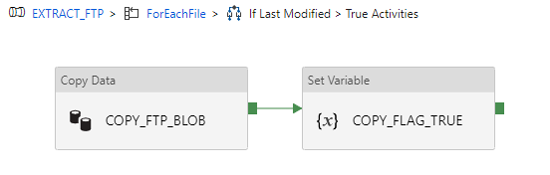
Figure 11: Workflow inside the IF statement
We check for each file on the FTP server to see if the Last Modified date is equal to the day before execution. If it is True, then the file will be copied to a Blob Storage Account,and a global boolean variable will be set to True. This variable will be used afterwards to execute the Databricks notebook only when this variable is set on this condition. Notice that this variable is True when at least one of the files have been modified. This happens because the Databricks notebook will merge all the files into one dataset and thus, it is necessary to execute it when at least one of the files have been modified.
Inside the configuration of the Copy activity we had also to use the current item of the ForLoop in order to copy the correct file. We used the same method as in the Get Last Modified activity, by adding the parameter of the dataset in the Source tab of the activity.
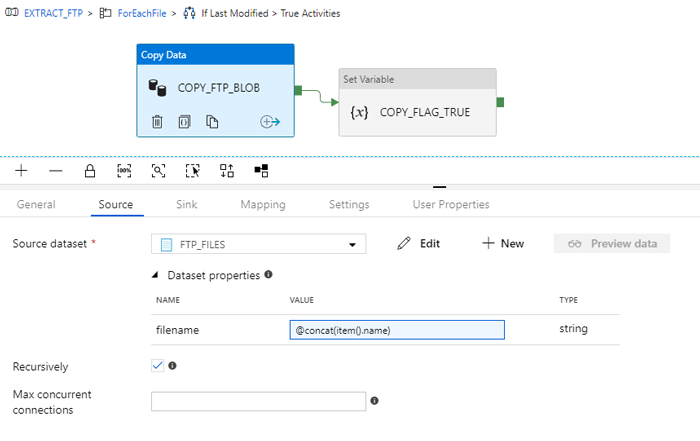
Figure 12: Configuration of the source dataset of the COPY activity
In the case of the Sink tab, we used a Blob Container and created subfolders with the Year and Month of the dataset. We had to access the filename of the dataset, where the business user had defined the year and month that this data makes reference to. This is one of the reasons why the business user must be told to maintain the correct naming format when uploading files to the FTP Server. Notice that the method we used is the same as the one we used with the FTP file dataset object. We defined 2 parameters in the dataset configuration to make it dynamic, and sent the definition of the parameters through the copy activity by accessing the filename (which is the current item of the ForLoop iteration).
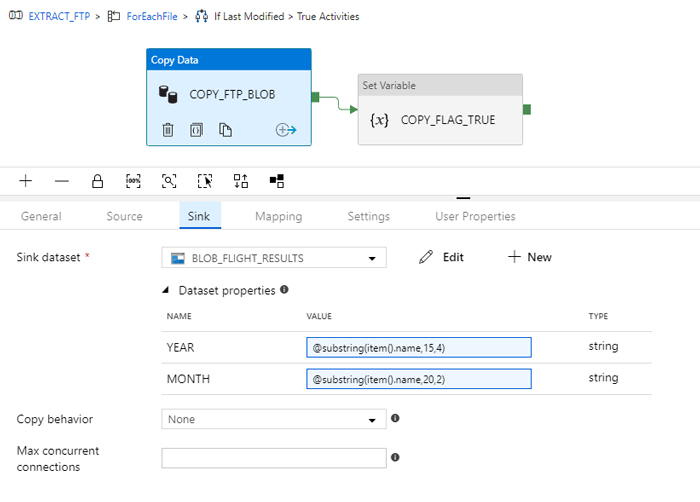
Figure 13: Configuration of the sink dataset of the COPY activity
Finally, when the mentioned global variable is set to True, the Databricks Notebook is executed:
@equals(variables('copyFlag'),bool(1))
We won’t go into the details nor the content of this Notebook, but basically, we first read from the Blob Storage and create a table in Databricks with the transformations mentioned before. We then use Tableau to read the table while the cluster is running and refresh the extract associated with the table. In order to trigger the Tableau Extract we use an Activity “Execute Pipeline” that triggers the specific pipeline that will refresh the extract.

Figure 14: Workflow inside the second IF statement
4.3. Visualization – Tableau Refresh
One of the great advantages of Azure Databricks in comparison to other similar tools is that you can schedule a cluster to terminate after a specified time of inactivity and thus, save money when you are not running any notebooks. On the other hand, when cluster is terminated, you can’t access the tables stored in Databricks because the cluster isn’t running. Therefore, in a production environment you should copy the final tables to a permanent storage such as a DWH after executing the necessary transformations. Then, the visualization tool would be connected to this permanent store.
In our case, in order to simplify the architecture of our demo, we didn’t create a layer for the permanent store, and we took advantage of the many connection possibilities Tableau offers. For this specific case we created a Spark SQL Data Source in Tableau that connects to the Databricks instance.
As mentioned, the Databricks instance is only up and running a few minutes after it has finished the process so we must synchronize the Tableau extract with the end of the Databricks activity.
For this purpose, we have developed a pipeline that refreshes the extract by calling the API of Tableau Server. It is necessary to do an extract and not a live connection in this case because when the Databricks cluster is offline Tableau can’t access the data.
In order to call the Tableau Server API from ADF, we recommend following the next steps:
- Create a Linked Service (type REST) to access Tableau: One important thing to notice here is that if your Tableau Server is running in a VM in your private network, you should use , the connection won’t work.
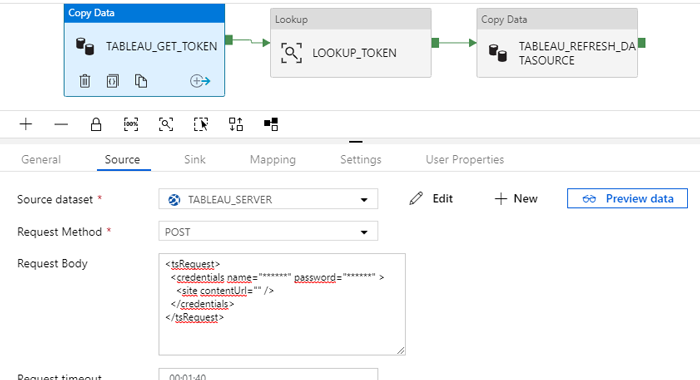
- API calls can be executed using a copy activity that will do a POST / GET request and copy the response into a json file. Since we must do 2 API calls, we will create 2 REST datasets to do the calls and 1 JSON to save the response in our Blob Storage account.
- The first API call will consist in the Authentication process. We must sign in with our credentials and get the token as the response, which we will save in a JSON file. As you can see in the image, the basic information you must fill is the Request Method and the Request body of the call, and the Relative URL in the dataset configuration (api/3.0/auth/signin)

Figure 15: Configuration of the source dataset of the authentication process
- Once the token is saved in a blob, we can use the Lookup activity to get this token from the file and use it for the next API call, which will refresh the data source extract.

Figure 16: Tableau extract refresh workflow
- Finally, we use a Copy Activity to do the API call that will refresh the extract from the data source (bear in mind that the first time you create the data connection, it must be uploaded manually to Tableau Server). To do the extract, one must know the Site ID and the data source ID, which are 2 alphanumeric codes that can be found calling the API through tools like Postman, where developers can see the response to an API call and look for the ID of the data source they are interested in. In this second call we must fill the following parameters:
- Request Method: POS
- Request Body (empty): {}
- Header 1 –
X-Tableau-Auth: @concat(activity('LOOKUP_TOKEN').output.firstRow. credentials.token) - Header 2 –
Content-Type: application/json - Relative URL:
@{concat('api/3.0/sites/YOUR_SITE_ID/datasources/YOUR_
DATASOURCE_IDrefresh')}
- The first API call will consist in the Authentication process. We must sign in with our credentials and get the token as the response, which we will save in a JSON file. As you can see in the image, the basic information you must fill is the Request Method and the Request body of the call, and the Relative URL in the dataset configuration (api/3.0/auth/signin)

5. Monitor Pipelines on Azure
Now that our ETL is running, we can use different methods to monitor that everything is working as expected:
- Azure Data Factory Monitor: here we can track all the pipeline executions of our Azure Data Factory and see whether the activities of a pipeline have been successfully executed. As mentioned in the article, we could have used other ingestion methods such as Logic Apps to trigger the main workflow when a new file is added to the FTP Server. However, with this method we wouldn’t be able to monitor this part of the process because it would be out of Azure Data Factory.
- Querying the Target Table: because we are capturing the date of execution through our pipeline, we can simply query the target table and check the date of the last records inserted.
- Through Tableau’s last extract refresh: the last step of our pipeline was to do an extract refresh of a data source uploaded to Tableau Server. If we navigate to this data source in the server, we can see the datetime of the last refresh and see if it matches with the last execution of the pipeline.
6. Manual trigger
As mentioned at the beginning of the blog article, this pipeline would be executed daily and look for new or modified files. However, we also implemented a Logic Apps Service which executes the pipeline when an HTTP request is received.
While working with our clients, we have noticed that business users prefer a method to execute the pipeline manually when they upload new data to the source system. Although they could wait to the next execution to see the new data in the visualization tool, there are cases where they need to update the data as soon as possible.
To do so, we developed the following pipeline using Azure Logic Apps:
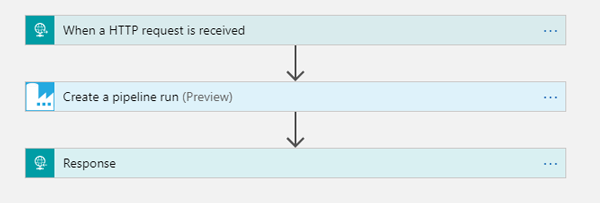
Figure 17: Logic App workflow to manually execute ADF pipelines
Basically, this application will be listening to HTTP requests on a specific URL, and create a pipeline run when the request is received. Logic Apps will create the URL automatically for you, and only by calling it in the browser, business users can manually run an ADF pipeline.
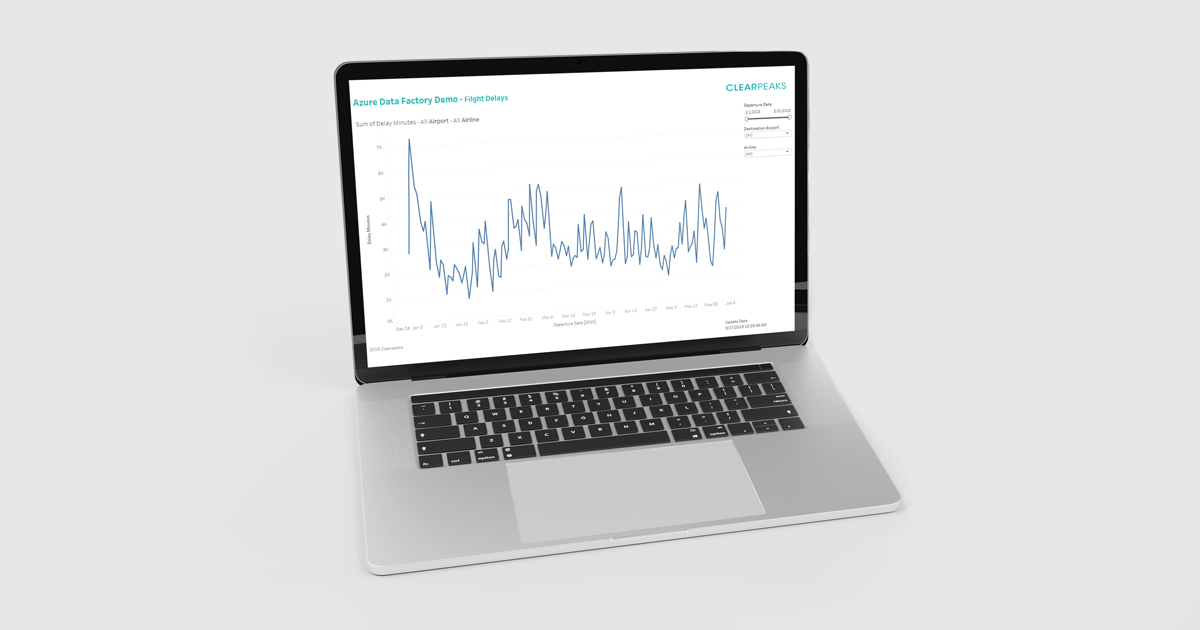
7. Result
Once the extract and the process are completed, it’s time to check the results on Tableau. We have generated a graph that shows the total amount of flight delays per day.
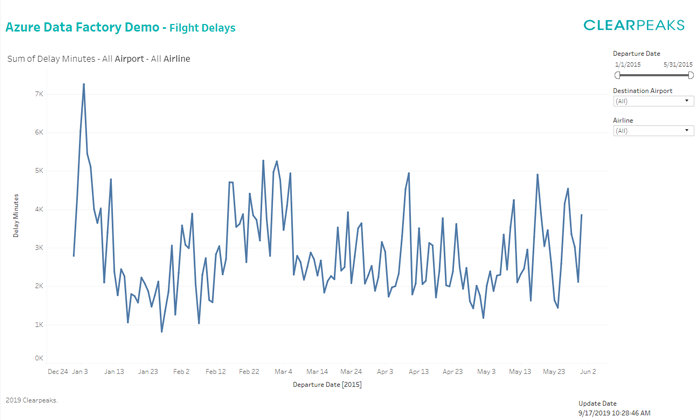
Figure 18: Tableau visualization of the demo
Conclusion
In this blog article we have detailed the various steps that need to be taken when implementing an end-to-end pipeline, from the ingestion layer to the refresh of the visualization and the manual execution of the pipeline if that is required by the end-users. We used Azure Data Factory service to ingest, transform and load the data while adding complex logic to prevent having to run a cluster every day and thus, saving money. In this blog article we have also demonstrated some advanced examples of how Azure Data Factory together with Azure Logic Apps can be used to create automated and pay-per-use ETL pipelines with REST API triggering.