14 Dec 2022 Exploring Cloudera Data Platform Public Cloud on AWS – Data Hub and Data Warehouse
As more organisations take the plunge into the public cloud and there are more data product entrants into the market, activities such as architecting the right data platform, selecting the right tools for data collection, processing, storage, and analytics, and maintaining a high level of security, become a challenge. Here at ClearPeaks we have recommended Cloudera since they began their journey with the Cloudera Data Platform, (CDP) the hybrid data platform that delivers faster data analytics with optimal performance, scalability, and security, a one-stop solution to all the above-mentioned problems.
Just to convince you, we have prepared a series of blog posts where we will explore each of the Cloudera Data Platform Public Cloud services, build a use case around it, and then get blown away by how easy and fast it all is!
This blog is the first entry in our series “Exploring Cloudera Data Platform Public Cloud on AWS”, in which we will primarily focus on the CDP Public Cloud environment, Data Hub, and the Cloudera Data Warehouse service with Data Visualization.
First, let’s make sure we understand the basics of Cloudera Data Platform.
CDP is an easy, fast, and secure enterprise analytics and management platform available in two form factors:
CDP Public Cloud is an integrated analytics and data management platform available on all major cloud providers, e.g. AWS, Azure, and GCP. It offers a collection of various services to achieve a variety of use cases for data analytics, ML, and AI, with secure granular access control and data governance.
CDP Public Cloud Services
CDP Public Cloud consists of several cloud services built to address specific enterprise data cloud use cases, and includes Data Hub powered by Cloudera Runtime, data services (Data Warehouse, Machine Learning, Data Engineering, and DataFlow), the administrative layer (Management Console), and SDX services (Data Lake, Data Catalog, Replication Manager, and Workload Manager).
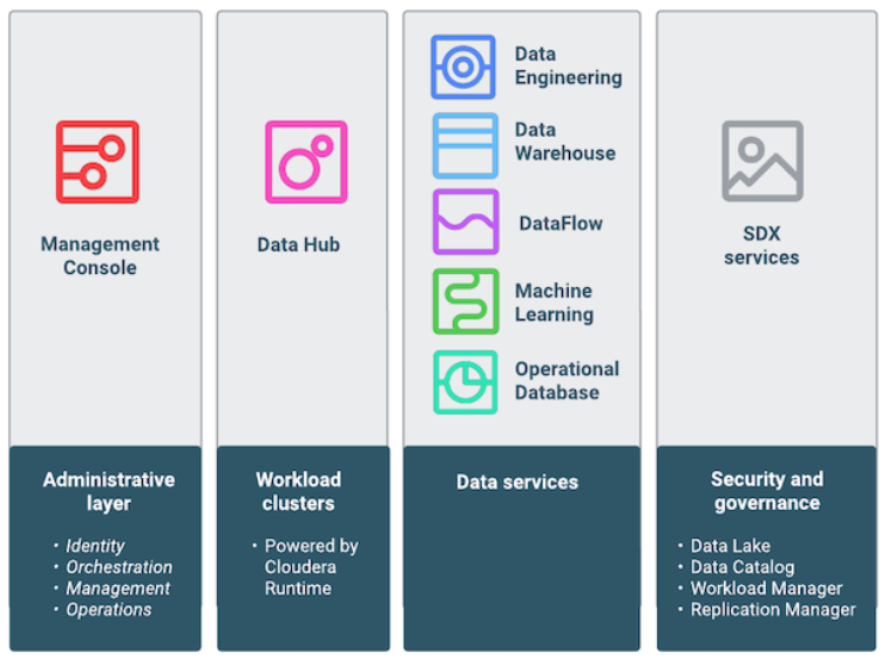
Figure 1: Cloudera Public Cloud Services
Use Case
Our use case is to fetch real-time Bitcoin order book information from blockchain.com via a REST API, split them into buy and sell orders, then ingest them into a Hive transaction table. This will be done on our CDP Data Hub cluster. We will further visualise this real-time data and gain insights using CDP Data Visualization inside the Cloudera Data Warehouse data service.
First, let’s have a quick look at the components and how we’ll use them in our use-case.
CDP Public Cloud Components
Data Lake
A Data Lake is a CDP service that provides a protective ring around the data stored in a cloud object store, including authentication, authorisation, and governance with SDX. When you register an environment in CDP, a Data Lake is automatically deployed for that environment. It uses Apache Knox to provide a protected gateway to access the Data Lake component UIs and other on-demand CDP workload component UIs, such as Data Hub clusters and Data Services.
CDP Data Lake is not only used due to the security of the environment, but also as its Hive metastore (HMS) stores the metadata of our table in this use case. CDW has default connectivity with the Data Lake HMS.
Data Hub
Data Hub is a service to launch and manage workload clusters. It provides a set of default cluster definitions and templates that allow you to provision workload clusters quickly for prescriptive use cases, such as data engineering or flow management. You can also access and manage the clusters that you create via Data Hub and Cloudera Manager.
For our use case, a Data Hub cluster will be deployed using the Flow Management Light Duty for AWS template.
Since we are deploying the CFM Data Hub cluster, we should introduce NiFi (if you don’t know about it already!). NiFi is a super-cool no-code distributed data movement tool, with umpteen inbuilt connectors for any data source or target. We’ll use NiFi to build a data flow that will ingest our source data and push it into our data lake. You can find out more about NiFi in some of our previous articles like this or this.
CDW
Data Warehouse is a service to create independent, self-service data warehouses and data marts that autoscale to meet your varying workload demands. It has a dedicated runtime for clients connecting to your Virtual Warehouse in CDP Public Cloud. In CDW, business analysts and authorised users and clients use a Database Catalog and Virtual Warehouse to access data. CDW integrates Data Visualization to build visual data.
We will use CDW data service to access and query our tables stored in Data Lake HMS and visualise using Data Visualization.
CDP Data Visualization
Cloudera Data Visualization is a tool that augments data exploration and analytics to share insights more effectively across the business. In a previous blog post, we covered the on-prem version of CDP Data Visualization with a use case to build a Covid-19 tracker.
In this blog, we will look at the cloud-native version of Data Visualization, part of CDW Data Service. We will create a connection between the Data Visualization instance and the Hive Virtual Warehouse instance in the CDW environment.
Now let’s get stuck in!
Preparing the Environment
We’ll assume that the CDP environment is already registered with AWS; you can follow the quick start guide in the official documentation here. Create a Data Hub cluster using the Flow Management Light Duty for AWS template in the same CDP environment. You can follow this document to create a Data Hub cluster using the default template.
You can also refer our blog post about registering the environment and spinning a Data Hub cluster on Azure here; though the Cloud providers are different, the process is the same.
Once we are ready, we start our registered CDP environment and Data Lake by selecting our Environment > Start Environment.
It will ask us if we want to automatically start our Data Hub cluster and we confirm:
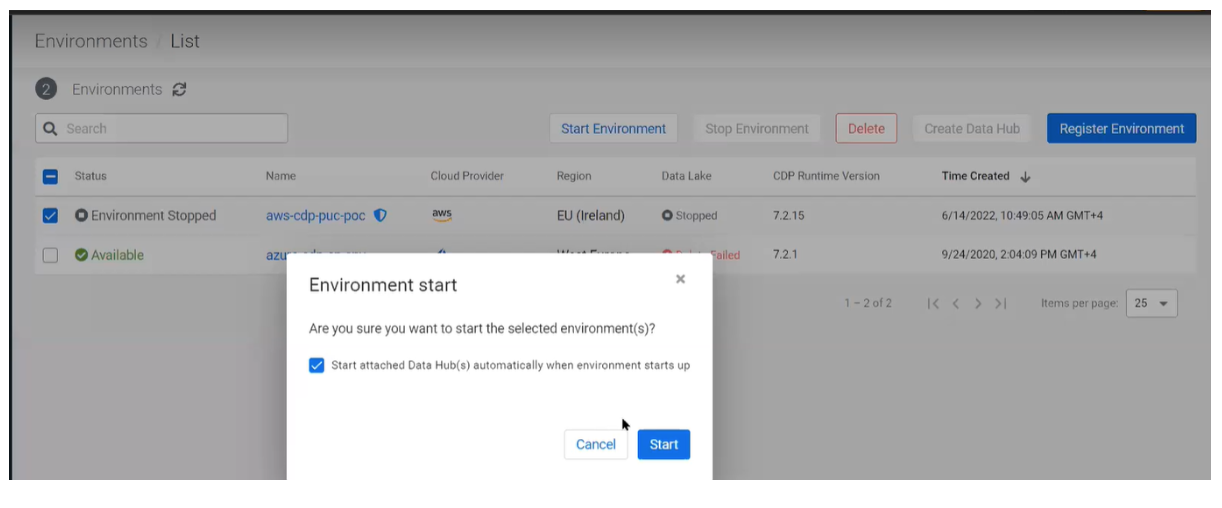
Figure 2: Starting CDP Environment
While the environment starts up, we can confirm that we have a workload user and have created the IDBroker mapping:
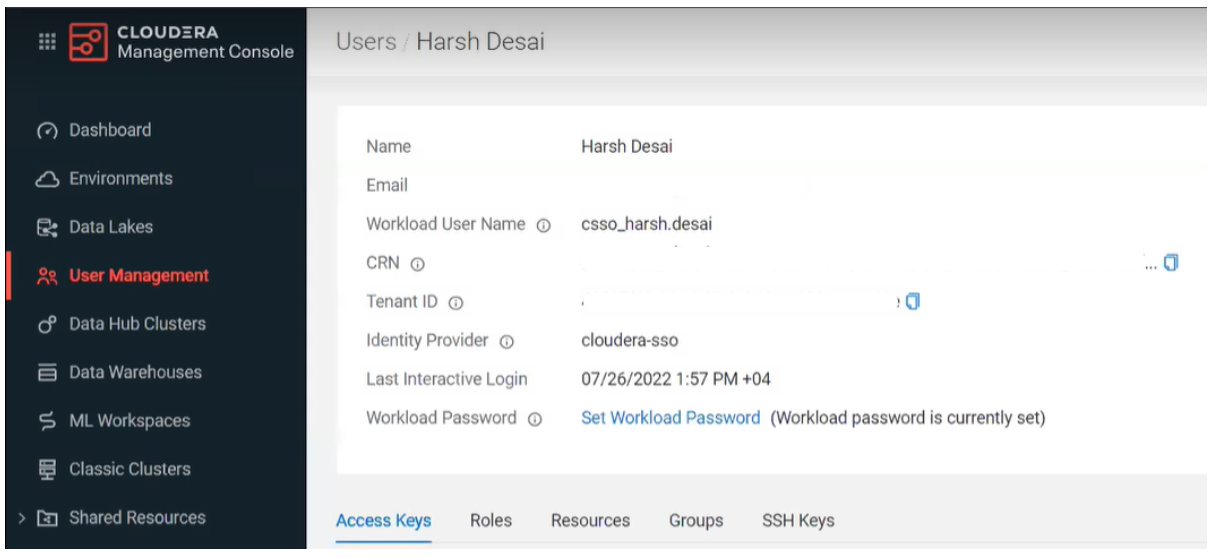
Figure 3: Set Workload Password
The IDBroker Mapping defines the relationship between our CDP user and the AWS IAM role that provides write access to our environment’s S3 bucket. The steps to create the IDBroker mapping in CDP are documented here. We mapped our user with the Data Lake Admin role, but you can choose different permissions.
Once the environment has been enabled, we can activate our Cloudera Data Warehouse environment – it takes a while to get up and running – and we need to create the Hive table that our flow will ingest data into.
Navigate to Cloudera Data Warehouse > Environments > Activate
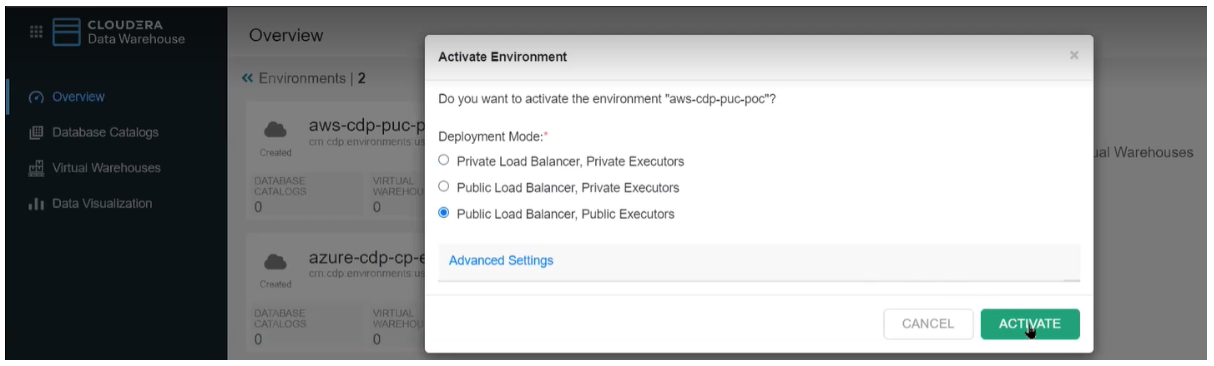
Figure 4: Activate CDW Environment
You need to have a DWAdmin role in CDP to activate, terminate, launch, stop, or update services in Database Catalogs and Virtual Warehouses. Once our CDW environment has been activated and the default Database Catalog has started, we create a Hive Virtual Warehouse of XSMALL size (2 executors) with compaction enabled, which will be sufficient for our use case:
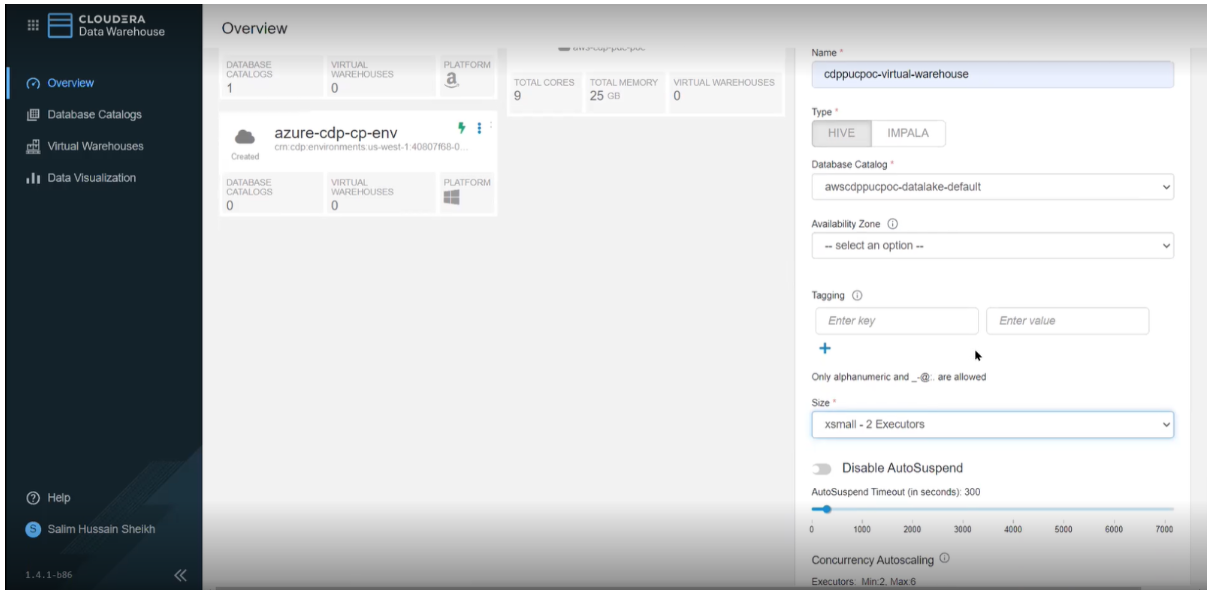
Figure 5: Create Hive Virtual Warehouse
We need to enable compaction since our data files are small and data ingestion will make frequent inserts into the Hive table. Delta files are created when data changes are made on Cloudera Data Warehouse (CDW) with inserts, updates, and deletes. The more changes that are made, the more delta files are created. When a large number of delta files are created, query performance degrades. Compaction removes these delta files to enhance query performance.
Once the virtual warehouse has started, we can create a Hive transactional table to ingest data from NiFi in Data Lake HMS.
We navigate to Hive Virtual Warehouse à Options (three dots) > Open Hue UI.
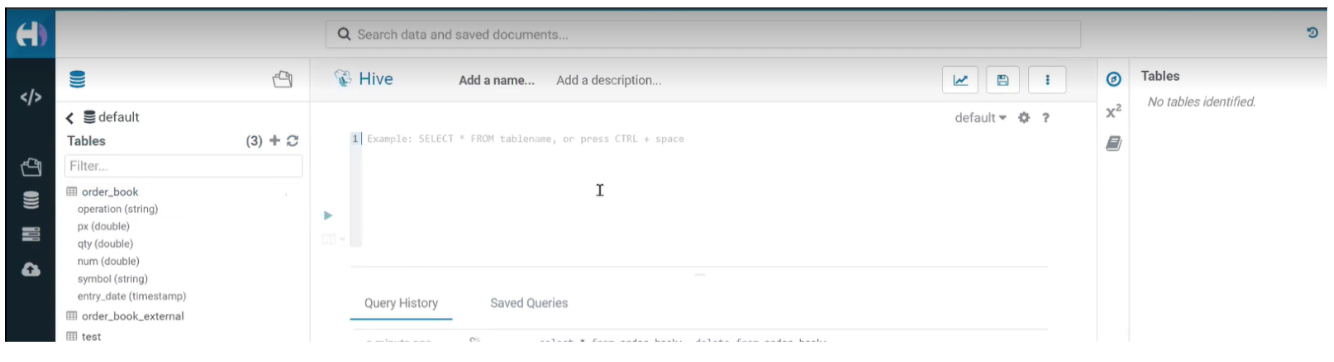
Figure 6: Hue Hive Editor
We used the DDL below to create the order_book table in the default database:
CREATE EXTERNAL TABLE order_book (
operation string,
symbol string,
entry_date string,
px double,
qty double,
num double
)
STORED AS PARQUET;
Raw Data
The raw data we are going to use in our use case is Bitcoin’s order book data from blockchain.com in bids and ask. This is real-time data in JSON format that’s publicly available.
Your VPC must be able to reach the following URL: https://api.blockchain.com/v3/exchange/l2/BTC-USD
The NiFi Flow
Once all the necessary prerequisites have been met, we can access the NiFi canvas from the Data Hub cluster and create a NiFi Process Group Crypto_Demo; inside which we create our NiFi flow. It looks something like this:

Figure 7: NiFi Flow
Let’s have a look at the processors we used in the flow:
InvokeHTTP
This processor is responsible for ingesting the real-time order book data of Bitcoin using a REST endpoint from blockchain.com. We added the remote URL property with the value below:

Figure 8: InvokeHTTP processor properties
UpdateAttribute
We added this processor to add a timestamp column to downloaded raw data for visualisation purposes later:
Timestamp
${now():toNumber()}
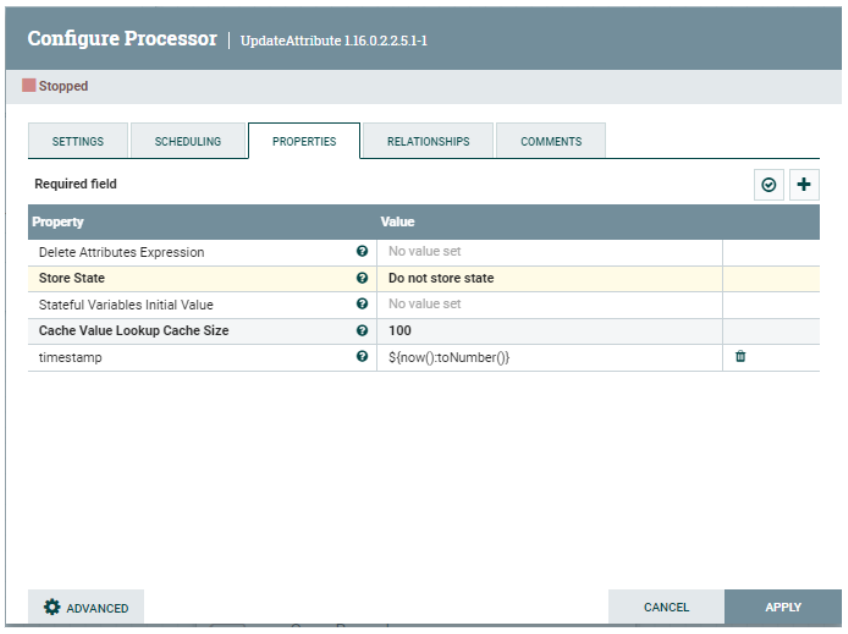
Figure 9: UpdateAttribute processor properties
QueryRecord
This processor splits the order book JSON files into two, based on the results of the queries below. All the asks and bids are recorded in separate flowfiles. We add the timestamp attribute in the record JSON here:
asks
select symbol,asks,'${timestamp}' as "timestamp" from FLOWFILE
bids
select symbol,bids,'${timestamp}' as "timestamp" from FLOWFILE
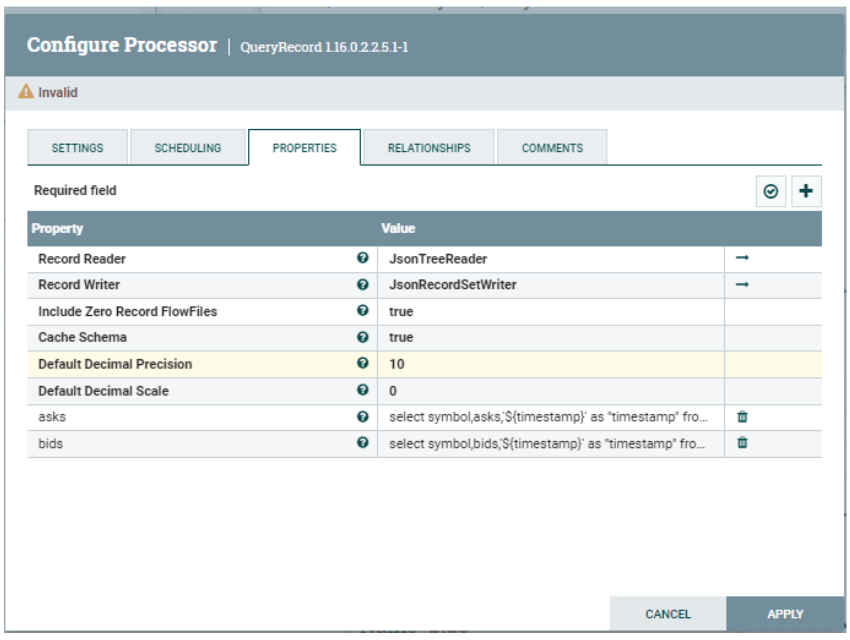
Figure 10: QueryRecord processor properties
JoltTransformRecord
This processor cleanses and formats order book JSON files using the Jolt specification for the next processor, i.e. PuHive3Strreaming, to be able to ingest into the Hive transaction table we created earlier. Below you can see the Jolt specification property:
{
    "operation": "shift",
    "spec": {
      "bids": {
        "*": {
 "#bids": "[&1].operation",
          "@(2,symbol)": "[&1].symbol",
          "px": "[&1].px",
          "qty": "[&1].qty",
          "num": "[&1].num",
"@(2,timestamp)": "[&1].entry_date"
        }
      },
"asks": {
        "*": {
 "#asks": "[&1].operation",
          "@(2,symbol)": "[&1].symbol",
          "px": "[&1].px",
          "qty": "[&1].qty",
          "num": "[&1].num",
"@(2,timestamp)": "[&1].entry_date"
        }
      }
    }
    }
]
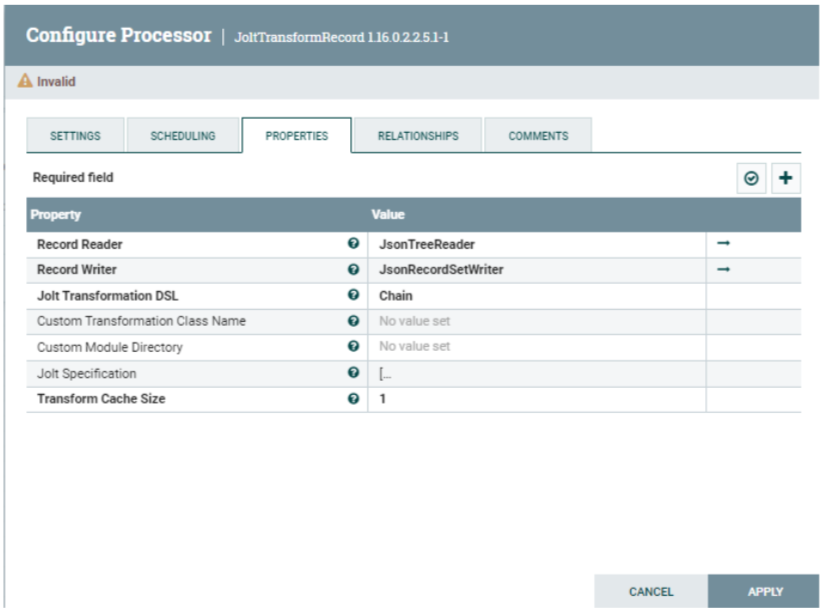
Figure 11: JoltTransformRecord processor properties
PuHive3Streaming
This is an important processor, responsible for making connections with Data Lake HMS and ingesting data into the Hive transactional table we created before.
Make sure to download the client config from the Data Lake cluster CM, extract and get the client config files hive-site.xml, hdfs-site.xml, and core-site.xml, then copy them to all the NiFi nodes in the Data Hub NiFi cluster via SSH.
This can be done using the workload user and files can be copied to the /tmp location.
Below are the processor values (some are masked):
Hive Metastore URI | thrift://<datalake_hms_url>:9083 | |
|---|---|---|
Hive Configuration Resources | /tmp/hive-site.xml,/tmp/hdfs-site.xml,/tmp/core-site.xml | |
Database Name | Default | |
Table Name | order_book | |
Kerberos Principal | <workload_username> | |
Kerberos Password | <workload_username_password> |
You can also use the workload user keytab here:
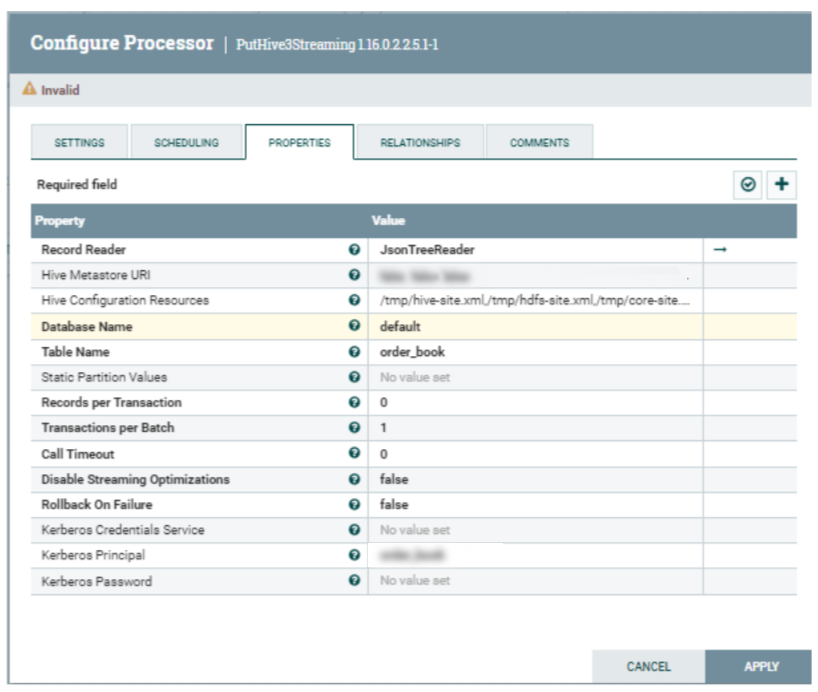
Figure 12: PutHive3Streaming processor properties
Now we’re ready to start the NiFi flow and see the data running through the system.
Cloudera Data Warehouse
Ingested data can be accessed from CDW’s inbuilt SQL query editors CDW Hue and CDW DAS UI.
Go to CDW Data Service, Overview page, and under Virtual Warehouses, click on either the Hue button or DAS UI.
We verified from DAS that data is being ingested regularly and the record count is increasing.
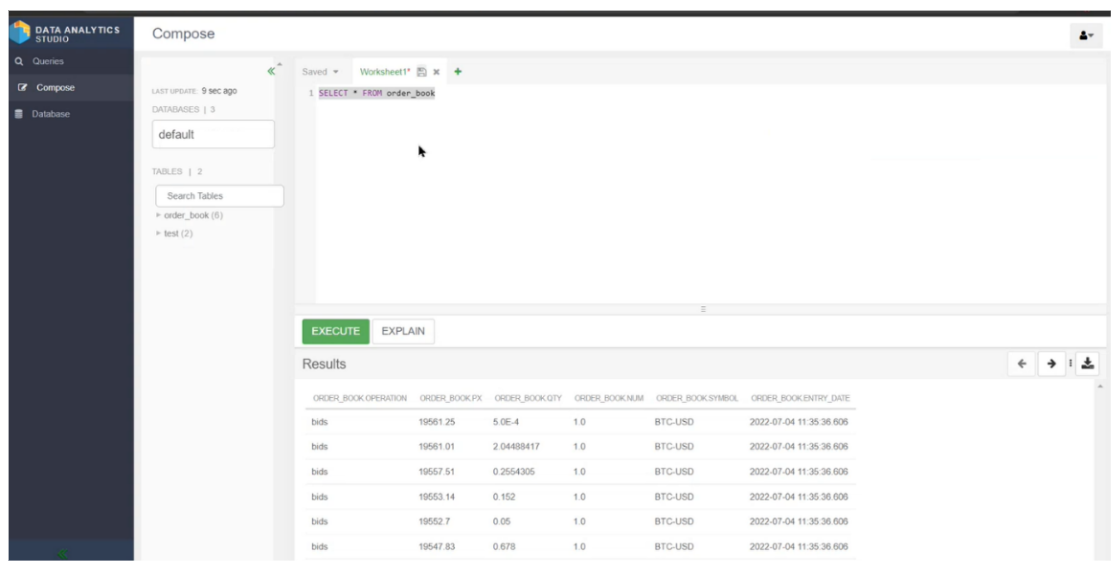
Figure 13: Query table data in DAS UI
Now let’s analyse our data visually with the help of CDP Data Visualization.
Building a Real-time Dashboard in CDP Data Visualization
First, activate a Data Visualization instance in CDW:

Figure 14: Data Visualization instance in CDW
Now create a connection for the Hive Virtual Warehouse by navigating to the Data Page > New Connection:
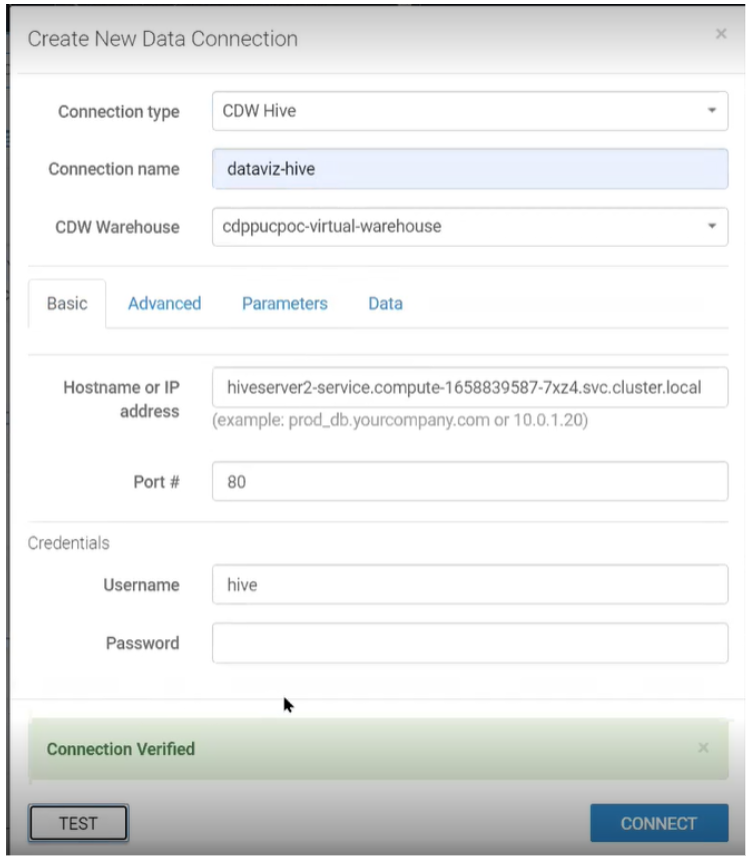
Figure 15: Creating New Data Connection
Once tested, we’ll create a dataset to point to our order_book table and start building our Data Visualization dashboard, which will look something like the image below. We are not going to go through all the steps, but you can refer to our detailed implementation of a Data Visualization dashboard in this blog post.
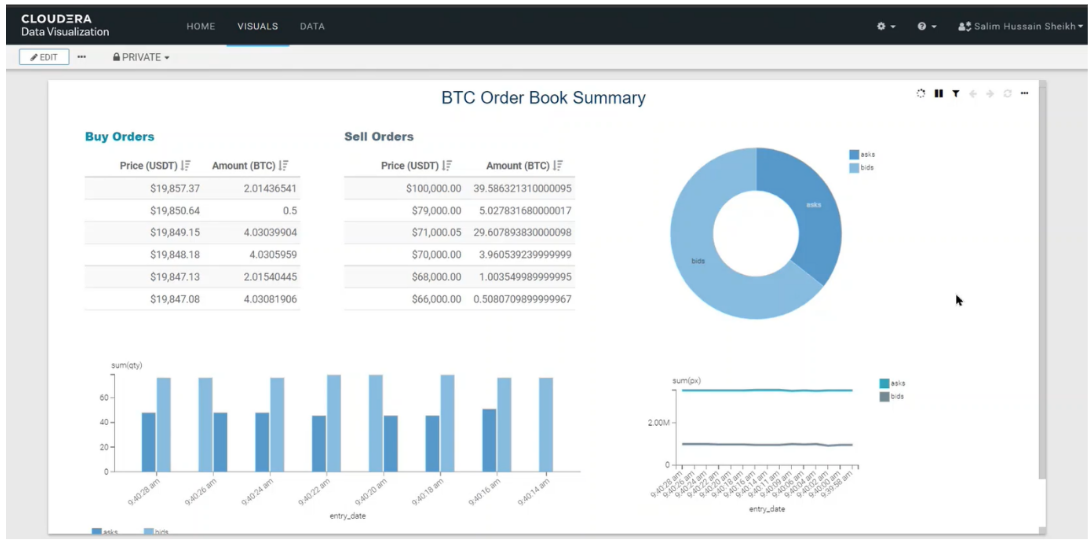
Figure 16: Real-time Data Visualization Dashboard
We’ll set our dashboard to auto-refresh every second so we can analyse this real-time data on this powerful visual dashboard.
Cleanup Time
Good job folks! Now let’s not forget to clean up our environment and turn off any services we will not be using anymore, to avoid unnecessary costs. These steps are optional and assume that no one else is using the CDP environment.
Follow these steps in order, finishing one before beginning another:
- Stop Data Visualization instance
- Stop Hive Virtual Warehouse
- Deactivate CDW environment
- Stop CDW environment (this will also stop the Data Lake and Data Hub cluster)
Conclusion
In this article, we deployed a fully functional, secured NiFi cluster in just a few clicks, in a fraction of the time it takes to create an on-prem cluster, using CDP Public Cloud on AWS. We created a NiFi flow that ingests real-time data into a Hive transaction table in our data warehouse (CDW). We also leveraged the Data Visualization service to create a powerful real-time dashboard. If you want to see all of this in action, watch our YouTube video!
This is just one example of how much we can do with the powerful and feature-rich Cloudera CDP Public Cloud. In the next blog post in this series, we will explore Cloudera DataFlow service in the CDP Public Cloud by deploying this flow onto that service.
Here at ClearPeaks we believe our expert and certified Cloudera consultants can architect and deploy the right set of tools for your business.
We hope you found this blog post useful, please contact us if you would like to know more about what we can do for you!
